2008 AUDI A4 display
[x] Cancel search: displayPage 171 of 342
Parking aid169
Controls
Safety
Driving tips
General maintenance
Self-help
Technical data
Parking aidApplies to vehicles: with Audi parking system/plus/advancedGeneral notesVarious systems are available to help you when parking or manoeu-
vring in tight spaces, depending on the equipment fitted on your
vehicle.
The Audi parking system gives an acoustic warning if there are any
obstacles behind the car ⇒page 169.
When you are parking, the Audi parking system plus warns you
acoustically and optically about obstacles in front of and behind the
vehicle ⇒page 170.
In conjunction with a reversing camera, the Audi parking system
advanced shows a picture of the area behind the vehicle. This
picture helps you to manoevre the vehicle backwards and sideways.
In addition, you are assisted by the acoustic signals and graphic
display of the parking aid ⇒page 171.
Note
To ensure that the acoustic parking aid works properly, the sensors
must be kept clean and free of snow and ice.Audi parking systemApplies to vehicles: with Audi parking systemDescription
The Audi parking system is an acoustic parking aid.Sensors are located in the rear bumper. When the sensors detect an
obstacle, you are alerted by acoustic signals (beeps). The measuring
range of the sensors starts at about:The acoustic signals sound with increasing frequency as you
approach the obstacle. A warning tone will sound continuously
when the vehicle is less than approx. 0.30 m away from the obstacle.
Stop reversing immediately!
The volume of the warning beeps will be gradually reduced after
about 4 seconds if the vehicle remains at a constant distance from
a detected obstacle (it will not be reduced if the obstacle is closer
than 0.30 m).
The parking aid is switched on automatically when reverse gear is
engaged. You will hear a brief acknowledgement tone.
WARNING
•
The parking aid cannot replace the full concentration of the
driver. The driver is always responsible for safety during parking
and other manoeuvres.
•
The sensors have blind spots in which obstacles are not regis-
tered. It is particularly important to ensure that there are no small
children or animals near the vehicle, as the sensors may not
always be able to detect them.
•
Always keep a close watch on the area around the vehicle and
make full use of the rear-view mirrors.Caution
Please note that low obstacles detected by the system may no
longer be registered by the sensors as the car moves closer, so the
system will not give any further warning. Certain kinds of obstacles
(such as wire fences, chains, thin painted posts or trailer draw bars, Rear
Side
0.60 m
Centre
1.60 m
document_0900452a81b1b9de.book Seite 169 Donnerstag, 26. Juli 2007 9:16 09
Page 172 of 342
Parking aid 170etc.) may not always be detected by the system, so take care not to
damage the vehicle in such cases.
Note
•
Please refer to the notes on towing ⇒page 177.
•
You can adjust the volume and pitch of the beeps ⇒page 177.
Audi parking system plusApplies to vehicles: with Audi parking system plusDescription
The Audi parking system plus is a parking aid with
acoustic signals and graphic display.Sensors are located in the front and rear bumpers. When the
sensors detect an obstacle, you are alerted by acoustic signals
(beeps) and a graphic display. The measuring range of the sensors
starts at about:
The acoustic signals sound with increasing frequency as you
approach the obstacle. A warning tone will sound continuously
when the vehicle is less than approx. 0.30 m away from the obstacle.
Stop moving immediately!
The volume of the warning beeps will be gradually reduced after
about 4 seconds if the vehicle remains at a constant distance from
a detected obstacle (it will not be reduced if the obstacle is closer
than 0.30 m).
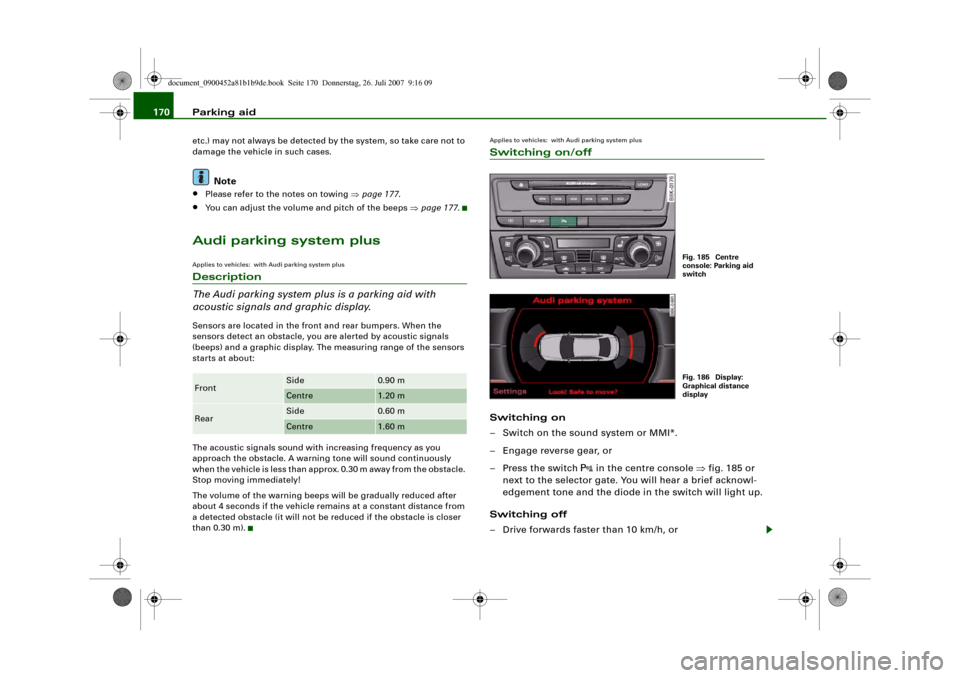
Applies to vehicles: with Audi parking system plusSwitching on/offSwitching on
– Switch on the sound system or MMI*.
– Engage reverse gear, or
– Press the switch
in the centre console ⇒fig. 185 or
next to the selector gate. You will hear a brief acknowl-
edgement tone and the diode in the switch will light up.
Switching off
– Drive forwards faster than 10 km/h, or
Front
Side
0.90 m
Centre
1.20 m
Rear
Side
0.60 m
Centre
1.60 m
Fig. 185 Centre
console: Parking aid
switchFig. 186 Display:
Graphical distance
display
document_0900452a81b1b9de.book Seite 170 Donnerstag, 26. Juli 2007 9:16 09
Page 173 of 342
Parking aid171
Controls
Safety
Driving tips
General maintenance
Self-help
Technical data
– Press the switch
, or
– Switch off the ignition.
Segments in the graphic display
You can estimate the distance to an obstacle by referring to the red
segments at the front and rear of the vehicle ⇒page 170, fig. 186.
The closer the vehicle gets to the obstacle the closer the segments
move towards the vehicle in the graphic. At the latest when the
penultimate segment is highlighted the vehicle has reached the
danger (collision) zone. Stop moving immediately ⇒!
WARNING
•
The parking aid cannot replace the full concentration of the
driver. The driver is always responsible for safety during parking
and other manoeuvres.
•
The sensors have blind spots in which obstacles are not regis-
tered. It is particularly important to ensure that there are no small
children or animals near the vehicle, as the sensors may not
always be able to detect them.
•
Always keep a close watch on the area around the vehicle and
make full use of the rear-view mirrors.Caution
Please note that low obstacles detected by the system may no
longer be registered by the sensors as the car moves closer, so the
system will not give any further warning. Certain kinds of obstacles
(such as wire fences, chains, thin painted posts or trailer draw bars,
etc.) may not always be detected by the system, so take care not to
damage the vehicle in such cases.
Note
•
You can change the display and adjust the volume and pitch of
the beeps ⇒page 177.
•
Please refer to the notes on towing ⇒page 177.
•
There is a slight delay in the picture display.
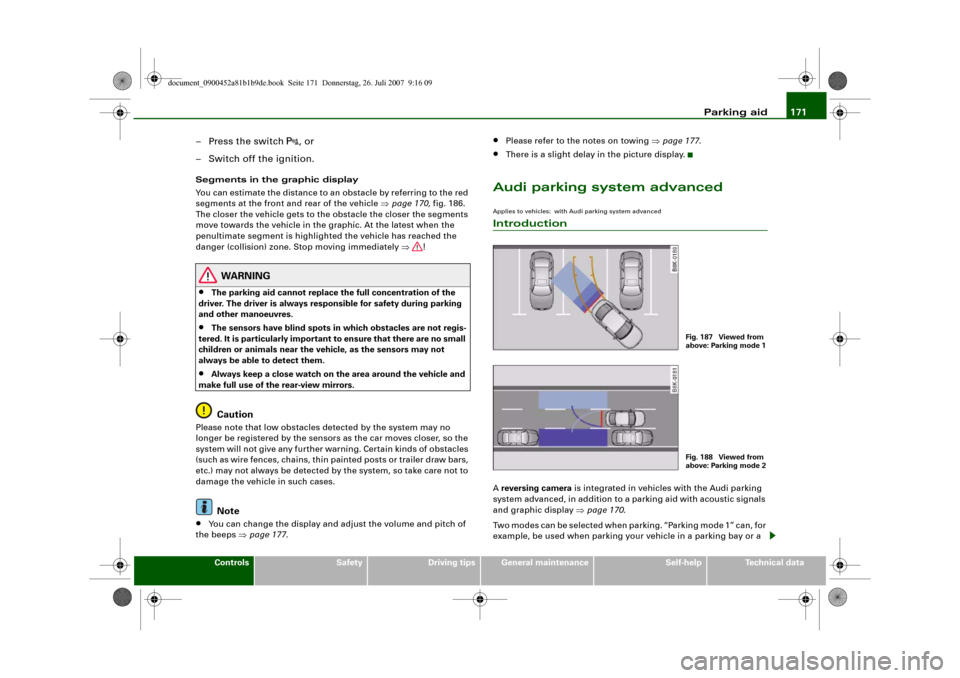
Audi parking system advancedApplies to vehicles: with Audi parking system advancedIntroductionA reversing camera is integrated in vehicles with the Audi parking
system advanced, in addition to a parking aid with acoustic signals
and graphic display ⇒page 170.
Two modes can be selected when parking. “Parking mode 1” can, for
example, be used when parking your vehicle in a parking bay or a
Fig. 187 Viewed from
above: Parking mode 1Fig. 188 Viewed from
above: Parking mode 2
document_0900452a81b1b9de.book Seite 171 Donnerstag, 26. Juli 2007 9:16 09
Page 174 of 342
Parking aid 172garage ⇒fig. 187. Select “parking mode 2” if you wish to park
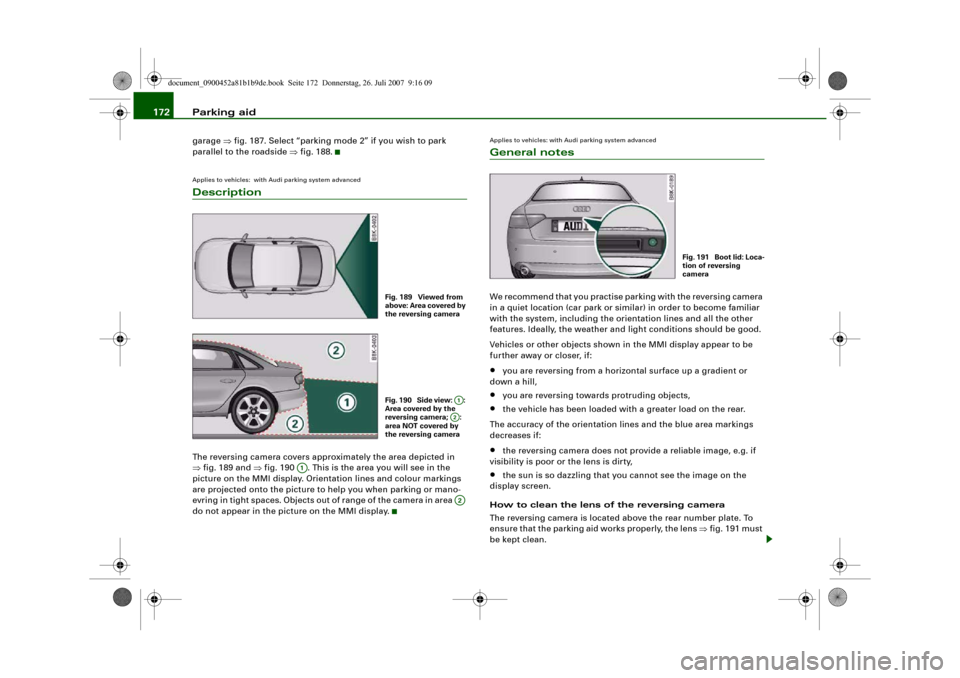
parallel to the roadside ⇒fig. 188.Applies to vehicles: with Audi parking system advancedDescriptionThe reversing camera covers approximately the area depicted in
⇒fig. 189 and ⇒fig. 190 . This is the area you will see in the
picture on the MMI display. Orientation lines and colour markings
are projected onto the picture to help you when parking or mano-
evring in tight spaces. Objects out of range of the camera in area
do not appear in the picture on the MMI display.
Applies to vehicles: with Audi parking system advancedGeneral notesWe recommend that you practise parking with the reversing camera
in a quiet location (car park or similar) in order to become familiar
with the system, including the orientation lines and all the other
features. Ideally, the weather and light conditions should be good.
Vehicles or other objects shown in the MMI display appear to be
further away or closer, if:•
you are reversing from a horizontal surface up a gradient or
down a hill,
•
you are reversing towards protruding objects,
•
the vehicle has been loaded with a greater load on the rear.
The accuracy of the orientation lines and the blue area markings
decreases if:
•
the reversing camera does not provide a reliable image, e.g. if
visibility is poor or the lens is dirty,
•
the sun is so dazzling that you cannot see the image on the
display screen.
How to clean the lens of the reversing camera
The reversing camera is located above the rear number plate. To
ensure that the parking aid works properly, the lens ⇒fig. 191 must
be kept clean.
Fig. 189 Viewed from
above: Area covered by
the reversing cameraFig. 190 Side view: :
Area covered by the
reversing camera; :
area NOT covered by
the reversing camera
A1A2
A1
A2
Fig. 1 91 Bo o t lid : Lo c a-
tion of reversing
camera
document_0900452a81b1b9de.book Seite 172 Donnerstag, 26. Juli 2007 9:16 09
Page 175 of 342
Parking aid173
Controls
Safety
Driving tips
General maintenance
Self-help
Technical data
•
Moisten the lens using a commercially available, alcohol-based
glass cleaning agent and clean the lens with a dry cloth ⇒.
•
Use a small brush to remove snow and a de-icer spray to remove
ice ⇒.
WARNING
•
The parking aid cannot replace the full concentration of the
driver. The driver is always responsible for safety during parking
and other manoeuvres.
•
Always keep a close watch on the area around the vehicle and
make full use of the rear-view mirrors.
•
Do not allow the camera images in the MMI display to distract
you from watching the traffic.
•
For safety reasons, you should not use the system if the posi-
tion and installation angle of the camera have been changed, e.g.
in a rear-end collision. Have it checked by a qualified workshop.Caution
•
Please note that low obstacles detected by the system may no
longer be registered by the sensors as the car moves closer, so the
system will not give any further warning. Certain kinds of obstacles
(such as wire fences, chains, thin painted posts or trailer draw bars,
etc.) may not always be detected by the system, so take care not to
damage the vehicle in such cases.
•
Never remove snow and ice from the lens of the reversing
camera using warm or hot water - danger of cracks appearing on the
lens.
•
Never use abrasive cleaning agents on the lens.
Applies to vehicles: with Audi parking system advancedSwitching on/off
The reversing camera is automatically switched on
together with the acoustic signals and graphic display
when you select reverse gear.Switching on
– Switch on the MMI system.
– Engage reverse gear, or
– Press the switch
in the centre console ⇒page 170,
fig. 185. You will hear a brief acknowledgement tone and
the diode in the switch will light up.
Switching off
– Drive forwards faster than 10 km/h, or
– Press the switch
, or
– Switch off the ignition.
Changing display via MMI
– Press the control button for Graphic ⇒page 174, fig. 192
to show the graphic display on the screen.
– Press the control button for Rear View to display the
picture from the reversing camera.
WARNING
•
Some objects (e.g. narrow posts or bars), recesses in the
ground or protruding parts on other vehicles may not be displayed
in a satisfactory manner or may not be displayed at all on the MMI
screen.A5
document_0900452a81b1b9de.book Seite 173 Donnerstag, 26. Juli 2007 9:16 09
Page 176 of 342
Parking aid 174•
Only use the reversing camera to assist you if it is supplying
you with a good and clear picture. The quality of the picture could
be impaired by adverse light, dirt on the lens or a defect (accident
risk).
•
Only use the reversing camera when the boot lid is completely
c lo s e d . P l e a se m a k e su re t h a t t here are no objects mounted to the
rear end of the vehicle which could block the view of the reversing
camera.Note
•
If your vehicle is near an obstacle, the graphic display will also
appear in the reversing camera image. This superimposed graphic
helps the driver to localise the critical area of the vehicle.
•
You can change the display and adjust the volume and pitch of
the beeps ⇒page 177.
•
Please refer to the notes on towing ⇒page 177.
•
There is a slight delay in the picture display.
Applies to vehicles: with Audi parking system advancedParking perpendicular to the roadside
Parking mode 1 can be used when parking your vehicle in
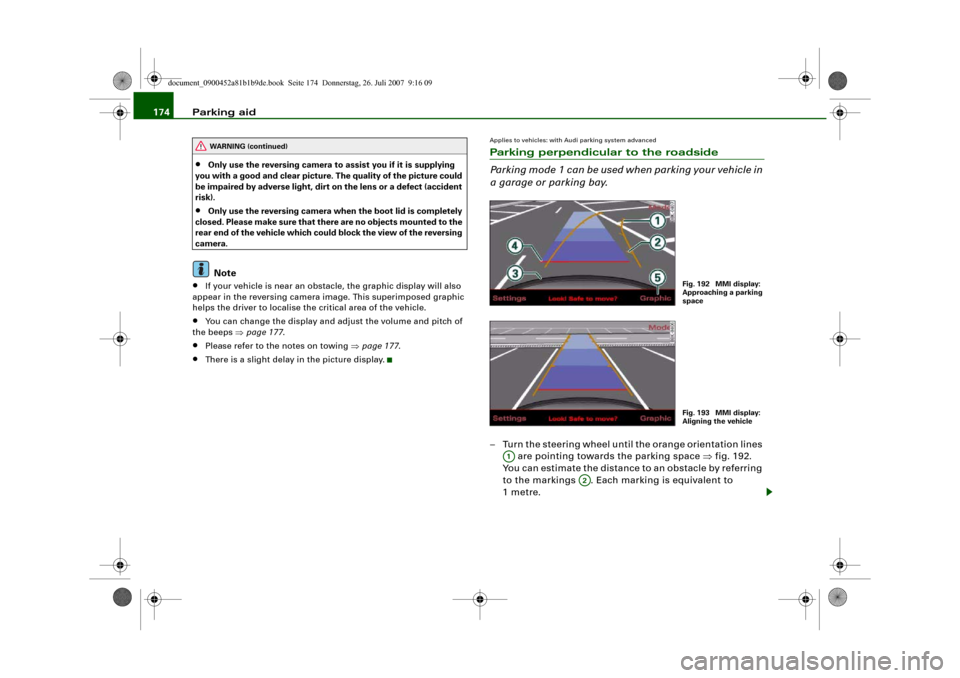
a garage or parking bay.– Turn the steering wheel until the orange orientation lines
are pointing towards the parking space ⇒fig. 192.
You can estimate the distance to an obstacle by referring
to the markings . Each marking is equivalent to
1metre.
WARNING (continued)
Fig. 192 MMI display:
Approaching a parking
spaceFig. 193 MMI display:
Aligning the vehicle
A1
A2
document_0900452a81b1b9de.book Seite 174 Donnerstag, 26. Juli 2007 9:16 09
Page 177 of 342
Parking aid175
Controls
Safety
Driving tips
General maintenance
Self-help
Technical data
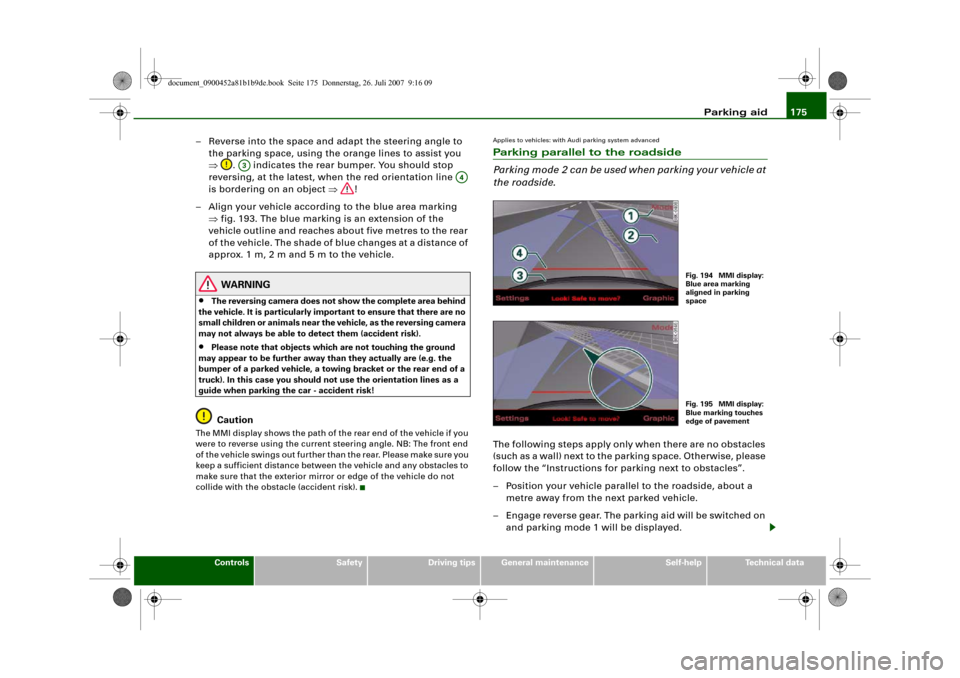
– Reverse into the space and adapt the steering angle to
the parking space, using the orange lines to assist you
⇒. indicates the rear bumper. You should stop
reversing, at the latest, when the red orientation line
is bordering on an object ⇒!
– Align your vehicle according to the blue area marking
⇒fig. 193. The blue marking is an extension of the
vehicle outline and reaches about five metres to the rear
of the vehicle. The shade of blue changes at a distance of
approx. 1m, 2m and 5m to the vehicle.
WARNING
•
The reversing camera does not show the complete area behind
the vehicle. It is particularly important to ensure that there are no
small children or animals near the vehicle, as the reversing camera
may not always be able to detect them (accident risk).
•
Please note that objects which are not touching the ground
may appear to be further away than they actually are (e.g. the
bumper of a parked vehicle, a towing bracket or the rear end of a
truck). In this case you should not use the orientation lines as a
guide when parking the car - accident risk!Caution
The MMI display shows the path of the rear end of the vehicle if you
were to reverse using the current steering angle. NB: The front end
of the vehicle swings out further than the rear. Please make sure you
keep a sufficient distance between the vehicle and any obstacles to
make sure that the exterior mirror or edge of the vehicle do not
collide with the obstacle (accident risk).
Applies to vehicles: with Audi parking system advancedParking parallel to the roadside
Parking mode 2 can be used when parking your vehicle at
the roadside.The following steps apply only when there are no obstacles
(such as a wall) next to the parking space. Otherwise, please
follow the “Instructions for parking next to obstacles”.
– Position your vehicle parallel to the roadside, about a
metre away from the next parked vehicle.
– Engage reverse gear. The parking aid will be switched on
and parking mode 1 will be displayed.
A3
A4
Fig. 194 MMI display:
Blue area marking
aligned in parking
spaceFig. 195 MMI display:
Blue marking touches
edge of pavement
document_0900452a81b1b9de.book Seite 175 Donnerstag, 26. Juli 2007 9:16 09
Page 178 of 342
Parking aid 176
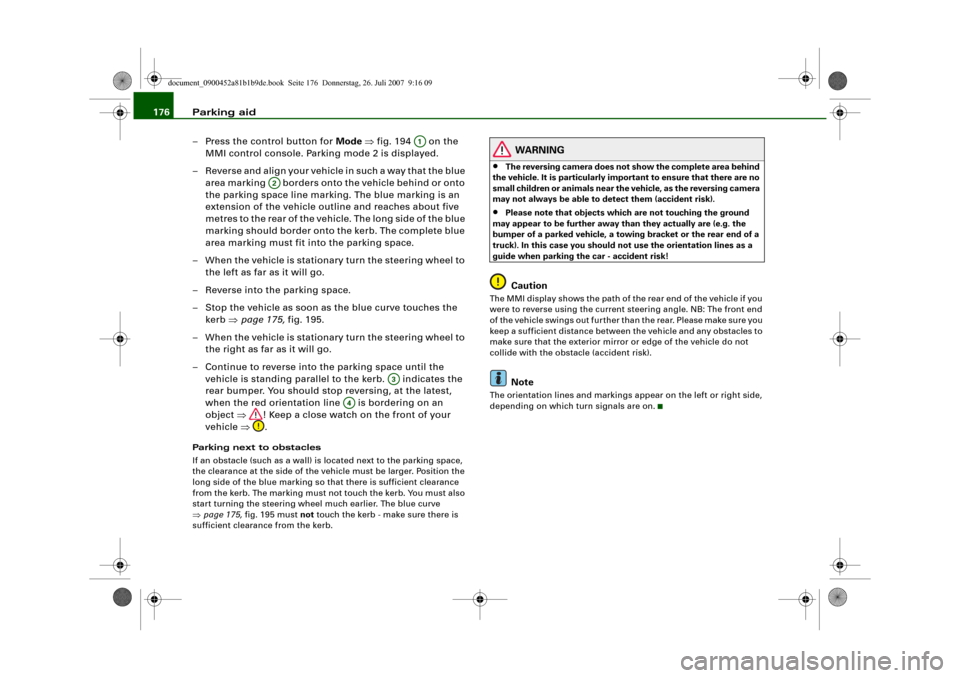
– Press the control button for Mode ⇒fig. 194 on the
MMI control console. Parking mode 2 is displayed.
– Reverse and align your vehicle in such a way that the blue
area marking borders onto the vehicle behind or onto
the parking space line marking. The blue marking is an
extension of the vehicle outline and reaches about five
metres to the rear of the vehicle. The long side of the blue
marking should border onto the kerb. The complete blue
area marking must fit into the parking space.
– When the vehicle is stationary turn the steering wheel to
the left as far as it will go.
– Reverse into the parking space.
– Stop the vehicle as soon as the blue curve touches the
kerb ⇒page 175, fig. 195.
– When the vehicle is stationary turn the steering wheel to
the right as far as it will go.
– Continue to reverse into the parking space until the
vehicle is standing parallel to the kerb. indicates the
rear bumper. You should stop reversing, at the latest,
when the red orientation line is bordering on an
object ⇒! Keep a close watch on the front of your
vehicle ⇒.Parking next to obstacles
If an obstacle (such as a wall) is located next to the parking space,
the clearance at the side of the vehicle must be larger. Position the
long side of the blue marking so that there is sufficient clearance
from the kerb. The marking must not touch the kerb. You must also
start turning the steering wheel much earlier. The blue curve
⇒page 175, fig. 195 must not touch the kerb - make sure there is
sufficient clearance from the kerb.
WARNING
•
The reversing camera does not show the complete area behind
the vehicle. It is particularly important to ensure that there are no
small children or animals near the vehicle, as the reversing camera
may not always be able to detect them (accident risk).
•
Please note that objects which are not touching the ground
may appear to be further away than they actually are (e.g. the
bumper of a parked vehicle, a towing bracket or the rear end of a
truck). In this case you should not use the orientation lines as a
guide when parking the car - accident risk!Caution
The MMI display shows the path of the rear end of the vehicle if you
were to reverse using the current steering angle. NB: The front end
of the vehicle swings out further than the rear. Please make sure you
keep a sufficient distance between the vehicle and any obstacles to
make sure that the exterior mirror or edge of the vehicle do not
collide with the obstacle (accident risk).
Note
The orientation lines and markings appear on the left or right side,
depending on which turn signals are on.
A1
A2
A3
A4
document_0900452a81b1b9de.book Seite 176 Donnerstag, 26. Juli 2007 9:16 09