Page 492 of 576
5-65
CHASREAR SHOCK ABSORBER
EC583000
REMOVAL POINTS
EC583320
Bearing
1. Remove:
9Stopper ring (upper bearing) 1
NOTE:
Press in the bearing while pressing its outer race
and remove the stopper ring.
2. Remove:
9Upper bearing 1
NOTE:
Remove the bearing by pressing its outer race.
EC584000
INSPECTION
EC584110
Rear shock absorber
1. Inspect:
9Damper rod 1
Bends/Damage �Replace absorber
assembly.
9Shock absorber 2
Oil leaks �Replace absorber assembly.
Gas leaks �Replace absorber assembly.
9Spring 3
Damage �Replace spring.
Fatigue �Replace spring.
Move spring up and down.
9Spring guide 4
Wear/Damage �Replace spring guide.
9Spring seat 5
Cracks/Damage �Replace.
9Bearing 6
Free play exists/Unsmooth revolution/
Rust �Replace. 3. Remove:
9Lower bearing 1
NOTE:
Remove the bearing by pressing its outer race.
1C3-9-32-5D 4/7/06 2:51 PM Page 22
Page 500 of 576
6-1
ELECELECTRICAL COMPONENTS AND WIRING DIAGRAM
EC600000
ELECTRICAL
EC610000
ELECTRICAL COMPONENTS AND WIRING DIAGRAM
EC611000
ELECTRICAL COMPONENTS
1“ENGINE STOP” button
2CDI unit
3Ignition coil
4CDI magneto
5Spark plug
EC612000
WIRING DIAGRAM
COLOR CODE
B...................Black
O ..................Orange
Y...................Yellow
B/R ...............Brack/Red
B/W ..............Black/White
G/L ..............Green/Blue
G/W ..............Green/White
W/L...............White/Blue
W/R ..............White/Red
1C3-9-32-6 4/6/06 5:32 PM Page 2
Page 502 of 576
6-2
ELECIGNITION SYSTEM
EC620000
IGNITION SYSTEM
EC621003
INSPECTION STEPS
Use the following steps for checking the possibility of the malfunctioning engine being attributable to
ignition system failure and for checking the spark plug which will not spark.
*Clean or replace
spark plug.
Primary coil
Secondary coil
Repair or replace.
Spark
Check entire ignition
system for connection.
Spark gap test
No good
No good
No good
No good
No good
No good No Spark
Check “ENGINE STOP”
button.
Pick-up coil
Source coil
Check ignition coil.
Check CDI magneto.
Replace CDI unit.
Replace.
Replace.
Replace.
Replace.
Replace.
*marked: Only when the ignition checker is used.
NOTE:
9Remove the following parts before inspection.
1) Seat
2) Fuel tank
9Use the following special tools in this inspection.
Dynamic spark tester:
YM-34487
Ignition checker:
90890-06754Pocket tester:
YU-3112-C/90890-03112
OK
OK
OK
OKReplace.
Check spark plug cap.No good
OK
1C3-9-32-6 4/6/06 5:32 PM Page 4
Page 508 of 576
6-4
ELECIGNITION SYSTEM
EC626003
IGNITION COIL INSPECTION
1. Inspect:
9Primary coil resistance
Out of specification �Replace.
2. Inspect:
9Secondary coil resistance
Out of specification �Replace.
NOTE:
9Remove the spark plug cap by turning it coun-
terclockwise and inspect.
9Install the spark plug cap by turning it clock-
wise until it is tight.
Tester (+) lead�Yellow lead 1
Tester (–) lead
�Black lead 2
Tester (+) lead�Spark plug lead 1
Tester (–) lead
�Yellow lead 2
Primary coil Tester selector
resistance position
0.24~0.36Ωat
Ω× 1
20°C (68°F)
Secondary coil Tester selector
resistance position
5.7~8.5kΩat
kΩ× 1
20°C (68°F)
1C3-9-32-6 4/6/06 5:32 PM Page 10
Page 510 of 576
6-5
ELECIGNITION SYSTEM
EC627011
CDI MAGNETO INSPECTION
1. Inspect:
9Pick-up coil resistance
Out of specification �Replace.
2. Inspect:
9Source coil 1 resistance
Out of specification �Replace.
Tester (+) lead�White/Red lead 1
Tester (–) lead
�White/Blue lead 2
Pick–up coil Tester selector
resistance position
248~372Ωat
Ω× 100
20°C (68°F)
Tester (+) lead�Black/Red lead 1
Tester (–) lead
�Green/Whitelead 2
Source coil 1 Tester selector
resistance position
720~1,080Ωat
Ω× 100
20°C (68°F)
EC62B000
SPARK PLUG CAP INSPECTION
1.Inspect:
9Spark plug cap
Loose connection �Tighten.
Deteriorated/damaged �Replace.
9Spark plug cap resistance
Out of specification �Replace.
Tester (+) lead�Spark plug lead terminal1
Tester (–) lead
�Spark plug terminal2
Spark plug cap Tester selector
resistance position
4~6kΩat
kΩ× 1
20°C (68°F)
1C3-9-32-6 4/6/06 5:32 PM Page 12
Page 512 of 576
6-6
ELECIGNITION SYSTEM
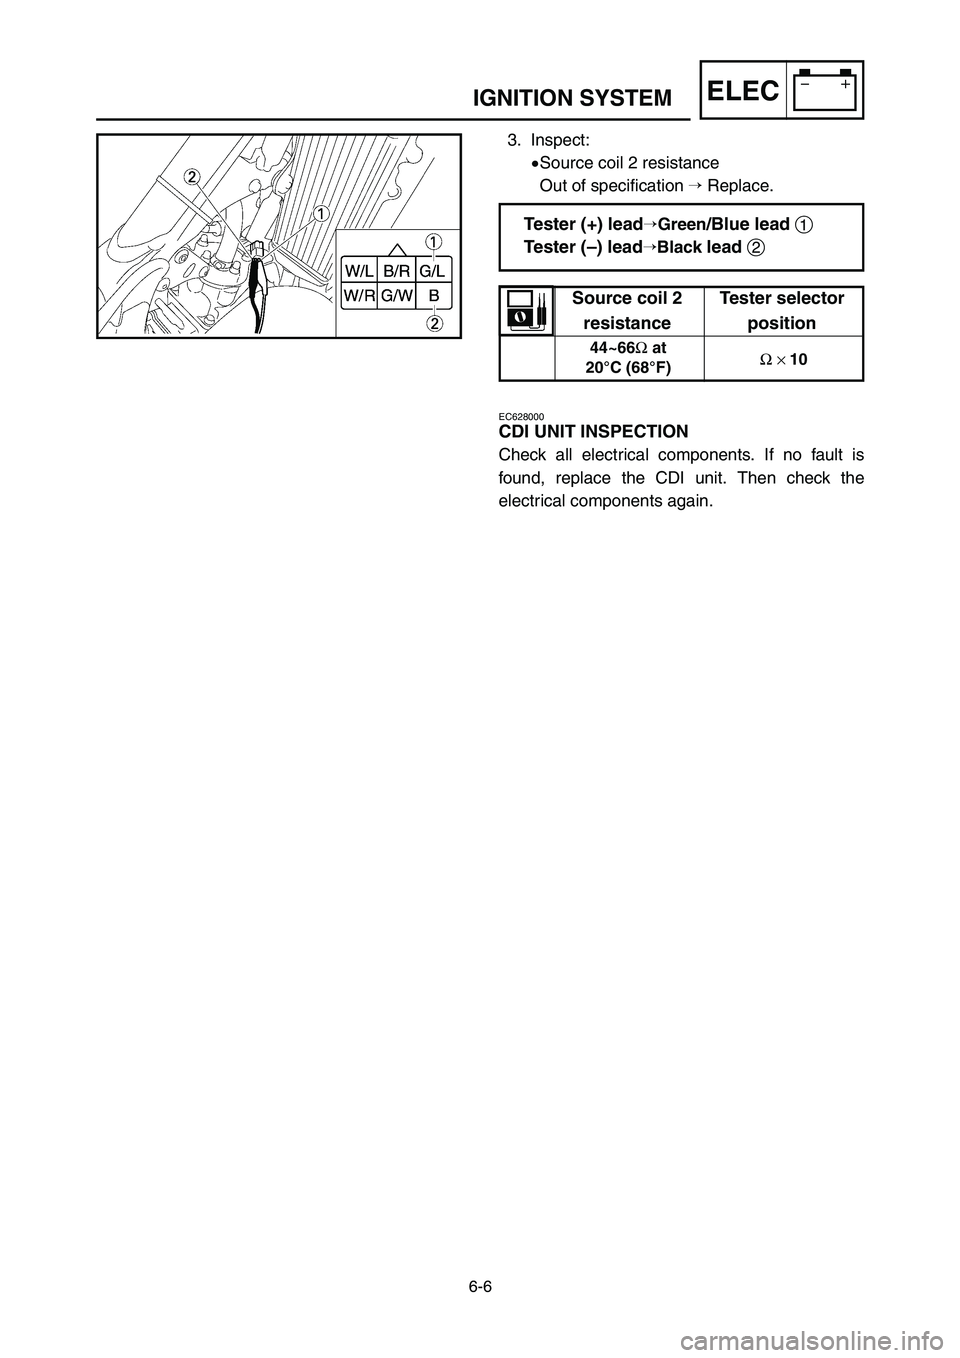
3. Inspect:
9Source coil 2 resistance
Out of specification �Replace.
EC628000
CDI UNIT INSPECTION
Check all electrical components. If no fault is
found, replace the CDI unit. Then check the
electrical components again.
Tester (+) lead�Green/Blue lead 1
Tester (–) lead
�Black lead 2
Source coil 2 Tester selector
resistance position
44~66Ωat
Ω× 10
20°C (68°F)
1C3-9-32-6 4/6/06 5:32 PM Page 14
Page 514 of 576
 7-1
TUNSETTING
EC700000
TUNINGEC710000
ENGINEEC711001
Carburetor setting
9The role of fuel is to cool the engine, and in the
case of a 2-stroke engine, to lubricate the
engine in addition to power gen")
7-1
TUNSETTING
EC700000
TUNINGEC710000
ENGINEEC711001
Carburetor setting
9The role of fuel is to cool the engine, and in the
case of a 2-stroke engine, to lubricate the
engine in addition to power generation.
Accordingly, if a mixture of air and fuel is too
lean, abnormal combustion will occur, and
engine seizure may result. If the mixture is too
rich, spark plugs will get wet with oil, thus mak-
ing it impossible to bring the engine into full play
or if the worst comes to the worst, the engine
may stall.
9The richness of the air-fuel mixture required for
the engine will vary with atmospheric conditions
of the day and therefore, the settings of the car-
buretor must be properly suited to the atmos-
pheric conditions (air pressure, humidity and
temperature).
9Finally, the rider himself must make a test-run
and check his machine for conditions (pick-up of
engine speed, road surface conditions) and for
the discoloration of the spark plug(s). After tak-
ing these into consideration, he must select the
best possible carburetor settings.
It is advisable to make a note of settings,
atmospheric conditions, road surface condition,
lap-time, etc. so that the memorandum can be
used as a reference useful for future.
EC712000
Atmospheric conditions and carburetor
setting
The reason for the above tendency is that the
richness or leanness of a fuel mixture depends
on the density of the air (i.e. the concentration of
oxygen in it).
Air
Air temp. Humidity pressure Mixture Setting
(altitude)
High HighLow
Richer Leaner
(high)
Low LowHigh
Leaner Richer
(low)
1C3-9-32-7A 4/10/06 9:09 AM Page 2
Page 516 of 576
7-2
TUNSETTING
That is:
9Higher temperature expands the air with its
resultant reduced density.
9Higher humidity reduces the amount of oxygen
in the air by so much of the water vapor in the
same air.
9Lower atmospheric pressure (at a high altitude)
reduces the density of the air.
EC713001
Test run
After warming up the engine equipped with the
standard type carburetor(s) and spark plug(s),
run two or three laps of the circuit and check the
smooth operation of the engine and discoloration
of spark plug(s).
åNormal
∫Over burned (too lean)
çOil fouled (too rich)
Discoloration Condition of spark plug
NormalInsulator is dry and
burnt brown.
Over burned
Insulator is whitish.
(too lean)
Oil fouled Insulator is sooty and
(too rich) wet.
A
B
C
1C3-9-32-7A 4/10/06 9:09 AM Page 4
 5-65
CHASREAR SHOCK ABSORBER
EC583000
REMOVAL POINTS
EC583320
Bearing
1. Remove:
9Stopper ring (upper bearing) 1
NOTE:
Press in the bearing while pressing its outer race
and remove the stopper ring.
2")
 6-1
ELECELECTRICAL COMPONENTS AND WIRING DIAGRAM
EC600000
ELECTRICAL
EC610000
ELECTRICAL COMPONENTS AND WIRING DIAGRAM
EC611000
ELECTRICAL COMPONENTS
1“ENGINE STOP” button
2CDI unit
3Ignition coil")
 6-2
ELECIGNITION SYSTEM
EC620000
IGNITION SYSTEM
EC621003
INSPECTION STEPS
Use the following steps for checking the possibility of the malfunctioning engine being attributable to
ignition system failu")


 7-2
TUNSETTING
That is:
9Higher temperature expands the air with its
resultant reduced density.
9Higher humidity reduces the amount of oxygen
in the air by so much of the water vapor in the
same air.")