Page 46 of 116

6-5
1
2
3
4
56
7
8
9
10
11
EBU20681
Engine break-in
There is never a more important period in the life of
your engine than the first 20 hours of riding. For
this reason, you should read the following material
carefully.
Since the engine is brand new, do not put an ex-
cessive load on it for the first 20 hours. The various
parts in the engine wear and polish themselves to
the correct operating clearances. During this peri-
od, prolonged full-throttle operation or any condi-
tion that might result in engine overheating must
be avoided.
0–10 hours
Avoid prolonged operation above 1/2 throttle. Vary
the speed of the ATV regularly. Do not operate it at
one set throttle position.
10–20 hours
Avoid prolonged operation above 3/4 throttle. Rev
the engine freely, but do not use full throttle at any
time.
20 hours and beyond
The ATV can now be operated normally.CAUTION:
ECB00220
If any engine trouble should occur during the
engine break-in period, immediately have a
Yamaha dealer check the ATV.
EBU26770
Parking
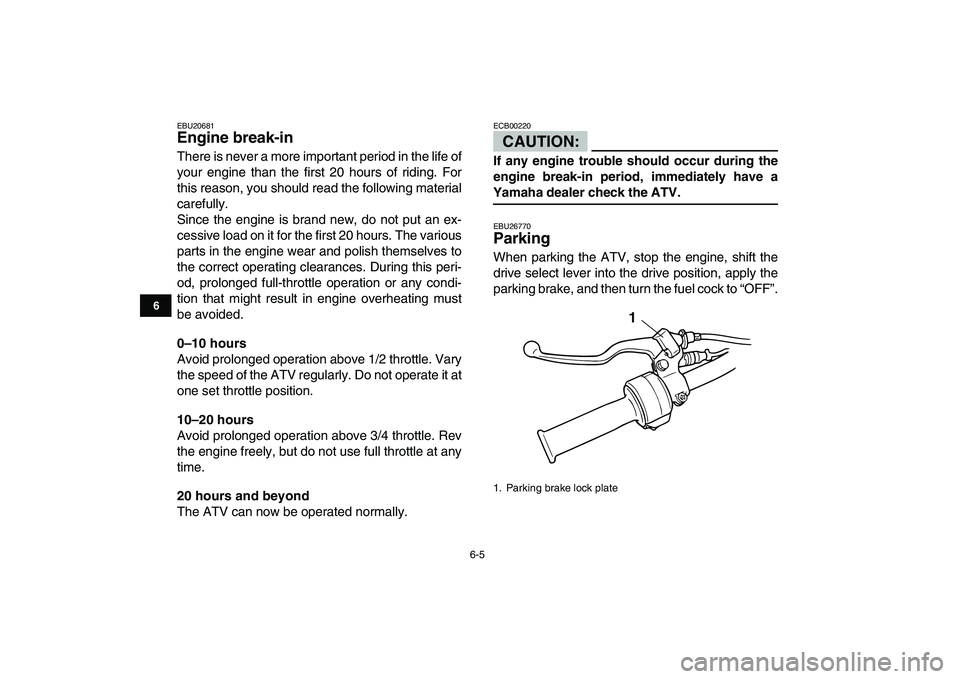
When parking the ATV, stop the engine, shift the
drive select lever into the drive position, apply the
parking brake, and then turn the fuel cock to “OFF”.
1. Parking brake lock plate
1
Page 54 of 116

7-5
1
2
3
4
5
67
8
9
10
11
WARNING
EWB01420
Never consume alcohol or drugs before or
while driving this ATV.
Pre-operation checks
Always perform the pre-operation checks listed on
page 5-1 before riding for proper care of the ATV
and to ensure safety.
WARNING
EWB01430
Always inspect your ATV each time you use it
to make sure the ATV is in safe operating con-
dition. Always follow the inspection and main-
tenance procedures and schedules described
in the Owner’s Manual. Failure to inspect the
ATV before operating or failure to properly
maintain the ATV increases the possibility of
an accident or equipment damage.
WARNING
EWB01440
Always use the size and type tires specified in
the Owner’s Manual for this ATV on page 5-4.
Always maintain proper tire pressure as de-
scribed in the Owner’s Manual on page 5-5.Use of improper tires on this ATV, or operation
of this ATV with improper or uneven tire pres-
sure, may cause loss of control, increasing
your risk of an accident.
Do not operate at speeds too fast for your
skills or the conditions.
WARNING
EWB01450
Always go at a speed that is proper for the ter-
rain, visibility and operating conditions, and
your experience. Operating this ATV at speeds
too fast for your skills or the conditions in-
creases your chances of losing control of the
ATV, which can result in an accident.
Speed limiter
For riders less experienced with this model, the
throttle lever housing is equipped with a speed lim-
iter. The speed limiter keeps the throttle from fully
opening, even when the throttle lever is pushed to
the maximum. Turning in the adjusting screw limits
the maximum engine power available and de-
creases the maximum speed of the ATV. Turning
in the adjusting screw decreases top speed, and
turning it out increases top speed. (See page 4-5.)
Page 65 of 116

7-16
1
2
3
4
5
67
8
9
10
11
RIDING DOWNHILL
When riding your ATV downhill, shift your weight
as far to the rear and uphill side of the ATV as pos-
sible. Move back on the seat and sit with your arms
straight. Allow the engine compression to do most
of the braking for you. Improper braking may cause
a loss of traction.
Use caution while descending a hill with loose or
slippery surfaces. Braking ability and traction may
be adversely affected by these surfaces. Improper
braking may also cause a loss of traction.
Whenever possible, ride your ATV straight down-hill. Avoid sharp angles which could allow the ATV
to tip or roll over. Carefully choose your path and
ride no faster than you will be able to react to ob-
stacles which may appear.
WARNING
EWB01620
Always follow proper procedures for going
down hills as described in this Owner’s Manu-
al.
Note: a special technique is required when
braking as you go down a hill.
�
Always check the terrain carefully before
you start down any hill.
�
Shift your weight backward.
�
Never go down a hill at high speed.
�
Avoid going down a hill at an angle that
would cause the ATV to lean sharply to one
side. Go straight down the hill where possi-
ble.
Page 75 of 116

8-4
1
2
3
4
5
6
78
9
10
11
7
*
Rear brake
�
Check operation and correct if necessary.
�
Check brake lever free play and adjust if neces-
sary.
√√√√√
�
Replace brake shoes. Whenever worn to the limit
8
*
Wheels
�
Check runout and for damage, and replace if nec-
essary.
√ √√√
9
*
Tires
�
Check tread depth and for damage, and replace if
necessary.
�
Check air pressure and balance, and correct if
necessary.
√ √√√
10
*
Wheel bearings
�
Check for looseness or damage, and replace if
necessary.
√ √√√
11
*
Drive shaft univer-
sal joint
�
Lubricate with lithium-soap-based grease.
√√√
12
*
Chassis fasteners
�
Make sure that all nuts, bolts, and screws are
properly tightened.
√√√√√
13
*
Shock absorber
assemblies
�
Check operation and correct if necessary.
�
Check for oil leakage and replace if necessary.
√√√
14
*
Knuckle shafts
�
Lubricate with lithium-soap-based grease.
√√√
15
*
Steering shaft
�
Lubricate with lithium-soap-based grease.
√√√
16
*
Steering system
�
Check operation and repair or replace if damaged.
�
Check toe-in and adjust if necessary.
√√√√√
17
*
Carburetor
�
Check choke operation and correct if necessary.
�
Check engine idling speed and adjust if neces-
sary.
√√√√
NO. ITEMCHECK OR MAINTENANCE
JOBINITIAL EVERY
Whichev-
er comes
firstmonth 1 3 6 6 12
km
(mi)320
(200)1200
(750)2400
(1500)2400
(1500)4800
(3000)
hours 20 75 150 150 300
Page 76 of 116

8-5
1
2
3
4
5
6
78
9
10
11
18
*
Crankcase breather
system
�
Check breather hose for cracks or other damage,
and replace if necessary.
√√√
19 Engine oil
�
Change.
�
Check ATV for oil leakage, and correct if neces-
sary.
√ √√√
20 Final gear oil
�
Change.
�
Check ATV for oil leakage, and correct if neces-
sary.
√√
21
*
Moving parts and
cables
�
Lubricate.
√√√√
22
*
Throttle lever hous-
ing and cable
�
Check operation and correct if necessary.
�
Check throttle cable free play and adjust if neces-
sary.
�
Lubricate throttle lever housing and cable.
√√√√√
23
*
Exhaust system
�
Check for leakage and replace gasket(s) if neces-
sary.
�
Check for looseness and tighten all screw clamps
and joints if necessary.
√√√
24 Spark arrester
�
Clean.
√√√
25
*
Front and rear brake
switches
�
Check operation and correct if necessary.
√√√√√
26
*
Battery
�
Check electrolyte level and specific gravity, and
correct if necessary.
�
Make sure that the breather hose is properly
routed.
√√√√√
NO. ITEMCHECK OR MAINTENANCE
JOBINITIAL EVERY
Whichev-
er comes
firstmonth136612
km
(mi)320
(200)1200
(750)2400
(1500)2400
(1500)4800
(3000)
hours 20 75 150 150 300
Page 78 of 116
8-7
1
2
3
4
5
6
78
9
10
11
EBU23211
Checking the spark plug
The spark plug is an important engine component,
which is easy to check. Since heat and deposits
will cause any spark plug to slowly erode, the spark
plug should be removed and checked in accor-
dance with the periodic maintenance and lubrica-
tion chart. In addition, the condition of the spark
plug can reveal the condition of the engine.
To remove the spark plug
1. Remove the spark plug cap.
2. Remove the spark plug as shown, with thespark plug wrench included in the owner’s tool
kit.
To check the spark plug
1. Check that the porcelain insulator around the
center electrode of the spark plug is a medi-
um-to-light tan (the ideal color when the ATV
is ridden normally).
NOTE:
If the spark plug shows a distinctly different color,
the engine could be operating improperly. Do not
attempt to diagnose such problems yourself. In-
stead, have a Yamaha dealer check the ATV.
1. Spark plug cap
1
1. Spark plug wrench
1
Page 79 of 116

8-8
1
2
3
4
5
6
78
9
10
11
2. Check the spark plug for electrode erosion
and excessive carbon or other deposits, and
replace it if necessary.
To install the spark plug
1. Measure the spark plug gap with a wire thick-
ness gauge and, if necessary, adjust the gap
to specification.2. Clean the surface of the spark plug gasket
and its mating surface, and then wipe off any
grime from the spark plug threads.
3. Install the spark plug with the spark plug
wrench, and then tighten it to the specified
torque.NOTE:
If a torque wrench is not available when installing
a spark plug, a good estimate of the correct torque
is 1/4–1/2 turn past finger tight. However, the spark
plug should be tightened to the specified torque as
soon as possible.
4. Install the spark plug cap.
EBU23251
Engine oil
The engine oil level should be checked before
each ride. In addition, the oil must be changed at
the intervals specified in the periodic maintenance
and lubrication chart. Specified spark plug:
NGK/CR7HSA
Spark plug gap:
0.6–0.7 mm (0.024–0.028 in)
1. Spark plug gap
Tightening torque:
Spark plug:
12.5 Nm (1.25 m·kgf, 9.0 ft·lbf)
Page 80 of 116
8-9
1
2
3
4
5
6
78
9
10
11
To check the engine oil level
1. Place the ATV on a level surface.
2. Start the engine, warm it up for several min-
utes, and then turn it off.
3. Wait a few minutes until the oil settles before
checking.
4. Remove the engine oil filler cap, and then
wipe the dipstick off with a clean rag.
5. Insert the dipstick into the filler hole (without
screwing it in), and then remove it again to
check the oil level.NOTE:
The engine oil should be between the minimum
and maximum level marks.
6. If the engine oil is at or below the minimum
level mark, add sufficient oil of the recom-
mended type to raise it to the correct level.
7. Insert the dipstick into the oil filler hole, and
then tighten the engine oil filler cap.
To change the engine oil
1. Place the ATV on a level surface.
2. Start the engine, warm it up for several min-
1. Engine oil filler cap
2. Dipstick
12
1. Maximum level mark
2. Minimum level mark
1
2