Page 58 of 79

Rear wheel installation1. Install the rear wheel and the
axle.
2. Install the axle nut.
3. Insert the brake rod into the
brake cam lever and install the
brake free play adjusting nut.
4. Install the tension bar onto the
brake shoe plate and tighten the
tension bar nut to the specified
tightening torque.
5. Take the Motorcycle off the
centerstand.
6. Tighten the axle nut to the
specified tightening torque.
Then install a new cotter pin.
Specified torque:
Tension bar nut:
14 ft-lb (1.9 m kg)
Axle nut:
65 ft-lb (9.05 m kg)Always use a new cotter pin.
Check the operation of the brake
light after adjusting the rear brake. 7. Adjust the rear brake pedal free
play. (See page 6-17.)
TroubleshootingAlthough YAMAHA Motorcycles
receive a rigid inspection before
shipment from the factory, trouble
may occur during operation. Any
problem in the fuel, compression, or
ignition systems can cause poor
starting and loss of power. The
troubleshooting chart describes a
quick, easy procedure for making
checks. If your Motorcycle requires
any repair, bring it to a YAMAHA
dealer. The skilled technicians at a
YAMAHA dealership have the tools,
experience, and know-how to
properly service your Motorcycle.
Use only genuine YAMAHA parts
on your Motorcycle. Imitation
parts may look like YAMAHA
parts, but they are often inferior.
Consequently, they have a shorter
service life and can lead to
expensive repair bills.
PERIODIC MAINTENANCE AND MINOR REPAIR
6-32
WARNINGWARNING
Page 59 of 79
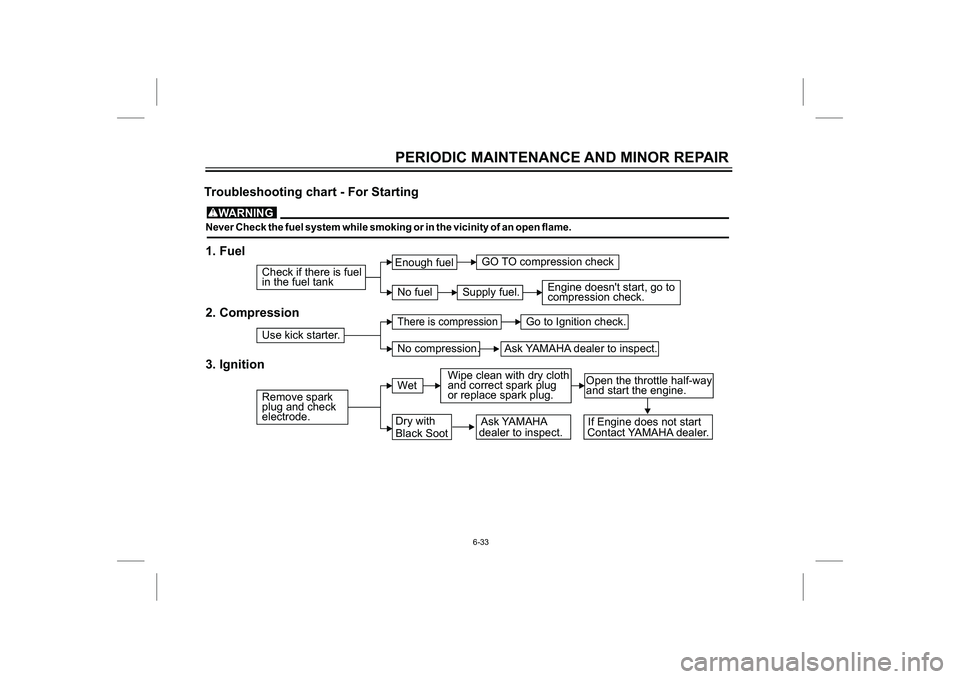
Ask YAMAHA dealer to inspect.compression check. Engine doesn't start, go to
Dry with
Black SootWet No compression.
There is compression
electrode. plug and check Remove spark Use kick starter.
Wipe clean with dry cloth
and correct spark plugGo to Ignition check. Enough fuel
No fuelGO TO compression check
in the fuel tank Check if there is fuel
Supply fuel.
Open the throttle half-way
and start the engine.
or replace spark plug.
WARNING
Never Check the fuel system while smoking or in the vicinity of an open flame.
PERIODIC MAINTENANCE AND MINOR REPAIR
6-33Ask YAMAHA
dealer to inspect.
Troubleshooting chart - For Starting
1. Fuel
2. Compression
3. Ignition
If Engine does not start
Contact YAMAHA dealer.
Page 61 of 79

8. Clean the seat with a vinyl
upholstery cleaner to keep the
cover pliable and glossy.
9. Automotive-type wax may be
applied to all painted and chrome-
plated surfaces. Avoid
combination cleaner waxes. Many
contain abrasive which may mar
the paint or protective finish. When
finished, start the engine and let it
idle for several minutes.
B. STORAGELong term storage (60 days or more)
of your Motorcycle will require some
preventive procedures to guard
against deterioration. After thor-
oughly cleaning the Motorcycle,
prepare for storage as follows:
1. Drain the fuel tank, fuel lines, and
carburetor float bowl.
2. Remove the empty fuel tank, pour
a cup of SAE 10W30 or 20W40
motor oil in the tank, shake the
tank to coat the inner surfaces
thoroughly and drain off the
excess oil. Reinstall the tank.
3. Remove the spark plug, pour
about one tablespoon of SAE
10W30 or 20W40 motor oil in the
spark plug hole and reinstall the
spark plug. Kick the engine over
several times (with the ignition off)
to coat the cylinder wall with oil.
4. Remove the drive chain.
Thoroughly clean the chain withsolvent and lubricate it. Reinstall
the chain or store it in a plastic bag
(tied to frame for safe-keeping).
5. Lubricate all control cables.
6. Block up the frame to raise both
wheels off the ground.
7. Tie a plastic bag over the
exhaust pipe outlet to prevent
moisture from entering.
8. If storing in a humid or salt-air
atmosphere, coat all exposed
metal surfaces with a light film of
oil. Do not apply oil to any rubber
parts or the seat cover.
9. Remove the battery and charge it.
Store it in a dry place and
recharge it once a month. Do not
store the battery in an excessively
warm or cold place (less than 0ºC
or more than Ambient).
Make any necessary repairs before
storing the Motorcycle.
CLEANING AND STORAGE
7-2
NOTE :
Page 62 of 79

SPECIFICATIONS
8-1
SpecificationsModel LIBERO (5TS8)
Dimensions
Kerb weight :(With Engine Oil &
90% Fuel in Tank)- 119Kg.
Engine ::
Overall length 2,000 mm
Overall width 730 mm
Overall height 1,050 mm
Seat height (Upto Rider) 800 mm
(Upto Pillion Rider) 850 mm
Wheelbase 1,290 mm
Ground clearance 173 mm
Minimum turning radius 2,000 mm
Engine type
Cylinder arrangement
Displacement
Bore x Stroke 49X56
Compression ratio 9 : 1
Starting system
Lubrication system
Maximum power 7.6
Maximum torque 0.80Air cooled 4-stroke,SOHC
Forward inclined single
cylinder
106 cm
mm
Kick starter
Wet sump
PS(5.59 KW) @ 7500
Kgm. @ 6000
3
RPM
RPM
EngineOil:
Capacity
Air filter:
Fuel :
Carburettor:Type:
:
Periodic oil change 1.0
Total amount
Type G
Fuel tank capacity
Reserve amount
Type Variable Venturi Type
Manufacturer M/S Keihin Fie PrivateBe sure to use motor oils that do not contain
antifriction modifiers. Passenger car motor oils (often
labelled Energy conserving) contain anti-friction
additives which will cause clutch and/or starter clutch
slippage, resulting in reduced component life and
poor engine performance.
YAMALUBE 4-Stroke motor
oil (20W40 type SG)
L
1.2 L (First fill/Overhaul)
Wet type element
asoline (Petrol)
13.0 Litres
1.7Litres
Limited India.
CAUTION :
Page 67 of 79
PRE-DELIVERY INSPECTION REPORT
f. Wheels
Tyre :Tyre pressure Solo Double
(PSI)
Front 25 25
Rear 33 36
R i m : Runout - Radial - 1.5 mm (Max)
- Lateral - 1.5 mm (Max)
Spokes : No loosenes
g. Locks Operation : • Ignition
• Steering• Fuel Tank Cap• Side Cover (L.H.)
h. FastenersSpecified Torque
(Ft-Lb)
1. Front Wheel Axle Nuts 25-40
2. Front Fork (Crown Handle & Inner Tube)13-202. Front Fork under Bracket Stem Nut18-223. Handle Bar Mounting Bolts 13-204. Rear Shock Absorber Mounting Bolts22-355. Rear Swing Arm Pivot Shaft Nut32-526. Rear Wheel Axle/Sprocket. Shaft Nuts60-70
B. ENGINE
a. Engine Oil : • Oil Level (For checking - Refer Pg. 6-9)
• Check for any Leakages
10-2
service2.pmd11/3/2006, 8:50 PM 2
Page 69 of 79
PRE-DELIVERY INSPECTION REPORT10-4
C. ELECTRICAL
a. Ignition Switch Operation
b. Left Hand Switch Operation & Pass Beam
• Horn
• Indicator• Head Light
c. All Bulbs - Functioningd. Battery
• Electrolyte Level
• Specific Gravity• Routing of Breather Pipe• Fuse• Routing of Positive Wire (Red) Below Breather Pipe
D. ROAD TEST
a. Starting
b. Gear Shifting Operationc. Clutch Operationd. Application of Brakes (Front and Rear)e. Speedo/ Odo Meter Operationf. Fuel gauge OperationEXPLAINED BYSIGNATURE: _____________ NAME:
CUSTOMER’S SIGN
MAIN SELLING DLR’S STAMP, SIGNATURE
service2.pmd11/3/2006, 8:50 PM 4
Page 70 of 79

10-5
1. Operation of all the locks (Ignition, Steering, Fuel Tank Cap, Side Cover L.H.).
2. Fuel Cock Lever Operation and its reserve position; Fuel Tank Capacity including reserve & Fuel
Gauge.
3. Operation and function of Starter Lever.
4. Operation of Kick Lever.
5. Operation of Throttle.
6. Operation of Handle Bar Switches, their Functions and Pass Beam.
7. Disadvantages of riding on half Clutch (Never ride with clutch pressed).
8. Gear shifting pattern.
9. Tyre inflation pressure :Front - 25 Psi Rear - 33 Psi (Solo), 36 Psi (Double)
10. Never give sudden acceleration; always accelerate gradually
11. Simultaneous use of Front and Rear Brakes.
12. Never ride with your foot on Rear brake Pedal.
13. Whenever parking the Motorcycle on the Side Stand, ensure that the Fuel Cock Lever is in closed
position.
14. Always adjust both the right and left Shock Absorbers to the same position.INSTALLATIONProcedures to be explained to the customer on delivery of the Motorcycle by the Dealer's
Representative.
service2.pmd11/3/2006, 8:50 PM 5
Page 76 of 79

1. DO’S (�)
�
1Always use genuine ‘spare parts’ purchased from YAMAHA Authorised Dealers.
�
2Always use only genuine oils
• 4T - 20W/40 SG grade - YAMALUBE 4T
�
3 Always keep your engine well turned. Save environment and also improve Fuel Efficiency
�
4 • ALWAYS GET YOUR MOTORCYCLE REPAIRED AND MAINTAINED ONLY AT YAMAHA AUTHORISED
DEALER.
• YAMAHA serves you through a wide network of Authorised Dealers.
�
5.Check the Following at every scheduled service:-
a) Spark Plug : Check/Reset Gap/Replace as per the recommendations
in this Owner’s Manual (page no 6-7)
b) Carburetor :Cleaning/Adjustment Every 4500 kmsc) Air Filter : Clean every 2000 kms as per the environment conditions.
d) Piston/Rings/Cylinder : Check / Clean / Replace if necessary
e) Exhaust System : Check / Replace if necessary
f) Valve Timing : Check / Adjust every 4500 kms
g) Compression pressure :Check / Diagnose.
�6 Always drive with Starter Lever in OFF position.
�7 Use Starter Lever for minimum possible period (1 to 2 minutes) only to start and warm up Engine
(may be required only in winter)
DO’S AND DON’TS FOR THE MOTORCYCLE
2
greenbook.pmd11/3/2006, 8:50 PM 2
Page:
< prev 1-8 9-16 17-24