Page 44 of 76

To install the spark plug
1. Spark plug gap
1. Measure the spark plug gap with
a wire thickness gauge and, if
necessary, adjust the gap to spe-
cification.
2. Clean the surface of the spark
plug gasket and its mating surfa-
ce, and then wipe off any grime
from the spark plug threads.
3. Install the spark plug with the
spark plug wrench, and then
tighten it to the specified torque.
NOTE:
If a torque wrench is not available
when installing a spark plug, a good
estimate of the correct torque is
1/4~1/2 turn past finger tight. Howe-
ver, the spark plug should be tighte-
ned to the specified torque as soon
as possible.
4. Install the spark plug cap.
5. Install the storage compartment
by installing the bolts.
6. Close the seat.
EAUM1550
Engine oil
The engine oil level should be chec-
ked before each ride. In addition, the
oil must be changed at the intervals
specified in the periodic maintenance
and lubrication chart and when the
service indicator light comes on.
To check the engine oil level
1. Place the scooter on the centers-
tand.
NOTE:
Make sure that the scooter is positio-
ned straight up when checking the oil
level. A slight tilt to the side can result
in a false reading.
2. Start the engine, warm it up for
several minutes, and then turn it
off.
Tightening torque:
Spark plug:
12.5 Nm (1.25m•kgf, 9.05 ft•lbf)
Spark plug gap:
0.8 - 0.9 mm (0.031 - 0.035 in)
1
ZAUM0037
6
PERIODIC MAINTENANCE AND MINOR REPAIR
6-8
1B9-F8199-E1.qxd 9/10/06 09:59 Página 44
Page 47 of 76

6. Add the specified amount of the
recommended final transmission
oil, and then install and tighten
the oil filler cap.
EWA11310
s s
WARNING
�Make sure that no foreign
material enters the final trans-
mission case.
�Make sure that no oil gets on
the tire or wheel.
7. Check the final transmission case
for oil leakage. If oil is leaking,
check for the cause.
EAU20070
Coolant
The coolant level should be checked
before each ride. In addition, the coo-
lant must be changed at the intervals
specified in the periodic maintenance
and lubrication chart.
EAUS1270
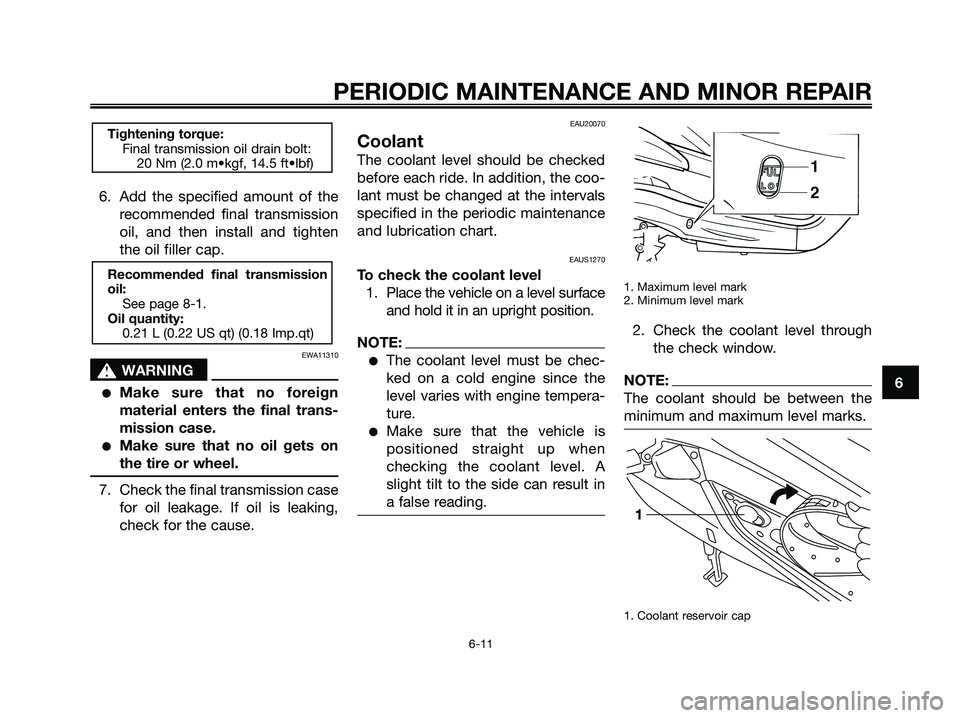
To check the coolant level
1. Place the vehicle on a level surface
and hold it in an upright position.
NOTE:
�The coolant level must be chec-
ked on a cold engine since the
level varies with engine tempera-
ture.
�Make sure that the vehicle is
positioned straight up when
checking the coolant level. A
slight tilt to the side can result in
a false reading.
1. Maximum level mark
2. Minimum level mark
2. Check the coolant level through
the check window.
NOTE:
The coolant should be between the
minimum and maximum level marks.
1. Coolant reservoir cap
1
Recommended final transmission
oil:
See page 8-1.
Oil quantity:
0.21 L (0.22 US qt) (0.18 Imp.qt)
Tightening torque:
Final transmission oil drain bolt:
20 Nm (2.0 m•kgf, 14.5 ft•lbf)
6
PERIODIC MAINTENANCE AND MINOR REPAIR
6-11
1B9-F8199-E1.qxd 9/10/06 09:59 Página 47
Page 49 of 76
3. Pull the air filter element out.
4. Lightly tap the air filter element to
remove most of the dust and dirt,
and then blow the remaining dirt
out with compressed air.
5. Check the air filter element for
damage and replace it if neces-
sary.
6. Insert the air filter element into
the air filter case.
7. Install the air filter case cover by
installing the screws.Cleaning the V-belt case air filter
element
1. Remove the V-belt case air filter
cover by removing the screws.
2. Remove the air filter element, and
then blow out the dirt with com-
pressed air as shown.3. Check the air filter element for
damage and replace it if neces-
sary.
4. Install the air filter element with
the colored side facing outward.
5. Install the V-belt case air filter
cover by installing the screws.
6
PERIODIC MAINTENANCE AND MINOR REPAIR
6-13
1B9-F8199-E1.qxd 9/10/06 09:59 Página 49
Page 59 of 76

3. Fully charge the battery before
installation.
4. After installation, make sure that
the battery leads are properly
connected to the battery termi-
nals.
ECA10630
CAUTION:
�Always keep the battery char-
ged. Storing a discharged bat-
tery can cause permanent bat-
tery damage.
�To charge a sealed-type (MF)
battery, a special (constant-
voltage) battery charger is
required. Using a conventional
battery charger will damage
the battery. If you do not have
access to a sealed-type (MF)
battery charger, have a Yamaha
dealer charge your battery.
EAU23610
Replacing the fuses
The main fuse and the fuse box,
which contains the fuses for the indi-
vidual circuits, are located behind
cowling B. (See page 6-6.)
If a fuse is blown, replace it as
follows.
1. Turn the key to “OFF” and turn off
the electrical circuit in question.
2. Remove the blown fuse, and then
install a new fuse of the specified
amperage.ECA10640
CAUTION:
Do not use a fuse of a higher ampe-
rage rating than recommended to
avoid causing extensive damage to
the electrical system and possibly a
fire.
3. Turn the key to “ON” and turn on
the electrical circuit in question to
check if the device operates.
4. If the fuse immediately blows
again, have a Yamaha dealer
check the electrical system.
Specified fuses:
Main fuse:
30 A
Headlight fuse:
15 A
Signaling system fuse:
15 A
Ignition fuse:
5 A
Clock fuse (backup):
5 A
Radiator fan fuse:
10 A
6
PERIODIC MAINTENANCE AND MINOR REPAIR
6-23
1B9-F8199-E1.qxd 9/10/06 09:59 Página 59
Page 60 of 76

EAU23910
Replacing a headlight bulb
This model is equipped with quartz
bulb headlights. If a headlight bulb
burns out, replace it as follows.
1. Remove cowling B. (See page
6-6.)
1. Headlight coupler
2. Disconnect the headlight coupler,
and then remove the headlight
bulb cover.
3. Remove the headlight bulb hol-
der according to the following
illustration, and then remove the
defective bulb.
1. Headlight bulb cover
NOTE:
The removal procedure depends on
the type of bulb holder installed on
your vehicle.
EWA10790
s s
WARNING
Headlight bulbs get very hot. The-
refore, keep flammable products
away from a lit headlight bulb, and
do not touch the bulb until it has
cooled down.
4. Place a new bulb into position,
and then secure it with the bulb
holder.
ECA10660
CAUTION:
Do not touch the glass part of the
headlight bulb to keep it free from
oil, otherwise the transparency of
the glass, the luminosity of the
bulb, and the bulb life will be adver-
sely affected. Thoroughly clean off
any dirt and fingerprints on the
headlight bulb using a cloth mois-
tened with alcohol or thinner.
5. Install the bulb cover, and then
connect the coupler.
6. Install the cowling.
7. Have a Yamaha dealer adjust the
headlight beam if necessary.
1
1
6
PERIODIC MAINTENANCE AND MINOR REPAIR
6-24
1B9-F8199-E1.qxd 9/10/06 09:59 Página 60
Page 61 of 76

EAUT1260
Replacing a front turn signal
light bulb
ECA10670
CAUTION:
It is advisable to have a Yamaha
dealer perform this job.
1. Place the scooter on the centers-
tand.
2. Remove cowling A. (See page
6-6.)
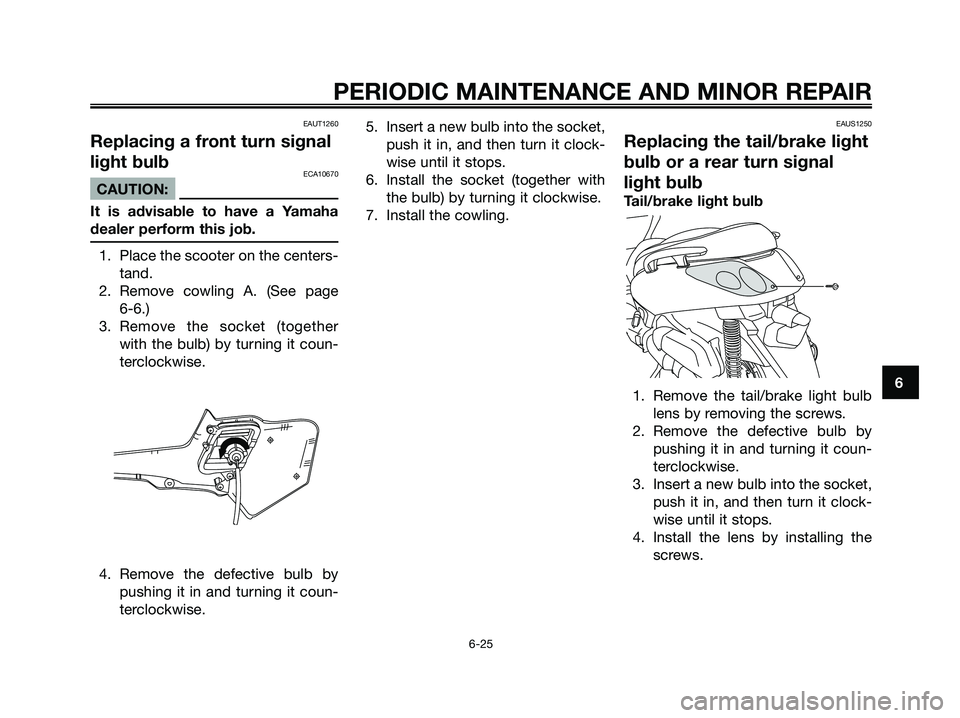
3. Remove the socket (together
with the bulb) by turning it coun-
terclockwise.
4. Remove the defective bulb by
pushing it in and turning it coun-
terclockwise.5. Insert a new bulb into the socket,
push it in, and then turn it clock-
wise until it stops.
6. Install the socket (together with
the bulb) by turning it clockwise.
7. Install the cowling.
EAUS1250
Replacing the tail/brake light
bulb or a rear turn signal
light bulb
Tail/brake light bulb
1. Remove the tail/brake light bulb
lens by removing the screws.
2. Remove the defective bulb by
pushing it in and turning it coun-
terclockwise.
3. Insert a new bulb into the socket,
push it in, and then turn it clock-
wise until it stops.
4. Install the lens by installing the
screws.
6
PERIODIC MAINTENANCE AND MINOR REPAIR
6-25
1B9-F8199-E1.qxd 9/10/06 09:59 Página 61
Page 62 of 76
Rear turn signal light bulb
1. Remove the tail/brake light lens
by removing the screw.
2. Remove the turn signal light bulb
lens by removing the screw.
3. Remove the defective bulb by
pushing it in and turning it coun-
terclockwise.
4. Insert a new bulb into the socket,
push it in, and then turn it clock-
wise until it stops.
5. Install the turn signal light bulb
lens by installing the screw.6. Install the tail/brake light bulb
lens by installing the screw.
ECA10680
CAUTION:
Do not overtighten the screws,
otherwise the lens may break.
EAUS1150
Replacing the license plate
light bulb
1. Remove the lens by removing the
screw.
2. Remove the defective bulb by
pulling it out.
3. Insert a new bulb into the socket.
4. Install the lens by installing the
screw.
6
PERIODIC MAINTENANCE AND MINOR REPAIR
6-26
1B9-F8199-E1.qxd 9/10/06 09:59 Página 62
Page 63 of 76

ECA11190
CAUTION:
Do not overtighten the screw,
otherwise the lens may break.
EAUS1260
Replacing the auxiliary light
bulb
If the auxiliary light bulb burns out,
replace it as follows.
1. Remove cowling B . (See page
6-6.).
2. Remove the socket (together
with the bulb) by pulling it out.
3. Remove the defective bulb by
pulling it out.
4. Insert a new bulb into the socket.
5. Install the socket (together with
the bulb) by pushing it in.
6. Install the cowling B.
EAU25880
Troubleshooting
Although Yamaha scooters receive a
thorough inspection before shipment
from the factory, trouble may occur
during operation. Any problem in the
fuel, compression, or ignition sys-
tems, for example, can cause poor
starting and loss of power.
The following troubleshooting charts
represent quick and easy procedures
for checking these vital systems your-
self. However, should your scooter
require any repair, take it to a Yamaha
dealer, whose skilled technicians
have the necessary tools, experience,
and know-how to service the scooter
properly.
Use only genuine Yamaha replace-
ment parts. Imitation parts may look
like Yamaha parts, but they are often
inferior, have a shorter service life and
can lead to expensive repair bills.
6
PERIODIC MAINTENANCE AND MINOR REPAIR
6-27
1B9-F8199-E1.qxd 9/10/06 09:59 Página 63