Page 218 of 422
7-9
LEARNING TO OPERATE YOUR VEHICLE
You should become familiar with the performance
characteristics of the vehicle in a large, flat area
that is free of obstacles and other vehicles. Prac-
tice control of the accelerator pedal, brakes, steer-
ing, and drive select lever. Drive first at slow speed
and become comfortable at that speed before
gradually increasing your speed. Become familiar
with the way the vehicle feels in low and high rang-
es, first in two-wheel drive (2WD) and then in four-
wheel drive (4WD) and four-wheel drive with the
differential locked (DIFF. LOCK). Also practice
driving in reverse. Take the time to learn basic op-
eration before attempting more difficult maneu-
vers.
EE.book Page 9 Friday, August 4, 2006 12:02 PM
Page 222 of 422
7-13
CAUTION:_ Do not shift from low to high or vice versa with-
out coming to a complete stop and waiting for
the engine to return to normal idle speed. Dam-
age to the engine or drive train may occur. _TURNING YOUR VEHICLE
The vehicle is easier to steer in two-wheel drive
(2WD) than four-wheel drive (4WD). Steering
takes the most effort in 4WD with the differential
locked (DIFF. LOCK).
It is possible for the vehicle to roll over or go out of
control if you attempt sharp, high-speed turns. You
should also be careful making sharp turns on
rough terrain. Do not attempt to turn around or
make abrupt maneuvers on slopes.
EE.book Page 13 Friday, August 4, 2006 12:02 PM
Page 224 of 422
7-15
Position your hands on the steering wheel so that
your thumbs and fingers do not wrap around the
wheel. This is particularly important when driving
in rough terrain. The front wheels will move right
and left as they respond to the terrain, and this
movement will be felt in the steering wheel. A sud-
den jolt could wrench the steering wheel around,
and your thumbs or fingers could be injured if they
are in the way of the steering wheel spokes.
BRAKING
Braking ability is affected by the type of terrain. In
most cases, gradually application of the brakes is
more effective than abrupt braking, particularly on
loose surfaces like gravel. Always allow for greater
braking distance on rough, loose, or slippery sur-
faces.
EE.book Page 15 Friday, August 4, 2006 12:02 PM
Page 255 of 422
.Engine oil filter cartridgeReplace.Final gear oil
Check oil level/oil leak")
8-8
Fuel line*Check fuel hose for cracks or damage.
Replace if necessary.Engine oilReplace (warm engine before draining).Engine oil filter cartridgeReplace.Final gear oil
Check oil level/oil leakage.
Replace.Differential gear oil
Front brake*Check operation/brake pad wear/fluid leakage/see NOTE page
8-9.
Correct if necessary. Replace pads if worn to the limit.Rear brake*Check operation/brake pad wear/fluid leakage/see NOTE page
8-9.
Correct if necessary. Replace pads if worn to the limit.Accelerator pedal*Check operation and free play.V-belt*Check operation.
Check for wear, cracks, or damage.Wheels*Check balance/damage/runout.
Repair if necessary.Wheel bearings*Check bearing assemblies for looseness/damage.
Replace if damaged.Front and rear
suspension*Check operation and for leakage.
Correct if necessary.Steering system*Check operation and for looseness/Replace if damaged.
Check toe-in/Adjust if necessary.Rear upper and lower
knuckle pivots*Lubricate with lithium-soap-based grease.Drive shaft universal joint*Lubricate with lithium-soap-based grease.Engine mount*Check for cracks or damage.
Check bolt tightness.Front and rear axle boots*Check operation.
Replace if damaged.Stabilizer bushings*Check for cracks or damage.
ITEM ROUTINEWhichever
comes firstINITIAL EVERY
month136612
km
(mi)320
(200)1,200
(750)2,400
(1,500)2,400
(1,500)4,800
(3,000)
hours 20 75 150 150 300
EE.book Page 8 Friday, August 4, 2006 12:02 PM
Page 334 of 422
8-87 1. Brake pad wear indicator groove
1. Rainure d’indication d’usure de plaquette de frein
1. Ranura indicadora de desgaste de la pastilla de freno
EVU00830
Front brake pad check
Each brake pad is provided with wear indicator
grooves, which allow you to check the brake pad
wear without having to disassemble the brake. To
check the brake pad wear, check the wear indica-
tor grooves. If a brake pad has worn to the point
that the wear indicator grooves have almost disap-
peared, have a Yamaha dealer replace the brake
pads as a set.NOTE:_ The wheels need to be removed to check the
brake pads. (See pages 8-107–8-109 for wheel re-
moval and installation procedures.) _
EE.book Page 87 Friday, August 4, 2006 12:02 PM
Page 354 of 422
8-107
1. Nut (× 4)
1.Écrou (× 4)
1. Tuerca (× 4)
EVU00920
Steering shaft lubrication
Lubricate the pivot points.
EVU00930
Wheel removal
1. Loosen the wheel nuts.
2. Elevate the vehicle and place a suitable
stand under the frame.
3. Remove the nuts from the wheel.
4. Remove the wheel. Recommended lubricant:
Lithium-soap-based grease
(all-purpose grease)
EE.book Page 107 Friday, August 4, 2006 12:02 PM
Page 356 of 422
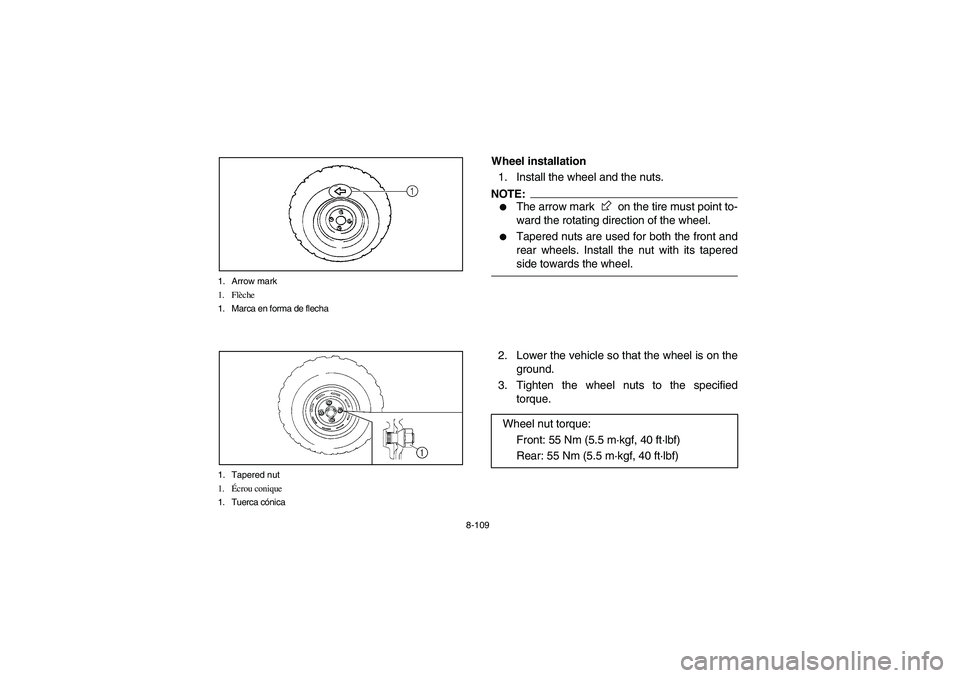
8-109 1. Arrow mark
1. Flèche
1. Marca en forma de flecha
1. Tapered nut
1.Écrou conique
1. Tuerca cónica
EVU00940
Wheel installation
1. Install the wheel and the nuts.NOTE:_ �
The arrow mark on the tire must point to-
ward the rotating direction of the wheel.
�
Tapered nuts are used for both the front and
rear wheels. Install the nut with its tapered
side towards the wheel.
_2. Lower the vehicle so that the wheel is on the
ground.
3. Tighten the wheel nuts to the specified
torque.
Wheel nut torque:
Front: 55 Nm (5.5 m·kgf, 40 ft·lbf)
Rear: 55 Nm (5.5 m·kgf, 40 ft·lbf)
EE.book Page 109 Friday, August 4, 2006 12:02 PM
Page 366 of 422

9. Ca")
8-119 1. Main fuse 2. Spare main fuse
3. Headlight fuse 4. Ignition fuse
5. Auxiliary DC jack fuse 6. Four-wheel-drive motor fuse
7. Signaling system fuse
8. Backup fuse (for odometer and clock)
9. Carburetor warmer fuse 10. Spare fuse (× 3)
1. Fusible principal 2. Fusible principal de rechange
3. Fusible des phares 4. Fusible d’allumage
5. Fusible de la prise pour accessoires
6. Fusible du moteur du dispositif quatre roues motrices
7. Fusible du système de signalisation
8. Fusible de sauvegarde (pour le compteur kilométrique et la montre)
9. Fusible du système de réchauffage de carburateur
10. Fusible de rechange (× 3)
1. Fusible principal 2. Fusible principal de repuesto
3. Fusible de los faros 4. Fusible del encendido
5. Fusible de la toma auxiliar de corriente continua
6. Fusible de la tracción integral
7. Fusible del sistema de intermitencia
8. Fusible de repuesto (cuentakilómetros y reloj)
9. Fusible del calentador del carburador
10. Fusible de reserva (× 3)
3. Remove the blown fuse, and then install a
new fuse of the specified amperage.
4. Turn the key to “ON” and turn on the electrical
circuit in question to check if the device oper-
ates.
5. If the fuse immediately blows again, have a
Yamaha dealer check the electrical system.
6. Install the battery compartment cover.
7. Close the hood.Specified fuses:
Main fuse: 30.0 A
Headlight fuse: 15.0 A
Ignition fuse: 10.0 A
Auxiliary DC jack fuse: 10.0 A
Signaling system fuse: 10.0 A
Carburetor warmer fuse: 10.0 A
Four-wheel-drive motor fuse: 3.0 A
Backup fuse: 10.0 A
EE.book Page 119 Friday, August 4, 2006 12:02 PM


1.Écrou (× 4)
1. Tuerca (× 4)
EVU00920
Steering shaft lubrication
Lubricate the pivot points.
EVU00930
Wheel removal
1. Loosen the wheel nuts.
2. Elevate the vehicle and place")