Page 276 of 422
8-29 1. O-ring
1. Joint torique
1. Junta tórica
1. Oil filter cartridge 2. Torque wrench
1. Cartouche de filtre à huile 2. Clé dynamométrique
1. Cartucho del filtro de aceite 2. Llave dinamométrica
5. Apply a light coat of engine oil to the O-ring of
the new oil filter cartridge.NOTE:_ Make sure the O-ring is seated properly. _6. Install the new oil filter cartridge with an oil fil-
ter wrench, and then tighten it to the specified
torque with a torque wrench.
7. Install the engine oil drain bolt, and then tight-
en it to the specified torque.
8. Add the specified amount of recommended
engine oil, and then install the engine oil filler
cap and tighten it. Tightening torque:
Oil filter cartridge:
17 Nm (1.7 m·kgf, 12 ft·lbf)
Tightening torque:
Engine oil drain bolt:
30 Nm (3.0 m·kgf, 22 ft·lbf)
EE.book Page 29 Friday, August 4, 2006 12:02 PM
Page 278 of 422
8-31
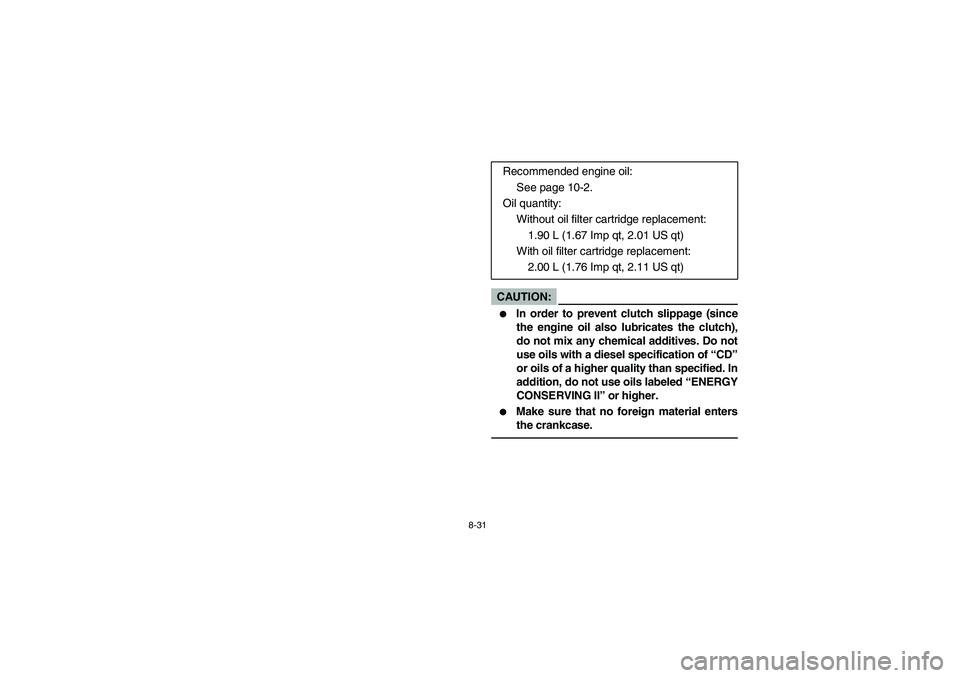
CAUTION:_ �
In order to prevent clutch slippage (since
the engine oil also lubricates the clutch),
do not mix any chemical additives. Do not
use oils with a diesel specification of “CD”
or oils of a higher quality than specified. In
addition, do not use oils labeled “ENERGY
CONSERVING II” or higher.
�
Make sure that no foreign material enters
the crankcase.
_
Recommended engine oil:
See page 10-2.
Oil quantity:
Without oil filter cartridge replacement:
1.90 L (1.67 Imp qt, 2.01 US qt)
With oil filter cartridge replacement:
2.00 L (1.76 Imp qt, 2.11 US qt)
EE.book Page 31 Friday, August 4, 2006 12:02 PM
Page 280 of 422
8-33
9. Start the engine, and then let it idle for sever-
al minutes while checking it for oil leakage. If
oil is leaking, immediately turn the engine off
and check for the cause.
10. Turn the engine off, wait at least ten minutes,
and then check the oil level and correct it if
necessary.
11. Install the console.
EE.book Page 33 Friday, August 4, 2006 12:02 PM
Page 294 of 422
 8-47 1. Coolant reservoir cap
2. Maximum level mark 3. Minimum level mark
1. Bouchon du vase d’expansion
2. Repère de niveau maximum 3. Repère de niveau minimum
1. Tapón del depósito de líquido")
8-47 1. Coolant reservoir cap
2. Maximum level mark 3. Minimum level mark
1. Bouchon du vase d’expansion
2. Repère de niveau maximum 3. Repère de niveau minimum
1. Tapón del depósito de líquido refrigerante
2. Marca de nivel máximo 3. Marca de nivel mínimo
EVU00732
Coolant
The coolant level should be checked before each
ride.
Checking the coolant level
1. Place the vehicle on a level surface.
2. Open the hood. (See pages 8-17–8-19 for
hood opening and closing procedures.)
3. Check the coolant level in the coolant reser-
voir when the engine is cold as the coolant
level varies with engine temperature.NOTE:_ The coolant should be between the minimum and
maximum level marks. _4. If the coolant is at or below the minimum level
mark, remove the reservoir cap, add coolant
to the maximum level mark, install the reser-
voir cap, and then close the hood.
Coolant reservoir capacity
(up to the maximum level mark):
0.35 L (0.31 Imp qt, 0.37 US qt)
EE.book Page 47 Friday, August 4, 2006 12:02 PM
Page 302 of 422
8-55
Inspection
The spark plug is an important engine component
and is easy to inspect. The condition of the spark
plug can indicate the condition of the engine.
The ideal color of the porcelain insulator around
the center electrode is a medium-to-light tan for a
vehicle that is being ridden normally.
Do not attempt to diagnose such problems your-
self.
Instead, take the vehicle to a Yamaha dealer. You
should periodically remove and inspect the spark
plug because heat and deposits will cause the
spark plug to slowly break down and erode. If elec-
trode erosion becomes excessive, or if carbon and
other deposits are excessive, you should replace
the spark plug with the specified plug.
Specified spark plug:
DPR8EA-9 (NGK)
EE.book Page 55 Friday, August 4, 2006 12:02 PM
Page 310 of 422
8-63 1. Air filter element
1.Élément du filtre à air
1. Filtro de aire
1. Air filter case check hose
1. Tube de vidange du boîtier de filtre à air
1. Tubo de vaciado de la caja del filtro de aire
4. Tap the air filter element to remove most of
the dust and dirt, and then blow the remain-
ing dirt out with compressed air.
5. Install the air filter element into the air intake
duct grill.
6. Install the air intake duct grill by installing the
quick fastener screws.
Cleaning the engine air filter elementNOTE:_ There is a check hose at the bottom of the air filter
case. If dust or water collects in this hose, empty
the hose and clean the air filter element and air fil-
ter case. _1. Remove the seats. (See page 4-45 for seat
removal and installation procedures.)
2. Remove the console. (See page 8-21 for
console removal and installation proce-
dures.)
EE.book Page 63 Friday, August 4, 2006 12:02 PM
Page 314 of 422
8-67 1. Air filter frame 2. Sponge material
3. Element retaining plate
1. Armature de filtre à air 2.Élément en mousse
3. Plaque de retenue de l’élément
1. Bastidor del filtro de aire 2. Material esponjoso
3. Placa de retención del filtro
5. Remove the sponge material from its frame.
6. Wash the sponge material gently but thor-
oughly in solvent.
WARNING
Always use parts cleaning solvent to clean the
sponge material. Never use low flash point sol-
vents or gasoline to clean the sponge material
because the engine could catch fire or ex-
plode.7. Squeeze the excess solvent out of the
sponge material and let it dry.CAUTION:_ Do not twist the sponge material when squeez-
ing it. _
EE.book Page 67 Friday, August 4, 2006 12:02 PM
Page 318 of 422
8-71
NOTE:_ The air filter element should be cleaned every 20–
40 hours. It should be cleaned and lubricated more
often if the vehicle is operated in extremely dusty
areas. Each time air filter element maintenance is
performed, check the air inlet to the air filter case
for obstructions. Check the air filter element rubber
joint to the carburetor and manifold fittings for an
airtight seal. Tighten all fittings securely to avoid
the possibility of unfiltered air entering the engine. _CAUTION:_ Never operate the engine with the air filter ele-
ment removed. This will allow unfiltered air to
enter, causing rapid engine wear and possible
engine damage. Additionally, operation with-
out the air filter element will affect carburetor
jetting with subsequent poor performance and
possible engine overheating.
EE.book Page 71 Friday, August 4, 2006 12:02 PM
 8-29 1. O-ring
1. Joint torique
1. Junta tórica
1. Oil filter cartridge 2. Torque wrench
1. Cartouche de filtre à huile 2. Clé dynamométrique
1. Cartucho del filtro de aceite 2. Llave dinamométri")
 8-33
9. Start the engine, and then let it idle for sever-
al minutes while checking it for oil leakage. If
oil is leaking, immediately turn the engine off
and check for the cause.
10. Turn the engine")
 8-55
Inspection
The spark plug is an important engine component
and is easy to inspect. The condition of the spark
plug can indicate the condition of the engine.
The ideal color of the porcelain insul")
 8-63 1. Air filter element
1.Élément du filtre à air
1. Filtro de aire
1. Air filter case check hose
1. Tube de vidange du boîtier de filtre à air
1. Tubo de vaciado de la caja del filtro de aire")
 8-67 1. Air filter frame 2. Sponge material
3. Element retaining plate
1. Armature de filtre à air 2.Élément en mousse
3. Plaque de retenue de l’élément
1. Bastidor del filtro de aire 2. Materi")
 8-71
NOTE:_ The air filter element should be cleaned every 20–
40 hours. It should be cleaned and lubricated more
often if the vehicle is operated in extremely dusty
areas. Each time air filter elem")