Page 129 of 166
. To decrease
the throttle cable free play, turn the adjusting
bolt in direction (b).
3. Tighten the locknut")
8-44
8 2. To increase the throttle cable free play, turn
the adjusting bolt in direction (a). To decrease
the throttle cable free play, turn the adjusting
bolt in direction (b).
3. Tighten the locknut.
EBU24060Valve clearance The valve clearance changes with use, resulting in
improper air-fuel mixture and/or engine noise. To
prevent this from occurring, the valve clearancemust be adjusted by a Yamaha dealer at the inter-
vals specified in the periodic maintenance and lu-
brication chart.
EBU24070Adjusting the drive select lever safety
system cable The drive select lever safety system cable stretch-
es with use, which can result in improper function.
Therefore, the safety system cable should be
checked and adjusted at the intervals specified in
the periodic maintenance and lubrication chart.EBU27470Checking the front and rear brake pads The front and rear brake pads must be checked for
wear at the intervals specified in the periodic main-
tenance and lubrication chart. Each brake pad is
provided with a wear indicator groove, which al-
lows you to check the brake pad wear without hav-
ing to disassemble the brake. If a brake pad has
worn to the point that the wear indicator groove has
almost disappeared, have a Yamaha dealer re-
place the brake pads as a set.
1. Locknut
2. Throttle cable free play adjusting bolt
3. Throttle cable free playU3B460E0.book Page 44 Friday, May 12, 2006 2:51 PM
Page 132 of 166

8-47
8Rear brake
Observe these precautions:
�When checking the fluid level, make sure that
the top of the brake fluid reservoir is level.�Use only the recommended quality brake fluid,
otherwise the rubber seals may deteriorate,
causing leakage and poor braking performance.�Refill with the same type of brake fluid. Mixing
fluids may result in a harmful chemical reaction
and lead to poor braking performance.
�Be careful that water does not enter the brake
fluid reservoir when refilling. Water will signifi-
cantly lower the boiling point of the fluid and may
result in vapor lock.�Brake fluid may deteriorate painted surfaces or
plastic parts. Always clean up spilled fluid imme-
diately.�As the brake pads wear, it is normal for the brake
fluid level to gradually go down. However, if the
brake fluid level goes down suddenly, have a
Yamaha dealer check the cause.EBU24290Changing the brake fluid Have a Yamaha dealer change the brake fluid at
the intervals specified in the NOTE after the peri-
odic maintenance and lubrication chart. In addi-
tion, have the oil seals of the master cylinders and
calipers as well as the brake hoses replaced at the
intervals listed below or whenever they are dam-
aged or leaking.�Oil seals: Replace every two years.�Brake hoses: Replace every four years.
1. Minimum level markRecommended brake fluid:
DOT 4
U3B460E0.book Page 47 Friday, May 12, 2006 2:51 PM
Page 134 of 166

8-49
8Replacement of brake components requires
professional knowledge. These procedures
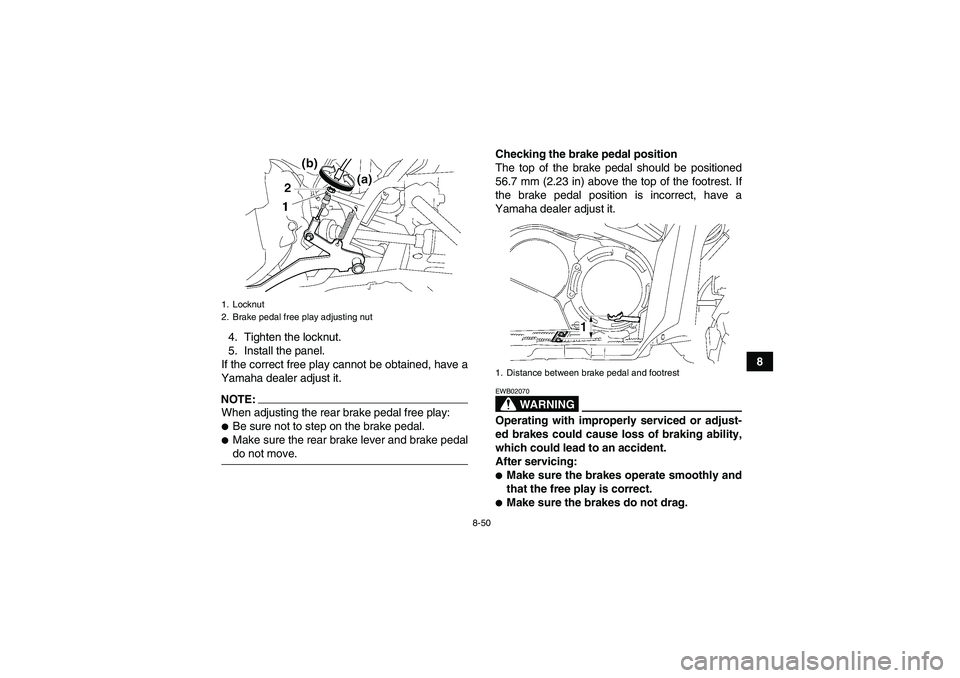
should be performed by a Yamaha dealer.EBU27780Adjusting the brake pedal free play and
checking the brake pedal position The brake pedal free play must be adjusted and
brake pedal position must be checked and, if nec-
essary, adjusted at the intervals specified in the
periodic maintenance and lubrication chart.NOTE:�Always perform this maintenance completely in
the following order whenever adjusting the rear
brake.�Before adjusting the brake pedal free play and
checking the brake pedal position, check therear brake pads for wear.
Adjusting the brake pedal free play
The brake pedal free play should measure 0.0–5.0
mm (0.00–0.20 in) as shown. If the free play is in-
correct, adjust it as follows.1. Remove panel H. (See page 8-8.)
2. Loosen the locknut.
3. Turn the brake pedal free play adjusting nut in
direction (a) to increase the free play, and in
direction (b) to decrease it.
1. Brake pedal free play
U3B460E0.book Page 49 Friday, May 12, 2006 2:51 PM
Page 135 of 166
8-50
8 4. Tighten the locknut.
5. Install the panel.
If the correct free play cannot be obtained, have a
Yamaha dealer adjust it.
NOTE:When adjusting the rear brake pedal free play:�Be sure not to step on the brake pedal.�Make sure the rear brake lever and brake pedaldo not move.Checking the brake pedal position
The top of the brake pedal should be positioned
56.7 mm (2.23 in) above the top of the footrest. If
the brake pedal position is incorrect, have a
Yamaha dealer adjust it.
WARNING
EWB02070Operating with improperly serviced or adjust-
ed brakes could cause loss of braking ability,
which could lead to an accident.
After servicing:�Make sure the brakes operate smoothly and
that the free play is correct.�Make sure the brakes do not drag.
1. Locknut
2. Brake pedal free play adjusting nut
1. Distance between brake pedal and footrest
U3B460E0.book Page 50 Friday, May 12, 2006 2:51 PM
Page 146 of 166
8-61
8
CAUTION:ECB00670Make sure the headlight bulb holder cover is
securely fitted over the bulb holder and seatedproperly.
9. Adjust the headlight beam if necessary.EBU25550Adjusting a headlight beam CAUTION:ECB00690It is advisable to have a Yamaha dealer makethis adjustment.
To raise a headlight beam, turn the adjusting
screw in direction (a).
To lower a headlight beam, turn the adjusting
screw in direction (b).
EBU25640Replacing the tail/brake light bulb If the tail/brake light bulb burns out, replace it as
follows.
1. Remove panel I. (See page 8-8.)
2. Remove the bulb holder (together with the
bulb) by turning it counterclockwise.1. Headlight beam adjusting screw
U3B460E0.book Page 61 Friday, May 12, 2006 2:51 PM
Page 147 of 166
8-62
8 3. Remove the defective bulb by pushing it in
and turning it counterclockwise.4. Insert a new bulb into the bulb holder, push it
in, and then turn it clockwise until it stops.
5. Install the bulb holder (together with the bulb)
by turning it clockwise.
6. Install the panel.
EBU25650Removing a wheel 1. Loosen the wheel nuts.
2. Elevate the ATV and place a suitable stand
under the frame.
3. Remove the nuts from the wheel.
4. Remove the wheel.
1. Tail/brake light bulb holder
1. Tail/brake light bulb
1. Wheel nut
U3B460E0.book Page 62 Friday, May 12, 2006 2:51 PM
Page 152 of 166

9-1
9
EBU25860
CLEANING AND STORAGE
EBU25880Cleaning Frequent, thorough cleaning of your ATV will not
only enhance its appearance but will improve its
general performance and extend the useful life of
many components.
1. Before cleaning the ATV:
a. Block off the end of the exhaust pipe to
prevent water entry. A plastic bag and
strong rubber band may be used.
b. Make sure the spark plug and all filler caps
are properly installed.
2. If the engine case is excessively greasy, apply
degreaser with a paint brush. Do not apply de-
greaser to the wheel axles.
3. Rinse the dirt and degreaser off with a garden
hose. Use only enough pressure to do the job.CAUTION:ECB00710Excessive water pressure may cause water
seepage and deterioration of wheel bearings,
brakes, transmission seals and electrical de-
vices. Many expensive repair bills have result-ed from improper high-pressure detergent
applications such as those available in coin-
operated car washers.
4. Once most of the dirt has been hosed off,
wash all surfaces with warm water and mild,
detergent-type soap. An old toothbrush or bot-
tle brush is handy for hard-to-reach places.
5. Rinse the ATV off immediately with clean wa-
ter and dry all surfaces with a chamois, clean
towel or soft absorbing cloth.
6. Clean the seat with a vinyl upholstery cleaner
to keep the cover pliable and glossy.
7. Automotive type wax may be applied to all
painted and chrome plated surfaces. Avoid
combination cleaner-waxes. Many contain
abrasives which may mar the paint or protec-
tive finish. When finished cleaning, start the
engine and let it idle for several minutes.
U3B460E0.book Page 1 Friday, May 12, 2006 2:51 PM
Page 154 of 166
9-3
9e. Remove the spark plug cap from the spark
plug, and then install the spark plug and
the spark plug cap.
4. Lubricate all control cables and the pivoting
points of all levers and pedals.
5. Check and, if necessary, correct the tire air
pressure, and then block up the ATV so that
all of its wheels are off the ground. Alternative-
ly, turn the wheels a little every month in order
to prevent the tires from becoming degraded
in one spot.
6. Cover the muffler outlet with a plastic bag to
prevent moisture from entering it.
7. Remove the battery and fully charge it. Store
it in a cool, dry place and charge it once a
month. Do not store the battery in an exces-
sively cold or warm place [less than 0 °C (30
°F) or more than 30 °C (90 °F)]. For more in-
formation on storing the battery, see page
8-55.
NOTE:Make any necessary repairs before storing theATV.U3B460E0.book Page 3 Friday, May 12, 2006 2:51 PM