Page 108 of 166
8-23
8
NOTE:The engine oil should be between the minimumand maximum level marks.
6. If the engine oil is at or below the minimum
level mark, add sufficient oil of the recom-
mended type to raise it to the correct level.
7. Insert the dipstick completely into the oil filler
hole.
8. Install the panel.
CAUTION:ECB00850Be sure the engine oil is at the correct level,otherwise engine damage may result.
To change the engine oil (with or without oil fil-
ter cartridge replacement)
1. Place the ATV on a level surface.
2. Remove panel F. (See page 8-8.)
3. Place an oil pan under the engine to collect
the used oil.
4. Remove the dipstick, and then remove the en-
gine oil drain bolt to drain the oil from the
crankcase.
1. Maximum level mark
2. Minimum level mark
1. Engine oil drain bolt
U3B460E0.book Page 23 Friday, May 12, 2006 2:51 PM
Page 109 of 166
8-24
8
NOTE:Skip steps 5–9 if the oil filter cartridge is not beingreplaced.
5. Remove panel G. (See page 8-8.)
6. Remove the oil filter cartridge with an oil filter
wrench.NOTE:An oil filter wrench is available at a nearby Yamahadealer.
7. Apply a thin coat of engine oil to the O-ring of
the new oil filter cartridge.
NOTE:Make sure that the O-ring is properly seated.
8. Install the new oil filter cartridge with an oil fil-
ter wrench, and then tighten it to the specified
torque with a torque wrench.
1. Oil filter cartridge
2. Oil filter wrench
1. O-ring
U3B460E0.book Page 24 Friday, May 12, 2006 2:51 PM
Page 110 of 166

8-25
8
9. Install panel G.
10. Install the engine oil drain bolt, and then tight-
en it to the specified torque.11. Add the specified amount of the recommend-
ed engine oil, and then insert the dipstick com-
pletely into the oil filler hole.
CAUTION:ECB00300�In order to prevent clutch slippage (since the
engine oil also lubricates the clutch), do not
mix any chemical additives. Do not use oils
with a diesel specification of “CD” or oils of
a higher quality than specified. In addition,
do not use oils labeled “ENERGY CONSERV-
ING II” or higher.�Make sure that no foreign material enters thecrankcase.
1. Torque wrenchTightening torque:
Oil filter cartridge:
17 Nm (1.7 m·kgf, 12 ft·lbf)
Tightening torque:
Engine oil drain bolt:
30 Nm (3.0 m·kgf, 22 ft·lbf)
Recommended oil:
See page 10-1.
Oil quantity:
Without oil filter cartridge replacement:
2.00 L (2.11 US qt) (1.76 Imp.qt)
With oil filter cartridge replacement:
2.10 L (2.22 US qt) (1.85 Imp.qt)
U3B460E0.book Page 25 Friday, May 12, 2006 2:51 PM
Page 111 of 166
8-26
8 12. Start the engine, and then let it idle for several
minutes while checking it for oil leakage. If oil
is leaking, immediately turn the engine off and
check for the cause.
13. Turn the engine off, wait at least ten minutes,
and then check the oil level and correct it if
necessary.
14. Install panel F.
EBU27302Final gear oil The final gear case must be checked for oil leak-
age before each ride. If any leakage is found, have
a Yamaha dealer check and repair the ATV. In ad-
dition, the final gear oil level must be checked and
the oil changed as follows at the intervals specified
in the periodic maintenance and lubrication chart.
To check the final gear oil level
1. Place the ATV on a level surface.NOTE:The final gear oil level must be checked on a coldengine.
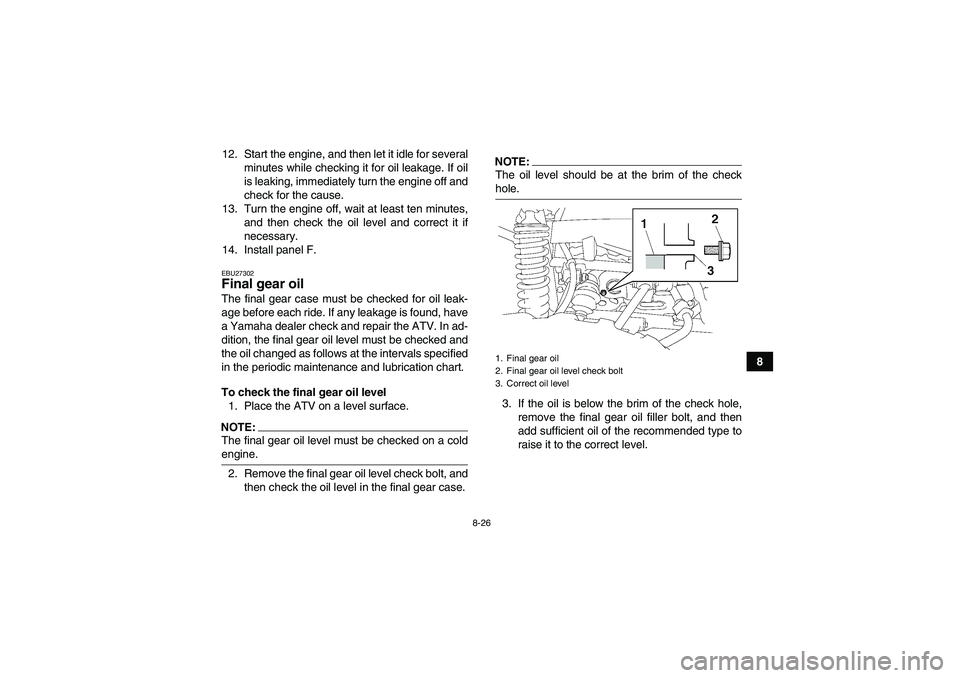
2. Remove the final gear oil level check bolt, and
then check the oil level in the final gear case.
NOTE:The oil level should be at the brim of the checkhole.
3. If the oil is below the brim of the check hole,
remove the final gear oil filler bolt, and then
add sufficient oil of the recommended type to
raise it to the correct level.1. Final gear oil
2. Final gear oil level check bolt
3. Correct oil level
U3B460E0.book Page 26 Friday, May 12, 2006 2:51 PM
Page 112 of 166
8-27
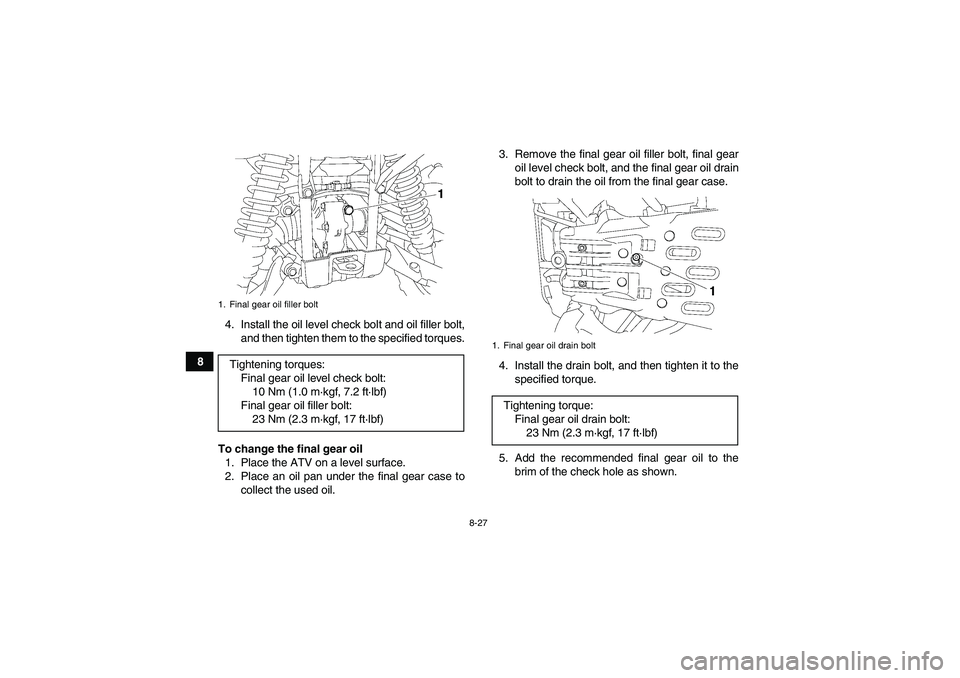
84. Install the oil level check bolt and oil filler bolt,
and then tighten them to the specified torques.
To change the final gear oil
1. Place the ATV on a level surface.
2. Place an oil pan under the final gear case to
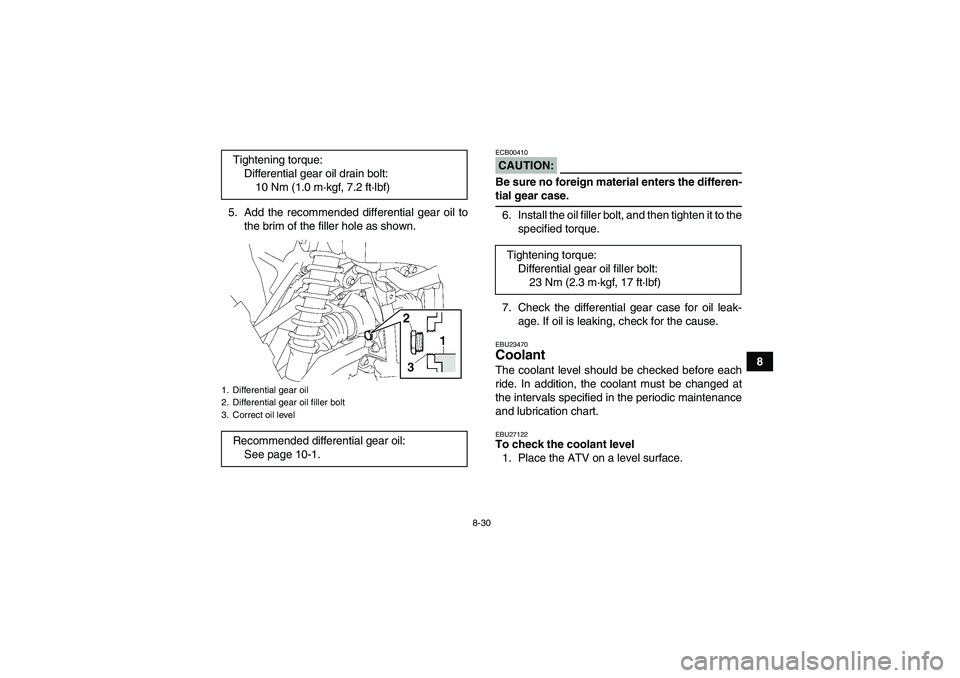
collect the used oil.3. Remove the final gear oil filler bolt, final gear
oil level check bolt, and the final gear oil drain
bolt to drain the oil from the final gear case.
4. Install the drain bolt, and then tighten it to the
specified torque.
5. Add the recommended final gear oil to the
brim of the check hole as shown.
1. Final gear oil filler boltTightening torques:
Final gear oil level check bolt:
10 Nm (1.0 m·kgf, 7.2 ft·lbf)
Final gear oil filler bolt:
23 Nm (2.3 m·kgf, 17 ft·lbf)
1. Final gear oil drain boltTightening torque:
Final gear oil drain bolt:
23 Nm (2.3 m·kgf, 17 ft·lbf)
U3B460E0.book Page 27 Friday, May 12, 2006 2:51 PM
Page 113 of 166

8-28
8
CAUTION:ECB00420Be sure no foreign material enters the finalgear case.
6. Install the oil level check bolt and oil filler bolt,
and then tighten them to the specified torques.7. Check the final gear case for oil leakage. If oil
is leaking, check for the cause.
EBU23421Differential gear oil The differential gear case must be checked for oil
leakage before each ride. If any leakage is found,
have a Yamaha dealer check and repair the ATV.
In addition, the differential gear oil level must be
checked and the oil changed as follows at the in-
tervals specified in the periodic maintenance and
lubrication chart.
To check the differential gear oil level
1. Place the ATV on a level surface.NOTE:The differential gear oil level must be checked ona cold engine.
1. Final gear oil
2. Final gear oil level check bolt
3. Correct oil levelRecommended final gear oil:
See page 10-1.
Tightening torques:
Final gear oil level check bolt:
10 Nm (1.0 m·kgf, 7.2 ft·lbf)
Final gear oil filler bolt:
23 Nm (2.3 m·kgf, 17 ft·lbf)
U3B460E0.book Page 28 Friday, May 12, 2006 2:51 PM
Page 114 of 166
8-29
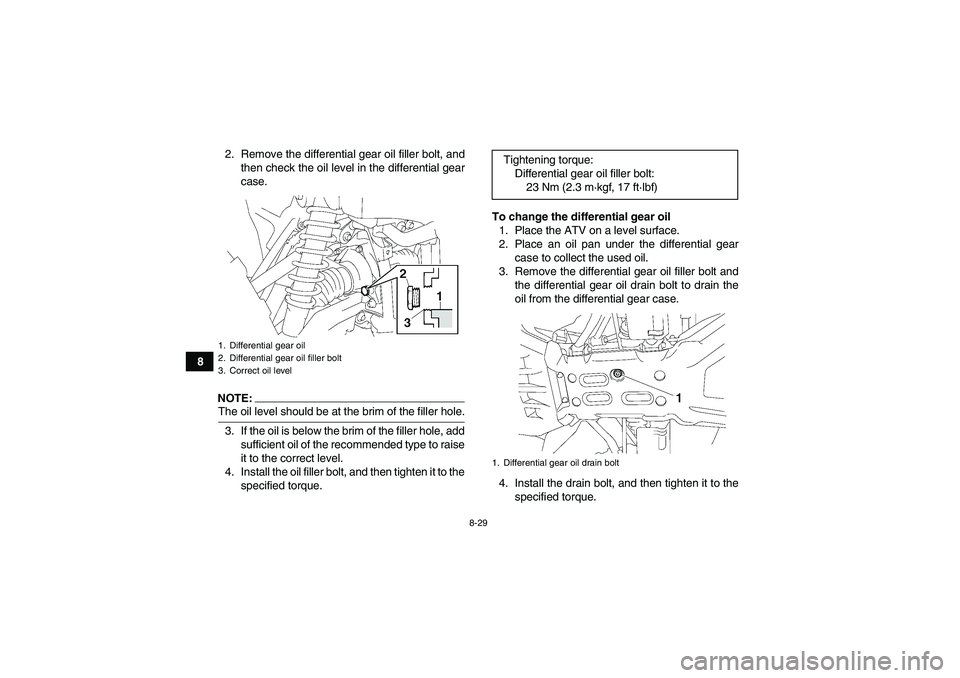
82. Remove the differential gear oil filler bolt, and
then check the oil level in the differential gear
case.
NOTE:The oil level should be at the brim of the filler hole.
3. If the oil is below the brim of the filler hole, add
sufficient oil of the recommended type to raise
it to the correct level.
4. Install the oil filler bolt, and then tighten it to the
specified torque.To change the differential gear oil
1. Place the ATV on a level surface.
2. Place an oil pan under the differential gear
case to collect the used oil.
3. Remove the differential gear oil filler bolt and
the differential gear oil drain bolt to drain the
oil from the differential gear case.
4. Install the drain bolt, and then tighten it to the
specified torque.1. Differential gear oil
2. Differential gear oil filler bolt
3. Correct oil level
Tightening torque:
Differential gear oil filler bolt:
23 Nm (2.3 m·kgf, 17 ft·lbf)1. Differential gear oil drain bolt
U3B460E0.book Page 29 Friday, May 12, 2006 2:51 PM
Page 115 of 166
8-30
8 5. Add the recommended differential gear oil to
the brim of the filler hole as shown.
CAUTION:ECB00410Be sure no foreign material enters the differen-tial gear case.
6. Install the oil filler bolt, and then tighten it to the
specified torque.
7. Check the differential gear case for oil leak-
age. If oil is leaking, check for the cause.EBU23470Coolant The coolant level should be checked before each
ride. In addition, the coolant must be changed at
the intervals specified in the periodic maintenance
and lubrication chart.EBU27122To check the coolant level
1. Place the ATV on a level surface. Tightening torque:
Differential gear oil drain bolt:
10 Nm (1.0 m·kgf, 7.2 ft·lbf)
1. Differential gear oil
2. Differential gear oil filler bolt
3. Correct oil levelRecommended differential gear oil:
See page 10-1.
Tightening torque:
Differential gear oil filler bolt:
23 Nm (2.3 m·kgf, 17 ft·lbf)
U3B460E0.book Page 30 Friday, May 12, 2006 2:51 PM