Page 9 of 144

OPERATION .................................................. 6-1
Starting a cold engine ................................ 6-1
Starting a warm engine .............................. 6-3
Operating the drive select lever and
driving in reverse ...................................... 6-3
Engine break-in .......................................... 6-4
Parking ....................................................... 6-5
Parking on a slope ..................................... 6-5
Accessories and loading ............................ 6-6
RIDING YOUR ATV ...................................... 7-1
GETTING TO KNOW YOUR ATV............... 7-2
RIDE WITH CARE AND
GOOD JUDGEMENT ................................ 7-2
BE CAREFUL WHERE YOU RIDE ............. 7-9
TURNING YOUR ATV .............................. 7-13
CLIMBING UPHILL ................................... 7-14
RIDING DOWNHILL.................................. 7-17
CROSSING A SLOPE............................... 7-18
CROSSING THROUGH SHALLOW
WATER ................................................... 7-19
RIDING OVER ROUGH TERRAIN ........... 7-22
SLIDING AND SKIDDING ......................... 7-22
WHAT TO DO IF... .................................... 7-24
WHAT TO DO... ........................................ 7-24PERIODIC MAINTENANCE AND
MINOR REPAIR .............................................8-1
Owner’s manual and tool kit .......................8-1
Periodic maintenance and
lubrication chart ........................................8-3
Removing and installing the panel ..............8-8
Checking the spark plug .............................8-8
Engine oil and oil filter cartridge ................8-10
Final gear oil .............................................8-14
Differential gear oil ....................................8-17
Cleaning the air filter element ...................8-19
Cleaning the spark arrester ......................8-22
V-belt cooling duct check hose .................8-24
V-belt case drain plug ...............................8-24
Adjusting the carburetor ............................8-24
Adjusting the engine idling speed .............8-25
Adjusting the throttle cable free play .........8-26
Valve clearance ........................................8-26
Adjusting the drive select lever safety
system cable ...........................................8-27
Checking the front brake pads and
rear brake friction plates .........................8-27
Checking the brake fluid level ...................8-28
Changing the brake fluid ...........................8-29
Checking the front brake lever free play ...8-29U4S260E0.book Page 2 Tuesday, October 3, 2006 1:53 PM
Page 21 of 144
3-1
3
EBU17680
DESCRIPTION
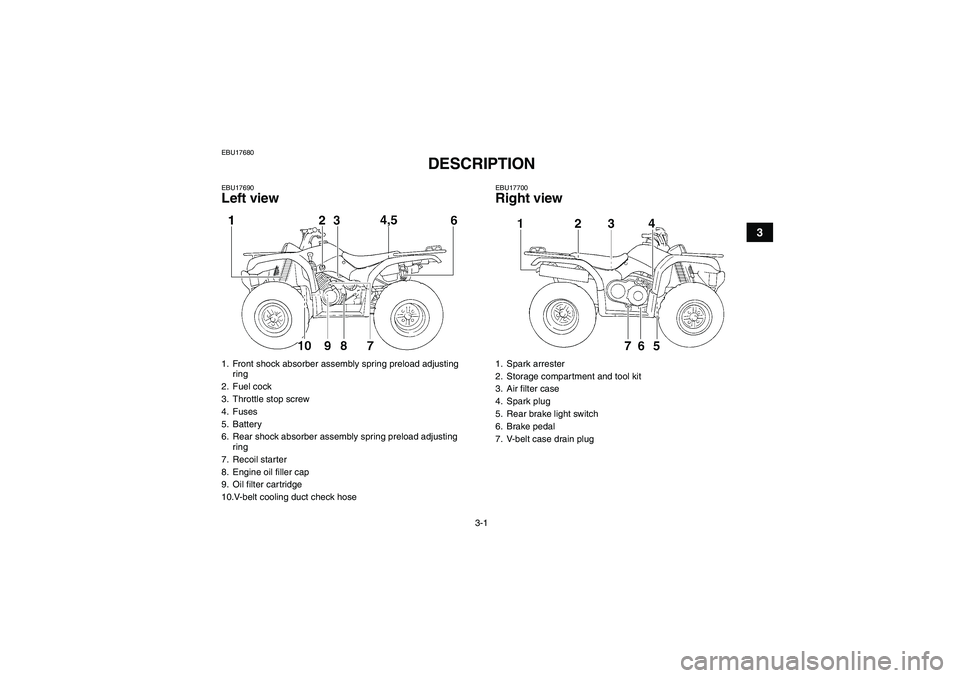
EBU17690Left view
EBU17700Right view
1. Front shock absorber assembly spring preload adjusting
ring
2. Fuel cock
3. Throttle stop screw
4. Fuses
5. Battery
6. Rear shock absorber assembly spring preload adjusting
ring
7. Recoil starter
8. Engine oil filler cap
9. Oil filter cartridge
10.V-belt cooling duct check hose
1. Spark arrester
2. Storage compartment and tool kit
3. Air filter case
4. Spark plug
5. Rear brake light switch
6. Brake pedal
7. V-belt case drain plug
U4S260E0.book Page 1 Tuesday, October 3, 2006 1:53 PM
Page 85 of 144

8-3
8
EBU22403Periodic maintenance and lubrication chart NOTE:�For ATVs not equipped with an odometer or an hour meter, follow the month maintenance intervals.�For ATVs equipped with an odometer or an hour meter, follow the km (mi) or hours maintenance inter-
vals. However, keep in mind that if the ATV isn’t used for a long period of time, the month maintenance
intervals should be followed.�Items marked with an asterisk should be performed by a Yamaha dealer as they require special tools,data and technical skills.NO. ITEMCHECK OR MAINTENANCE
JOBINITIAL EVERY
Whichev-
er comes
firstmonth136612
km
(mi)320
(200)1200
(750)2400
(1500)2400
(1500)4800
(3000)
hours 20 75 150 150 300
1*Fuel lineCheck fuel hoses for cracks or other damage, and
replace if necessary.√√√
2 Spark plugCheck condition and clean, regap, or replace if
necessary.√√√√√
3*ValvesCheck valve clearance and adjust if necessary.√ √√√
4 Air filter elementClean and replace if necessary.Every 20–40 hours (more often in wet or
dusty areas)
5*Front brakeCheck operation and correct if necessary.
Check fluid level and ATV for fluid leakage, and
correct if necessary.√√√√√
Replace brake pads. Whenever worn to the limit
U4S260E0.book Page 3 Tuesday, October 3, 2006 1:53 PM
Page 90 of 144
8-8
8
EBU23080Removing and installing the panel The panel shown needs to be removed to perform
some of the maintenance jobs described in this
chapter. Refer to this section each time the panel
needs to be removed and installed.EBU23111Panel A
To remove the panelRemove the bolt, and then take the panel off.To install the panel
Place the panel in the original position and install
the bolt.CAUTION:ECB00380When installing the panel, be sure not to pinchthe cables or wires.EBU23211Checking the spark plug The spark plug is an important engine component,
which is easy to check. Since heat and deposits
will cause any spark plug to slowly erode, the spark
1. Panel A
1. Panel A
2. Bolt
U4S260E0.book Page 8 Tuesday, October 3, 2006 1:53 PM
Page 91 of 144
8-9
8 plug should be removed and checked in accor-
dance with the periodic maintenance and lubrica-
tion chart. In addition, the condition of the spark
plug can reveal the condition of the engine.
To remove the spark plug
1. Remove the spark plug cap.
2. Remove the spark plug as shown, with the
spark plug wrench included in the owner’s tool
kit.To check the spark plug
1. Check that the porcelain insulator around the
center electrode of the spark plug is a medi-
um-to-light tan (the ideal color when the ATV
is ridden normally).
NOTE:If the spark plug shows a distinctly different color,
the engine could be operating improperly. Do not
attempt to diagnose such problems yourself. In-stead, have a Yamaha dealer check the ATV.
2. Check the spark plug for electrode erosion
and excessive carbon or other deposits, and
replace it if necessary.
1. Spark plug cap
1. Spark plug wrench
U4S260E0.book Page 9 Tuesday, October 3, 2006 1:53 PM
Page 92 of 144

8-10
8To install the spark plug
1. Measure the spark plug gap with a wire thick-
ness gauge and, if necessary, adjust the gap
to specification.
2. Clean the surface of the spark plug gasket
and its mating surface, and then wipe off any
grime from the spark plug threads.3. Install the spark plug with the spark plug
wrench, and then tighten it to the specified
torque.
NOTE:If a torque wrench is not available when installing
a spark plug, a good estimate of the correct torque
is 1/4–1/2 turn past finger tight. However, the spark
plug should be tightened to the specified torque assoon as possible.
4. Install the spark plug cap.EBU23312Engine oil and oil filter cartridge The engine oil level should be checked before
each ride. In addition, the oil must be changed and
the oil filter cartridge replaced at the intervals spec-
ified in the periodic maintenance and lubrication
chart.
To check the engine oil level
1. Place the ATV on a level surface. Specified spark plug:
NGK/DR8EA
Spark plug gap:
0.6–0.7 mm (0.024–0.028 in)
1. Spark plug gap
Tightening torque:
Spark plug:
17.5 Nm (1.75 m·kgf, 12.7 ft·lbf)
U4S260E0.book Page 10 Tuesday, October 3, 2006 1:53 PM
Page 107 of 144

8-25
8
CAUTION:ECB00480The carburetor has been set and extensively
tested at the Yamaha factory. Changing these
settings without sufficient technical knowl-
edge may result in poor performance of ordamage to the engine.EBU24000Adjusting the engine idling speed The engine idling speed must be checked and, if
necessary, adjusted as follows at the intervals
specified in the periodic maintenance and lubrica-
tion chart.NOTE:A diagnostic tachometer is needed to make thisadjustment.
1. Start the engine and warm it up.NOTE:The engine is warm when it quickly responds to thethrottle.
2. Attach the tachometer to the spark plug lead.
3. Check the engine idling speed and, if neces-
sary, adjust it to specification by turning the
throttle stop screw at the carburetor. To in-crease the engine idling speed, turn the throt-
tle stop screw in direction (a), and to decrease
it, turn the screw in direction (b).
NOTE:If the specified idling speed cannot be obtained as
described above, have a Yamaha dealer make theadjustment.1. Throttle stop screwEngine idling speed:
1450–1550 r/min
U4S260E0.book Page 25 Tuesday, October 3, 2006 1:53 PM
Page 129 of 144
8-47
8
EBU25751Troubleshooting chart
Check the fuel level in
the fuel tank.1. Fuel
There is enough fuel.
There is no fuel.
Check the compression.
Supply fuel.
The engine does not start.
Check the compression.
Operate the electric starter.2. Compression
There is compression.
There is no compression.
Check the ignition.
Have a Yamaha dealer
check the ATV.
Remove the spark plug
and check the electrodes.3. Ignition
Wipe off with a dry cloth and correct the
spark plug gap, or replace the spark plug.
Have a Yamaha dealer check the ATV.
The engine does not start.
Have a Yamaha dealer
check the ATV.
The engine does not start.
Check the battery.
Operate the electric starter.4. Battery
The engine turns over
quickly.
The engine turns over
slowly.
The battery is good.Check the battery lead connections,
and charge the battery if necessary.
DryWet
Open the throttle halfway and operate
the electric starter.
U4S260E0.book Page 47 Tuesday, October 3, 2006 1:53 PM