2007 VOLVO XC90 parking brake
[x] Cancel search: parking brakePage 135 of 268

2007 Volvo XC90
Automatic transmission with Geartronic
P Park
Use this position when starting the engine or parking the vehicle.
Never use P while the vehicle is in motion.
The parking brake should also be set whenever the vehicle is parked.
The gear selector is mechanically locked in the P position (SHIFTLOCK)\
. To release the gear selector from this
position, the engine must be running (or the ignition key must be in po\
sition II) and the brake pedal must be depressed.
N (Neutral)
Neutral - no gear engaged. Use the parking brake.
WARNING!
Never leave the vehicle unattended when the engine is running. If, by mi\
stake, the gear selector is moved from P, the
vehicle may start moving.
R (Reverse)
Never engage R while the vehicle is moving.
D (Drive)
D is the normal driving position and should be used as often as possible \
to help improve fuel economy. The vehicle should
not be moving when shifting from R to the D position.
NOTE: The transmission has 6 forward speeds.
file:///K|/ownersdocs/2007/2007_XC90/07xc90_06.htm (11 of 32)12/30/200\
6 5:53:44 PM
Page 143 of 268

2007 Volvo XC90
l At a distance of approximately 1 foot (30 cm), the signal will become \
constant. If objects are close to both the front and
rear bumpers, the signal will alternate between the front and rear speak\
ers.
Deactivating the system(s)
- Press the Park assist button on the center console (see
page 52) to temporarily deactivate the system(s).
- The indicator light in the button will go out when the system(s) hav\
e been deactivated.
- If the vehicle is equipped with front and rear park assist, both syste\
ms will be deactivated by pressing the button.
Park assist will be automatically reactivated the next time the engine i\
s started.
NOTE: It may be necessary to deactivate one or both of the park assist system\
s in certain cases.
l Rear park assist: towing a trailer, carrying bicycles in a rear-mounted carrier, etc, co\
uld trigger the rear park assist
system's sensors.
l Front park assist: it may not be possible to combine auxiliary headlights and front park \
assist since these lights could
trigger the system's sensors.
pg. 133 Starting and driving
Front/rear park assist (accessory/option)
Faults in the system
If the yellow warning symbol illuminates and a message is shown in the i\
nformation display, the system is not
functioning properly. Consult a Volvo retailer or authorized service tec\
hnician.
Cleaning the sensors
For the system to function properly, the sensors in the front and/or rea\
r bumpers should be kept clean. They can be cleaned
with car washing detergent and a sponge.
WARNING!
These systems are designed to be a supplementary aid when parking the ve\
hicle. They are not, however, intended to
replace the driver's attention and judgement.
CAUTION!
In certain circumstances, the park assist system may give unexpected war\
ning signals that can be caused by external
sound sources that use the same ultrasound frequencies as the system. Th\
is may include such things as the horns of
other vehicles, wet tires on asphalt, pneumatic brakes, motorcycle exhau\
st pipes, etc. This does not indicate a fault in
the system.
pg. 134 Starting and driving
Towing
file:///K|/ownersdocs/2007/2007_XC90/07xc90_06.htm (19 of 32)12/30/200\
6 5:53:44 PM
Page 148 of 268

2007 Volvo XC90
watched when driving in hot climates or hilly terrain. Use a lower gear \
and turn off the air conditioner if the temperature
gauge needle enters the red range.
l If the automatic transmission begins to overheat, a message will be disp\
layed in the text window.
l Hauling a trailer affects handling, durability, and economy.
l It is necessary to balance trailer brakes with the towing vehicle brakes\
to provide a safe stop (check and observe state/
local regulations).
l Do not connect the trailer's brake system directly to the vehicle's brak\
e system.
l Remove the ball and drawbar assembly when the hitch is not being used.
l Volvo recommends the use of synthetic engine oil when towing a trailer o\
ver long distances or in mountainous areas.
NOTE:
l When parking the vehicle with a trailer on a hill, apply the parking bra\
ke before putting the gear selector in (P)ark.
When starting on a hill, put the gear selector in (D)rive before relea\
sing the parking brake. Always follow the trailer
manufacturer's recommendations for wheel chocking.
l If you use the manual (Geartronic) shift positions while towing a trai\
ler, make sure the gear you select does not put too
much strain on the engine (using too high a gear).
WARNING!
l Bumper-attached trailer hitches must not be used on Volvos, nor should s\
afety chains be attached to the bumper.
l Trailer hitches attaching to the vehicle rear axle must not be used.
l Never connect a trailer's hydraulic brake system directly to the vehicle\
brake system, nor a trailer's lighting system
directly to the vehicle lighting system. Consult your nearest authorized\
Volvo retailer for correct installation.
l When towing a trailer, the trailer's safety wire must be correctly faste\
ned to the hole or hook provided in the trailer
hitch on the vehicle. The safety wire should never be fastened to or wou\
nd around the drawbar ball.
pg. 139 Starting and driving
Towing a trailer
Smoother starts with a trailer
Models equipped with the V8-engine and the 6-speed automatic transmissio\
n have a built-in function that reduces
acceleration slightly in first gear when the vehicle is towing a trailer\
. This is done to help avoid wheel spin and to make
starting off smoother.
l This function is activated when the trailer's electrical connector is pl\
ugged into the electrical socket mounted near the
trailer hitch.
l The function is automatically deactivated when the trailer's wiring is d\
isconnected from the socket. The vehicle will
then accelerate normally.
NOTE: Since this function is activated when a connector is plugged into the e\
lectrical socket near the trailer hitch, it will
be activated by any electrical equipment (e.g. bicycle racks with light\
ing, etc) that is plugged in, and will remain active
until the equipment is unplugged from the socket.
Leveling
If your vehicle is equipped with automatic leveling, the rear suspension\
always retains the correct ride height regardless of
the load.
l The system adjusts the rear suspension to the correct level after the ve\
hicle has been driven a short distance.
file:///K|/ownersdocs/2007/2007_XC90/07xc90_06.htm (24 of 32)12/30/200\
6 5:53:44 PM
Page 177 of 268

2007 Volvo XC90
WARNING!
The undersides of accessory running boards are not intended for attachin\
g the
jack.
Changing a wheel
- Park the vehicle on a firm, level, non-slippery surface.
- Engage the parking brake and put the gear selector in the Park positio\
n.
- Loosen the wheel bolts by exerting downward pressure on the lug wrench\
.
- Remove the wheel cap (where applicable) using the lug wrench in the \
tool bag.
pg. 169 Wheels and tires
Changing wheels
- With the wheels still on the ground, use the lug wrench to loosen the \
wheel bolts 1/2 - 1 turn. Turn the
bolts counterclockwise to loosen the bolts.
CAUTION!
- The vehicle must not be driven with wheels of different dimensions or \
with a spare tire other than
the one that came with the vehicle. The use of different size wheels can\
seriously damage your
vehicle's transmission.
- Correct tightening torque on wheel bolts must be observed.
- The wheel bolts should never be greased or lubricated.
- Extended, chromed wheel bolts must not be used with steel rims, as the\
y make it impossible to fit
the hub caps.
pg. 170 Wheels and tires
Changing wheels
file:///K|/ownersdocs/2007/2007_XC90/07xc90_07.htm (21 of 23)12/30/200\
6 5:53:47 PM
Page 179 of 268

2007 Volvo XC90
WARNING!
l The jack must correctly engage the bar in the jack attachment. The vehic\
le's weight must not rest
on the jack attachment. See illustration "Attaching the jack" on the pre\
vious page.
l Be sure the jack is on a firm, level, non-slippery surface.
l Never allow any part of your body to be extended under a vehicle support\
ed by a jack.
l Use the jack intended for the vehicle when replacing a wheel. For any ot\
her job, use stands to
support the side of the vehicle being worked on.
l Apply the parking brake and put the gear selector in the (P)ark position.
l Block the wheels standing on the ground, use rigid wooden blocks or larg\
e stones.
l The jack should be kept well-greased.
pg. 172 Wheels and tires
This page left intentionally blank.
Contents | Top of Page
file:///K|/ownersdocs/2007/2007_XC90/07xc90_07.htm (23 of 23)12/30/200\
6 5:53:47 PM
Page 211 of 268

2007 Volvo XC90
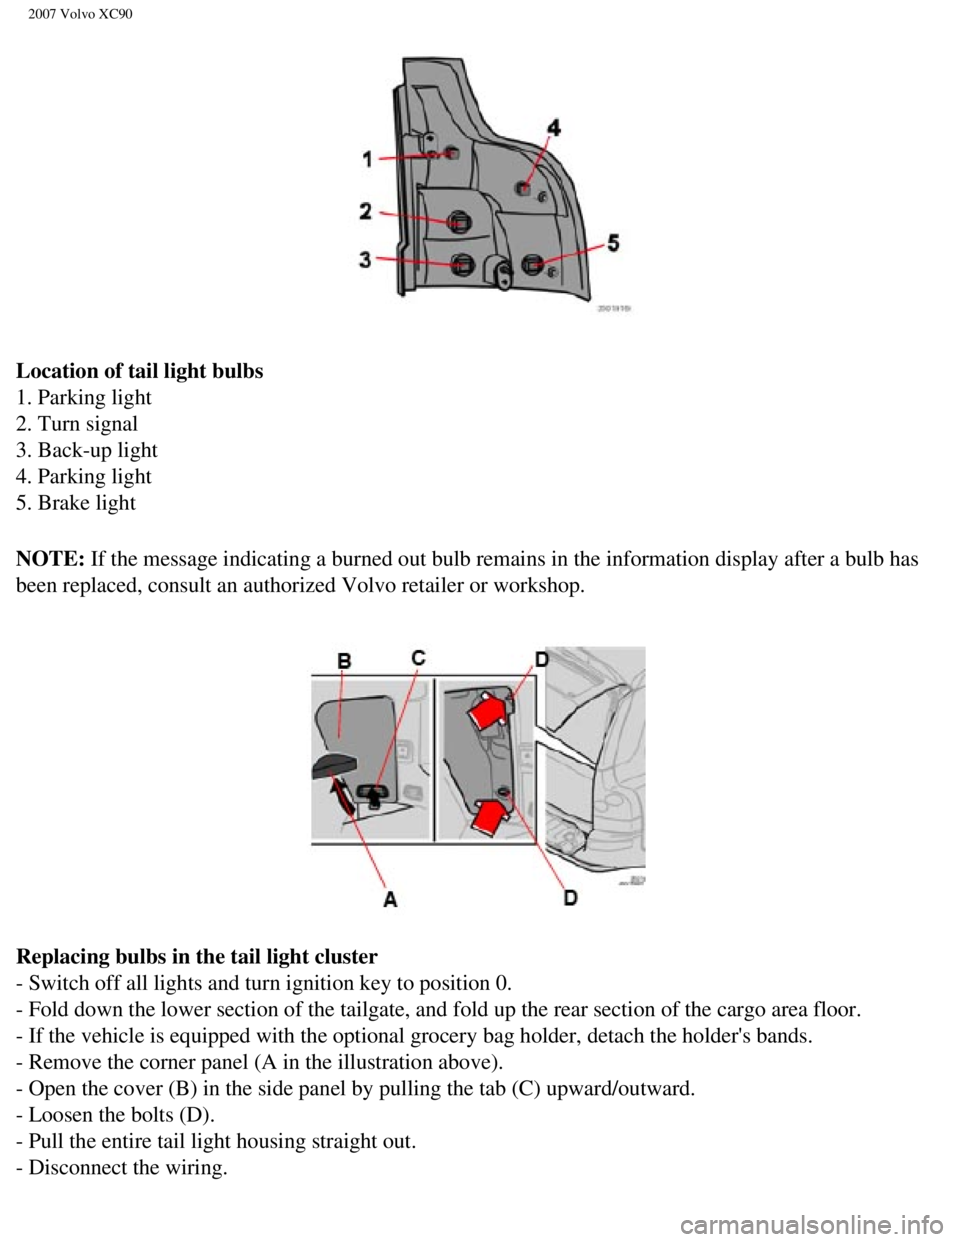
Location of tail light bulbs
1. Parking light
2. Turn signal
3. Back-up light
4. Parking light
5. Brake light
NOTE: If the message indicating a burned out bulb remains in the information \
display after a bulb has
been replaced, consult an authorized Volvo retailer or workshop.
Replacing bulbs in the tail light cluster
- Switch off all lights and turn ignition key to position 0.
- Fold down the lower section of the tailgate, and fold up the rear sect\
ion of the cargo area floor.
- If the vehicle is equipped with the optional grocery bag holder, detac\
h the holder's bands.
- Remove the corner panel (A in the illustration above).
- Open the cover (B) in the side panel by pulling the tab (C) upward\
/outward.
- Loosen the bolts (D).
- Pull the entire tail light housing straight out.
- Disconnect the wiring.
file:///K|/ownersdocs/2007/2007_XC90/07xc90_09.htm (25 of 37)12/30/200\
6 5:53:50 PM
Page 212 of 268

2007 Volvo XC90
- Place the tail light housing on a soft cloth to avoid scratching the l\
ens.
- Turn the lamp holder(s) counterclockwise and pull out.
- Turn signal, back-up light, brake light bulbs: Turn the bulb countercl\
ockwise and remove it.
- Parking light bulbs: Pull the bulb straight out.
- Insert a new bulb.
- Place the lamp holder in the groove and turn clockwise.
- Press wiring back into place.
- Align the tail light housing with the holes for the retaining bolts an\
d press it into place.
- Tighten the retaining bolts.
- Reinsert the side and corner panels.
pg. 199 Maintenance
Replacing bulbs
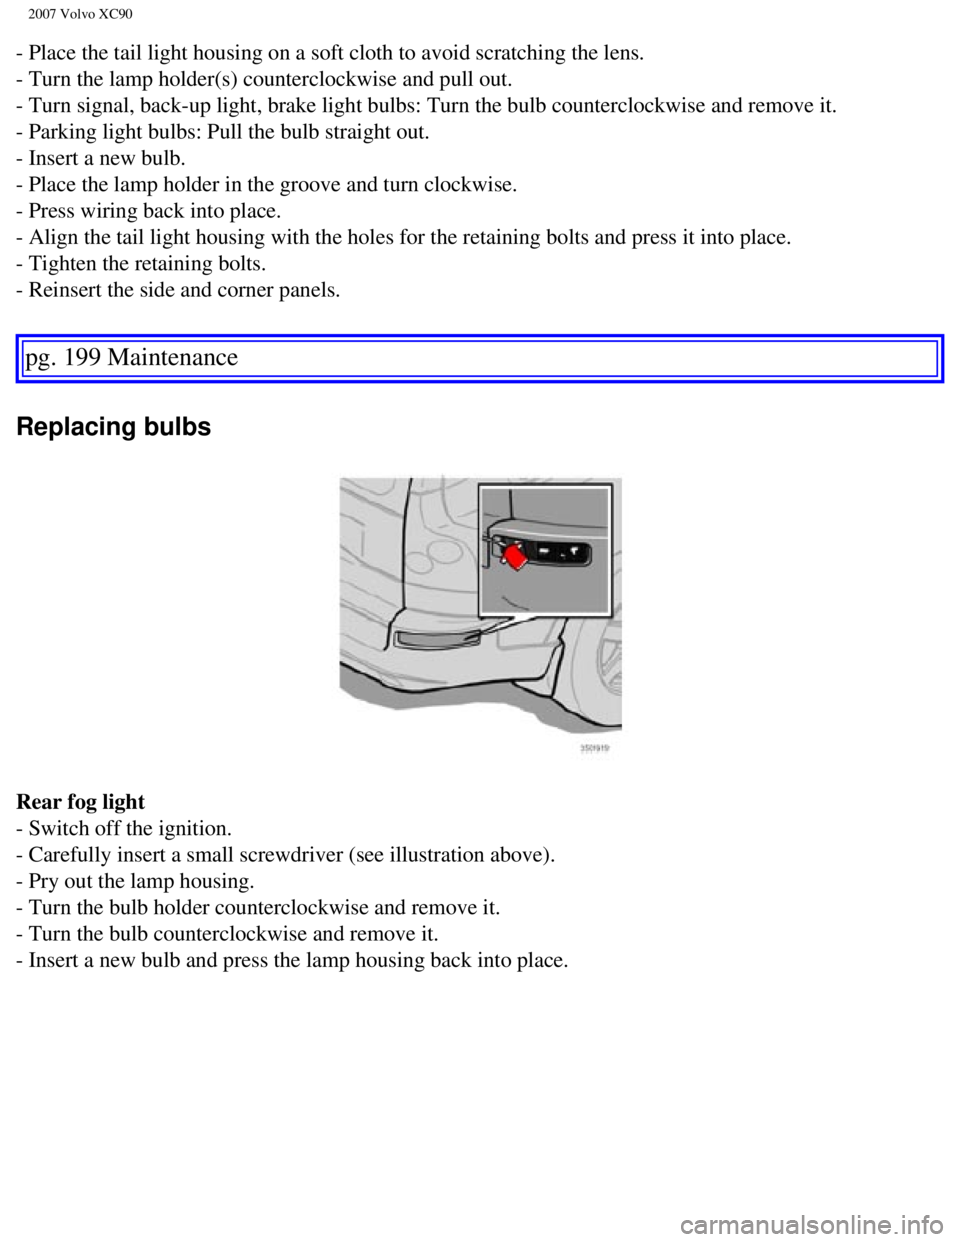
Rear fog light
- Switch off the ignition.
- Carefully insert a small screwdriver (see illustration above).
- Pry out the lamp housing.
- Turn the bulb holder counterclockwise and remove it.
- Turn the bulb counterclockwise and remove it.
- Insert a new bulb and press the lamp housing back into place.
file:///K|/ownersdocs/2007/2007_XC90/07xc90_09.htm (26 of 37)12/30/200\
6 5:53:50 PM
Page 221 of 268

2007 Volvo XC90
Fuses in the cargo compartment
The fuses in the cargo area are located behind the panel on the driver's\
side of the cargo compartment.
When replacing a blown fuse, be sure to replace it with a new one of the\
same color and amperage
(written on the fuse). No. Amperage
1. Backup lights 10
2. Parking lights, foglights, cargo compartment lighting, license plate \
lights, brake light
diodes 20
3. Accessories 15
4. -
5. Rear Electronic module 10
6. Rear Seat Entertainment (accessory) 7.5
7. Trailer wiring (30-feed) 15
8. 12-volt socket in cargo compartment 15
9. Rear passenger's side door - power window, power window cutout functi\
on 20
10. Rear driver's side door - power window, power window cutout function\
20
11. -
12. -
13. -
14. Subwoofer (option), rear air conditioning system (option) 15
15. -
file:///K|/ownersdocs/2007/2007_XC90/07xc90_09.htm (35 of 37)12/30/200\
6 5:53:51 PM