Page 216 of 251
NOTE
A certain amount of air seepage from the tires occurs naturally and tire pressure fluctuates with seasonal changes in
temperature. Always check tire pressure regularly.
222 06 Maintenance and specifications
Wheels and tires
Tire inflation pressure table - Canadian models
The following tire pressures are recommended by Volvo for your vehicle. Refer to the tire inflation placard for
information specific to the tires installed on your vehicle at the factory.
NOTE
A certain amount of air seepage from the tires occurs naturally and tire pressure fluctuates with seasonal changes in
temperature. Always check tire pressure regularly.
223 06 Maintenance and specifications
Wheels and tires
ProCarManuals.com
Page 218 of 251

NOTE
TPMS indicates low tire pressure but does not replace normal tire maintenance. For information on correct tire
pressure, please refer to the tables beginning on page 221
, or consult your Volvo retailer.
The tire pressure warning light will not identify which tire is under-inflated. Be sure to check all four tires.
A certain amount of air seepage from the tires occurs naturally and tire pressure fluctuates with seasonal changes
in temperature. Always check tire pressure regularly.
Erasing warning messages
When a low tire pressure warning message has been displayed, and the tire pressure warning light has come on:
1. Use a tire pressure gauge to check the inflation pressure of all four tires.
2. Re-inflate the tire(s) to the correct pressure (consult the tire pressure placard or the tables beginning on page 221
).
3. In certain cases, it may be necessary to drive the vehicle for several minutes at a speed of 20 mph (30 km/h) or
faster. This will erase the warning text and the warning light will go out.
WARNING
Incorrect inflation pressure could lead to tire failure, resulting in a loss of control of the vehicle.
Changing wheels with TPMS
Please note the following when changing or replacing the factory installed TPMS wheels/tires on the vehicle:
Only the factory-mounted wheels are equipped with TPMS sensors in the valves.
If the vehicle is equipped with a temporary spare tire, this tire does not have a TPMS sensor.
If wheels without TPMS sensors are mounted on the vehicle, TIRE PRESS SYST SERVICE REQUIRED will be
displayed each time the vehicle is driven above 25 mph (40 km/h) for 10 minutes or more.
Once TPMS sensors are properly installed, the warning message should not reappear. If the message is still
displayed, drive the vehicle for several minutes at a speed of 20 mph (30 km/h) or faster to erase the message.
Volvo recommends that TPMS sensors be fitted on all wheels used on the vehicle. Volvo does not recommend
moving sensors back and forth between sets of wheels.
NOTE
If you change to tires with a different recommended inflation pressure, the TPMS system must be recalibrated to
these tires. This must be done by an authorized Volvo retailer or workshop.
If a tire is changed, or if the TPMS sensor is moved to another wheel, the sensor's seal, nut, and valve core should
be replaced.
When installing TPMS sensors, the vehicle must be parked for at least 15 minutes with the ignition off. if the
vehicle is driven within 15 minutes, a TPMS error message will be displayed.
CAUTION
When inflating tires with TPMS valves, press the pump's mouthpiece straight onto the valve to help avoid bending or
otherwise damaging the valve.
225 06 Maintenance and specifications
Wheels and tires
ProCarManuals.com
Page 227 of 251

Changing a tire:
1. Apply the parking brake.
2. Put the gear selector in P.
3. Block the wheels that are on the ground with wooden blocks or large stones.
4. Remove the wheel cover (where applicable) using the lug wrench in the tool bag.With the vehicle still on the
ground, use the lug wrench to loosen the wheel nuts 1/2-1 turns by exerting downward pressure.
5. Turn the nuts counterclockwise to loosen.
235 06 Maintenance and specifications
Wheels and tires
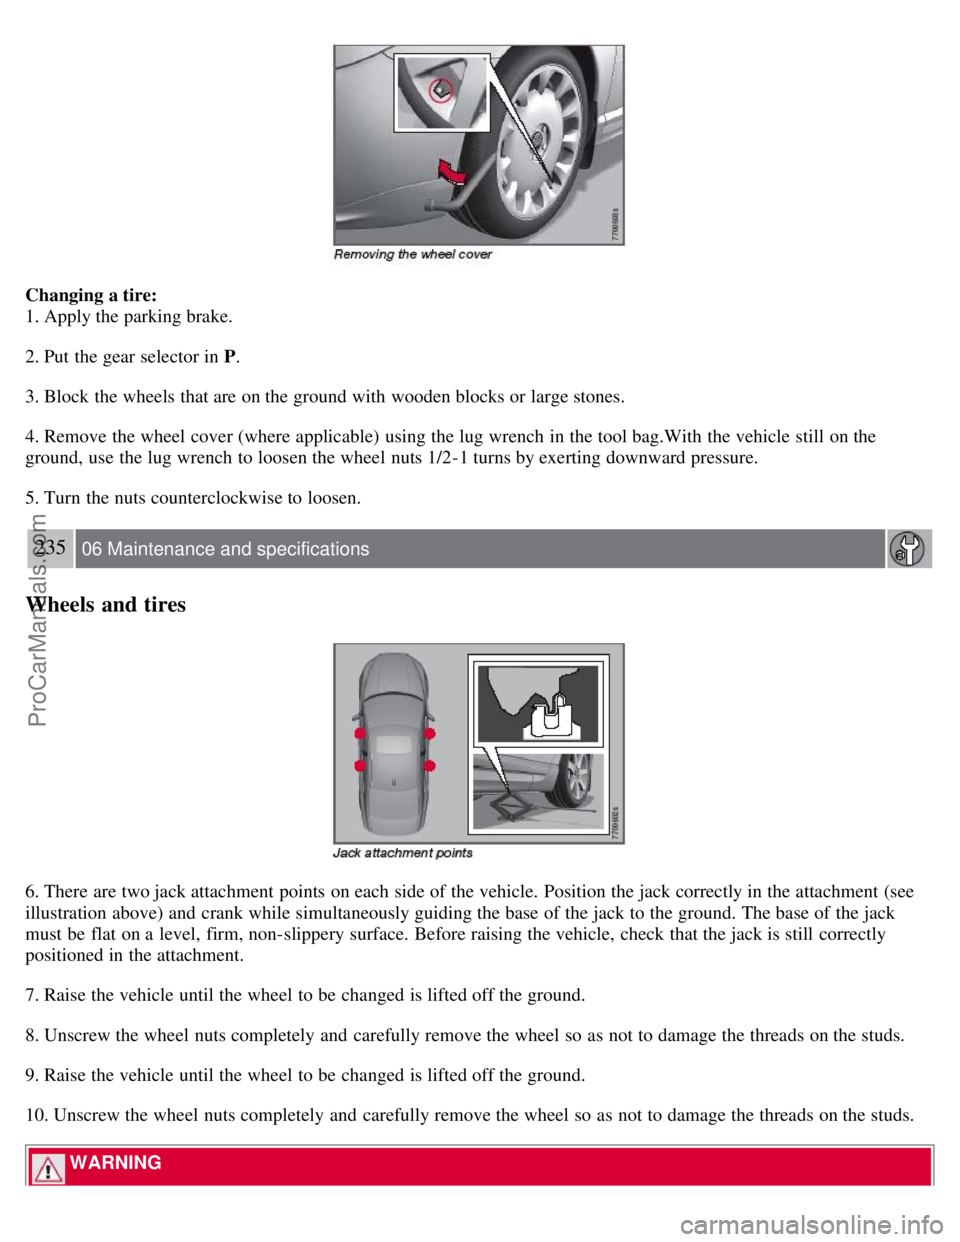
6. There are two jack attachment points on each side of the vehicle. Position the jack correctly in the attachment (see
illustration above) and crank while simultaneously guiding the base of the jack to the ground. The base of the jack
must be flat on a level, firm, non-slippery surface. Before raising the vehicle, check that the jack is still correctly
positioned in the attachment.
7. Raise the vehicle until the wheel to be changed is lifted off the ground.
8. Unscrew the wheel nuts completely and carefully remove the wheel so as not to damage the threads on the studs.
9. Raise the vehicle until the wheel to be changed is lifted off the ground.
10. Unscrew the wheel nuts completely and carefully remove the wheel so as not to damage the threads on the studs.
WARNING
ProCarManuals.com
Page 240 of 251
2 0 0 7
VOLVO S80
252 Index
Numerics
12-volt sockets 160, 161
A
Accessory installation warning7
Active Bi -Xenon headlights85
Active chassis system141
Active yaw control139
Adaptive cruise control144-148
Air conditioning122
Air distribution119
Air distribution table124
Air vents120
Airbags
disconnecting the front passenger's side21-23
front18-20
inflatable curtain25
side impact24
Alarm system62-64
All wheel drive106
Anti-freeze172, 196
Anti-lock brake system107
warning light71
Approach lighting50, 89
Audio system
audio functions127
CD player/changer128, 129
menu control126
overview125
radio functions130
Sirius satellite radio132-135
sound settings127
steering wheel keypad125
Auto-dim rearview mirror95
Automatic locking59
Automatic locking retractor31
ProCarManuals.com