2007 VOLVO S40 parking brake
[x] Cancel search: parking brakePage 2 of 208

In Canada: Volvo Cars of Canada Corp.
National Customer Service
175 Gordon Baker Road
North York, Ontario M2H 2N7
1-800-663-8255
www.volvocanada.com
2006 © Volvo Car Corporation. All rights reserved.
2 Contents
00 Introduction
General information 6
Volvo and the environment7
Important warnings9
01 Safety
Occupant safety 12
Seat belts14
Supplemental Restraint System17
Front airbags18
Occupant Weight Sensor (OWS)21
Side impact protection airbags24
Volvo Inflatable Curtain (VIC)25
Whiplash Protection System27
Crash mode29
Child safety30
Child restraint systems33
Infant seats35
Convertible seats37
Booster cushions40
ISOFIX lower anchors41
Top tether anchors42
02 Instrument and controls
Instrument overview 46
Instrument panel49
Indicator and warning symbols51
Symbols - instrument panel52
Information display55
Center console controls57
Lighting panel58
Left-side steering wheel lever60
Trip computer61
Cruise control63
Right-side steering wheel lever64
Rain sensor65
Steering wheel adjustment, Hazard
warning flashers66
Parking brake
67
Power windows68
Mirrors70
Power moonroof (option)72
ProCarManuals.com
Page 40 of 208

2 0 0 7
VOLVO S40
44 02 Instruments and controls
Instrument overview 46
Instrument panel49
Indicator and warning symbols51
Symbols - instrument panel52
Information display55
Center console controls57
Lighting panel58
Left-side steering wheel lever60
Trip computer61
Cruise control63
Right-side steering wheel lever64
Rain sensor65
Steering wheel adjustment, Hazard warning flashers66
Parking brake67
Power windows68
Mirrors70
Power moonroof (option)72
Personal settings74
Home Link® Universal Transceiver (option)76
45 02 Instruments and controls
46 02 Instruments and controls
Instrument overview
ProCarManuals.com
Page 42 of 208

22. Rear-view mirror70
23. Display for climate control, personal settings, and audio system74/210
24. Audio system 210
25. Controls for personal settings and audio system74/210
26. Controls for climate system 85/87
27. Gear selector, manual 133-134
Gear selector, automatic135
28. Hazard warning flashers66
29. Door open handle, and locking button115
30. Glove compartment100/116
31. Parking brake 67
32. 12-volt socket57
33. Not in use
34. Not in use
48 02 Instruments and controls
Instrument overview
Control panel in driver's door
1. Lockout switch for rear windows68
2. Power windows68
3. Door mirror button, driver's side71
4. Door mirror adjustment control71
5. Door mirror button, passenger's side71
49 02 Instruments and controls
Instrument panel
Instrument panel
ProCarManuals.com
Page 44 of 208

12. High beam indicator
13. Clock setting button - Turn the button to set the time.
14. Temperature gauge - The gauge indicates the temperature of the engine cooling system. If the temperature is
abnormally high and the needle enters the red zone, a message is shown in the display. Bear in mind that auxiliary
lamps in front of the air intake reduce the cooling capacity at high outside temperatures and high engine loads.
15. Indicator and warning symbols
51 02 Instruments and controls
Indicator and warning symbols
Function check
The indicator and warning symbols
1 light up when you turn the ignition key or the optional keyless drive start control
to the driving position (position II) before starting. This shows that the symbols are functioning.
When the engine starts, all symbols go out. If the engine is not started within 5 seconds, all of the symbols except
CHECK ENGINE and will go out. Certain symbols may not have their functions illustrated, depending on the car's
equipment.
The PARK BRAKE symbol will not go out until the parking brake has been released.
1On certain engines, the symbol for low oil pressure is not used. Instead, a text warning is provided in the information display, see also page 190.
Symbols in the center of the instrument panel
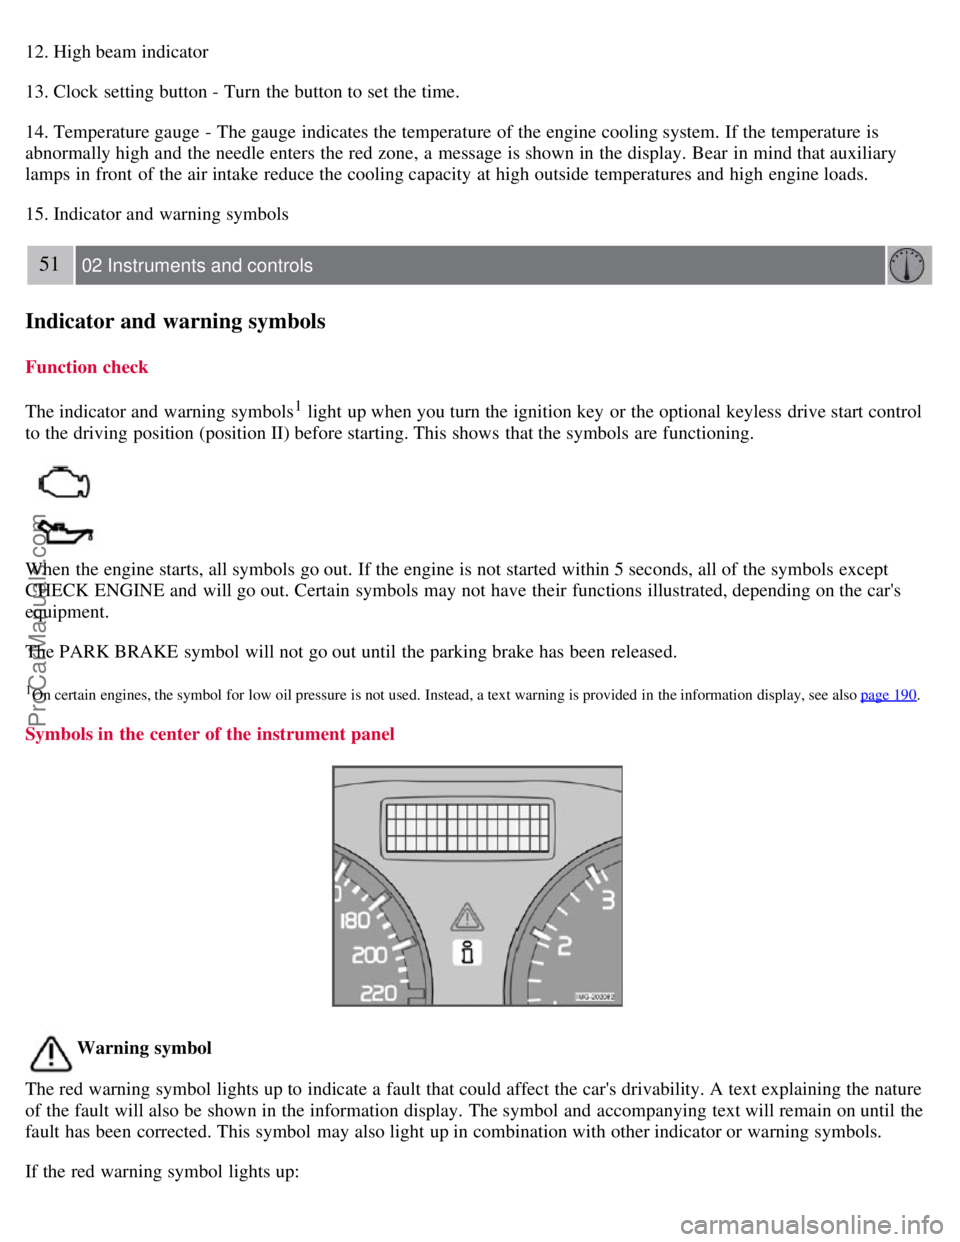
Warning symbol
The red warning symbol lights up to indicate a fault that could affect the car's drivability. A text explaining the nature
of the fault will also be shown in the information display. The symbol and accompanying text will remain on until the
fault has been corrected. This symbol may also light up in combination with other indicator or warning symbols.
If the red warning symbol lights up:
ProCarManuals.com
Page 47 of 208

1. Turn signal indicator for trailer (certain models)
If you are towing a trailer, this light will flash simultaneously with the turn signals on the trailer. If the light does not
flash when signaling, one of the turn signals on the trailer or on the car are not functioning properly.
2. Parking brake applied
This light is on when the parking brake (hand brake) is applied. The parking brake lever is situated between the front
seats. See page 67
for more information.
NOTE
Canadian models are equipped with the second symbol.
3. SRS system warning light
If this light comes on while the car is being driven, or remains on for longer than approximately 10 seconds after the
car has been started, the SRS system's diagnostic functions have detected a fault in a seat belt lock or tensioner, a front
airbag, side impact airbag, and/or an inflatable curtain. Have the system(s) inspected by a trained and qualified Volvo
service technician as soon as possible.
4. Oil pressure warning light
1
If the light comes on while driving the car, stop the engine immediately, and check the engine oil level. If the oil level
is normal and the light stays on after restart, have the car towed to the nearest authorized Volvo retailer. After hard
driving, the light may come on occasionally when the engine is idling. This is normal, provided it goes off when the
engine speed is increased.
5. Seat belt reminder
This symbol (and the seat belt reminder light above the rear view mirror) will light up if either front seat occupant has
not buckled his/her seat belt. If the car is not moving, the symbols will go out after approximately 6 seconds.
ProCarManuals.com
Page 61 of 208

NOTE
Regulations regarding the use of the hazard warning flasher may vary, depending on where you live.
67 02 Instruments and controls
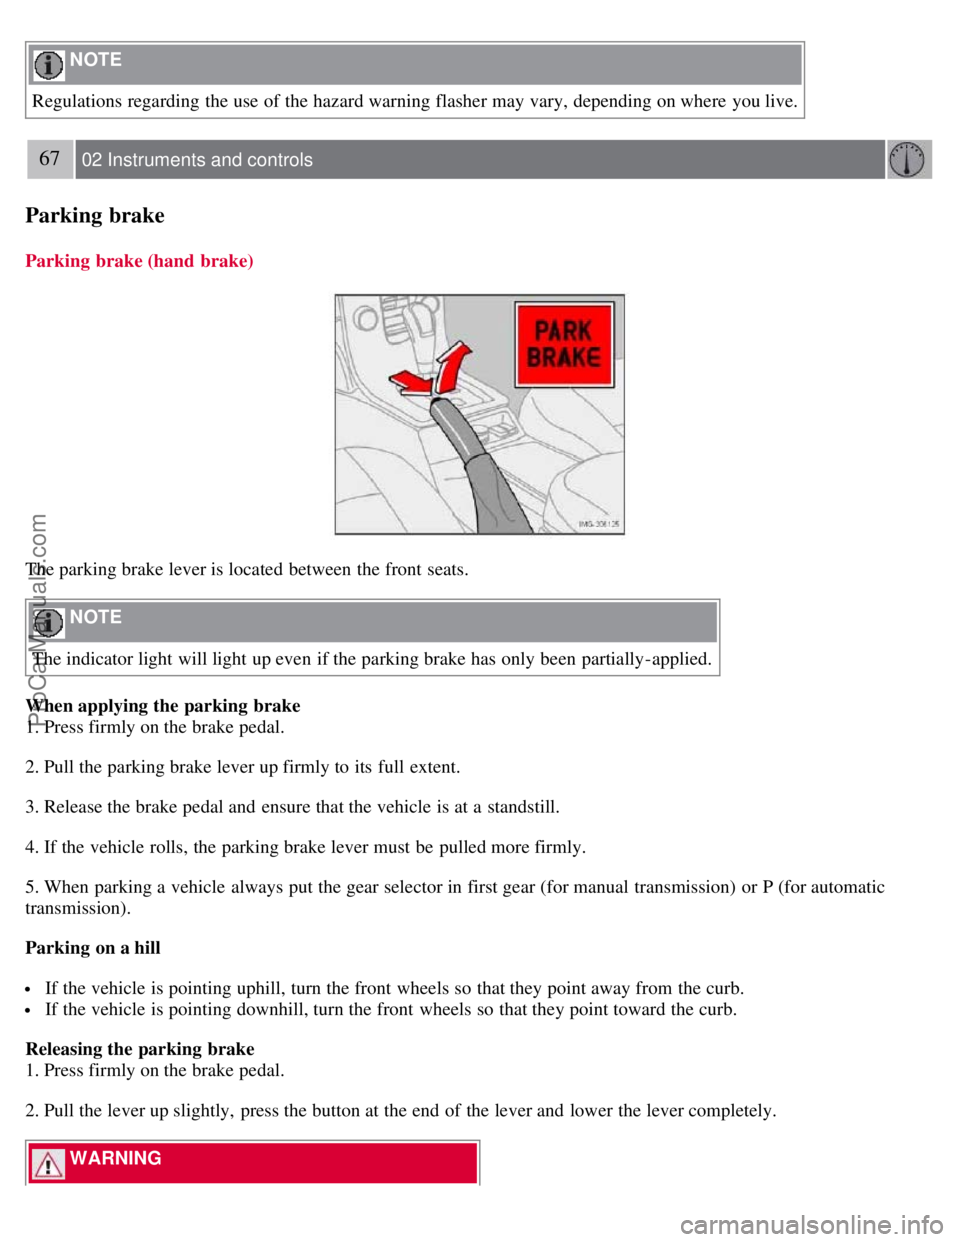
Parking brake
Parking brake (hand brake)
The parking brake lever is located between the front seats.
NOTE
The indicator light will light up even if the parking brake has only been partially-applied.
When applying the parking brake
1. Press firmly on the brake pedal.
2. Pull the parking brake lever up firmly to its full extent.
3. Release the brake pedal and ensure that the vehicle is at a standstill.
4. If the vehicle rolls, the parking brake lever must be pulled more firmly.
5. When parking a vehicle always put the gear selector in first gear (for manual transmission) or P (for automatic
transmission).
Parking on a hill
If the vehicle is pointing uphill, turn the front wheels so that they point away from the curb.
If the vehicle is pointing downhill, turn the front wheels so that they point toward the curb.
Releasing the parking brake
1. Press firmly on the brake pedal.
2. Pull the lever up slightly, press the button at the end of the lever and lower the lever completely.
WARNING
ProCarManuals.com
Page 62 of 208

Pull up the parking brake lever up firmly to its full extent.
Ashtrays/cigarette lighter
The auxiliary sockets can also be used for cigarette lighters. Ashtrays and lighters are available as accessories. Please
contact your Volvo retailer.
68 02 Instruments and controls
Power windows
Operation
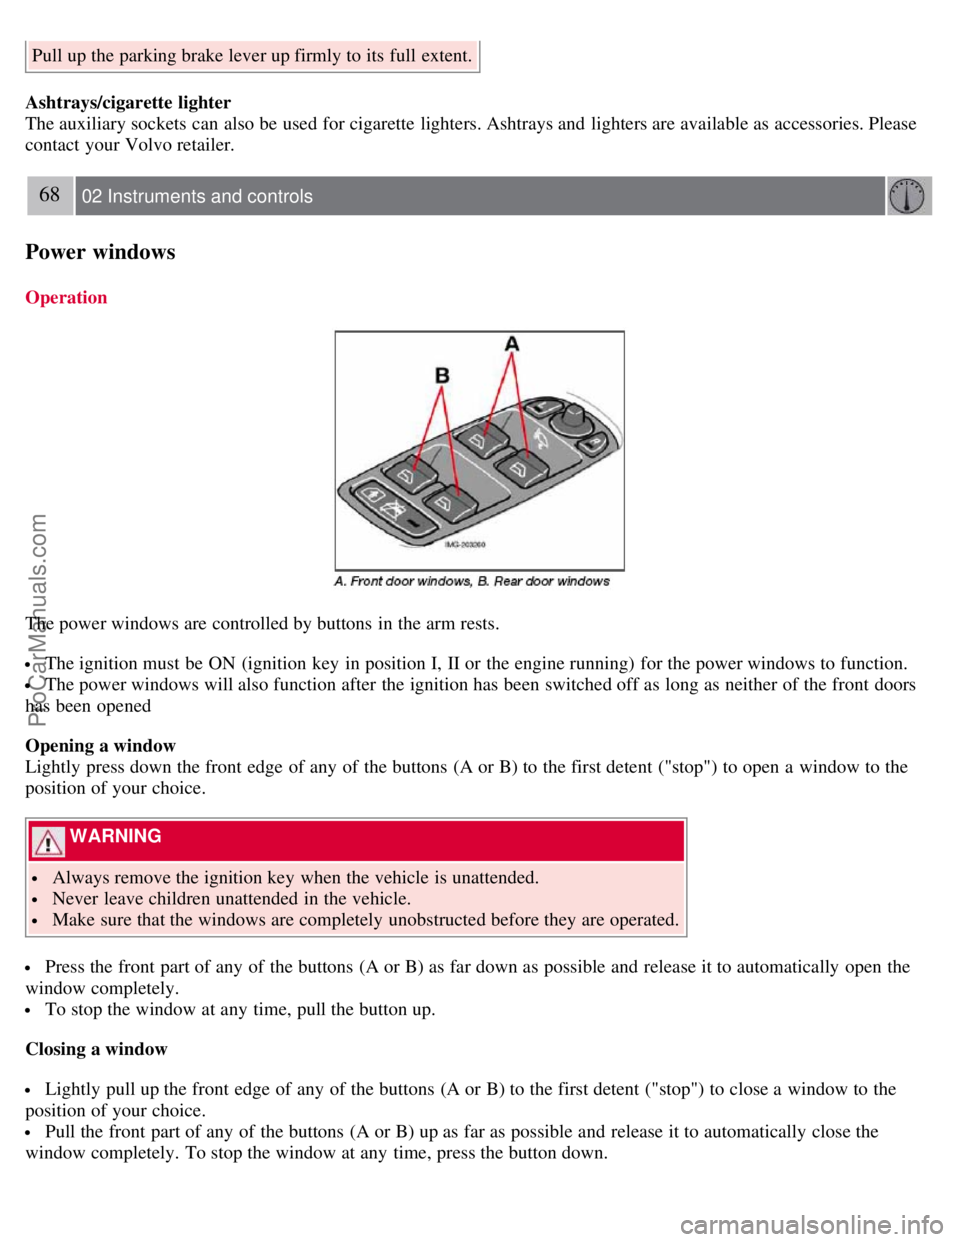
The power windows are controlled by buttons in the arm rests.
The ignition must be ON (ignition key in position I, II or the engine running) for the power windows to function.
The power windows will also function after the ignition has been switched off as long as neither of the front doors
has been opened
Opening a window
Lightly press down the front edge of any of the buttons (A or B) to the first detent ("stop") to open a window to the
position of your choice.
WARNING
Always remove the ignition key when the vehicle is unattended.
Never leave children unattended in the vehicle.
Make sure that the windows are completely unobstructed before they are operated.
Press the front part of any of the buttons (A or B) as far down as possible and release it to automatically open the
window completely.
To stop the window at any time, pull the button up.
Closing a window
Lightly pull up the front edge of any of the buttons (A or B) to the first detent ("stop") to close a window to the
position of your choice.
Pull the front part of any of the buttons (A or B) up as far as possible and release it to automatically close the
window completely. To stop the window at any time, press the button down.
ProCarManuals.com
Page 118 of 208

Never switch off the ignition (turn the ignition key or start control to position 0) or remove the key or start control
from the ignition switch while the vehicle is in motion. This could cause the steering wheel to lock, which would
make the vehicle impossible to steer.
To start the engine
1. Fasten the seat belt.
WARNING
Before starting, check that the seat, steering wheel and mirrors are adjusted properly. Make sure the brake pedal can
be depressed completely. Adjust the seat if necessary.
2. Apply the parking brake if not already set. The gear selector should be locked in the Park ( P) position (Shiftlock).
See also page 138
.
Manual transmission : the clutch must be fully depressed.
3. The vehicle is equipped with an autostart feature. Without touching the throttle pedal, turn the key to position III
and release it. The starter motor will then operate automatically (for up to ten seconds) until the engine starts. If the
engine fails to start, repeat this step.
NOTE
After a cold start, idle speed may be noticeably higher than normal for a short period. This is done to help bring
components in the emission control system to their normal operating temperature as quickly as possible, which
enables them to control emissions and help reduce the vehicle's impact on the environment.
4. To release the gear selector from the Park ( P) position, the engine must be running (or the ignition key must be in
position II) and the brake pedal must be depressed.
5. Select the desired gear. On models with an automatic transmission, the gear engages after a very slight delay which
is especially noticeable when selecting R.
130 06 Starting and driving
Starting the vehicle
NOTE
Immobilizer : If two of the keys to your vehicle are close together, e.g., on the same key ring when you try to start
the vehicle, this could cause interference in the immobilizer system and result in the vehicle not starting. If this
should occur, remove one of the keys from the key ring before trying to start the vehicle again.
Keylock: Models equipped an automatic transmission have a keylock system. When the engine is switched off, the
gear selector must be in the Park ( P) position before the key can be removed from the ignition switch
1.
When starting in cold weather, the transmission may shift up at slightly higher engine speeds than normal until the
automatic transmission fluid reaches normal operating temperature.
Do not race a cold engine immediately after starting. Oil flow may not reach some lubrication points fast enough
to prevent engine damage.
1 The optional keyless drive start control does not need to be removed from the ignition switch.
ProCarManuals.com