2007 VOLVO S40 alarm
[x] Cancel search: alarmPage 3 of 208

Personal settings74
Home Link® Universal
Transceiver (option)76
3 Contents
03 Climate
General information
82
Air vents84
Manual climate control85
Electronic Climate Control (ECC) -
option87
Air distribution
90
04 Interior
Front seats94
Interior lighting97
Storage compartments99
Rear seat101
Trunk103
05 Locks and alarm
Remote control and key blade 106
Valet locking110
Keyless drive (option as
available)112
Locking and unlocking
115
Locking the glove compartment,
Child safety locks116
Alarm
117
4 Contents
06 Starting and driving
General information122
Fuel requirements125
Starting the vehicle129
Starting the car with keyless drive
(option as available)131
Manual transmission, 5-speed
133
Manual transmission, 6-speed134
Automatic transmission135
Shiftlock override138
All Wheel Drive (option)139
Brake system140
Stability system142
Towing144
Jump starting146
Towing a trailer147
Detachable trailer hitch149
Transporting loads150
07 Wheel and tires
General information154
Tire inflation156
Tire designations160
Glossary of tire terminology162
Vehicle loading163
Uniform tire quality gradings165
Snow chains, snow tires, studded
tires166
Temporary spare
167
Wheel nuts168
Tire rotation169
Changing a wheel170
08 Car care
Washing and cleaning the car176
Paint touch up180
5 Contents
ProCarManuals.com
Page 41 of 208

47 02 Instruments and controls
Instrument overview
1. Steering wheel adjustment66
2. Hood opener187
3. Controls in front doors(see inset illustration at next page)
4. Left steering wheel lever60
5. Lighting panel58
6. Door open handle and locking button115
7. Climate system air vent84
8. Side window air vent84
9. Cruise control63
10. Horn, airbag18
11. Main instrument panel49
12. Audio controls (option)211
13. Right steering wheel lever64
14. Ignition switch128
15. Moonroof control (option)72
16. Not in use
17. Movement detector (option), alarm sensor118
18. Courtesy lighting switch97
19. Driver's side reading light97
20. Passenger's side reading light97
21. Seat belt reminder53
ProCarManuals.com
Page 92 of 208

Packages on the rear parcel shelf can obscure vision and may become dangerous projectiles in the event of a
sudden stop or an accident.
Glove compartment
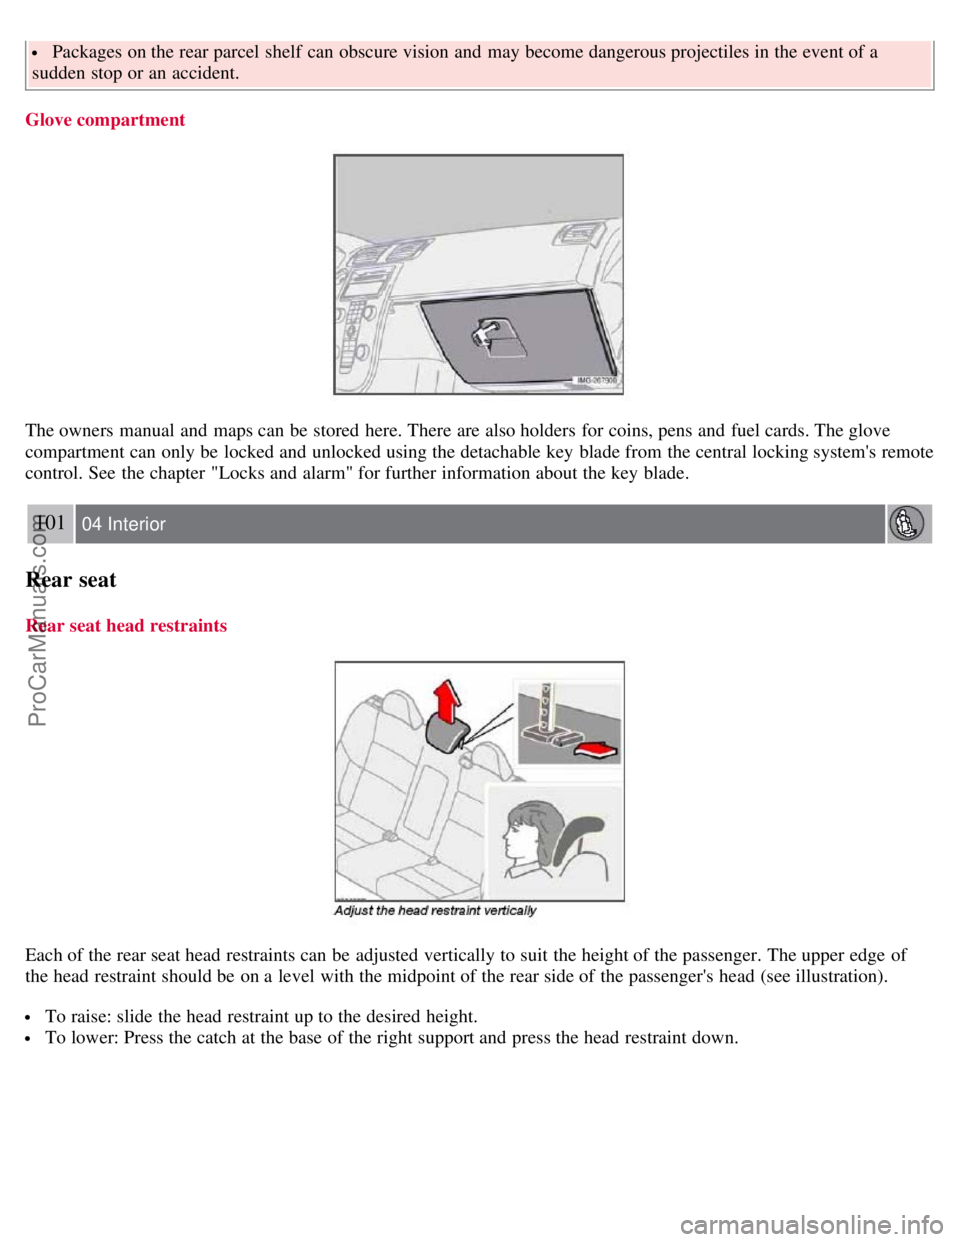
The owners manual and maps can be stored here. There are also holders for coins, pens and fuel cards. The glove
compartment can only be locked and unlocked using the detachable key blade from the central locking system's remote
control. See the chapter "Locks and alarm" for further information about the key blade.
101 04 Interior
Rear seat
Rear seat head restraints
Each of the rear seat head restraints can be adjusted vertically to suit the height of the passenger. The upper edge of
the head restraint should be on a level with the midpoint of the rear side of the passenger's head (see illustration).
To raise: slide the head restraint up to the desired height.
To lower: Press the catch at the base of the right support and press the head restraint down.
ProCarManuals.com
Page 95 of 208

2 0 0 7
VOLVO S40
104 05 Locks and alarm
Remote control and key blade 106
Valet locking110
Keyless drive (option as available)112
Locking and unlocking115
Locking the glove compartment, Child safety locks116
Alarm117
105 05 Locks and alarm
106 05 Locks and alarm
Remote control and key blade
Remote controls
Two remote controls that also function as ignition keys are provided with your car. The remote controls contain
detachable metal key blades for manually locking or unlocking the driver's door and the glove compartment.
USA - FCC ID: LTQVO315TX
This device complies with part 15 of the FCC rules. Operation is subject to the following conditions: (1) This device
may not cause harmful interference, and (2) this device must accept any interference received, including interference
that may cause undesired operation.
Canada - IC: 3659AVO315TX
Operation is subject to the following conditions: (1) this device may not cause interference, and (2) this device must
accept any interference, including interference that may cause undesired operation of the device.
Loss of a remote control
ProCarManuals.com
Page 96 of 208

If either of the remote controls is lost, the other must be taken with the car to a Volvo retailer. As an anti-theft
measure, the code of the lost remote control must be erased from the system.
Each key blade has a unique code, which is used if new key blades are required. A maximum of six remote
controls/key blades can be programmed and used for one car.
Immobilizer (start inhibitor)
Each of the keys supplied with your car contains a coded transponder. The code in the key is transmitted to an antenna
in the ignition switch where it is compared to the code stored in the start inhibitor module. The car will start only with
a properly coded key. If you misplace a key, take the other keys to an authorized Volvo retailer for reprogramming as
an antitheft measure.USA - FCC ID: LTQWFS 125VO
This device complies with part 15 of the FCC rules. Operation is subject to the following condition: (1) This device
may not cause harmful interference, and (2) this device must accept any interference received, including interference
that may cause undesired operation.
Canada - IC: 3659A-WFS125VO
Operation is subject to the following conditions: (1) this device may not cause interference, and (2) this device must
accept any interference, including interference that may cause undesired operation of the device.
CAUTION
Never use force on the narrow section of the remote control - this is where the transponder is located. The car cannot
be started if the transponder is damaged.
107 05 Locks and alarm
Remote control and key blade
Remote control functions
1. Lock - Press the Lock button on the remote once to lock all doors and the trunk. The turn signals will flash once to
confirm locking.
NOTE
ProCarManuals.com
Page 97 of 208

The car can also be locked if a door is open (does not apply to vehicles with the optional keyless drive.
2. Unlock - Press the Unlock button on the remote once to unlock the driver's door. The turn signals will flash twice to
confirm unlocking.
After a short pause, press the Unlock button a second time within 10 seconds to unlock the other doors and the trunk.
A long press (at least 2 seconds) opens all side windows.
NOTE
The turn signals flash to confirm that the vehicle has been correctly locked/unlocked with the remote control or
the optional keyless drive. When locking the vehicle, the turn signals will flash a confirmation only if all the doors
are securely closed and locked. Flashing confirmation for locking and unlocking may be customized in the vehicle's
Personal settings menu. See page 74
for more information.
The two-step unlocking function can be changed so that one press of the Unlock button unlocks all of the doors
and the trunk. See Personal settings on page 74
for more information.
Automatic relocking: If the doors are unlocked, the locks will automatically reengage (re-lock) and the alarm will
rearm after 2 minutes unless a door or the trunk has been opened.
Automatic locking : When the car starts to move, the doors and trunk can be locked automatically. This feature can
be turned on or off, see Personal settings on page 74
for more information.
Airbag deployment will automatically attempt to unlock the doors.
3. Approach lighting - As you approach the car:
Press the yellow button on the remote control to light the interior lighting, position/parking lamps, and license plate
lighting. These lights will switch off automatically after 30, 60 or 90 seconds. See the Personal settings on page 75
for
information about adjusting the time setting.
4. Unlock trunk - Press the button once to disarm the alarm system and unlock only the trunk. After closing, the trunk
will not automatically relock. Press Lock to relock it and rearm the alarm.
NOTE
This function will unlock, but not pop open, the trunk.
5. Panic alarm : - This button can be used to attract attention during emergency situations.
To activate the panic alarm, press and hold the red button for at least 3 seconds or press it twice within 3 seconds. The
turn signals and horn will be activated.
The panic alarm will stop automatically after 30 seconds.
108 05 Locks and alarm
Remote control and key blade
To deactivate, wait approximately 5 seconds and press the red button again.
NOTE
This button will NOT unlock the car.
Weak battery in the remote control
ProCarManuals.com
Page 98 of 208

When the battery begins to lose its charge, the Information symbol in the instrument panel (see page 51) lights up and
REMOTE BATTERY LOW VOLTAGE is shown in the information display.
Replacing the battery in the remote control
If the range of the transmitter is noticeably reduced, this indicates that the battery (type CR 2032, 3V) is weak and
should be replaced. To replace the battery:
1. Remove the key blade.
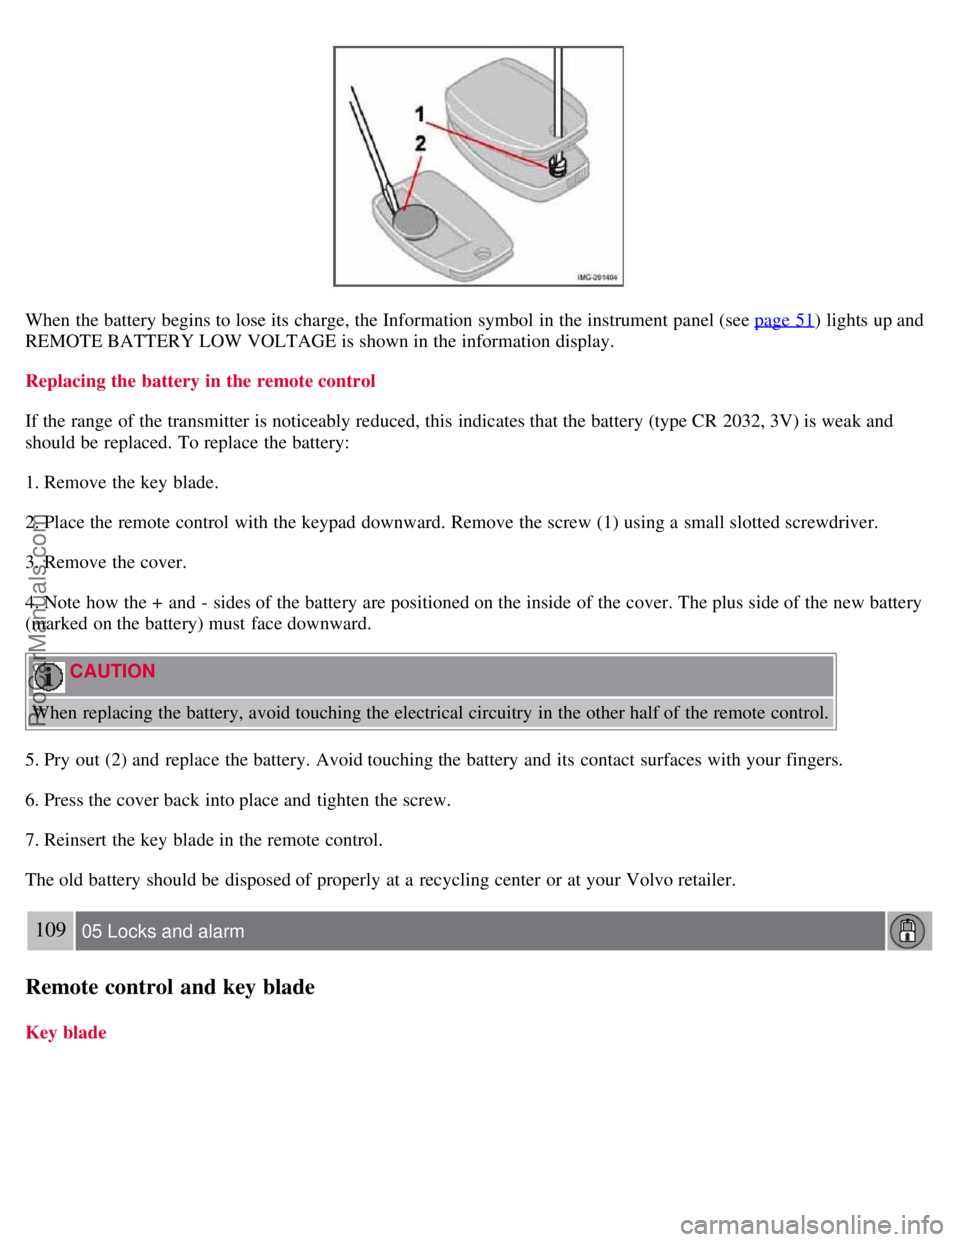
2. Place the remote control with the keypad downward. Remove the screw (1) using a small slotted screwdriver.
3. Remove the cover.
4. Note how the + and - sides of the battery are positioned on the inside of the cover. The plus side of the new battery
(marked on the battery) must face downward.
CAUTION
When replacing the battery, avoid touching the electrical circuitry in the other half of the remote control.
5. Pry out (2) and replace the battery. Avoid touching the battery and its contact surfaces with your fingers.
6. Press the cover back into place and tighten the screw.
7. Reinsert the key blade in the remote control.
The old battery should be disposed of properly at a recycling center or at your Volvo retailer.
109 05 Locks and alarm
Remote control and key blade
Key blade
ProCarManuals.com
Page 99 of 208

The key blade can be removed from the remote control. When removed, the key blade can be used as follows:
To lock/unlock the driver's door
To lock/unlock the glove compartment (see page 116)
For valet locking (see the explanation below)
Removing the key blade
Slide the spring loaded catch (1) to the side and pull the key blade (2) out of the remote control.
Reinserting the key blade in the remote control
1. Hold the remote control with the pointed end down.
2. Carefully slide the key blade into its groove.
3. Gently press the key blade in the groove until it clicks into place.
Unlocking the doors with the detached key blade
Insert the key blade as far as possible in the driver's door lock. Turn the key blade clockwise approximately one -
quarter turn to unlock the driver's door only.
NOTE
After unlocking the driver's door with the key blade, opening the door will trigger the alarm.
To disable the alarm:
Models with the standard remote control : Press the Unlock button on the remote control, or insert the key in the
ignition switch.
Models with the optional keyless drive : Press the Unlock button on the keyless drive remote control. If the
batteries in the remote are weak, remove the keyless drive start control from the ignition switch by pressing the catch
(see the illustration on page 131
) and pulling the control out of the ignition switch. Insert the ignition key section of a
keyless drive remote control in the ignition switch.
Locking the doors with the detached key blade
1. Lock the rear doors and the front passenger's door by pressing the lock button on each door.
2. Turn the key blade one -quarter turn counterclockwise to lock the driver's door.
NOTE
This does not arm the alarm or lock the trunk.
ProCarManuals.com