2007 VOLKSWAGEN JETTA Page 53
[x] Cancel search: Page 53Page 273 of 477
Booklet 3.1 Controls and Equipment
Applies to vehicles: with front center armrest and one storage comportment
Front center armrest with storage compartment
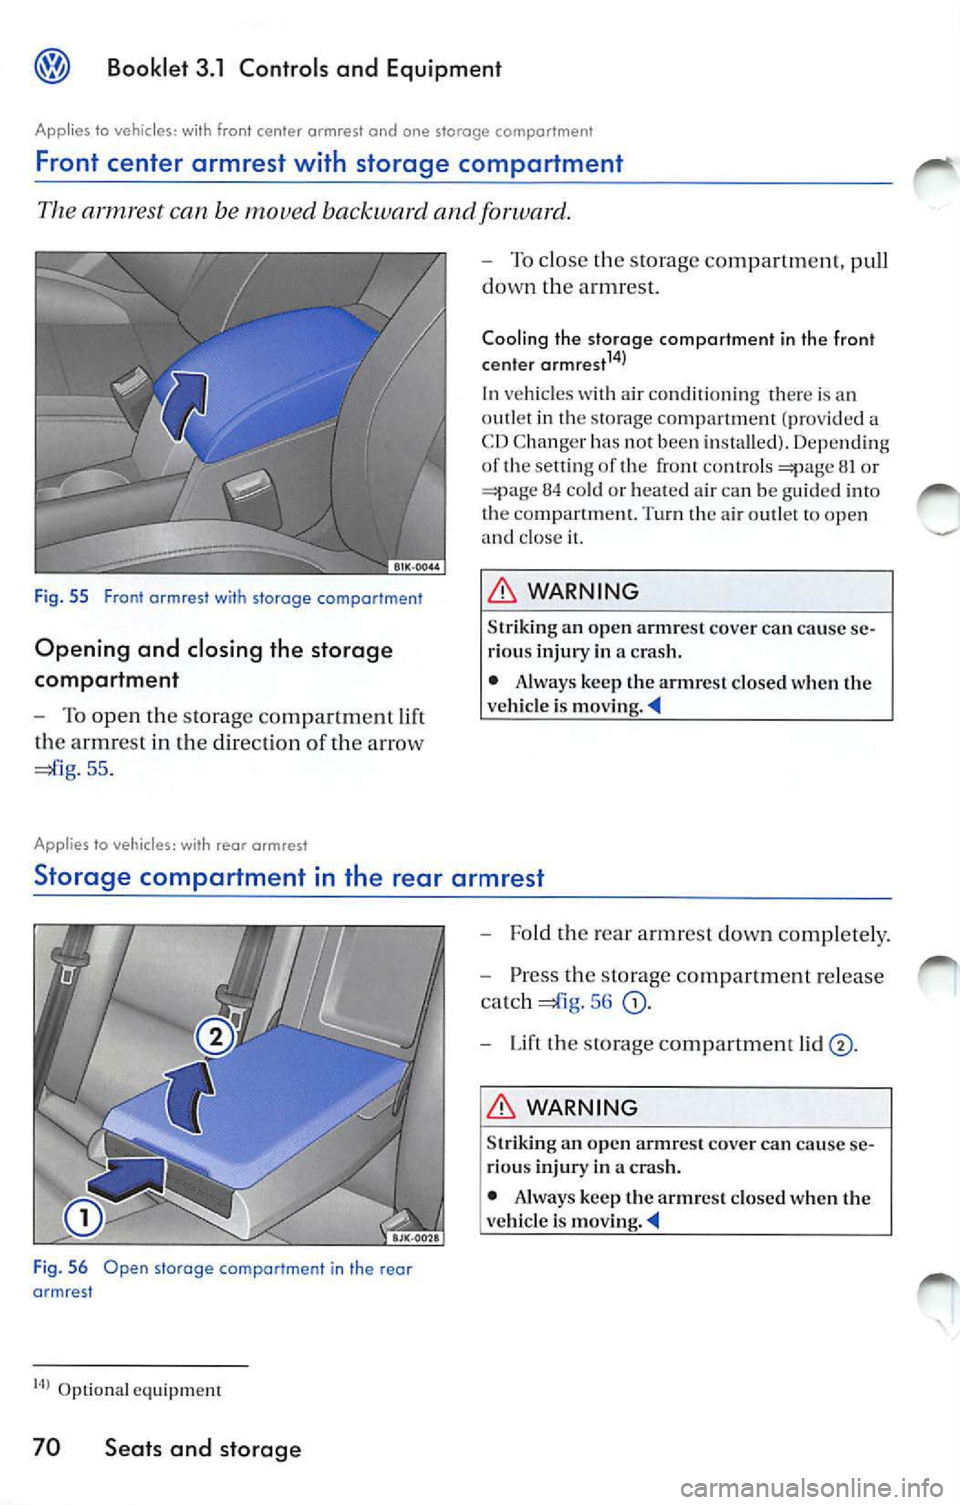
arm rest can be moved backward and forward.
Fig. 5 5 Front armrest with storage comportme nt
Opening and closing the storage
compartment
- To open th e storage compar tment lift
th e armr est in the direction of the arrow
55 .
Applies to vehicles: with rear armrest
- To clo se th e s torag e co mpartm en t, pu ll
do wn the a rm re st.
Cooling the s torag e compartment in the front
ce nter armr est
In ve hicles w ith air co nditi oning there is a n
ou tlet in the s to rage c omp artm ent (pro vid ed a
C D Chang er
no t be en in sta lled) . D ep ending
o f th e settin g of th e front controls =: page 81 or
84 cold or h eat ed air ca n be g uid ed int o
th e co mpartm ent . Turn th e air outl et t o o pen
a nd clo se it.
WARNING
Str iking an open armrest cover can cause se
riou s inju ry in a cras h.
• Always keep the armrest closed when th e
ve hicl e is m ov ing.
Opti onal e quipm ent
70 Seats and storage
-Fold th e rear armr est do wn complete ly .
- Pre ss the s torage compa rtment relea se
c at ch
56
- Lift th e storage compartme nt
WARNING
St riki ng an open armrest cover ca n cause se
r ious injury in a cras h.
• Always keep the ar mr est clo sed when the
ve hicl e is movin g.
Page 311 of 477
Booklet 3.1 Controls and Equ ipment
Accelerating
- Pull th e lever upward in direction
to th e+ position to increase the
s peed by about 0.5 mph
(I km/h ).
Decelerating
- Pull the lever downward in direction of
a rrow © to the - positio n to lowe r the
s peed b y 0.5 mph (about I km/h).
Switching off
-Push the leve r in the direction of arrow
all the way to the OFF position whil e
d rivi ng. The CHU ISE or
symbo l goes off .
- Sw itch th e ignit ion off when the v ehicle
i s standing still.
WARNING
Using the crui se cont ro l whe n it i s not possib le
to dri ve sa fely at a constant speed is dangerous
in "Desc ription".
Tip s
• If th e cruise con trol is switc hed on th e
( or ·t-i sy mbol in the in stru ment cluster
li g ht s up .
• If th e c ruise co ntrol i s
the or symb ol goes o ut. The syste m is
swi tc h ed off compl etely when the selec tor leve r
is in P, Nor
• If yo u increase vehicl e speed with th e accel
erato r pedal, the prev ious ly programmed sp eed
will be re sum ed when the acce le rator p edal is re
leased . T hi s w ill not be the case. however, ifche
vehicle s peed is mo re than 6 mph (10 km/h)
hi gh er than the s tored speed fo r long er
5
minut es. The speed will then have to be store d
again .
• The set speed can be sw itche d off te mpo
rarily if you p ress the brake peda l or the clutch
pedal. Pull th e lever briefly towa rd th e steering
whee l to the point where you can start to fee l re
s is tance
107, fig. 85 to r esum e the
speed again. "'4
App lies to vehic les: with independent lever for Cruise cont·ol
Turning off control temporarily
You can turn off the control temporar ily as
follow s:
- Depress the brake pedal,
- Dep re ss th e clutch pedal, or
- Pu sh the l ever briefly to the point where
yo u can star t to feel r esis tanc e in the dir ec
t ion of a rrow
10 7, 85
Th e set sp ee d re mains in th e mem ory , but it is
not maintain ed. To res um e the spee d previo usly
se lected, re lease the brak e pedal and pull th e
l e ver bri efly coward the stee ring wheel to the
108 Driving
point whe re yo u ca n start to f eel resi stan ce 107, fig. 85
If you drive faster than about 1 10 mph (180 km/h)
the cru ise co ntrol is sw itch ed off automati cally
a nd you cann ot ac tivate the cruise contro l. To
ac tivate the cru ise control again, drive s lower
than about 110 mph (180 km/ h).
WARNING
Us ing the cruise contro l when it is not possib le
to drive safely at a constant spee d is dangerous
in "Descrip tion" on page 107. "'4
Page 321 of 477
About this booklet
This booklet contains important information,
tip s, s uggest ions and WARN INGS on usin g yo ur
veh icle. The other booklets in the Owner's Liter
ature contain further information tha t you
sho uld be aware of for yo ur own safety and for
the sa fety of yo ur pa ssenge rs.
Make sure that you always keep the comp lete
Owner's Literature in the vehi cle. Th is is es pe
cia lly import ant whe n you lend or sell th e ve
hicl e.
Thi s manual describes the vehicle equipm ent at
th e time of publicatio n. Some of the equipmen t
d escribed w ill not be availab le until a late r date,
or is only available for certain markets.
Illustrations may slightly vary fro m you r veh icle.
Fo r tl1is reaso n yo u sh ou ld regard illus tratio ns as
a general g uide.
A t th e beginning of this booklet, you
find a
table of contents sho wing all the item s de
scr ibed in this manua l in the order they appear .
An alphabetica l ind ex is a t the end of the
booklet.
Dire ction s and positions (for example right, left,
front, rear ) are a lways re lat ive to the direction o f
travel of the vehicle unless sta ted otherwise.
Some sections of this book let do not app ly to a ll
ve hicl es. If this is the case, a text at the beginning
section indicates w hic h veh icles it appli es
to , for examp le "App lies to veh icles wit h Diese l
engi ne" .
The section i s con tinued on t he nex t page.
In dicates the end of a section.
® Registered trademarks are marked
or®·
However, the absence of this sym bol does
not const itute a wa iver of th e rights con
ce rnin g any te rm.
Cross-reference to a "WA RN ING" within
o r outside of a sect ion.
WARNING
Texts symbo l co ntain imp ortant in
formation on safety and how to reduce risk
of personal injury or d eath.
Note
T exts
sym bol dr aw your attention to potential sources of damage to your vehicle .
For th e sake of environment
Texts w ith this symbo l contain infor mation
a bo ut the environment and how you can he lp
to protect it.
Tips
Texts with thi s symbol contai n spec ia l tips and
othe r information abou t gett ing the most out of
your veh icle and its features.
Page 329 of 477

Booklet 3.2 Tips and Advice
Braking power and braking distance
Braking power and braking distance are influenced by driving situations and
road
Worn brake pads will not provide good braking.
The amount of wear and tear on the brake pads
depends to a great extent on the cond itions
und er which the vehicle is opera ted and the way
the vehicle is dr iven. If you do a lot of city
driv ing, drive short distances or have a sporty
driving style, we reco mm end th at you have the
thickness of your brake pad s checked by an au
thor ized Volkswagen dea ler more frequently
than r ecommend ed in the service schedule.
I f you dr ive witJ1 wet brakes , for example after a
dri ving through water,
heavy rainfall or
after washing the vehicle, brakin g power will be
reduced and sto pping distances w ill be longer
because the brake d iscs will be wet or in winter
ma ybe even frozen
the brakes must be dried
with severa l ca reful brake applications.
Brake fluid absorbs water and must be c hanged
every two years. Heavy use of the brakes can
cause vapor lock if the brake fl uid is too old.
Va por lock reduces braking power, increases
stopp ing distances and can even cause total
brake failure.
WARNING
• New tires and new brake pads do not pro
v id e maximum grip, control or braking abilit y.
• To reduce the risk of losing control, a colli
s ion and se rious persona l injuries, drive with
special ca re for the first
350 mil es (560 km).
• New brake pads do not have the best stop
ping power for the first
150 mil es (240 km) and
must be broken in. You can com pensate for
the slightly reduced braking ability by drivin g
w ith care and applying more pressure on the
brak e pedal.
• Never fo llow other vehicle s too close ly or
put yourse lf into other situ ations that might
r equ ire s udden , hard brakin g especially when
th e brake pads have not been broken in.
WARNING
Wet brake s or brak es coa ted ice or road
sa lt react slower and need longer stopping dis
tanc es.
• Carefully apply brakes for a lest.
• Alwa ys dry brake s and clean olT ice coa t
ings and salt coa tings with a few cautiou s
brake app lica tions.
• Always read and hee d all
in "Break ing in tir es and brake pads" on
page 7.
WARNING
Overheated brakes will reduce the vehicle's
s topping power and increase stoppin g di s
tances.
• Always avoid over hea tin g the brakes!
• When driving downhill, the brakes have to
work hard and hea t up quickly .
• Before driving clown a long, steep hill, al
ways red uce spee d and downshift to a lower
gea r. This will let th e ve hicle use engine
braking and reduce the load on the brakes.
• Always c han ge the brake fluid at least
every two years. Hard braking with old brake
fluid may cause a va por lock. Vapor lock re
duces brakin g power, increases s topping dis
tan ces and can even ca use to tal brake failure.
• A damaged front spoiler or new non stan
dard spoile r ca n reduce the airflo w to the
brake s and cause them to overheat.
• Always sec an au thorized Vo lkswage n
dealer or qualil1ed workshop if yo u think th at
you may have damaged the front spoiler.
• Be sure to read and heed all WARNINGS
and the information =-page 27, "Accessories
and part s" before buying accessorie s.
8 Driving and protecting the environment
Page 331 of 477
Booklet 3.2 Tips and Advice
Applies to veh icles: with o gaso line engi ne
Catalytic converter
Help the catalytic converter do its job
for a long time :
-Alwa ys use unl eaded gasol ine.
- Never
the ta nk complet ely empty .
- Do not put in too much en gin e oil
40, "Adding engine oil
-Never tow the ve hicle to start it, use
jump er cab les if n ecess ary
85.
If yo u notic e mi sfiring, uneve n runn ing or loss of
power w hen th e vehicl e is m ov ing , s low down
immediate ly and h ave the vehicl e in sp ec te d by
th e nea res t a uth oriz ed Volk swagen deal er or
qu alifi ed wo rksh op. These co nditions w ill u su
a ll y be in dic ated b y an ind icator light
3. 1, chapt er "Warning light s." If thi s
happ ens, raw f uel ca n ge t int o th e ex hau st
sys te m , d am age t he ca ta ly ti c co nverte r and es
ca pe int o th e atmosp here .
WARNING
A ca ta ly tic conver te r get s very hot and can
cau se lir e ca usin g se riou s personal injury.
• Neve r park where th e cata lytic converter
co uld come into conta ct with dry grass o r any
other flammabl e materials under the vehicl e.
Trailer towing
Technical requirements
Yo ur Volk sw agen was desig ned primaril y for
pas seng er tr an spor ta ti on. If yo u plan to
trai ler , plea se re m emb er th at yo ur ve hicle w ill be
p erformin g a serv ice for whi ch it w as not prim a
ril y in ten ded. The addit io na l lo ad will affec t du
r ability, hand lin g, econ omy and p erfor mance.
Tra iler to wing not only pl aces more s tress on the
ve hicle, it a lso calls for mor e co nce ntrati on from
t h e dr ive r.
WARNING (continued)
• Never appl y additional under coating or
ru st proofin g on or near the ex haus t manifold ,
exhaust pipes, ca ta ly tic conver te r or hea t
s hi elds.
39 , fig . 5 d o not sta rt the e ngi ne thi s co uld dama ge
the catalyt ic c onverter and the e ngin e! See an
a uthori zed Vo lkswage n dea le r or a qualifi ed
works hop.
• To avoi d dama ge to th e ca talyti c conve rter al
ways rea d and hee d th e in formation on
=:page 32, "Fu el suppl y".
For the sake of environment
Even when th e e missio n co ntro l syste m is
worki ng perf ec tly, yo u may so metim es s mell
s ulfur from th e ex hau st d ep endin g on th e
a m ount of sulf ur in th e fu el you arc usi ng. T he
s m ell ca n usua lly be so lved by ch angin g to an
ot her brand of ga solin e. T railer
For th ese reason s, a lwa ys fo llow the o pera tin g
an d dri vi ng in stru ction s given a nd use comm on
se nse.
T railer hitch
U se a we ig ht -carry ing hitch co n fo rm ing
trail er hit ch re movab le
ball mount. ch eck with th e traile r hit ch
10 Driving and protecting the environment
Page 371 of 477

Booklet 3.2 Tips and Advice
The electrolyte level be checked reg ularly in high-mileage vehicles, in hot
cou ntri es and in older batteries.
- Open the engine hood and open the
batt ery cover at the front.
- C heck th e co lor display in the round
w ind ow at the top of the battery.
- If there are air bubb les in the window,
tap the w indow gent ly un til they disp erse .
Th e positio n of th e battery is sh ow n in th e corre
spo ndin g engine compart ment diagram
3.3. Th
e ro und window ("magic eye '') on th e to p of
t h e batt ery chang es color, d epending on the
c harg e le vel and ele ctrolyt e le vel of the ba ttery.
I f th e c olor in the w indow i s co lor less or bri gh t
ye llow . the elec trol yte le vel of the battery is to o
I la ve the ba tte1y ch ec ked by a q ualifi ed
d eal ers hip ..
The col ors g ree n and b la ck ar c use d b y the work
s h op t o diagno se the battery.
Charging and replacing vehicle batteries
All work with the vehicle battery req uir es specia l know ledge.
Have th e batteries checked by auth orized
Vo lkswagen deale r o r qua lified workshop be
t ween regular ma inten an ce i nt erva ls if you of te n
driv e short distance s or i f th e vehicle is not
driven for lo ng peri ods.
I f the bat te ry has discharged and you have prob
l ems starting th e ve hicle, the battery might be
damaged . If thi s happens, we re comme nd you
h ave the ve hicle batte ry c hecked by an autho
ri ze d Vol kswag en dealer
it w ill he erly recha rged o r re pla ced.
C har ging vehicle batteries
T he c har ging of the vehicl e batt eri es s hould be
l ef t to an aut horized Vo lkswage n deale r o r qual
ifi ed workshop, b ecau se your ve hicle is
equipp ed w ith specia l batteri es th at mu st b e
charg ed in a contro lled e nvironm ent.
50 Checking and Filling
Rep lacing a battery
T he batt eries have been specia lly deve lo ped for
th eir lo cat io ns and they have specia l sa fe ty fea
Genui ne Volkswage n batte ries me et th e m aint e
nan ce, and safety sp ecificat io ns
fo r you r ve hicl e.
WARNING
• u se on ly maint en an ce -fr ee or
cycle -free, leak-proof batteries with the same
s pecification s and dimen sions as the ori ginal
e quipm ent batt ery. S pecifi cation s are liste d
on the batt ery hous ing.
• Before sta rtin g
work on th e batteries,
a lways rea d and heed a ll in
"Loca tion of battery" on page 49.
Page 383 of 477
Booklet 3.2 Tips and Advice
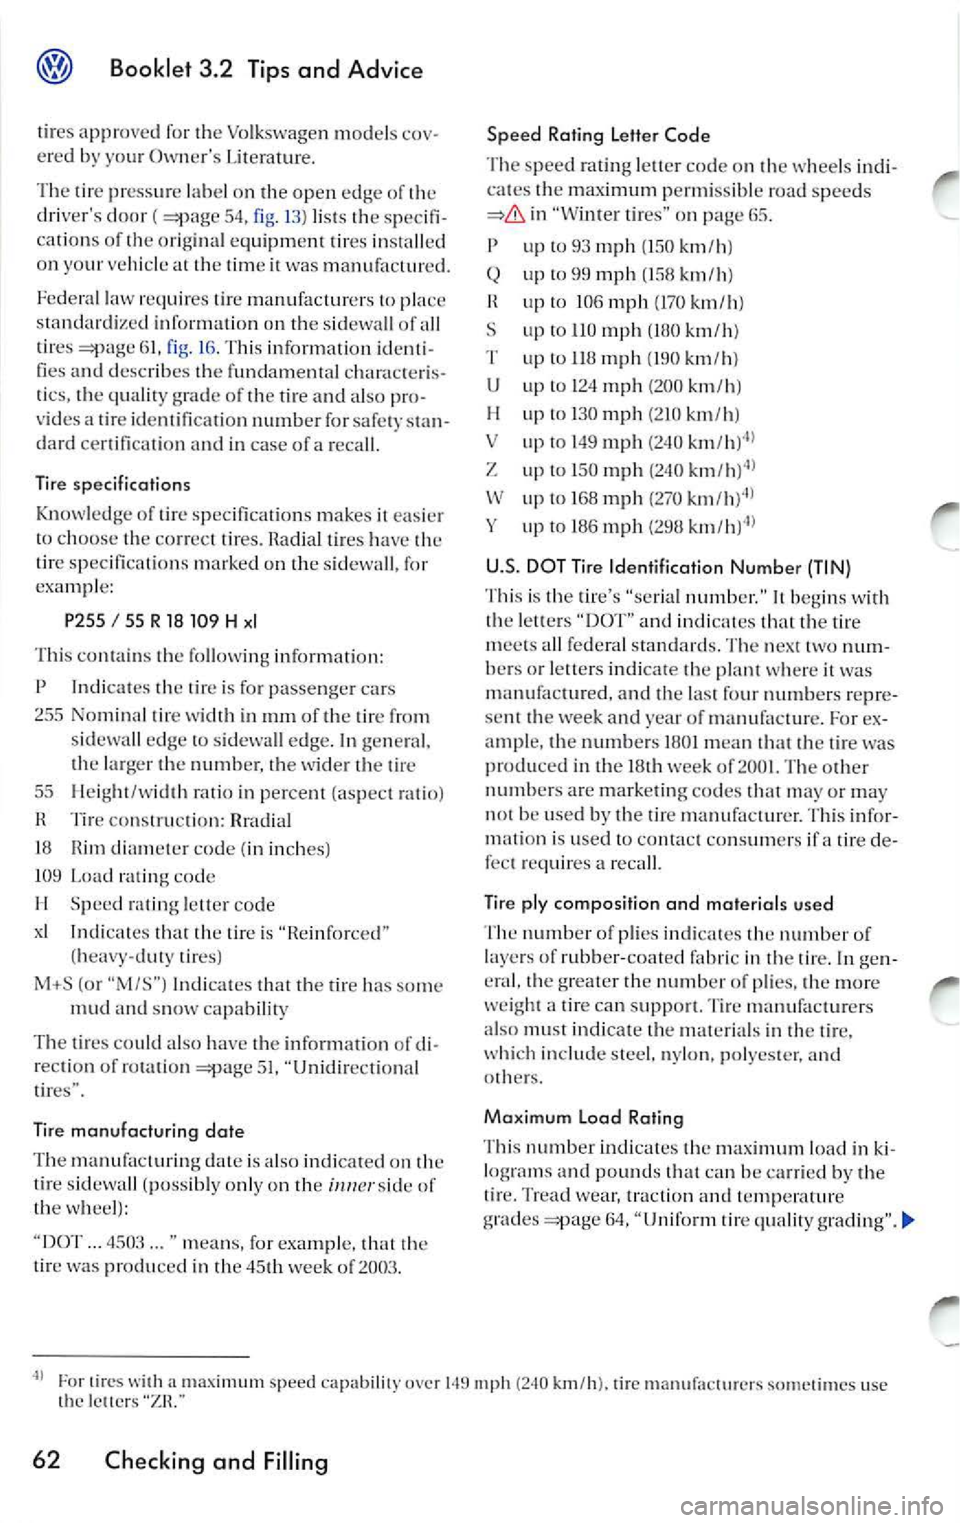
tires approved for the Volkswage n models ered by your Owner's Literature.
The tire pressure label on the open edge of the
dri ver's door (
54, fig. 13 ) lists th e s pec ifi
cations of the original equipm ent tir es insta lled
on your vehicle at the time it was
Federal law re quire s tire manufacturers to plac e
standardized informat io n on the sid ew all of all
t ir es
fig. This information id enti
fi es d esc ribes the fundamental charac te ris
ti cs, the quality grad e of the tire and also pro
vides
tir e id entifi cation number for safe ty stan
dard certificat ion an d in case of reca ll.
Tire specifications
Kn ow le d ge of tire sp ec ifica tions mak es it easier
to choose the tires. Hadial tires ha ve the
t ir e sp ec ifica tion s mark ed on th e sidewall, for
examp le :
P255 I 55 R 18 109 H x i
This contain s the following information:
Indi cates the tir e is for pass enger
No minal tire width in mm of the tire from
s ide wall edg e to sidewa ll edge. 1 n general.
th e lar ger the numb er, the wider th e tir e
55 I !e ight /width
in per cent (aspect ratio )
Tire constru ctio n: Hrad ial
1 8 Him diamete r
(in inch es)
109
co de
Speed le tter code
x i
tha t th e tire is "R einf orced"
( h eavy-d uty tir es)
M +S (o r "M /S") Indicates that t he tire h as some
m ud and snow capabili ty
The tire s could al so have the information of di
rection of rotation
51, "Unidi rectiona l
tires".
T ir e manufactur ing date
The manufa cturin g dat e is also indicate d on the
tir e sid ewa ll (poss ibly o nly on the i1111 erside of
th e wheel):
... 45 03 ... "means. fo r exam ple, that th e
tir e produ ced in the 45th week of
Speed Rating Letter Code
The sp ee d rating le tt er code on the wheel s indi
cates the maximum p ermi ssibl e roa d speeds
in "Wint er tires" on page
up 93 mph (150 km/h )
Q 99 mph km/h)
up to 106 mph (170 k m/h)
s up to llO mph (180 km /h )
T up
118 mph (190 km/h )
u up t o 124 mph (200 km/h )
up to 130 mph (210 km /h )
V up to 149 mph (240
up to 150 mph (240
\V up t o 168 mph (270 y
up to mph (298
U. S. DOT Tire Identification Number (TIN )
Thi s is the tir e's "se rial number." It begins with
th e le tt ers "DOT" and indicates
the tire
m ee ts all federal standards . The n ext two
ber s or lett ers indicate th e plant where it was
manufacture d. and the la st four numb ers repre
se nt the week and year of manuf acture. For ex
a mpl e. th e numb ers 180 1 m ean that the tire
produ ced in the 18th week of 2001. The oth er
numb ers are mark etin g co des ma y or ma y
n o t be used b y th e tire manufa cturer. T his infor
mati on is u sed to contact consum ers ifa tire de
f ec t req uires a reca ll.
Tir e ply compos ition and materials used
T he numb er of plies indicat es the numb er of
la ye rs of rubb er-co ated fabri c in the tir e. In gen
e ral, th e g rea te r the numb er of p lies , th e mor e
a tire can supp ort. Tire manuf actur ers
a lso mu st indicate the materials in the tire ,
wh ich include steel. nylon, poly este r, and
o th ers .
Maximu m Load Ra ting
Thi s numb er indi cat es the maximum load in ki
lo gram s and pounds that can h e
by the
tir e. Tread wear, traction and te mpe ralll re
g rades
64, tir e quality
·II For tir es max imum speed capabilit y over mph (240 km /h ). tire so metimes use
th e lette rs
62 Checking and Filling
Page 421 of 477
About this booklet
This booklet contains important information,
t ip s, suggest ions and WARNINGS on using your
ve hicle. The other booklets in the Owne r's Liter
ature contain further information that you
should be aware of for
own safety and for
the safety of your passengers.
Make sure that you alwa ys keep the complete
Owner's Litera ture in the veh icle. This is espe
ciall y im por-tant when you lend or sell the ve
hicle.
T hi s manual describes the vehicl e equip ment at
the time of publication . Some of the equ ipment
described will not be ava ilab le un til a lat er date,
or is only available for certain markets.
Illus trations may slig htly vary from you r vehicle.
For this reason you should regard illustrat ions as
a general guide.
At the beginning of this booklet, you will find a
table of contents contents showing a ll the item s
described in this manual in the order they ap
pear.
An alphabetical index i s at the end of the
booklet.
Directions and positions (for example right, left,
front, rear ) are always re lative to the direction of
trave l of the vehicle un less sta ted otherwi se.
Some sections of this bookle t do no t app ly to
vehicles. If this is the case, a text at the beginning
of the section indicates which vehicles it applies
to, for examp le "'Applies to vehicles with Diesel
engine".
The sec tion is continued on the next page.
Indicat es the end of a section.
® Regis tered tr ademarks are
or®·
Howe ver, the absence of this symbol does
n ot cons tit ut e a waiver o f the r ights con
cerni ng any term.
Cross-refe rence to a "WA RNING " within
or outside of a section.
Cross-refere nce to a "Note " within or out
side o f a sectio n.
WARNING
Texts with this symbo l con tain imp ortan t in
formation on safety and how to reduce the risk
of personal injury or death .
Note
Text s w ith this symbol draw your atlentio n to
potentia l so urc es of damage to your vehicle.
For the sake of environment
Texts with this symbol conta in inform atio n
abou t the environm ent and how you can help
prote ct it.
Tips
Tex ts
this symbo l contain special tips and
other information about getting the most out of
yo ur veh icle and i ts fealllres.