2007 VOLKSWAGEN GOLF PLUS tow
[x] Cancel search: towPage 323 of 541
Introduction
In thi s section yo u'll find inform ation on th e fo l
l ow ing:
Storage . . . . . . . . . . . . . . . . . . . . . . . . . . . . . . . .
Pr epara tio ns fo r workin g in the eng ine co m
In an p age
a w hee l page
Tire mobili ty page 336
Storage
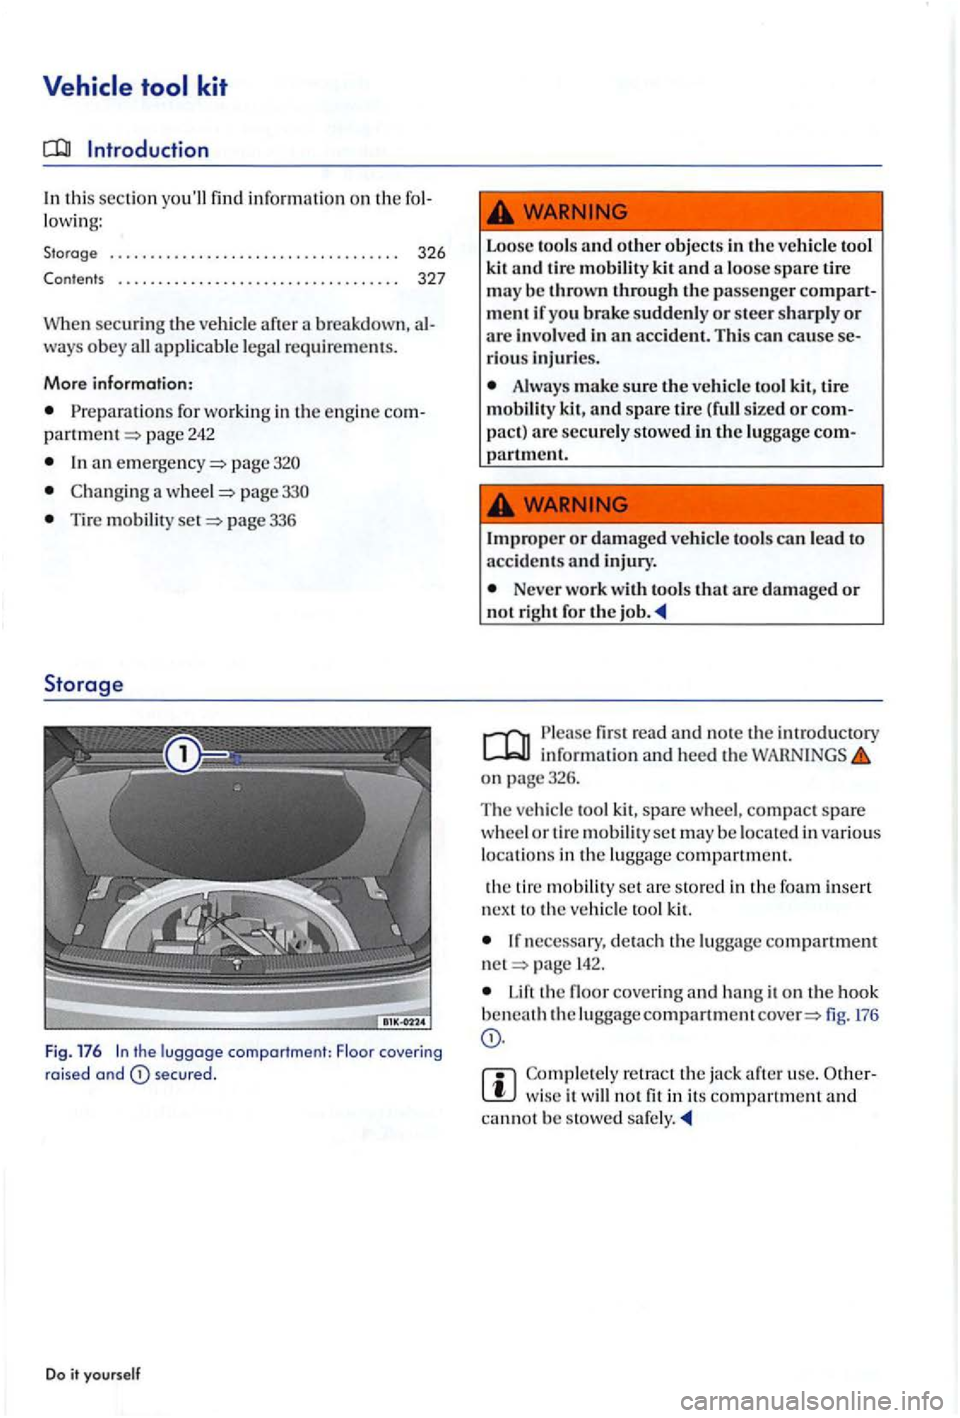
Fig. 176 In the luggage compartment: Floor covering raised and secu red.
Do it yourse lf
Loose tools and other objects kit and a lo o se spare tire may be thrown through the passenger compart
m ent if yo u brake suddenly or stee r sharply or are involv ed in an accident. This can cause se
r io u s injuri es.
Alw ays make sure the ve hicl e to ol kit , tire
mobili ty kit, and spare tire sized or com
pact ) are securel y stow ed in th e luggage com-ment.
I
mprope r or damaged vehicl e tools can lead to
a ccid ent s and injury .
Neve r work with tools that are damage d or not right for the job .
firs t read and note th e int rod uc tory inform ation an d heed th e o n page326.
T he ve hicle t
ool kit, spare wheel, compact spare w hee l or tir e mobilit y set may be locate d in various
l oca tions in the lu ggage compart men t.
th e tir e m obilit y
set are stored in the foam insert
n ex t to t he ve hicl e too l kit.
If necessary, de ta ch the luggage compartment net page
Lift th e floo r cover ing and ha ng it on th e hook beneath the luggageco mpart mem fig. 176
w ise it not fit in its co mpart ment and ca nnot be stowe d sa fe ly.
Page 324 of 541
Cont ents
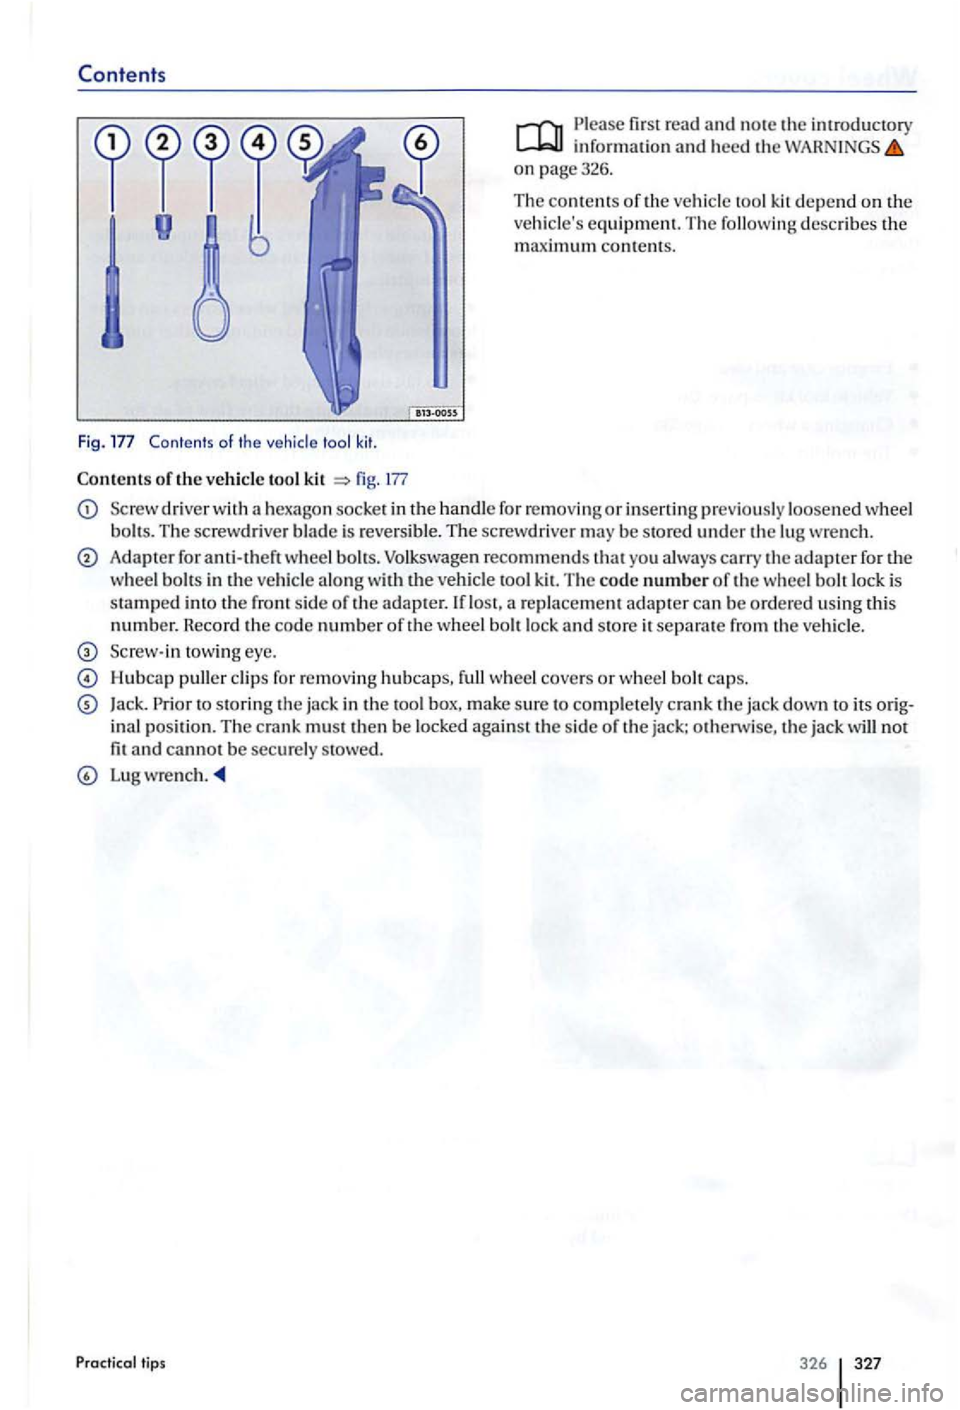
Fig . Contents of th e vehicle tool kit .
Con tents of th e vehicle tool kit fig. 177
Please first read and note the information and heed th e on page326.
T he
contents of th e ve hicl e tool kit d epend on the vehicle's equ ipment. The followin g describe s the maximum conte nt s.
Sc rewdri ver with a hexago n socke t in the handl e fo r r em ov ing or in se rting prev iou sly loosened w heel
bolt s. The screwdrive r blade is revers ible. The screw driver may be stored unde r th e lug wre nch.
Adapter for anti-theft wheel b olts. Volkswagen recom mends that yo u alw ays carry the adapte r fo r th e
w heel b olt s in the ve hicl e along w ith the veh icle tool The code number of the w heel bolt lock is
stamped th e sid e ofthe ad apter.
towing eye.
Hu bca p puller clip s for remov ing hubcaps, full wheel cover s or wheel b o lt caps.
Jack. Prior to stor in g th e jac k in the too l box, make s ure to co mpl ete ly crank the ja ck down to its ina l position. The cra nk mu st then b e locked against the sid e of the jack: oth erwise, the jack will not fit and cannot be sec urel y stowed.
Lug w rench .
Practica l tips
Page 327 of 541
Introduction
In this s ec tion lowing :
Preparation s chang ing a . . . . . . . . . . . . . 331
. . . . . . . . . . . . . . . . . . . . . . . . . . . . . . . . 332
the with the jack . . . . . . . . . . 333
Changing a
. . . . . . . . . . . . . . . . . . . . . . 335
ve hicl e design s and models are not ered with a jack and lug w re n ch . su ch cases , Volkswage n recommend s havi ng tires and wheels
changed by an authorized Volk swage n dealer or an authorized Volkswag en Servic e Facility.
Vehi cle key page 34
Tir es and wheels=>
In an page
Vehi cle tool pag e 32 6
Whee l cover s page 328
a whe el, especially on th e side of the road, can be da ngerou s. To help reduce the risk of ser ious personal injury:
Always stop the vehicle
Always make sure that all passengers , cially children, are in safe place outside the
Turn on the emergency nasher and set up another
Always make sure th at the ground is level and firm . If necessary place a sturdy board under the jack.
a whee l by yourse lf only if yo u arc
Always use proper and undamaged tools
when changing tire.
Always apply the parking brake and sh ift the transmission into Park mission ) or any gear (manual only) to help ve nt the ve hicle from moving suddenly and ping off the jack.
a w heel is lifted off the ground, having the tran smission in Park or in gea r not prevent sudden vehicl e movement.
Alwa ys blo ck
Jar object.
If you are towing trail er, alway s unhitch it
from your vehicle before star ting to change the
wh eel. Always apply th e trailer bra kes firmly and make sure the
Always use jac k that has been approved by th e m anufacturer for your vehicle . Never use other jack s, eve n if th ey have been approved for
u se on other Volk swag en models.
To reduce the risk of los ing control , crashes, and se riou s personal injurie s, neve r loosen the
sc re w s on rim s with threa ded rim rings.
Mter changin g a wheel , have the wheel bolt
tightening torque checked with an accurate
torqu e
wrench .
Page 328 of 541
Preparations for changing a
firs t rea d and note the introductory information and heed the on page
Checklist
G ettin g ready to change wheel. Follow these ste p s in the o rder lis ted
yo u h ave a nat tire, move safe distance away from the road. the ve hicl e on firm , leve l
the parking page 188.
3. Auto m ati c transmissio n : 179.
4. page 172.
5. transmission: Engage a page 179.
6. Have
tow ing a trailer: Unhit ch the trai le r from the ve hicle and park the trailer properly.
9. the lu ggage compartm ent is loaded: Remo ve th e lu ggage.
move th e spare or compac t spare wheel from the lu ggage compartment.
II. Take ofT the whe el covers page 328.
Disregarding
the safety -relat ed ch eckl is t may lead to accidents and seriou s injuries.
Always review and follow the checklist.
Follow accepted s afety practices and u se common
Pra ctical tips 331
Page 330 of 541
Wheel bolt s and w heel hub threads must
use the
wit h th e jack
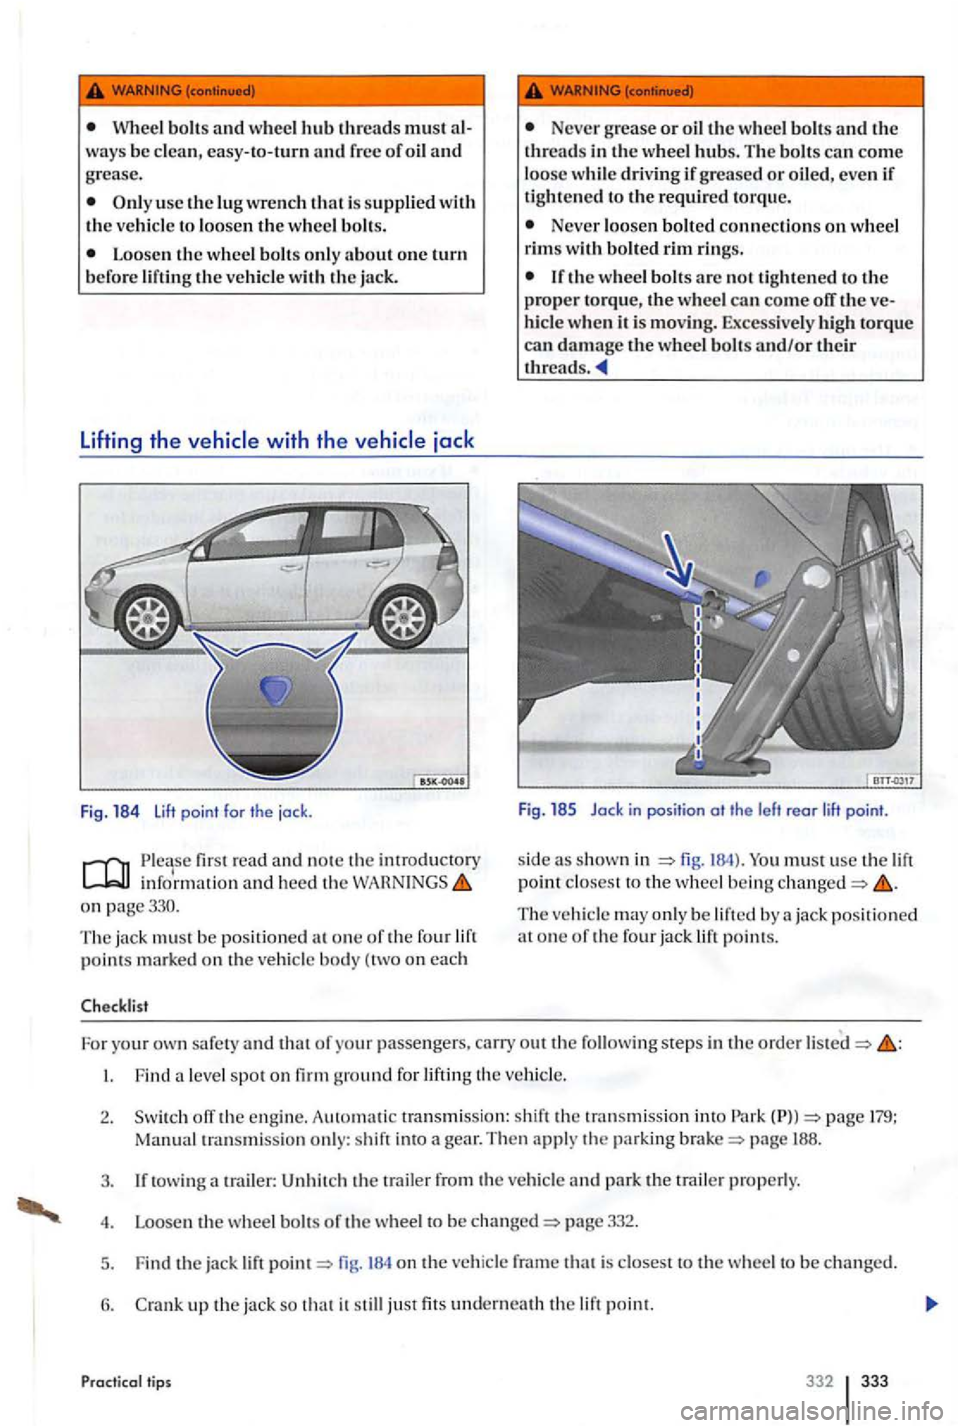
Fig . 184 lift point for th e jock .
first re a d and n o te the intro ducto ry infor mat io n and heed th e on page330.
T he jac k
must b e po sition ed at one o f the four lift points m arked on the ve hicl e bo d y ( tw o on each
Checkli st
Never grease or oil th e w heel bolts and the threads in the wheel hubs. The bo lt s can come
loos e w hile driving if greased or oiled, even if
tigh tened to the requi r e d torque.
Neve r loosen bolted connections on w heel
rims with bolted rim rin gs.
the w heel bolts are not tight en ed to the
p ro pe r torque, the wheel can come off the ve
hi cle whe n it is moving. E.xcessive ly
The ve hicle may only be lifte d by a jack positio ned
a t o n e o f th e four jack lift po int s.
F o r yo
ur own safety and that o f your passengers. carry out the follo wing step s in the o rder
tow in g trailer: the tr aile r from the ve hicle and park the trail er properly.
4 . Loosen the whee l b o lts o f th e w heel to be c han ged=> page 332.
5 . Find the ja ck lift
point=> fig. 184 on the ve hicle fram e tha t is closes t to the w heel to be c han ge d.
6.
up th e jack so tha t it still just fits undern eath the lift po int.
Pr actical tip s 332 333
Page 332 of 541
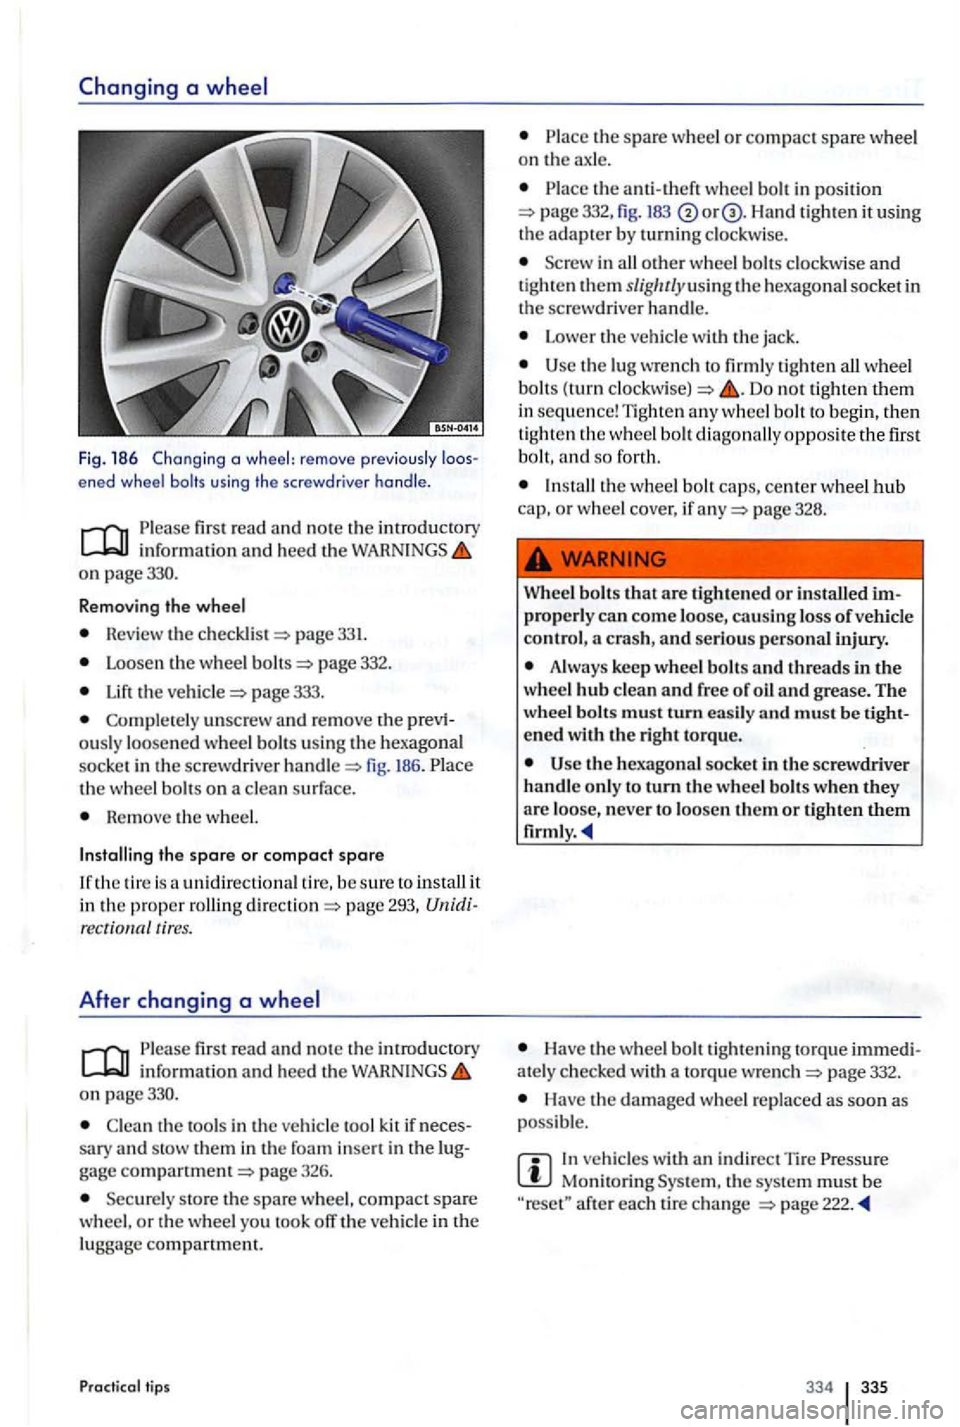
Fig. 186 Chang ing a wheel: remove previo usly ened wheel bolts using the screwdr iver handle .
first read and no te th e introduct ory inform ation and hee d the on page330.
R emov
ing the wheel
Revie w the pag e 331.
Loosen th e w heel page 332.
the page 333.
Complete ly unscrew and rem ove the ously loosened whee l bolt s using the hexago nal
soc ke t in the sc rew dri ver h andl e fig. 186. th e wheel bolts on a clea n surf ace .
Re m ove the w heel.
Installing the spare or compact spare
unidirectiona l tir e, b e sure to install it in the proper ro llin g pag e 293, tires.
After changing a
fir st read and note th e introductory info rm ation and hee d th e on page330.
Clea n th e tools in the vehicl e too l kit if sary and stow th em in th e foa m gage pag e 326.
Securely sto re th e spare whee l, compact spare
w heel, o r th e whee l yo u took off the vehicle in th e
lugga ge compartment.
Practical tips
the spare whee l o r compac t spare wheel on th e ax le.
th e a nti-th eft wheel bolt in position 332, fig. 183 Han d tigh ten it using the adapter b y turnin g clockw ise.
i n all other w hee l b olts clockw ise and tig ht en them slig/ u/yusin g th e hexago nal socket in
the screwdrive r handle.
Lower the ve hicl e with the jack .
the lug wre n ch to firml y tighten all wheel
bolt s (turn Do not tighten them in sequ en ce ! Tight en any wheel bolt to beg in, th en tighten th e wheel bo lt dia gonally opposite the first
b o lt, and so for th.
page 328.
Wh
eel bolts that a re tighte ned or installed p rope rly can come loo se, causing loss of vehicle
contro l,
Always keep whee l bolt s and threads in the
w hee l hub clean and free of oil and grease . The
wheel bolts mus t turn easil y and must be
the hexagona l socket in th e sc rewdriver
handl e o nly to turn th e w hee l bolt s when they are loo se, never to loosen th em or
Have th e w heel b o lt tightening to rqu e ately c hec ke d with a to rqu e wre nch page 332.
Have the dam aged whee l re p laced as soo n as
poss ible.
In ve hicles with indir ect T ir e Monitoring th e sys te m mu st b e after each tir e ch a nge
334 335
Page 335 of 541
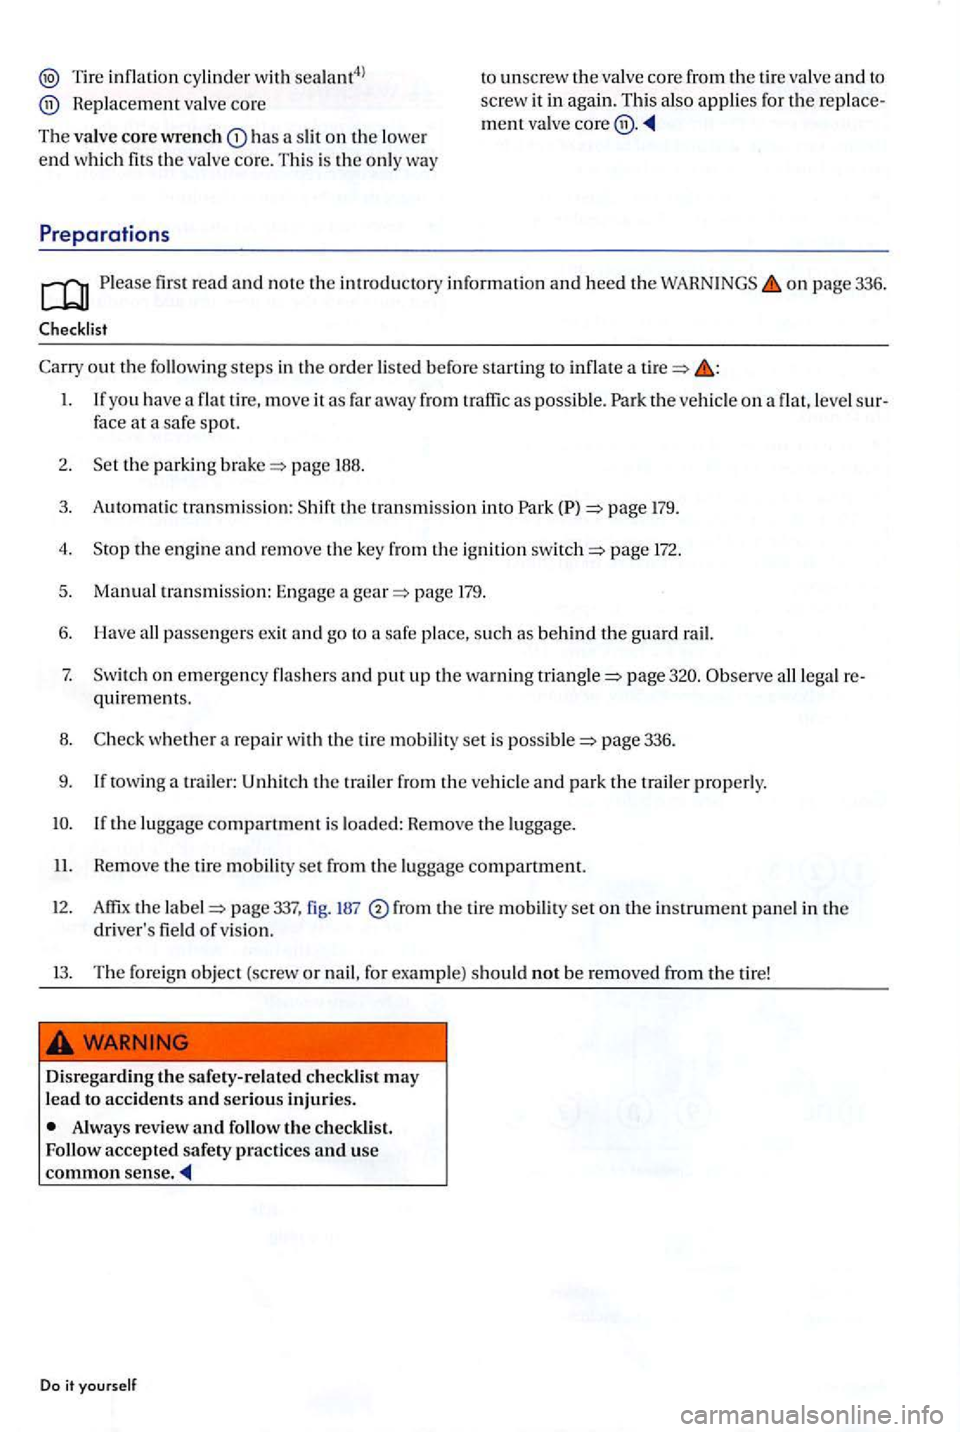
Tire inflatio n cy lind er w ith sealant4l
Replacem ent va lve cor e
Th e valv e
core wrench has a sl it on th e lowe r
end wh ich fits the va lve co re. Thi s is th e only way
Pr eparations
to unsc rew the v alve core from the tir e va lve and t o
sc rew it in aga in. T his a ls o applies for the replace
m ent va lv e co re @ .
first read and no te th e in troduc tory in for mation and hee d th e on page 336.
Checklist
188 .
3 . Autom atic transmi
ssio n: S hift th e tra nsmi ssio n into 179.
4 . Sto p th e e ng in e
and re m ove the key from th e ig ni tio n page 172.
5. Man ua l
tra nsmi ssion: Engage page 179.
6. Have all passengers exit and go to a safe place, su ch as behind th e g uard rail.
7. Swi tc h on em erge ncy flashers and put up th e wa rning page 320.
whe ther a repa ir th e tir e mob ility set is p age 336.
9. If towin g a trailer: Unhi tch th e trailer f rom th e ve hicl e and pa rk the trailer properly.
p age 337, fig. 187 ® from the tire mobility set o n the in strument panel in the driver's fie ld of vis io n.
1 3. The fore ig n o
bject (screw or nail, for example) sh o ul d not be re m ove d from th e tire!
Di sregarding the safe ty-r elat ed checkli st may
lead t o accidents and serious injurie s.
Always rev ie w and follow the c hecklist.
F ollow accepted safety practices and use common sense .
Do it yo ur self
Page 336 of 541
Please first read and note the introdu ctory information and heed the on page 336 .
the valve core from th e tir e valve
u sin g th e valve core page 337 , fig . 187 and place it on a clean surface.
Vigorous ly shake th e tir e inflation cylinder page 337, fig. 187
Tigh tly sc rew the filling page 337, fig. 187 to the tire inflation bo ttl e ( turn
He mov e the sealing plug from th e page 337, fig. 18 7 and slid e th e open end th e way onto the tire va lve.
H old the cylinder with the bottom po inting up and the entire contents of th e tir e inflati on inder int o th e tir e.
Detach the empty tir e inflation cylinder from
th e va lve.
p age337,fig. 187 sc rew the v al ve core back into the tir e valve.
the tire
the tire inflation page 337, fig. 187 o f th e air compressor tightl y to th e tir e va lve .
whether the air release pag e 337, 187 is screwe d on tightly.
page 337, fig. 187 into a soc ket of the page
Switch th e ai r compresso r on using th e page 337, fig. 187
Le t th e air compre ssor run until 2 .5 ) bar is re ach ed
Switch off the air compressor.
an air press ure of29-36 psi 2.5 bar)
cannot b e reac hed, unscrew the tire inflation hose from the tire v alve.
tips
Dr ive about feet m ete rs) backward s o r
f o rward s so that the sealant ca n be distributed sid e th e tire .
th e tire inflat ion hose of th e air pr esso r aga in to the tir e va lve and r epeat th e
th e required tir e pressure still cannot be reached. the tir e is too badly damaged. The t ir e
canno t b e sealed us ing th e tire mobilit y set. Do not
d rive the v ehicle. Get expert
Disconnect th e air compresso r and unscrew the tire infl ation hose from the tir e va lve .
mph km/h).
page340.
The tire inflation hose and ai r compresso r ca n
get hot during inflation.
Protec t hands and skin fro m hot parts.
Do not p lace th e hot tire inflation hose or hot air compressor on flammable material.
Let th e equipment cool off almost plet ely before sto wing it.
bar), th e damage is to o great to be repaired
wi th the tire mobility set. The sealant is not able to seal the tire. Do not drive the ve hicle. Get pert assistance.
Note
Do not let the compressor run for more than 8 minutes to help prevent overheating damage.
Let the compressor cool down for a few minutes
befor e switching it on again. Let it cool down most completely before stowing it in the re p a ir
kit.
338 339