2007 VOLKSWAGEN GOLF oil
[x] Cancel search: oilPage 330 of 444
3.2 Tips and Advice
The brake fluid be changed every two years.
We recommend that you have the brak e changed b y an authorize d Volkswagen dealer.
S top! Be
fore openin g th e e ngin e hood, always
read and heed all page 39.
Brake fluid
absorbs m oisture. time, it will absorb wate r from the air. the wa ter content in the brak e fluid is too high, the brake sys te m
c
ould corrode. Too much wa te r in the brak e fluid
a lso consid erably reduces the boilin g point of the brake fluid. Very heavy use of th e brak es with
old brake fluid may cause vapor lock . Vapo r lock
reduces braking power, in cre ases stopping tances and can eve n cause total brake failu re.
For this r
eason the brake fluid must be repla ced
every two years.
use brak e fluid the s pecification U S standard 116 4. The brake fluid must be new.
Stop ! Befor e working in the engine compartment, always read and h eed all WARNINGS 39. The engine compartment of any motor vehicl e is a potentiall y dangerous area and can cause seriou s persona l injury .
Brake failure can result from old or incorrect brake fluid.
fica tio n
(continued)
A lwa ys check with your authorized swage n deale r to make sure that you arc u sing the correct brake fluid.
The correct brake fluid is also listed on the
labe l on the brak e fluid reservoir.
Always store brake fluid in the closed
To reduce th e risk of poisoning, neve r us e empty food or beverage containers that mi ght mislead someone into drinking from them.
A lwa ys keep bra ke flu id out of the reach of childr en.
Alway s change th e b rake fluid as required in the maintenance bookl et. Heavy braking w ith old brake fluid may cause a vapor lock that reduces braking power, increases ping distances and can even cause tota l brake failure.
Note
Brake fluid can damage the pai nt. Wip e off any
brake fluid from rh c paint immedia tely.
For the sake of environment
B rake fluid
must be drained and disposed of in
th e proper manner obse rv ing env ironmental
Page 334 of 444
changea ble deco rat ive cove rs a re att ached to th e rim with s elf- locking sc rews . lfyou would ro re pla ce damaged wheel covers, contact your authorized Volkswa gen d eale r or
WARNING
New ti res or tires tha t are old, worn or aged cannot provide maximum control and braking ability.
New tires tend to be s lipp ery and must be broken in . To reduce the risk of losing co ntrol,
a co llisio n and serio us personal injuri es, drive with sp ecia l care for the first km).
(cont inued )
Driving with worn or damaged tire s can lead to lo ss of control, sudden tire failur e, cluding a blowou t and sudden deflation ,
c ras hes and seriou s personal injuries. Have wo rn or damaged tires rep laced imme di ate ly.
To redu ce the riskoflosingcontrol, crashes and s erio us personal injuries, never loose n
th e bolts on w heels with bolted rim rings.
more than 6 years old can onl y be used in an em erg en cy and then
w ith specia l care and at low speed.
Neve r m ount u se d tires on your ve hicle if
yo u are not sure of their used tires may have been damaged ev e n
t h oug h the damage cannot be seen th at can
lead to sudden tir e failure and loss of ve hicl e control.
hicl e pull s to one sid e when dri ving, always
s top as soo n as it is safe to do so and ch eck the
whee ls and tires for damage.
Accessory weight
Means the combined we ight ( in excess of those
sta ndard ite m s w hi ch may be repl aced) of mati c tran smission. power steering. po wer
bra kes, power windo ws. p owe r seats , radio, and heater, to th e ex te nt th at th ese item s are
or lowe r indica te
a short s id ewall for improved steering respo nse and better ove rall handling on dry pave ment.
Bead
Mean s the pa rt of the tire t hat is m ad e of stee l
wires , w rap ped or re inforce d by pl y cords and that is shap ed to fit t he rim.
Bead separation
Mean s a breakdow n of th e bond between
Means the strand s forming the in th e tire.
weight
Me ans th e weig ht of motor vehicl e w ith dard equ ipment including the m aximum pacity of fu el, oil. and coolant . a ir conditio nin g
a nd additional weight of opt io n al equipm ent.
E xtra load lire
M ea ns tire desi gn to operate at higher loads and at hi gher inflat ion pressure s th an th e corre -
s ponding sta ndard tire.
Page 355 of 444
3.2 Tips and Advice
Wheel bolts must always be tig hte ned to the correct torque.
The design of w heel bolts is mat ched to th e th e
correct wheel bolts with th e rig ht length and rectly shaped bolt heads mu st be use d. Th is sures th at w heels are securely and the
brake system functio ns correct ly.
In cert a in cir cumstances, y ou ma y not usc wheel
bolts from a differe nt vehicl e- ev en if it is th e
sa me mod el page
serio us personal in jury.
keep the wheel bolts the
th reads in the wheel hubs clean so the whee l
bolt s turn easily en ed.
Neve r grease or oi l th e wh eel bolt s and th e
th reads in the wheel hubs. They ca n become
WARN ING (continued)
loose while driving if grea sed or oile d, eve n if
t ightened to th e s pecifi ed torque.
use wheel bolt s belo ng to the
wheel rim installed .
Never usc diff erent wheel s bolts on your vehicle.
Always maintai n th e correc t tig htening torqu e for the w hee l b olts to reduce the ri sk of a wheel loss. If the tightening torque of the
whee l bolts is too low, they can loosen come out w hen th e vehicl e is m ov ing . If t he
tight en ing torque is too high, the wheel bolts and threads can be damaged the w heel
can become loose .
Note
The specifi ed torqu e for th e w hee l bolts is
88 ft/ lb s Nm). Afte r changi ng a whe el. th e
torqu e must b e ch ec ked as soon as po ss ibl e w ith
a torque wre nch - pref erably by an authori zed Volkswage n dealer or qu alified works hop.
Page 363 of 444
in wet con dition s. o rd er t o f ully exploi t th e
b en efits of un idi re c tional tires ag ain, yo u sh o uld
imm ed iat ely r eplace or chan ge th e tire in o rd er
t o r estor e th e co rrect direc tio n o f rotat ion.
WARNING
Imprope rl y tig h te n ed or mainta ined wheel
bo lts can b ec ome lo ose causing loss o f co n tro l,
a c olli sion and serious p erso nal inju ry:
Always keep the wh eel bolt s and th e
thread s in the wh eel hu bs clean so th e wheel
b olt s can turn eas ily and be properly
N eve r g re ase or oil th e w heel bo lts and the
threads in the wheel hub s. They can become loose whil e dri vin g if gr ease d or oiled , eve n if
ti ghten e d t o the sp ecified t orque.
After changing a
-secure the jack and
tool kit in th e luggage
-
page 86 .
- H
ave the tire pressures all
the d e tect an
page 62 o r
Always read a nd heed all and oth e r important pa ge 79,
Note
The s pecified to rqu e for th e w hee l bolts is
88 ft / lb s N m). The torque must be c hecke d
a s soon as possib le w ith a torq ue w re n ch -erably by an authorize d Volkswa gen deale r o r
q ualified wo rksho p.
rod ed and pla ced befo re you ha ve the torq ue chec ked or have the b olts ti g htened to th e proper to rq ue.
H ave th e damage d tire replace d with a tire o f
th e sa me brand . s p ecifi ca tio ns a nd tread
WARNING
Alw ays properly secure the vehicl e jack an d
too l kit in the lu gg ag e compartment.
ment. Loose item s in th e ve hicle ca n fly
a round the in sid e o f the ve hicl e d urin g hard brakin g or in a c rash causin g se riou s perso nal
in jury.
Note
Th e specified to rqu e fo r th e w heel bolts is
88 N m). Th e torqu e must be c hec ked as soo n as possi ble w ith a torqu e w renc h -erably by an a uth orized Volk sw age n deale r o r
qua lified wo rk s h o p.
yo u no tice that the w he el b olts arc rode d and ha rd to tu rn . they mu st b e rep la ced
b efor e yo u have the torq ue c hec ke d or have th e
b olts tight en ed to the prop er
W ha t d o
Page 373 of 444
(continued)
swagen dealer or a qualified workshop. rious personal injury m ay resu lt from erl y perfo rmed work.
Booklet 3.2 Tips and Advice
Note
Do not touch glass bulb with bare hands.
A bulb can on ly be rep laced by a bulb of the same type. The model identification is either on the bulb base or on the bulb
turn
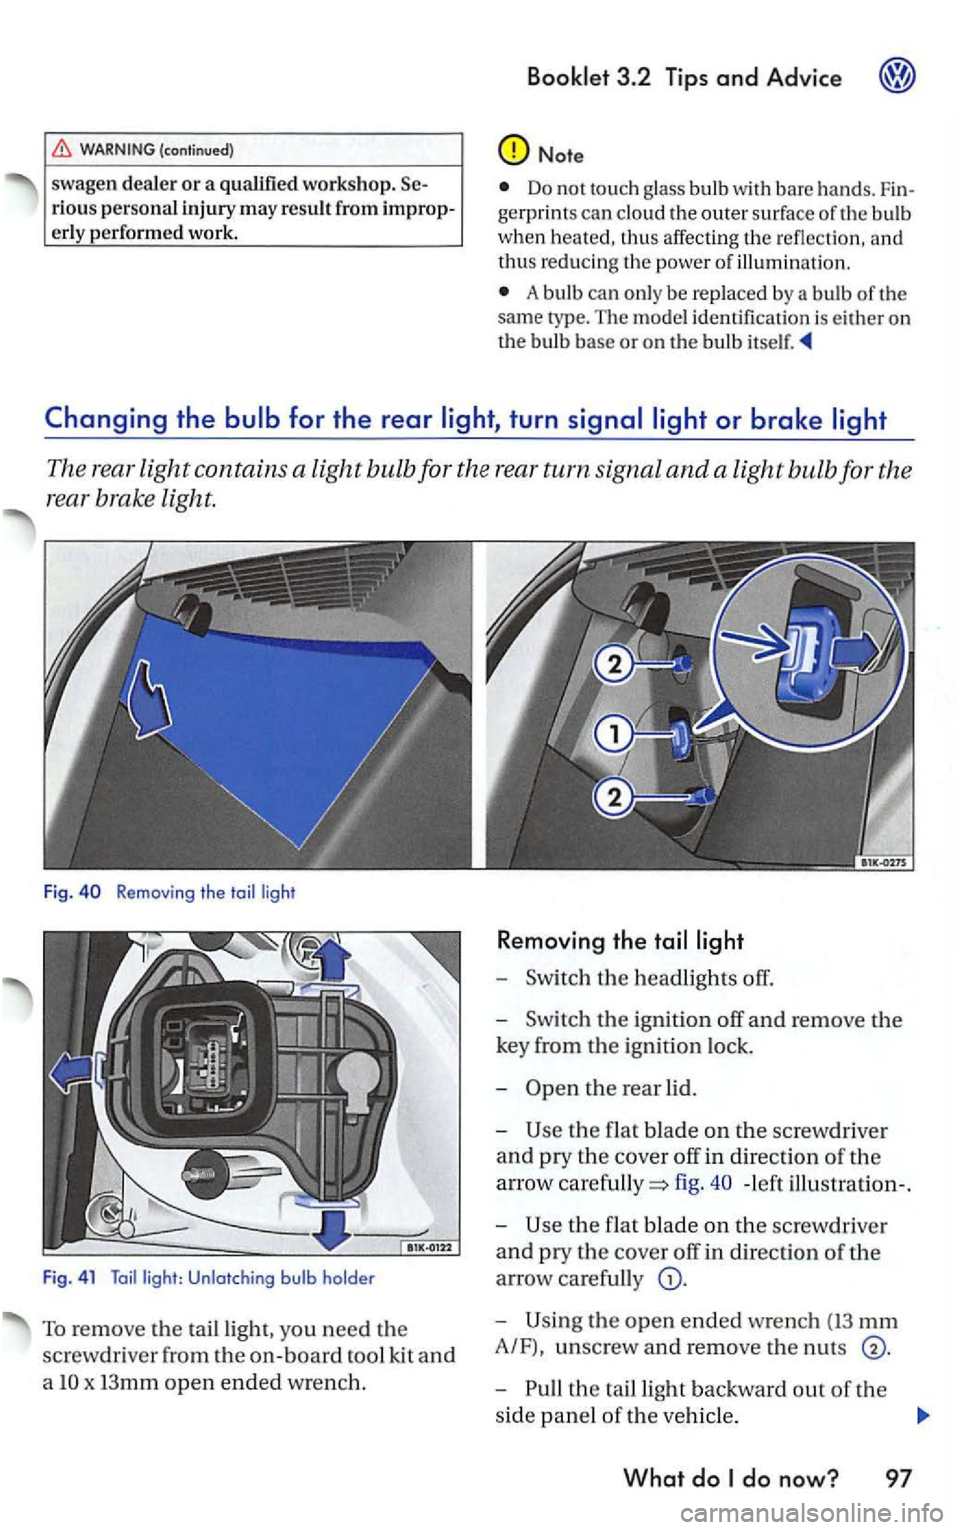
The rear light contains a light bulb fo r the rear turn signal and a light bulb for the
rea r brake light.
Fig . Removing the toi l ligh t
F ig . 4 1
Toil light: Unlotching bulb holde r
To remov e the tailligh t, yo u need the
screwdr iver from th e
on-board tool kit and
a
x I3mm open ended wrench.
R e moving the
-the headlights off.
-the ign ition off and remove the
key from the ignition lock.
-
the flat blade on th e screw driver
and pry the cover off in direction of th e
arrow
fig. - left illu stration-.
-
the f lat b lade on the sc rewdri ver
and pry the cover off in direction of the
arrow carefully
the open ended wrench (13 mm
A/F), unscrew and remo ve the nut s
the ta illight backward out of the
side panel
of th e veh icle .
What do
Page 384 of 444
light 5
See Anti-lock brake
should want to add an acces-sor y to my ve hicl e?
Add ress of
Add ress of Transport
Afte r c hanging a w heel 87
Alloy
wheels
fe el a slight v i
b ration on the brake pedal? 4
Ant i-t h
eft alarm system
Linking your trailer
Anti-theft wheel bolts 84
A uto Safety Hotline
Automatic car wash 22
B
3
Batt ery
56
low often should replace m y engin e
battery? 56
Important informatio n t o know befo re
d isconnect the battery 55
Hcplac ing
56 yo u must do after reconnect the battery 55
is the correct brake nuidleve l?. 53
Brake syste m 53
light 2
B rak
es low docs mois ture or road salt affect the brakes? 13
does it mean when feel a slight vibra tion o n the brake pedal? 4
Br
aking distance 13
Break-in period
Engin e 12
is the right way to break-in my vehicle? 12
Br e
aking in
B r
ake pads 12
Ti r
es 12
Break ing in
tires 12
Bulb ch
ange 93
Bulb fa
ilure 93
65 39 , 55
22
ra di o 33
phone 33
phone 33
a bulb 93
a w heel 86
brake pads
fuel cap 36
engine oil leve l 44
26
Page 385 of 444
Allo y w heels 26
Auto m
atic car w as h 22
Bumper 23
27
seat cove rs 29
Engine
compartment 27 Exterior 22
Fabric
trim 29
Instrument panel 28
Leat her 29
Outside mirrors 25 part s 28
belt s th e ve hicl e 22
25
tri m 28
and protection 2 1
scat covers
29
numbe r
For anti -
theft wheel bolt s
pressure 6 1
47
L eve l 49
L
oss 49
light 48
temperature
in structions 48
Tr
ailer t o w in g 48 light 48
recorders 34
D
Da ta Link for agnosti c II
D etermin in g correct load limit 71
D ifferentia l lock 6
D rive
econom ically 19
D rive
economi cally and he lp protec t th e environment 19
D
riving o u ts id e of the or Precautions
3 .2 Tips and Advice
light 5
Elec tron ic di
fferential lock 6
Electroni c
Control 9
Electronic
Stabili zat ion
How it work s 6
Em erge ncy
Lockin g drive r's door 88
Opening leve r for the rear lid 89
Unlo ckin g
driver's door 88
Emergen cy clos ing 88
E m erg
ency locking doors 88
E m erge ncy op
ening 88
E m erge ncy
unlocking of rear lid 89
E ngin e
Break-in 12
E ngine
compartment
27
Pr eca utions yo u s ho ul d tak e when working inside th e engine compartment 39
I add pl ain water to the engin e
c o ol
ant?
losses
light 4 1
E n gin e m a
nagem ent 9
E n gin e oil 42
Adding 45 Additi ves 46
leve l 44 43
Dip stick 44
How do I k now how much oil my engine is consuming? 43
c h an ge 46
Specificati on s 42
S pecificat i
ons gasolin e engine 42 kind of engine oil should put in my
ve hicle? 42
Page 386 of 444
sh o uld I check the engine oil
level? 43
ligh t 45
Engine oil sensor li g h t 44
Environment Avoiding pollution 23, 36
the eng in e compartment 28 Drive economically 19
light 9
also E lectron ic
light 7
Even t Data Hecorder
34
Exhaus t system
light II
Exhau st system 9
Externa l
aeria l 33
F
Fabric trim
light 35
Fuse b ox
I n the in strument p anel , left 92
In the in strum ent pan el, rig h t 92
table 92
Fuses
G
Gaskets
Gasoline 37
Blends 37 alcohol 37
rating 37
37
Hegular 37 Unleaded 37 ifl purchase poor qua lity fu el? 37
woul d happen if I put leaded gaso
l
ine in my ca r? 37
or summer tips 37
Gasoline addi tives
Generator light 56
G lossary oft ire and loading terminology 58
H
I low co uld I damage the cata lytic
conve rter? 9
I low do I know how much oil en gi ne is
consuming'? 43
How do I unlock the en gine hood? 41
How doe s moisture or road salt affec t the brakes? 13
How ofte n should I check my tire
pressures? 69
How often should I replace my engine
battery?
56
How oft e n should I wax my 24
I low ofte n should th e brak e nuid be
c h anged?
54
I low to jump start
light
I n st
rument pane l 28
J
Jack
Jump starti n g
Access positive and negative
terminals
Jumper cables
L
Leather