2007 TOYOTA SIENNA fuel pump
[x] Cancel search: fuel pumpPage 681 of 3000
ES–3882GR-FE ENGINE CONTROL SYSTEM – SFI SYSTEM
ES
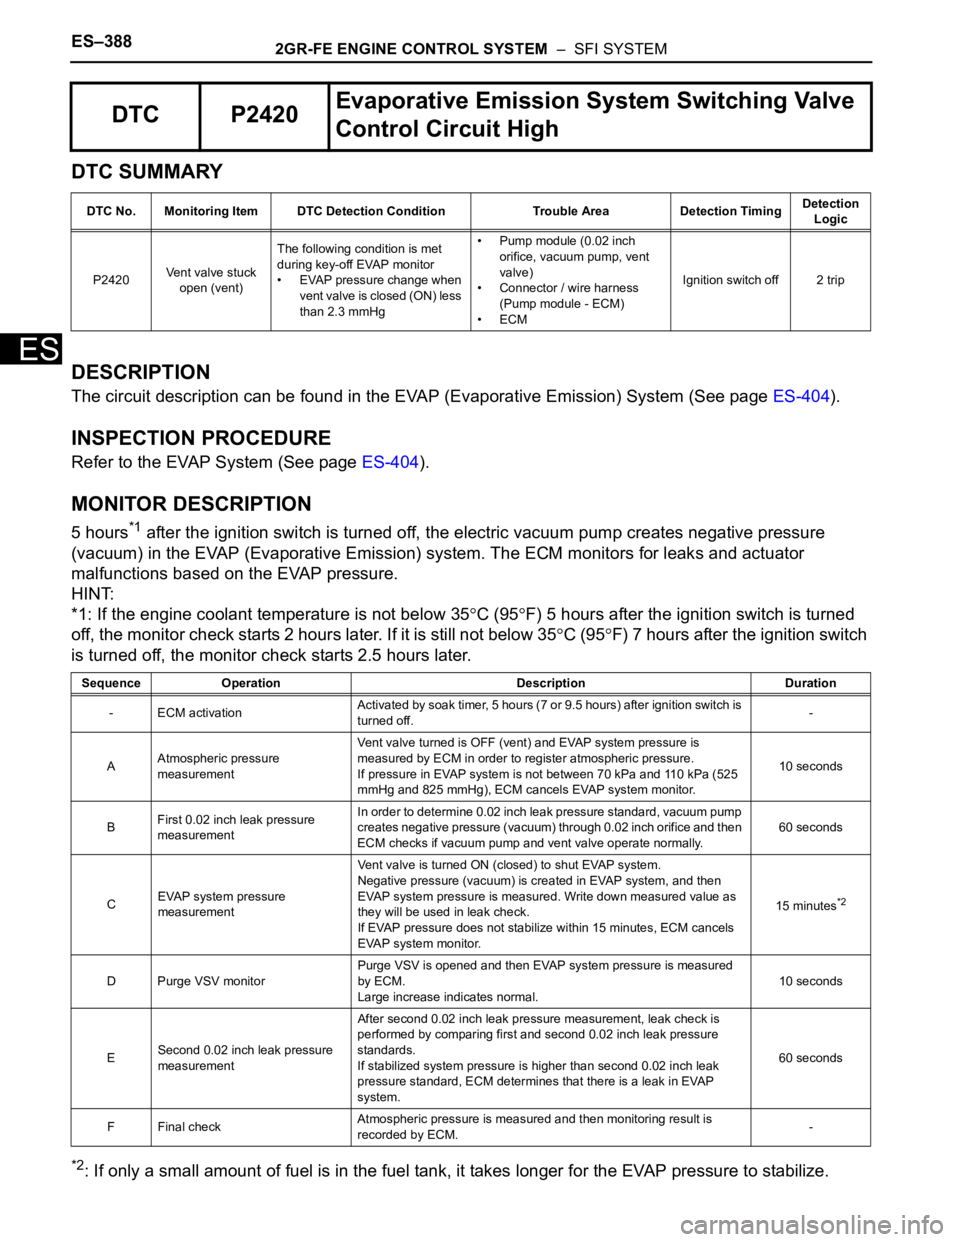
DTC SUMMARY
DESCRIPTION
The circuit description can be found in the EVAP (Evaporative Emission) System (See page ES-404).
INSPECTION PROCEDURE
Refer to the EVAP System (See page ES-404).
MONITOR DESCRIPTION
5 hours*1 after the ignition switch is turned off, the electric vacuum pump creates negative pressure
(vacuum) in the EVAP (Evaporative Emission) system. The ECM monitors for leaks and actuator
malfunctions based on the EVAP pressure.
HINT:
*1: If the engine coolant temperature is not below 35
C (95F) 5 hours after the ignition switch is turned
off, the monitor check starts 2 hours later. If it is still not below 35
C (95F) 7 hours after the ignition switch
is turned off, the monitor check starts 2.5 hours later.
*2: If only a small amount of fuel is in the fuel tank, it takes longer for the EVAP pressure to stabilize.
DTC P2420Evaporative Emission System Switching Valve
Control Circuit High
DTC No. Monitoring Item DTC Detection Condition Trouble Area Detection TimingDetection
Logic
P2420Vent valve stuck
open (vent)The following condition is met
during key-off EVAP monitor
• EVAP pressure change when
vent valve is closed (ON) less
than 2.3 mmHg• Pump module (0.02 inch
orifice, vacuum pump, vent
valve)
• Connector / wire harness
(Pump module - ECM)
•ECMIgnition switch off 2 trip
Sequence Operation Description Duration
- ECM activationActivated by soak timer, 5 hours (7 or 9.5 hours) after ignition switch is
turned off.-
AAtmospheric pressure
measurementVent valve turned is OFF (vent) and EVAP system pressure is
measured by ECM in order to register atmospheric pressure.
If pressure in EVAP system is not between 70 kPa and 110 kPa (525
mmHg and 825 mmHg), ECM cancels EVAP system monitor.10 seconds
BFirst 0.02 inch leak pressure
measurementIn order to determine 0.02 inch leak pressure standard, vacuum pump
creates negative pressure (vacuum) through 0.02 inch orifice and then
ECM checks if vacuum pump and vent valve operate normally.60 seconds
CEVAP system pressure
measurementVent valve is turned ON (closed) to shut EVAP system.
Negative pressure (vacuum) is created in EVAP system, and then
EVAP system pressure is measured. Write down measured value as
they will be used in leak check.
If EVAP pressure does not stabilize within 15 minutes, ECM cancels
EVAP system monitor.15 minutes
*2
D Purge VSV monitorPurge VSV is opened and then EVAP system pressure is measured
by ECM.
Large increase indicates normal.10 seconds
ESecond 0.02 inch leak pressure
measurementAfter second 0.02 inch leak pressure measurement, leak check is
performed by comparing first and second 0.02 inch leak pressure
standards.
If stabilized system pressure is higher than second 0.02 inch leak
pressure standard, ECM determines that there is a leak in EVAP
system.60 seconds
F Final checkAtmospheric pressure is measured and then monitoring result is
recorded by ECM.-
Page 700 of 3000
ES–4142GR-FE ENGINE CONTROL SYSTEM – SFI SYSTEM
ES
(2) Turn the ignition switch off and wait for 6 hours (8 or 10.5 hours).
HINT:
Do not start the engine until checking MONITOR STATUS. If the engine is started, the steps
described above must be repeated.
(c) Monitor Status
(1) Connect the intelligent tester to the DLC3.
(2) Turn the ignition switch to the ON position and turn the tester on.
(3) Select the following menu items: DIAGNOSIS / ENHANCED OBD II / MONITOR STATUS.
(4) Check the "Monitor Status" displayed on the tester.
HINT:
If INCMP is displayed, the monitor is not completed. Make sure that the preconditions have
been met, and perform "Monitor Conditions" again.
2. PURGE FLOW MONITOR CONFIRMATION (P0441)
HINT:
Perform this monitor confirmation after the Key-Off Monitor Confirmation shows COMPL (complete).
(a) Preconditions
The monitor will not run unless:
• The vehicle has been driven for 10 minutes or more (in a city area or on a freeway)
• The ECT is between 4.4
C and 35C (40F and 95F)
• The IAT is between 4.4
C and 35C (40F and 95F)
(b) Monitor Conditions
(1) Release the pressure from the fuel tank by removing and reinstalling the fuel tank cap.
(2) Warm the engine up until the ECT reaches more than 75
C (167F).
(3) Increase the engine speed to 3000 rpm once.
(4) Allow the engine to idle and turn the A/C ON for 1 minute.
(c) Monitor Status
(1) Turn the ignition switch off.
(2) Connect the intelligent tester to the DLC3.
(3) Turn the ignition switch to the ON position and turn the tester on.
(4) Select the following menu items: DIAGNOSIS / ENHANCED OBD II / MONITOR STATUS.
(5) Check the "Monitor Status" displayed on the tester.
HINT:
If INCMP is displayed, the monitor is not completed. Make sure that the preconditions have
been met, and perform "Monitor Conditions" again.
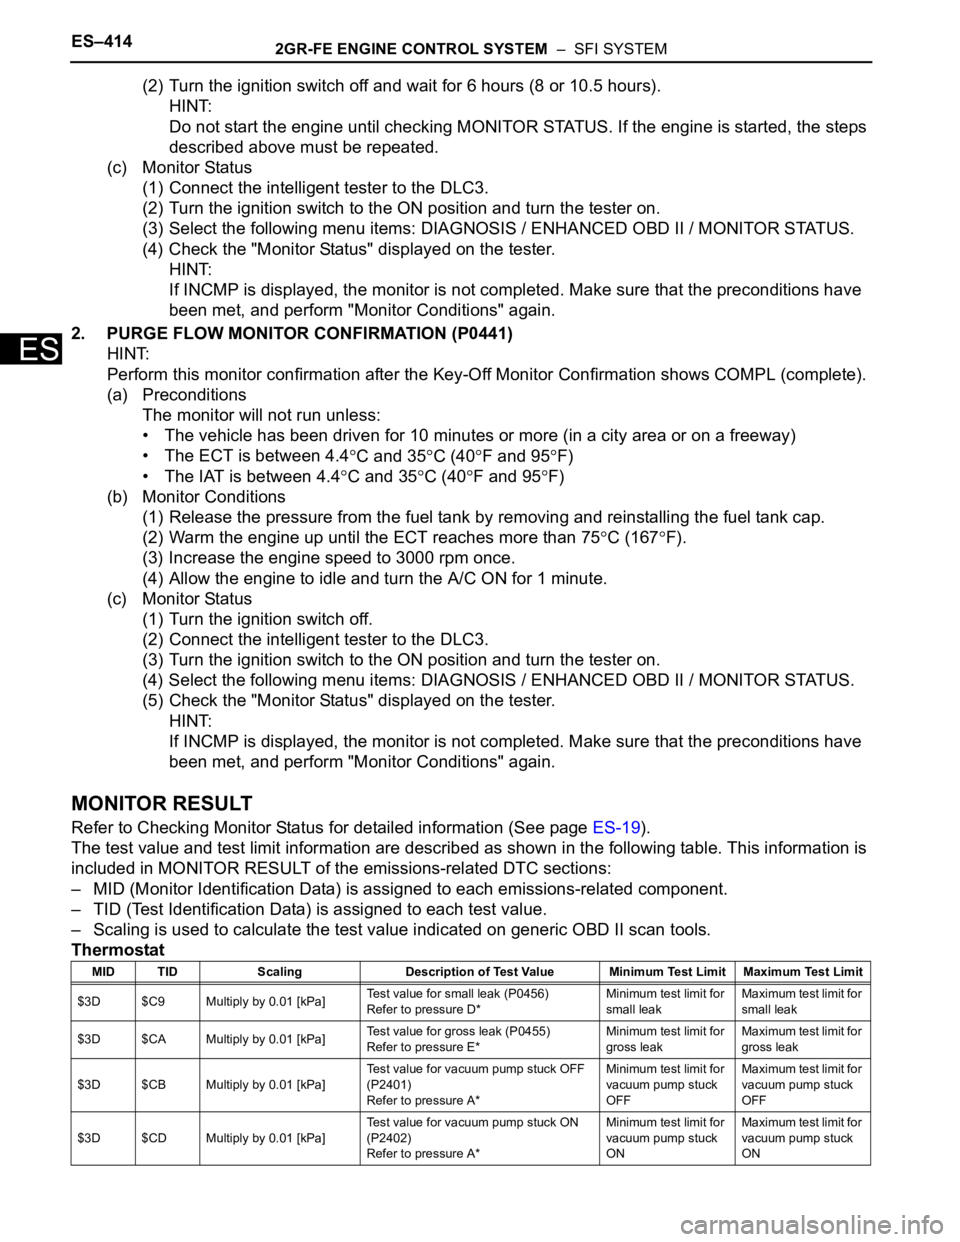
MONITOR RESULT
Refer to Checking Monitor Status for detailed information (See page ES-19).
The test value and test limit information are described as shown in the following table. This information is
included in MONITOR RESULT of the emissions-related DTC sections:
– MID (Monitor Identification Data) is assigned to each emissions-related component.
– TID (Test Identification Data) is assigned to each test value.
– Scaling is used to calculate the test value indicated on generic OBD II scan tools.
Thermostat
MID TID Scaling Description of Test Value Minimum Test Limit Maximum Test Limit
$3D $C9 Multiply by 0.01 [kPa]Test value for small leak (P0456)
Refer to pressure D*Minimum test limit for
small leakMaximum test limit for
small leak
$3D $CA Multiply by 0.01 [kPa]Test value for gross leak (P0455)
Refer to pressure E*Minimum test limit for
gross leakMaximum test limit for
gross leak
$3D $CB Multiply by 0.01 [kPa]Test value for vacuum pump stuck OFF
(P2401)
Refer to pressure A*Minimum test limit for
vacuum pump stuck
OFFMaximum test limit for
vacuum pump stuck
OFF
$3D $CD Multiply by 0.01 [kPa]Test value for vacuum pump stuck ON
(P2402)
Refer to pressure A*Minimum test limit for
vacuum pump stuck
ONMaximum test limit for
vacuum pump stuck
ON
Page 704 of 3000
ES–4182GR-FE ENGINE CONTROL SYSTEM – SFI SYSTEM
ES
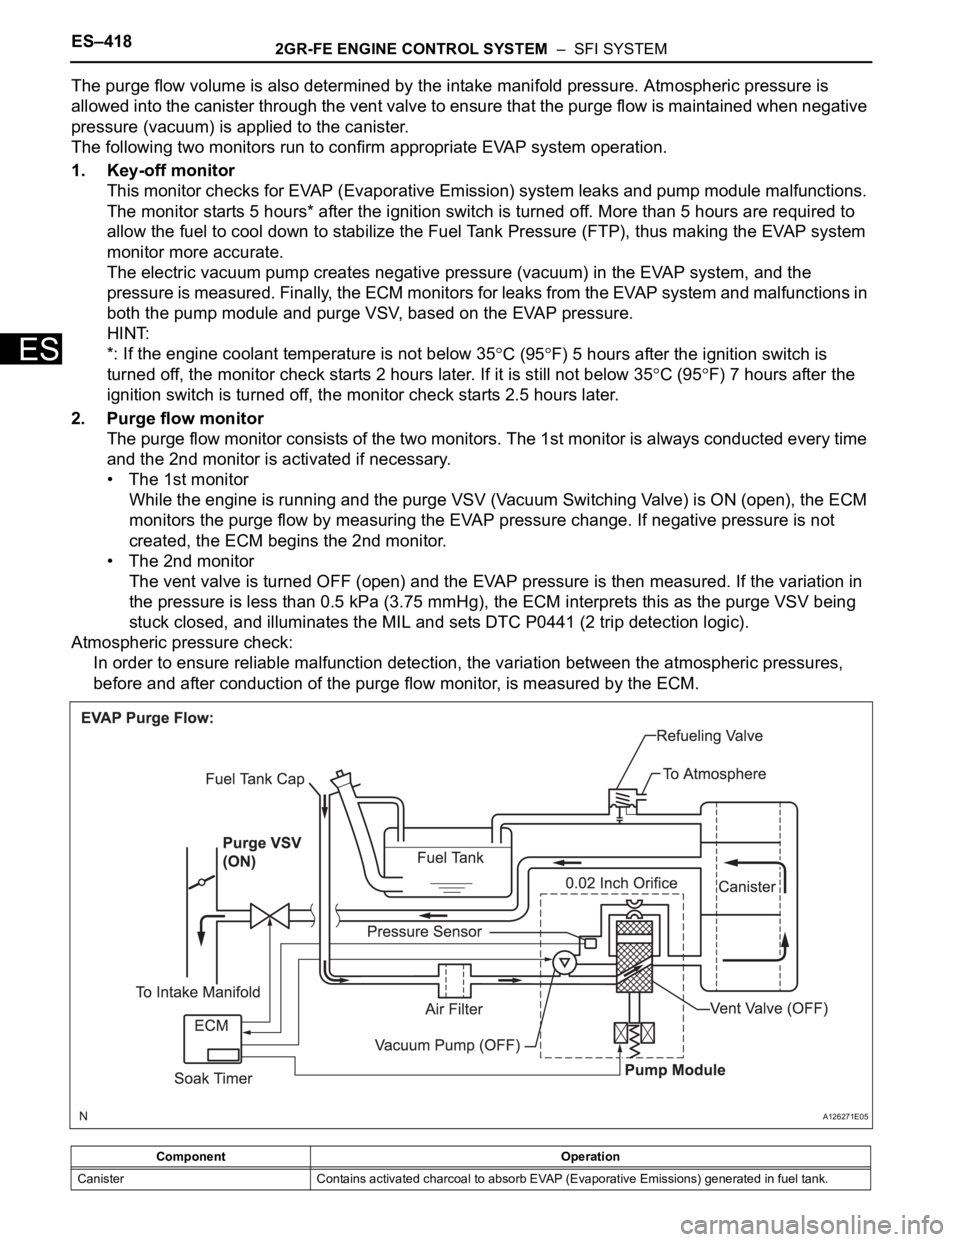
The purge flow volume is also determined by the intake manifold pressure. Atmospheric pressure is
allowed into the canister through the vent valve to ensure that the purge flow is maintained when negative
pressure (vacuum) is applied to the canister.
The following two monitors run to confirm appropriate EVAP system operation.
1. Key-off monitor
This monitor checks for EVAP (Evaporative Emission) system leaks and pump module malfunctions.
The monitor starts 5 hours* after the ignition switch is turned off. More than 5 hours are required to
allow the fuel to cool down to stabilize the Fuel Tank Pressure (FTP), thus making the EVAP system
monitor more accurate.
The electric vacuum pump creates negative pressure (vacuum) in the EVAP system, and the
pressure is measured. Finally, the ECM monitors for leaks from the EVAP system and malfunctions in
both the pump module and purge VSV, based on the EVAP pressure.
HINT:
*: If the engine coolant temperature is not below 35
C (95F) 5 hours after the ignition switch is
turned off, the monitor check starts 2 hours later. If it is still not below 35
C (95F) 7 hours after the
ignition switch is turned off, the monitor check starts 2.5 hours later.
2. Purge flow monitor
The purge flow monitor consists of the two monitors. The 1st monitor is always conducted every time
and the 2nd monitor is activated if necessary.
• The 1st monitor
While the engine is running and the purge VSV (Vacuum Switching Valve) is ON (open), the ECM
monitors the purge flow by measuring the EVAP pressure change. If negative pressure is not
created, the ECM begins the 2nd monitor.
• The 2nd monitor
The vent valve is turned OFF (open) and the EVAP pressure is then measured. If the variation in
the pressure is less than 0.5 kPa (3.75 mmHg), the ECM interprets this as the purge VSV being
stuck closed, and illuminates the MIL and sets DTC P0441 (2 trip detection logic).
Atmospheric pressure check:
In order to ensure reliable malfunction detection, the variation between the atmospheric pressures,
before and after conduction of the purge flow monitor, is measured by the ECM.
Component Operation
Canister Contains activated charcoal to absorb EVAP (Evaporative Emissions) generated in fuel tank.
A126271E05
Page 705 of 3000

2GR-FE ENGINE CONTROL SYSTEM – SFI SYSTEMES–419
ES
Cut-off valve Located in fuel tank. Valve floats and closes when fuel tank is 100% full.
Purge VSV (Vacuum Switching Valve)Opens or closes line between canister and intake manifold. ECM uses purge VSV to control EVAP
purge flow. In order to discharge EVAP absorbed by canister to intake manifold, ECM opens purge
VSV. EVAP discharge volume to intake manifold is controlled by purge VSV duty cycle ratio
(current-carrying time). (Open: ON, Close: OFF)
Refueling valveControls EVAP pressure from fuel tank to canister. Valve consists of diaphragm, spring and
restrictor (diameter: 0.08 inch). When fuel vapor and pressure inside fuel tank increase, valve
opens. While EVAP is purged, valve closes and restrictor prevents a large amount of vacuum from
affecting pressure in fuel tank. Valve is opened while refueling. When valve is open, adding fuel into
fuel tank is possible.
Roll-over valveLocated in fuel tank. Valve closes by its own weight when vehicle overturns to prevent fuel from
spilling out.
Service port Used for connecting vacuum gauge for inspecting EVAP system.
Soak timerBuilt into ECM. To ensure accurate EVAP monitor, measures 5 hours (+/- 15 min.) after ignition
switch is turned off. This allows fuel to cool down, stabilizing Fuel Tank Pressure (FTP). When
approx. 5 hours elapsed, ECM activates.
Canister pump module Consists of (a) to (d) below. Pump module cannot be disassembled.
(a) Vent valveVents and closes EVAP system. When ECM turns valve ON, EVAP system is closed. When ECM
turns valve OFF, EVAP system is vented. Negative pressure (vacuum) is created in EVAP system
to check for EVAP leaks by closing purge VSV and vent valve (closed), and operating vacuum
pump are turned on (refer to fig. 1).
(b) Canister pressure sensorIndicates pressure as voltages. ECM supplies regulated 5 V to pressure sensor, and uses feedback
from sensor to monitor EVAP system pressure (refer to fig 2).
(c) Vacuum pump Creates negative pressure (vacuum) in EVAP system for leak check.
(d) 0.02 inch orificeHas an opening with 0.02 inch diameter. Vacuum is produced through orifice by closing purge VSV,
turning off vent valve and operating vacuum pump, to monitor 0.02 inch leak pressure. 0.02 inch
leak pressure indicates a small leak of EVAP. Component Operation
Page 718 of 3000
ES–4322GR-FE ENGINE CONTROL SYSTEM – SFI SYSTEM
ES
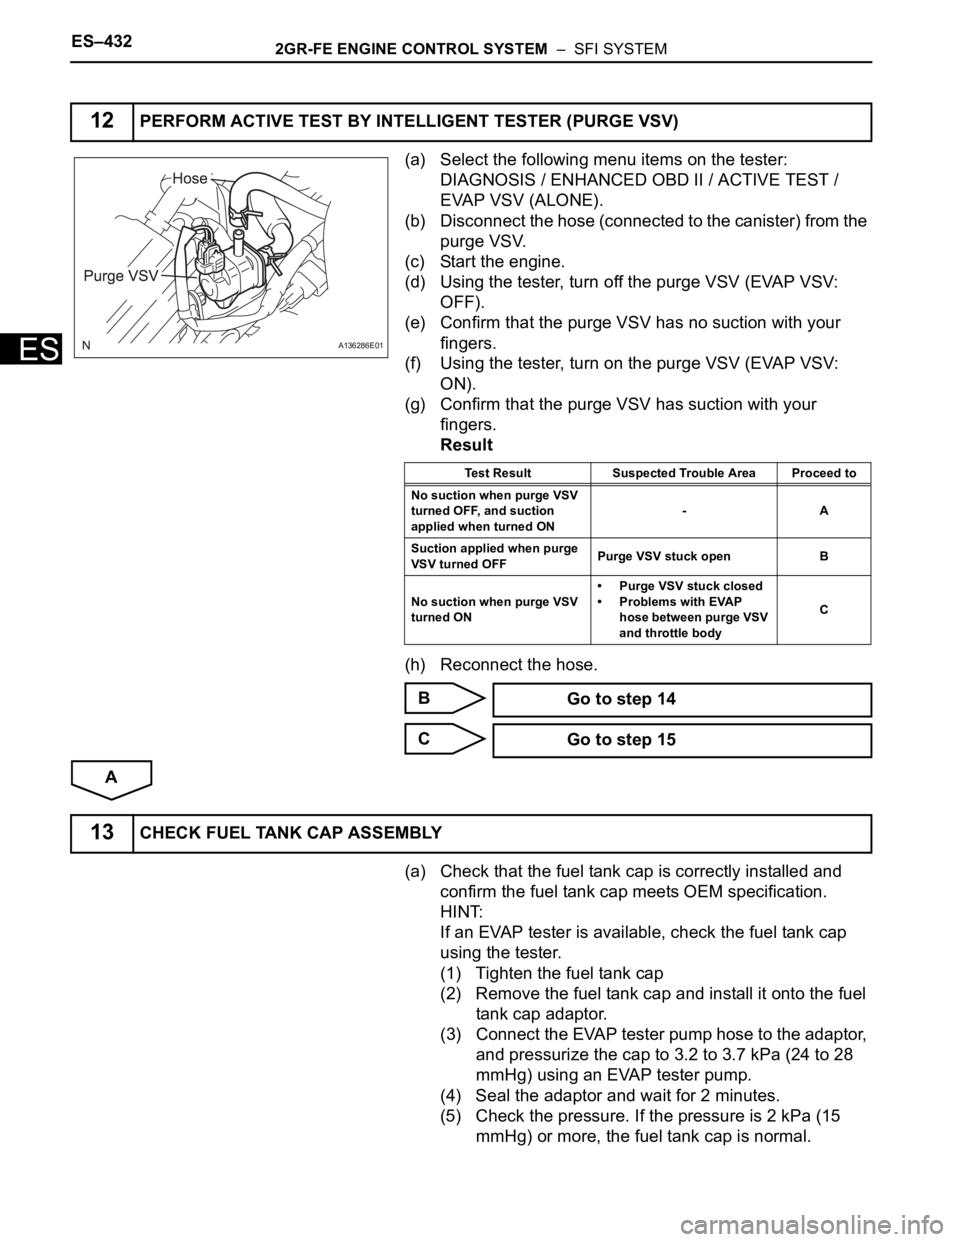
(a) Select the following menu items on the tester:
DIAGNOSIS / ENHANCED OBD II / ACTIVE TEST /
EVAP VSV (ALONE).
(b) Disconnect the hose (connected to the canister) from the
purge VSV.
(c) Start the engine.
(d) Using the tester, turn off the purge VSV (EVAP VSV:
OFF).
(e) Confirm that the purge VSV has no suction with your
fingers.
(f) Using the tester, turn on the purge VSV (EVAP VSV:
ON).
(g) Confirm that the purge VSV has suction with your
fingers.
Result
(h) Reconnect the hose.
B
C
A
(a) Check that the fuel tank cap is correctly installed and
confirm the fuel tank cap meets OEM specification.
HINT:
If an EVAP tester is available, check the fuel tank cap
using the tester.
(1) Tighten the fuel tank cap
(2) Remove the fuel tank cap and install it onto the fuel
tank cap adaptor.
(3) Connect the EVAP tester pump hose to the adaptor,
and pressurize the cap to 3.2 to 3.7 kPa (24 to 28
mmHg) using an EVAP tester pump.
(4) Seal the adaptor and wait for 2 minutes.
(5) Check the pressure. If the pressure is 2 kPa (15
mmHg) or more, the fuel tank cap is normal.
12PERFORM ACTIVE TEST BY INTELLIGENT TESTER (PURGE VSV)
A136286E01
Test Result Suspected Trouble Area Proceed to
No suction when purge VSV
turned OFF, and suction
applied when turned ON-A
Suction applied when purge
VSV turned OFFPurge VSV stuck open B
No suction when purge VSV
turned ON• Purge VSV stuck closed
• Problems with EVAP
hose between purge VSV
and throttle bodyC
Go to step 14
Go to step 15
13CHECK FUEL TANK CAP ASSEMBLY
Page 725 of 3000
2GR-FE ENGINE CONTROL SYSTEM – SFI SYSTEMES–439
ES
A
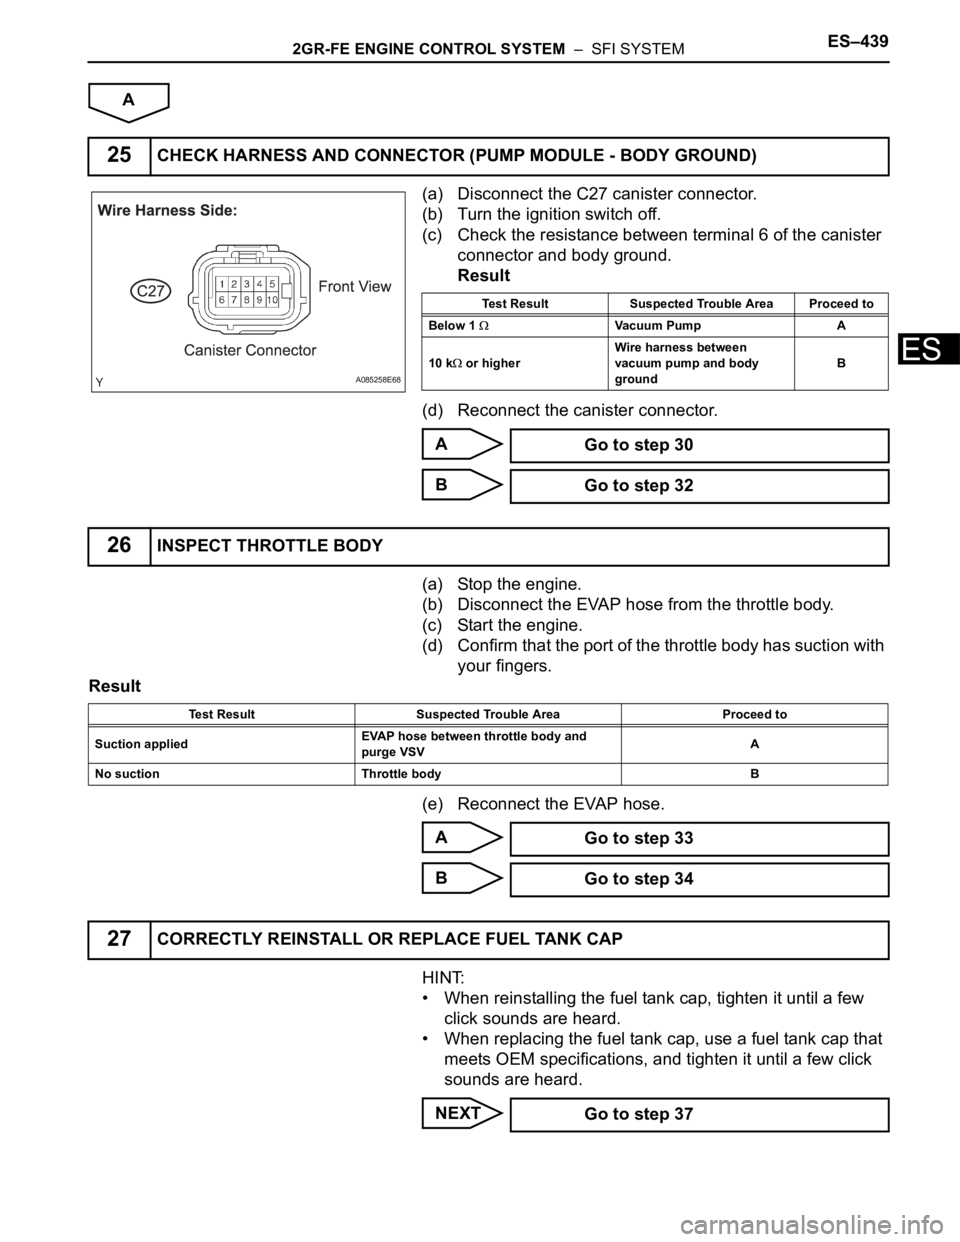
(a) Disconnect the C27 canister connector.
(b) Turn the ignition switch off.
(c) Check the resistance between terminal 6 of the canister
connector and body ground.
Result
(d) Reconnect the canister connector.
A
B
(a) Stop the engine.
(b) Disconnect the EVAP hose from the throttle body.
(c) Start the engine.
(d) Confirm that the port of the throttle body has suction with
your fingers.
Result
(e) Reconnect the EVAP hose.
A
B
HINT:
• When reinstalling the fuel tank cap, tighten it until a few
click sounds are heard.
• When replacing the fuel tank cap, use a fuel tank cap that
meets OEM specifications, and tighten it until a few click
sounds are heard.
NEXT
25CHECK HARNESS AND CONNECTOR (PUMP MODULE - BODY GROUND)
A085258E68
Test Result Suspected Trouble Area Proceed to
Below 1
Vacuum Pump A
10 k
or higherWire harness between
vacuum pump and body
groundB
Go to step 30
Go to step 32
26INSPECT THROTTLE BODY
Test Result Suspected Trouble Area Proceed to
Suction appliedEVAP hose between throttle body and
purge VSVA
No suction Throttle body B
Go to step 33
Go to step 34
27CORRECTLY REINSTALL OR REPLACE FUEL TANK CAP
Go to step 37
Page 727 of 3000
2GR-FE ENGINE CONTROL SYSTEM – SFI SYSTEMES–441
ES
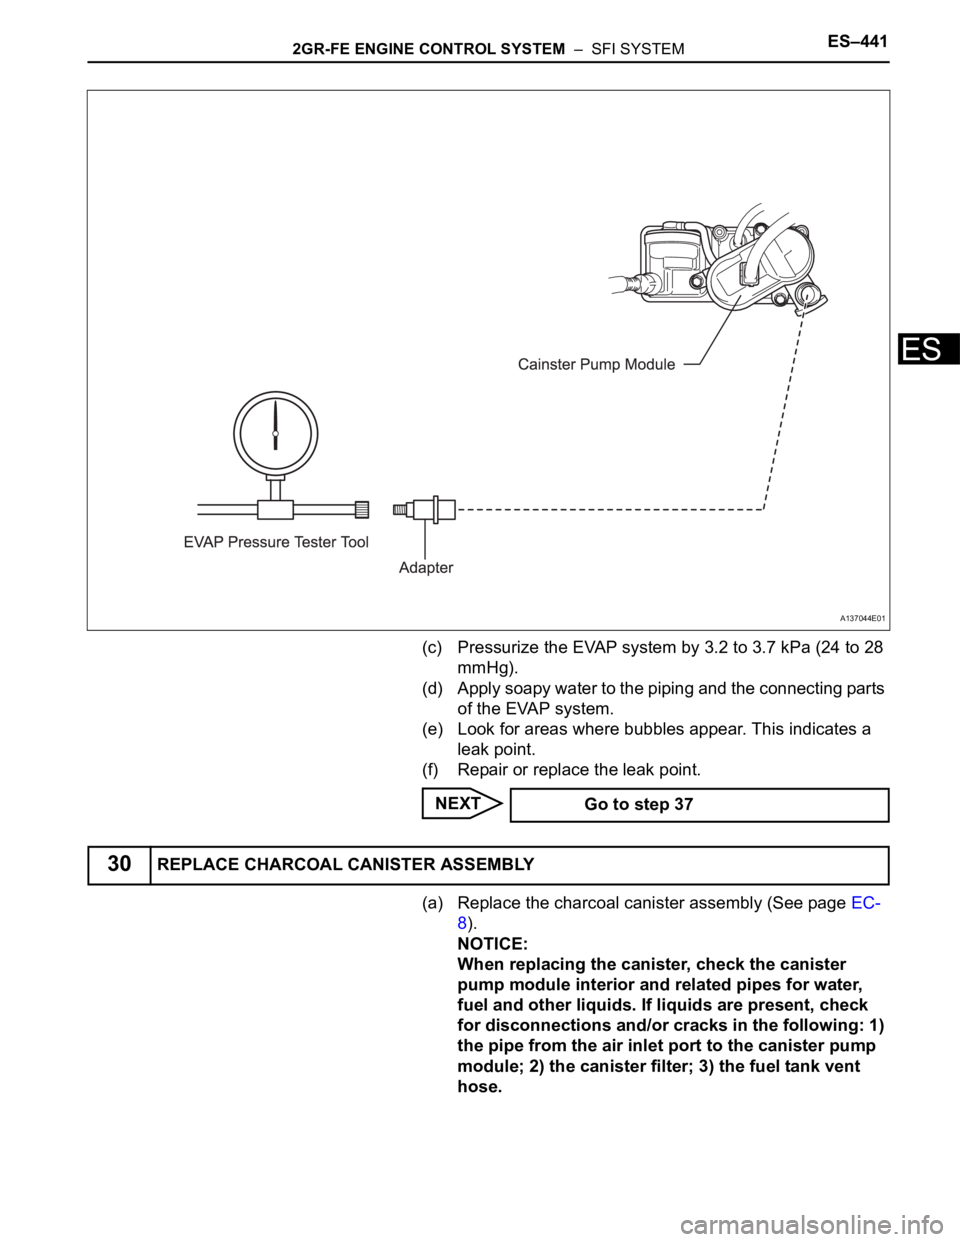
(c) Pressurize the EVAP system by 3.2 to 3.7 kPa (24 to 28
mmHg).
(d) Apply soapy water to the piping and the connecting parts
of the EVAP system.
(e) Look for areas where bubbles appear. This indicates a
leak point.
(f) Repair or replace the leak point.
NEXT
(a) Replace the charcoal canister assembly (See page EC-
8).
NOTICE:
When replacing the canister, check the canister
pump module interior and related pipes for water,
fuel and other liquids. If liquids are present, check
for disconnections and/or cracks in the following: 1)
the pipe from the air inlet port to the canister pump
module; 2) the canister filter; 3) the fuel tank vent
hose.
A137044E01
Go to step 37
30REPLACE CHARCOAL CANISTER ASSEMBLY
Page 745 of 3000
2GR-FE ENGINE CONTROL SYSTEM – SFI SYSTEMES–459
ES
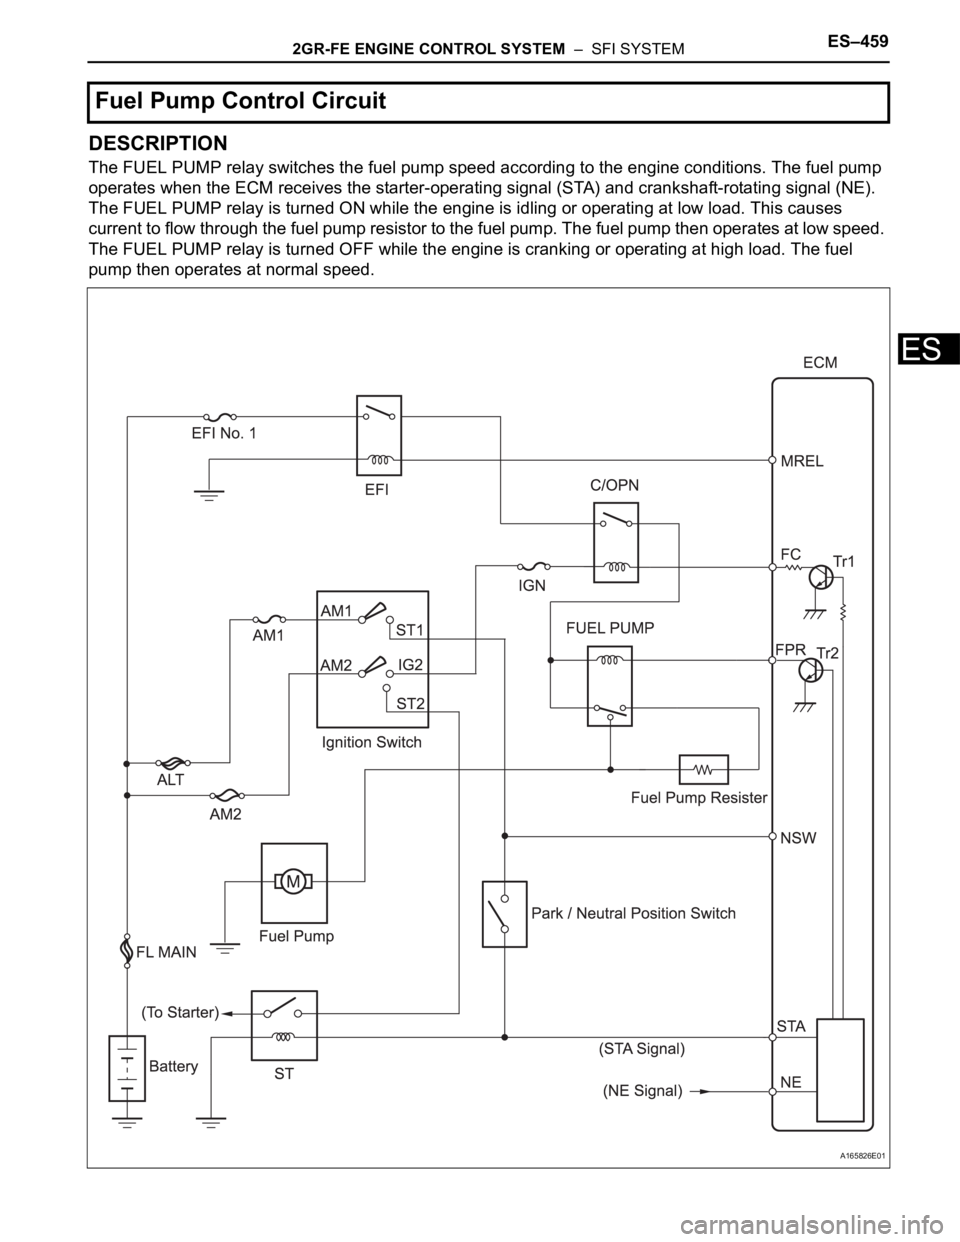
DESCRIPTION
The FUEL PUMP relay switches the fuel pump speed according to the engine conditions. The fuel pump
operates when the ECM receives the starter-operating signal (STA) and crankshaft-rotating signal (NE).
The FUEL PUMP relay is turned ON while the engine is idling or operating at low load. This causes
current to flow through the fuel pump resistor to the fuel pump. The fuel pump then operates at low speed.
The FUEL PUMP relay is turned OFF while the engine is cranking or operating at high load. The fuel
pump then operates at normal speed.
Fuel Pump Control Circuit
A165826E01