Page 251 of 458

(Type 1 and Type 2 only)
When the audio sound becomes difficult to
be heard due to road noise, wind noise,
etc. during driving, the system adjusts to
the optimum")
251
AUTOMATIC SOUND LEVELIZER (ASL)
(Type 1 and Type 2 only)
When the audio sound becomes difficult to
be heard due to road noise, wind noise,
etc. during driving, the system adjusts to
the optimum volume and tone quality ac-
cording to the noise level.
Vehicles with compact disc changer:
Touch the “ASL” switch.
When the system is on, the sound adjust-
ment level is displayed on the screen.
Vehicles without compact disc changer:
Touch the “DSP” switch to display the
“ASL” screen.
Touch “High”, “Mid” or “Low” and then
“OK”.
When you touch “High”, you can obtain
higher sensitivity of the sound levelizer.
When you touch “Low”, the sensitivity will
be lowered.
Touching “Off” turns the system off.YOUR RADIO ANTENNA
To remove an antenna on the roof, care-
fully turn it counterclockwise.
NOTICE
To prevent damage to the antenna,
make sure to remove it before driving
through an automatic car wash.
YOUR COMPACT DISC PLAYER
When you insert a disc, gently push it in
with the label side up.
The discs set in the player are played
continuously, starting with disc number 1.
The disc number of the disc currently be-
ing played, the track number and the time
from the beginning of the program appear
on the display.
Type 1 only:
When play of one disc ends, the first
track of the following disc starts. When
play of the final disc ends, play of the
first disc starts again.
The player will skip any empty disc num-
ber.
Page 266 of 458
 Inserting or ejecting compact disc
Ty p e 1 :
�Setting a single compact disc:
1. Push the “LOAD” button briefly.
The amber indicators at both ends of the
slot blinking. The amber blinking")
266
(a) Inserting or ejecting compact disc
Ty p e 1 :
�Setting a single compact disc:
1. Push the “LOAD” button briefly.
The amber indicators at both ends of the
slot blinking. The amber blinking indicators
change to continuous green illumination. 2. Insert only one disc.
You can set a disc at the lowest empty
disc number.
After insertion, the set disc is automatical-
ly loaded.
If the label faces down, the disc cannot
be played. In this case, “CD CHECK” ap-
pears on the display.
If you need to insert the next disc, repeat
the same procedure to insert another disc.
�Setting all the discs:
1. Push the “LOAD” button until you hear a beep.
The amber indicators at both ends of the
slot blinking. The amber blinking indicators
change to continuous green illumination. 2. Insert only one disc.
The amber indicators blink. 3. Insert the next disc after the amber blinking indicators change to contin-
uous green illumination.
4. Repeat this procedure until you in- sert all the discs.
To cancel the operation, push the “LOAD”
button.
Your automatic changer can store up to 6
discs.
If you do not insert the discs within 15
seconds after pushing the “LOAD” button,
the operation will be canceled automatical-
ly.NOTICE
Do not insert one disc stacked on top
of another one or feed them in con-
tinuously, to prevent discs from get-
ting stuck in the player.
Compact disc player operation
( Typ e 1 an d Typ e 2)
Page 267 of 458
 to highlight the disc number you want to eject.
2. Push the “
” button for the com-
pact disc briefly.
At this time, the amber indi")
267
26p129c
�Ejecting a single alone:
1. Touch the switch (1�6) to highlight the disc number you want to eject.
2. Push the “
” button for the com-
pact disc briefly.
At this time, the amber indicators of the
slot start blinking.
�Ejecting all the discs:
Push the “
” button for the compact
disc until you hear a beep.
26p205c
The numbers of the trays where the com-
pact disc is not set are dimmed.
Ty p e 2 :
When you insert a disc, the player will
automatically start. To eject the disc,
push the “
” button.
(b) Playing a compact disc
Ty p e 1 :
Push the “DISC·AUX” button if the disc
is already loaded in the player.
“CD CHANGER” appears on the display.
The discs set in the player are played
continuously, starting with the last disc
you inserted. The disc number of the disc
currently being played, the track number
and the time from the beginning of the
program are shown on the display.
When play of one disc ends, the first
track of the following disc starts. When
play of the final disc ends, play of the
first disc starts again.
Page 281 of 458
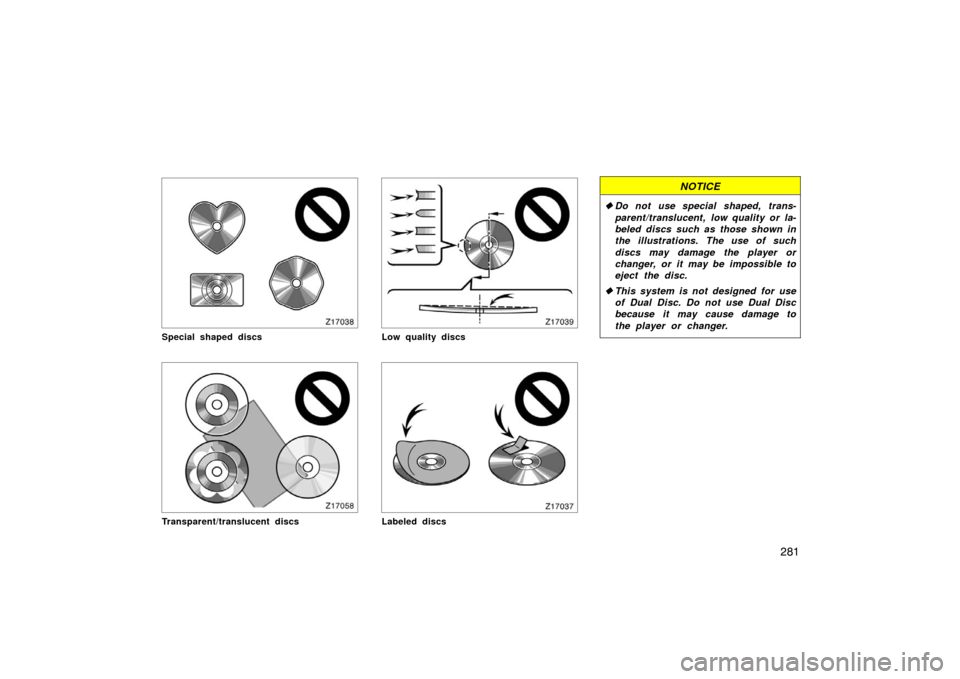
281
Special shaped discs
Z17058
Transparent/translucent discs
Low quality discs
Labeled discs
NOTICE
�Do not use special shaped, trans-
parent/translucent, low quality or la-
beled discs such as those shown in
the illustrations. The use of such
discs may damage the player or
changer, or it may be impossible to
eject the disc.
� This system is not designed for use
of Dual Disc. Do not use Dual Disc
because it may cause damage to
the player or changer.