Page 133 of 177
123
AM (See page 125)
FM (See page 125)
TAPE (See page 128)
CD (See page 130)
DVD (See page 135)
The switches for radio, cassette tape and
disc player operation are displayed on the
function switch display screen when the
audio control mode is selected. Touch
them lightly and directly on the screen.
The selected switch is highlighted in green or
yellow.
INFORMATION
�If the system does not respond to a
touch of a switch, move your finger
away from the screen and then touch
it again.
�You cannot operate dimmed
switches.
�Wipe off fingerprints on the surface of
the display using a glass cleaning
cloth.
Page 134 of 177

124 (b) Tone and balance
How good an audio program sounds to you is
largely determined by the mix of the treble,
midrange, and bass levels. In fact, different
kinds of music and vocal programs usually
sound better with different mixes of treble,
mid−range, and bass.
A good balance of the left and right stereo
channels and of the front and rear sound lev-
els is also important.
Keep in mind that if you are listening to a ste-
reo recording or broadcast, changing the
right/left balance will increase the volume of
one group of sounds while decreasing the vol-
ume of another.
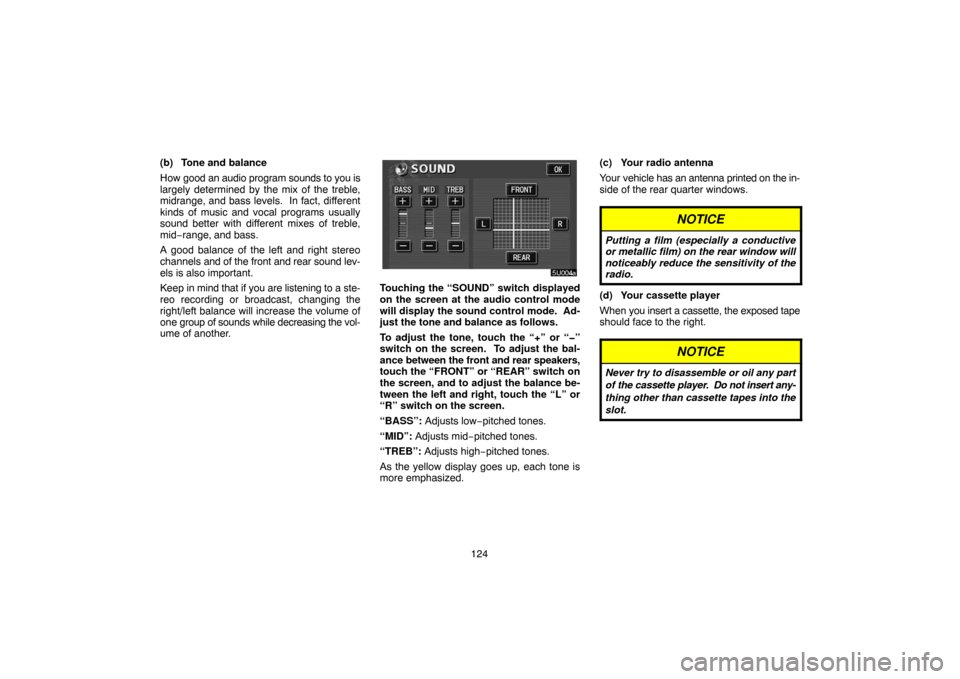
Touching the “SOUND” switch displayed
on the screen at the audio control mode
will display the sound control mode. Ad-
just the tone and balance as follows.
To adjust the tone, touch the “+” or “�”
switch on the screen. To adjust the bal-
ance between the front and rear speakers,
touch the “FRONT” or “REAR” switch on
the screen, and to adjust the balance be-
tween the left and right, touch the “L” or
“R” switch on the screen.
“BASS”: Adjusts low−pitched tones.
“MID”: Adjusts mid−pitched tones.
“TREB”: Adjusts high−pitched tones.
As the yellow display goes up, each tone is
more emphasized.(c) Your radio antenna
Your vehicle has an antenna printed on the in-
side of the rear quarter windows.
NOTICE
Putting a film (especially a conductive
or metallic film) on the rear window will
noticeably reduce the sensitivity of the
radio.
(d) Your cassette player
When you insert a cassette, the exposed tape
should face to the right.
NOTICE
Never try to disassemble or oil any part
of the cassette player. Do not insert any-
thing other than cassette tapes into the
slot.
Page 137 of 177

127
(d) Radio Data System
Your audio system is equipped with Radio
Data Systems (RDS). RDS mode allows you
to receive text messages from radio stations
that utilize RDS transmitters.
When RDS is on, the radio can
— only select stations of a particular program
type,
— display messages from radio stations,
— search for a stronger signal station.
RDS features are available for use only on FM
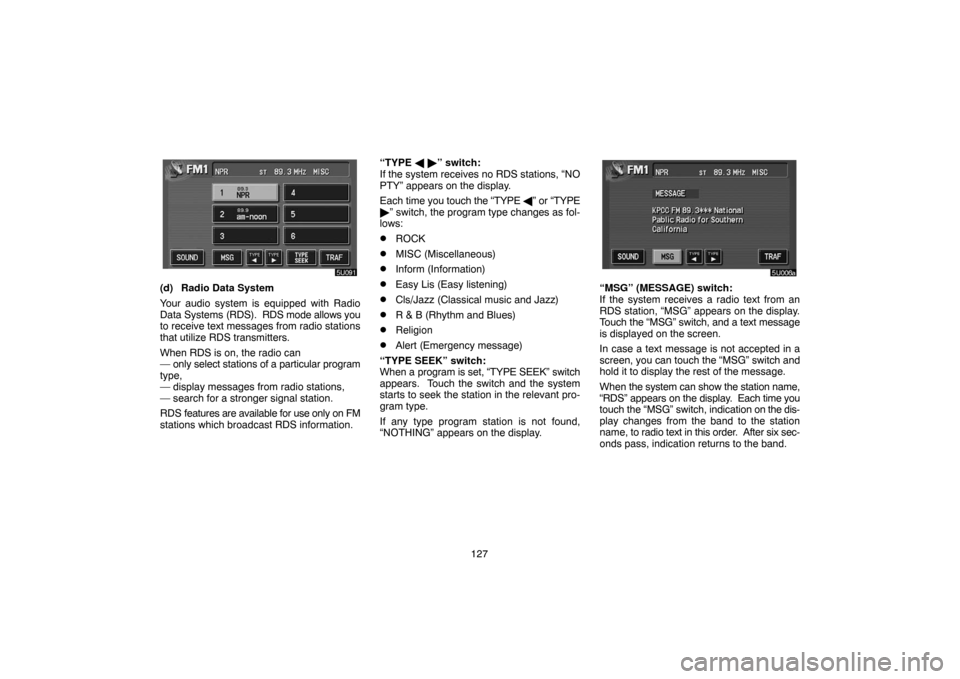
stations which broadcast RDS information.“TYPE � �” switch:
If the system receives no RDS stations, “NO
PTY” appears on the display.
Each time you touch the “TYPE �” or “TYPE
�” switch, the program type changes as fol-
lows:
�ROCK
�MISC (Miscellaneous)
�Inform (Information)
�Easy Lis (Easy listening)
�Cls/Jazz (Classical music and Jazz)
�R & B (Rhythm and Blues)
�Religion
�Alert (Emergency message)
“TYPE SEEK” switch:
When a program is set, “TYPE SEEK” switch
appears. Touch the switch and the system
starts to seek the station in the relevant pro-
gram type.
If any type program station is not found,
“NOTHING” appears on the display.
“MSG” (MESSAGE) switch:
If the system receives a radio text from an
RDS station, “MSG” appears on the display.
Touch the “MSG” switch, and a text message
is displayed on the screen.
In case a text message is not accepted in a
screen, you can touch the “MSG” switch and
hold it to display the rest of the message.
When the system can show the station name,
“RDS” appears on the display. Each time you
touch the “MSG” switch, indication on the dis-
play changes from the band to the station
name, to radio text in this order. After six sec-
onds pass, indication returns to the band.
Page 144 of 177

134 (h) Other compact disc player functions
“RPT” switch: Use it for automatic repeat of
the track you are currently listening to.
Touch the switch while the track is playing.
When the track is finished, the player will au-
tomatically go back to the beginning of the
track and play the track again. To cancel it,
touch the switch once again.
“DISC RPT” switch: Use it for automatic re-
peat of the disc you are currently listening to.
Touch the switch while the disc is playing.
When the disc is finished, the player will auto-
matically go back to the beginning of the disc
and play the disc again. To cancel it, touch the
button once again.
“DISC RAND” switch: Use it for automatic
track selection for all the discs and play by the
system.
When the switch is touched, the system se-
lects a track in the discs of all the trays which
are set and plays it. To cancel it, touch the
switch once again.
When a track is skipped or the system is inop-
erative, touch the switch to reset.“RAND” switch: Use it for automatic and
random selection of the disc which you are
currently listening to.
When the switch is touched, the system se-
lects a track in the disc you are currently lis-
tening to. To cancel it, touch the switch once
again.
CD text only — To display the title of the disc
and truck, touch the “TITLE” switch. When
the “TITLE OFF” switch is touched, the dis-
play changes to the disc number screen.(i) If the player malfunctions
If the player or another unit equipped with the
player malfunctions, your audio system will
display following error messages.
If “CD CHECK” appears on the display: It
indicates that the disc is dirty, damaged or it
was inserted up− side down. Clean the disc
or insert it correctly.
If “CD ERROR” appears on the display:
The following causes are possible.
�There is a trouble inside the system. Eject
the disc.
�The inside of the player unit may be too
hot due to the very high ambient tempera-
ture. Eject the disc and allow the player to
cool down.
If the malfunction is not rectified: Take
your vehicle to your dealer.
Page 145 of 177
135
— DVD player operation
The DVD player can play DVD video, audio
CD, video CD, CD text, dts�CD or DVD au-
dio only when a disc is loaded in the DVD
player.
�Audio CD, CD text, dts−CD 136. . . .
�DVD video, DVD audio 137. . . . . . . .
�Video CD 147. . . . . . . . . . . . . . . . . . .
Refer to “Rear seat entertainment system” for
details.
For appropriate discs for this player, see “Au-
dio system operating hints” on page 151.
(a) Inserting the disc
The indicator light turns on while the disc is
loaded.
If the label faces forward, the disc cannot be
played. In this case, “DISC CHECK” appears
on the screen.
If a disc which is not playable is inserted,
“DISC CHECK” will also appear on the
screen. For appropriate discs for this player,
see “Audio system operating hints” on page
151.
NOTICE
Never try to disassemble or oil any part
of the DVD player. Do not insert any-
thing other than a disc into the slot.
(b) Ejecting a disc
Push the “
” button.
Page 146 of 177

136
(c) Playing a disc
Push the “DISC” button if a disc is already
loaded in the player.
“DVD” appears on the screen. (If the CD play-
er is turned on, push the “DISC” button again
to switch to the DVD player.)
(d) Operating an audio CD
(audio CD, CD text, dts�CD)
PLAYING AN AUDIO CD
Push the “AUDIO” button to display this
screen.
CD text only — The disc title and track title will
appear on the screen when pushing the
“DISC” button.
SELECTING A DESIRED TRACK
“SEEK·TRACK” button: Use for direct ac-
cess to a desired track.
Push either side of the “SEEK·TRACK” but-
ton and hold it until the desired track number
appears on the display. As you release the
button, the player will start playing the se-
lected track from the beginning.
Fast forward: Touch the
switch and
hold it to fast forward the disc. When you re-
lease the switch, the player will resume play-
ing from that position.
Reverse: Touch the
switch and hold
it to reverse the disc. When you release the
switch, the player will resume playing.
Page 147 of 177

137
SEARCHING FOR A DESIRED TRACK
Touch the “SCAN” switch on the screen or
push the “SCAN” button.
“SCAN” will be highlighted in yellow on the
screen. The player will play the next track for
10 seconds, then scan again. To select a
track, touch the “SCAN” switch on the screen
or push the “SCAN” button a second time. If
the player reaches the end of the disc, it will
continue scanning at track 1.
After all the tracks are scanned in one pass,
normal play resumes.OTHER FUNCTIONS
“RPT” switch: Use it for automatic repeat of
the track you are currently listening to.
Touch the switch while the track is playing.
When the track is finished, the player will au-
tomatically go back to the beginning of the
track and play the track again.
To cancel it, touch the switch once again.
“RAND” switch: Use it for automatic and
random selection of the disc which you are
currently listening to.
When the switch is touched, the system se-
lects a track in the disc you are currently lis-
tening to.
To cancel it, touch the switch once again.
If a CD−TEXT disc is inserted, the title of the
disc and track will be displayed. Up to 29 let-
ters can be displayed.(e) Operating a DVD disc
NOTE: The playback condition of some
DVD video discs may be determined by a
DVD video software producer. This DVD
player plays a disc as the software pro-
ducer intended. So some functions may
not work properly. Be sure to read the in-
struction manual for the DVD video disc
separately provided. For the detailed in-
formation about DVD video discs, see “(h)
DVD player and DVD video disc informa-
tion”.
Precautions on DVD disc
When recording with a DVD video, DVD au-
dio or video CD, audio tracks may not record
in some cases while the menu is displayed.
As audio will not play in this case, verify that
the video tracks are playing and then activate
playback.
When playback of a disc is completed, play-
back will stop or the menu screen will be dis-
played.
The title/chapter number and playback time
display may not appear while playing back
certain DVD video discs.
Page 148 of 177
138
CAUTION
Conversational speech on some DVDs
is recorded at a low volume to empha-
size the impact of sound effects. If you
adjust the volume assuming that the
conversations represent the maximum
volume level that the DVD will play, you
may be startled by louder sound effects
or when you change to a different audio
source. The louder sounds may have a
significant impact on the human body or
pose a driving hazard. Keep this in mind
when you adjust the volume.
This “DVD Hint!” screen appears when the
video screen is first displayed after you
turn the ignition key to “ACC” or “ON”.
Touch “OK” when you read the message.DVD video
DVD audio
PLAYING A DVD DISC
Push the “AUDIO” button to display DVD
screen.
It you touch the “PICTURE” switch when the
vehicle is completely stopped and the parking
brake is applied, the video screen returns.