Page 109 of 404
101
(C) Booster seat(A) INFANT SEAT INSTALLATION
An infant seat must be used in rear
facing position only.CAUTION
�Never install a rearfacing child re-
straint system on the front passen-
ger seat even if the “AIRBAG OFF”
indicator light is illuminated. In the
event of an accident, the impact of
the rapid inflation of the front pas-
senger airbag could cause death or
serious injury to the child if the
rearfacing child restraint system is
installed on the front passenger
seat.
—Installation with seat belt
Page 110 of 404
102
�Do not install a child restraint sys-
tem on the rear seat if it interferes
with the lock mechanism of the
front seats. Otherwise, the child or
front seat occupant(s) may be killed
or seriously injured in case of sud-
den braking or a collision.
�If the driver ’s seat position does
not allow sufficient space for safe
installation, install the child re-
straint system on the rear right
seat.
Same angle
�When installing a child restraint
system in the rear center position,
adjust both seatbacks to the same
angle. Otherwise, the child restraint
system cannot be securely re-
strained and this may cause death
or serious injuries in a collision.1. Run the lap and shoulder belt throughor around the infant seat following the
instructions provided by its manufactur-
er and insert the tab into the buckle
taking care not to twist the belt. Keep
the lap portion of the belt tight.
Page 111 of 404
103
CAUTION
�After inserting the tab, make sure
the tab and buckle are locked and
that the lap and shoulder portions
of the belt are not twisted.
�Do not insert coins, clips, etc. in
the buckle as this may prevent you
from properly latching the tab and
buckle.
�If the seat belt does not function
normally, it cannot protect your
child from death or serious injury.
Contact your Toyota dealer immedi-
ately. Do not install the child
restraint system on the seat until
the seat belt is fixed.
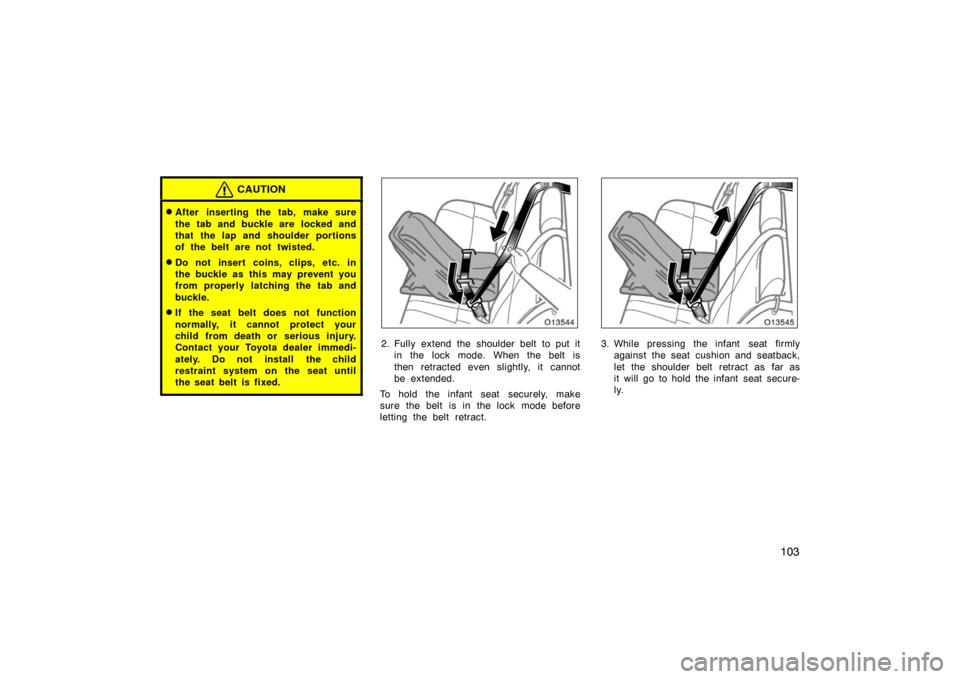
2. Fully extend the shoulder belt to put itin the lock mode. When the belt is
then retracted even slightly, it cannot
be extended.
To hold the infant seat securely, make
sure the belt is in the lock mode before
letting the belt retract.3. While pressing the infant seat firmly against the seat cushion and seatback,
let the shoulder belt retract as far as
it will go to hold the infant seat secure-
ly.
Page 112 of 404
104
CAUTION
Push and pull the child restraint sys-
tem in different directions to be sure
it is secure. Follow all the installation
instructions provided by its manufac-
turer.
4. To remove the infant seat, press thebuckle release button and allow the
belt to retract completely. The belt will
move freely again and be ready to
work for an adult or older child passen-
ger.(B) CONVERTIBLE SEAT INSTALLATION
A convertible seat must be used in for-
wardfacing or rearfacing position de-
pending on the age and size of the
child. When installing, follow the
manufacturer ’s instructions about the
appropriate age and size of the child as
well as directions for installing the
child restraint system.
Page 113 of 404

105
Install the child restraint system on the
front passenger seat only when it is un-
avoidable. Your vehicle is equipped with a
front passenger occupant classification
system. In order to activate the occupant
classification system correctly, install the
forward−facing child restraint system on
the front passenger seat in the following
order:
1. Turn the ignition switch to ON.
2. Move the front passenger seat to the rearward position.
3. Put the child restraint system on the front passenger seat without putting
your weight on the front passenger
seat.
4. Insert the seat belt tab into the seat belt buckle.
5. Fully extend the shoulder belt to put it in the lock mode. When the belt is
then retracted even slightly, it cannot
be extended. To hold the seat securely,
make sure the belt is in the lock mode
before letting the belt retract.
6. While pressing the convertible seat firmly against the seat cushion and
seatback, let the shoulder belt retract
as far as it will go to hold the convert-
ible seat securely.CAUTION
Push and pull the child restraint sys-
tem in different directions to be sure
it is secure. Follow all the installation
instructions provided by its manufac-
turer.
7. Put a child on the child restraint sys-tem and secure the child, complying
with the instructions provided by the
child restraint system manufacturer.
The “AIRBAG OFF” indicator light should
be illuminated when the ignition switch is
set at ON and the child is in the child
restraint system after following these pro-
cedures. The “AIRBAG OFF” indicator light
indicates the SRS front passenger airbag
and side airbag on the passenger side will
not deploy. If the “AIRBAG ON” indicator
light is illuminated, remove the child re-
straint system and reinstall it with the en-
gine off. If the “AIRBAG ON” indicator
light is illuminated when the ignition switch
is set to ON, then the SRS front passen-
ger airbag and side airbag on the passen-
ger side may deploy in an accident. Do
not drive the vehicle in this condition. Re-
move the child restraint system and con-
tact your Toyota dealer.
CAUTION
�Never install a rearfacing child re-
straint system on the front passen-
ger seat. A forwardfacing child re-
straint system should only be
installed on the front passenger
seat when unavoidable. If you must
install the child restraint system on
the front passenger seat, put the
seat in its most rearward position,
and install the forwardfacing child
restraint system in the proper or-
der. Otherwise, the front passenger
occupant classification system can
not detect the presence of the child
restraint system and the front pas-
senger airbag and side airbag on
the front passenger seat could
deploy, and the impact could cause
death or serious injury to the child.
Page 115 of 404
107
�Do not install a child restraint sys-
tem on the rear seat if it interferes
with the lock mechanism of the
front seats. Otherwise, the child or
front seat occupant(s) may be killed
or seriously injured in case of sud-
den braking or a collision.
�If the driver ’s seat position does
not allow sufficient space for safe
installation, install the child re-
straint system on the rear right
seat.
Same angle
�When installing a child restraint
system in the rear center position,
adjust both seatbacks to the same
angle. Otherwise, the child restraint
system cannot be securely re-
strained and this may cause death
or serious injuries in a collision.1. Run the lap and shoulder belt throughor around the convertible seat following
the instructions provided by its
manufacturer and insert the tab into
the buckle taking care not to twist the
belt. Keep the lap portion of the belt
tight.
Page 116 of 404
108
CAUTION
�After inserting the tab, make sure
the tab and buckle are locked and
that the lap and shoulder portions
of the belt are not twisted.
�Do not insert coins, clips, etc. in
the buckle as this may prevent you
from properly latching the tab and
buckle.
�If the seat belt does not function
normally, it cannot protect your
child from death or serious injury.
Contact your Toyota dealer immedi-
ately. Do not install the child
restraint system on the seat until
the seat belt is fixed.
2. Fully extend the shoulder belt to put itin the lock mode. When the belt is
then retracted even slightly, it cannot
be extended.
To hold the convertible seat securely,
make sure the belt is in the lock mode
before letting the belt retract.3. While pressing the convertible seat firmly against the seat cushion and
seatback, let the shoulder belt retract
as far as it will go to hold the convert-
ible seat securely.
Page 117 of 404
109
CAUTION
Push and pull the child restraint sys-
tem in different directions to be sure
it is secure. Follow all the installation
instructions provided by its manufac-
turer.
4. To remove the convertible seat, pressthe buckle release button and allow the
belt to retract completely. The belt will
move freely again and be ready to
work for an adult or older child passen-
ger.(C) BOOSTER SEAT INSTALLATION
A booster seat must be used in for-
wardfacing position only.