2007 SUZUKI GRAND VITARA oil level
[x] Cancel search: oil levelPage 69 of 211

Downloaded from www.Manualslib.com manuals search engine 4-7 INSTRUMENT PANEL
66J21-03E
systems (other than ABS) will turn on
automatically and the light will go out.
For details of the ESP
® systems, refer to
“Electronic Stability Program (ESP
®)” in
the “OPERATING YOUR VEHICLE” sec-
tion.
Oil Pressure Light
50G051
This light comes on when the ignition
switch is turned to the “ON” position, and
goes out when the engine is started. The
light will come on and remain on if there is
insufficient oil pressure. If the light comes
on when driving, pull off the road as soon
as you can and stop the engine. Check the
oil level and add oil if necessary. If there is
enough oil, the lubrication system should
be inspected by your SUZUKI dealer
before you drive the vehicle again.
Charging Light
50G052
This light comes on when the ignition
switch is turned to the “ON” position, and
goes out when the engine is started. The
light will come on and remain on if there is
something wrong with the battery charging
system. If the light comes on when the
engine is running, the charging system
should be inspected immediately by your
SUZUKI dealer.
Driver’s Seat Belt Reminder Light
60G049
If the driver’s seat belt is unbuckled when
the ignition switch is turned to the “ON”
position, this light will come on and then
blink. When the light comes on, a buzzer
will also sound intermittently for about 6
seconds. The reminder will repeat several
times under certain conditions until the
driver’s seat belt is buckled. After repeat-
ing several times, the reminder will be can-
celed even if the driver’s seat belt remains
unbuckled.
For details about the seat belt reminder,
refer to “Seat Belts and Child Restraint
Systems” in the “BEFORE DRIVING” sec-
tion.
CAUTION
If you operate the engine with this
light on, severe engine damage can
result.
Do not rely on the Oil Pressure
Light to indicate the need to add
oil. Be sure to periodically check
the engine oil level.
WARNING
It is absolutely essential that the
driver and passengers wear their
seat belts at all times. Persons who
are not wearing seat belts have a
much greater risk of injury if an acci-
dent occurs. Make a regular habit of
buckling your seat belt before putting
the key in the ignition.
Warning and Indicator Lights: 8
Page 143 of 211

Downloaded from www.Manualslib.com manuals search engine 9-5 INSPECTION AND MAINTENANCE
66J21-03E
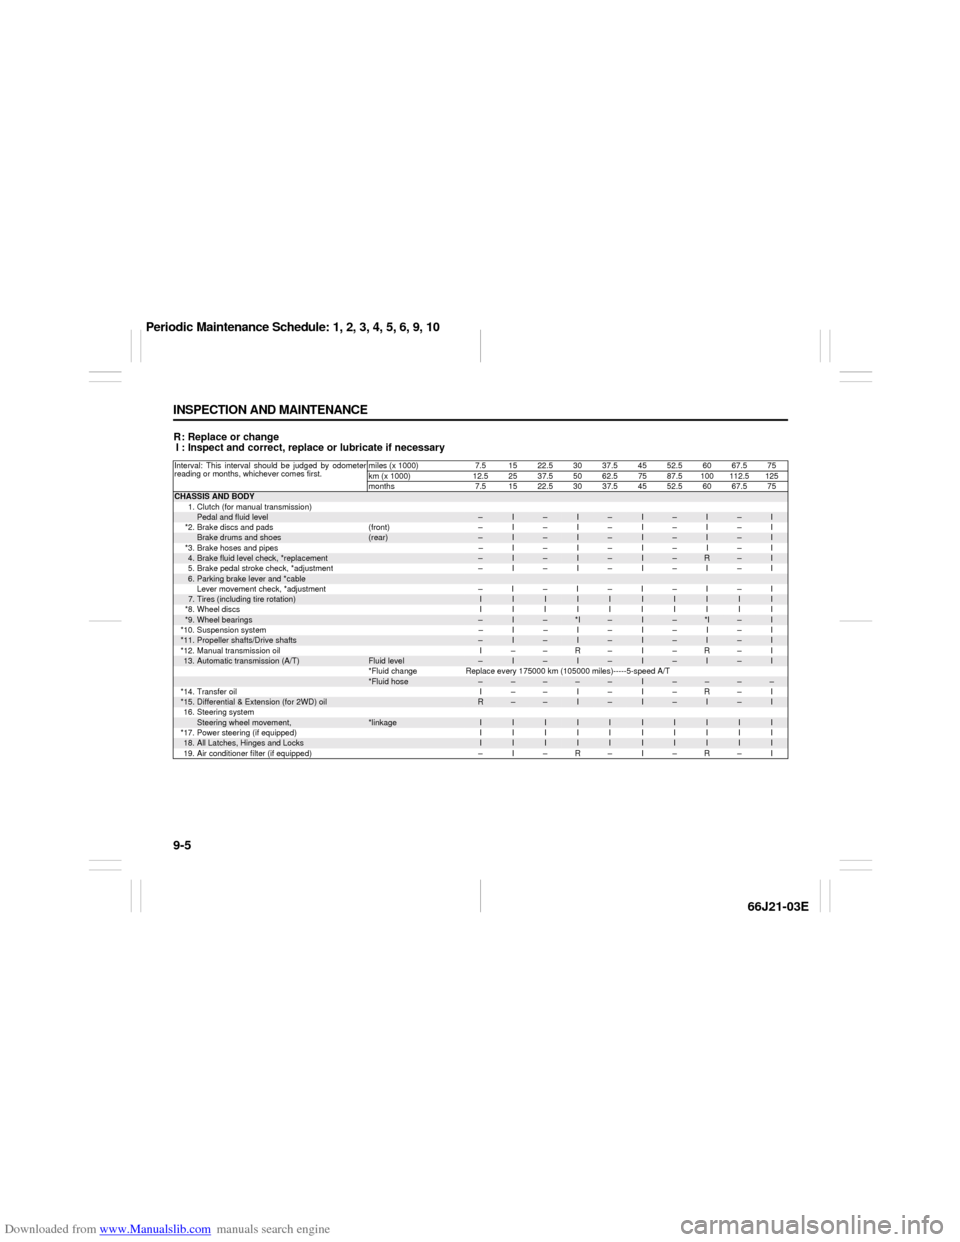
R: Replace or change
I : Inspect and correct, replace or lubricate if necessaryInterval: This interval should be judged by odometer
reading or months, whichever comes first.miles (x 1000) 7.5 15 22.5 30 37.5 45 52.5 60 67.5 75
km (x 1000) 12.52537.55062.57587.5100112.5125
months 7.5 1522.53037.54552.56067.575CHASSIS AND BODY
1. Clutch (for manual transmission)
Pedal and fluid level
–
I
–
I
–
I
–
I
–
I
*2. Brake discs and pads (front) – I – I – I – I – I
Brake drums and shoes
(rear)
–
I
–
I
–
I
–
I
–
I
*3. Brake hoses and pipes – I – I – I – I – I
4.Brake fluid level check, *replacement
–
I
–
I
–
I
–
R
–
I
5. Brake pedal stroke check, *adjustment – I – I – I – I – I
6.Parking brake lever and *cableLever movement check, *adjustment –I–I–I–I–I7.Tires (including tire rotation)
I
I
I
I
I
I
I
I
I
I
*8.Wheel discs IIIIIIIIII
*9.
Wheel bearings
–
I
–
*I
–
I
–
*I
–
I
*10. Suspension system – I – I – I – I – I
*11.
Propeller shafts/Drive shafts
–
I
–
I
–
I
–
I
–
I
*12. Manual transmission oil I – – R – I – R – I
13.
Automatic transmission (A/T)
Fluid level
–
I
–
I
–
I
–
I
–
I
*Fluid change Replace every 175000 km (105000 miles)-----5-speed A/T
*Fluid hose
–
–
–
–
–
I
–
–
–
–
*14. Transfer oil I – – I – I – R – I
*15.
Differential & Extension (for 2WD) oil
R
–
–
I
–
I
–
I
–
I
16. Steering system
Steering wheel movement,
*linkage
I
I
I
I
I
I
I
I
I
I
*17. Power steering (if equipped) I I I I I I I I I I
18.
All Latches, Hinges and Locks
I
I
I
I
I
I
I
I
I
I
19. Air conditioner filter (if equipped) – I – R – I – R – I
Periodic Maintenance Schedule: 1, 2, 3, 4, 5, 6, 9, 10
Page 144 of 211

Downloaded from www.Manualslib.com manuals search engine 9-6 INSPECTION AND MAINTENANCE
66J21-03E
R: Replace or change
I : Inspect and correct, replace or lubricate if necessary
NOTE:
This table shows the service schedule up to 250000 km (150000 miles).
Beyond 250000 km (150000 miles), perform the same services at the same intervals shown in the chart.
Beyond 250000 km (150000 miles), the maintenance services enclosed with a rectangle are required.
Item 9 *I - inspect for wear.Interval: This interval should be judged by odometer
reading or months, whichever comes first.miles (x 1000) 82.5 90 97.5 105112.5 120 127.5 135 142.5 150
km (x 1000) 137.5 150 162.5 175 187.5 200 212.5 225 237.5 250
months 82.5 90 97.5 105 112.5 120 127.5 135 142.5 150CHASSIS AND BODY
1. Clutch (for manual transmission)
Pedal and fluid level
–
I
–
I
–
I
–
I
–
I
*2. Brake discs and pads (front) – I – I – I – I – I
Brake drums and shoes
(rear)
–
I
–
I
–
I
–
I
–
I
*3. Brake hoses and pipes – I – I – I – I – I
4.Brake fluid level check, *replacement
–
I
–
I
–
R
–
I
–
I
5. Brake pedal stroke check, *adjustment – I – I – I – I – I
6.Parking brake lever and *cableLever movement check, *adjustment –I–I–I–I–I7.Tires (including tire rotation)
I
I
I
I
I
I
I
I
I
I
*8.Wheel discs IIIIIIIIII
*9.
Wheel bearings
–
*I
–
I
–
*I
–
I
–
I
*10. Suspension system – I – I – I – I – I
*11.
Propeller shafts/Drive shafts
–
I
–
I
–
I
–
I
–
I
*12. Manual transmission oil – R – I – R – I – R
13.
Automatic transmission (A/T)
Fluid level
–
I
–
I
–
I
–
I
–
I
*Fluid change Replace every 175000 km (105000 miles)-----5-speed A/T
*Fluid hose
–
I
–
–
–
–
–
I
–
–
*14. Transfer oil – I – I – R – I – I
*15.
Differential & Extension (for 2WD) oil
–
I
–
I
–
I
–
I
–
I
16. Steering system
Steering wheel movement,
*linkage
I
I
I
I
I
I
I
I
I
I
*17. Power steering (if equipped) I I I I I I I I I I
18.
All Latches, Hinges and Locks
I
I
I
I
I
I
I
I
I
I
19. Air conditioner filter (if equipped) – R – I – R – I – R
Periodic Maintenance Schedule: 1, 2, 3, 4, 5, 6, 9, 10
Page 148 of 211

Downloaded from www.Manualslib.com manuals search engine 9-10 INSPECTION AND MAINTENANCE
66J21-03E
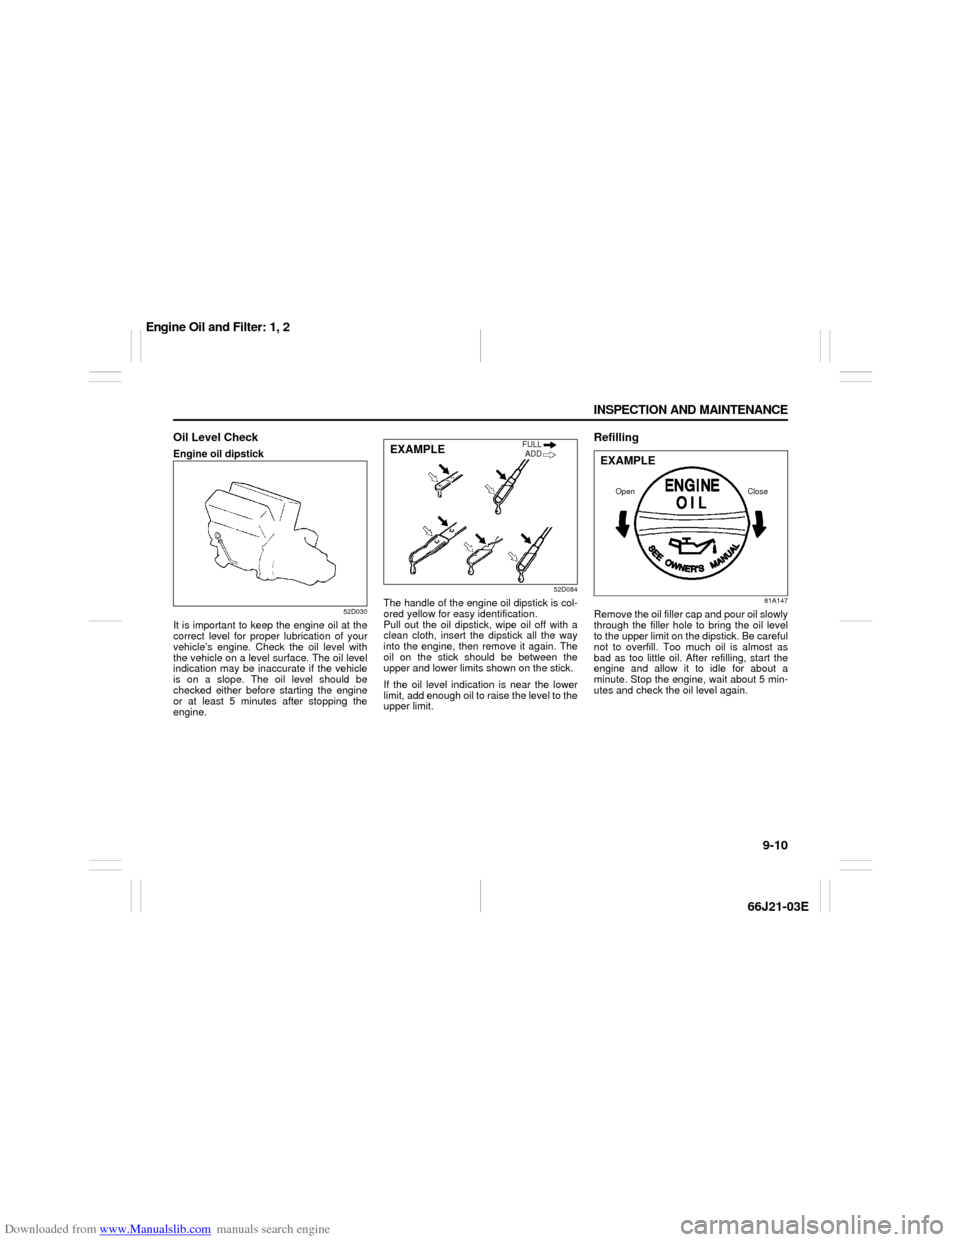
Oil Level CheckEngine oil dipstick
52D030
It is important to keep the engine oil at the
correct level for proper lubrication of your
vehicle’s engine. Check the oil level with
the vehicle on a level surface. The oil level
indication may be inaccurate if the vehicle
is on a slope. The oil level should be
checked either before starting the engine
or at least 5 minutes after stopping the
engine.
52D084
The handle of the engine oil dipstick is col-
ored yellow for easy identification.
Pull out the oil dipstick, wipe oil off with a
clean cloth, insert the dipstick all the way
into the engine, then remove it again. The
oil on the stick should be between the
upper and lower limits shown on the stick.
If the oil level indication is near the lower
limit, add enough oil to raise the level to the
upper limit.
Refilling
81A147
Remove the oil filler cap and pour oil slowly
through the filler hole to bring the oil level
to the upper limit on the dipstick. Be careful
not to overfill. Too much oil is almost as
bad as too little oil. After refilling, start the
engine and allow it to idle for about a
minute. Stop the engine, wait about 5 min-
utes and check the oil level again.
EXAMPLE
FULL
ADD
Close Open
EXAMPLE
Engine Oil and Filter: 1, 2
Page 150 of 211

Downloaded from www.Manualslib.com manuals search engine 9-12 INSPECTION AND MAINTENANCE
66J21-03E
52D086
(1) Oil filter
(2) Oil filter wrench
(3) 3/4 turn
6) Tighten the filter 3/4 turn from the point
of contact with the mounting surface (or
to the specified torque) using an oil filter
wrench.
7) Reinstall the engine under cover.
Refill with Oil and Check for Leaks1) Pour oil through the filler hole and
install the filler cap.
For the approximate capacity of the oil,
refer to the “Capacities” item in the
“SPECIFICATIONS” section.
2) Start the engine and look carefully for
leaks at the oil filter and drain plug. Run
the engine at various speeds for at least
5 minutes.
3) Stop the engine and wait about 5 min-
utes. Check the oil level again and add
oil if necessary. Check for leaks again.
83E010
Tightening torque specification
14 Nm (10.1 lb-ft, 1.4 kg-m)
CAUTION
To prevent oil leakage, make sure
that the oil filter is tight, but do not
overtighten it.
CAUTION
When replacing the oil filter, it is rec-
ommended that you use a genuine
SUZUKI replacement filter. If you use
an after-market filter, make sure it is
of equivalent quality and carefully fol-
low the manufacturer’s instructions
and precautions.
CAUTION
Oil leaks from around the oil filter or
drain plug indicate incorrect installa-
tion or gasket damage. If you find any
leaks or are not sure that the filter
has been properly tightened, have
the vehicle inspected by your SUZUKI
dealer.EXAMPLE
Engine Oil and Filter: 1, 2
Page 151 of 211

Downloaded from www.Manualslib.com manuals search engine 9-13 INSPECTION AND MAINTENANCE
66J21-03E
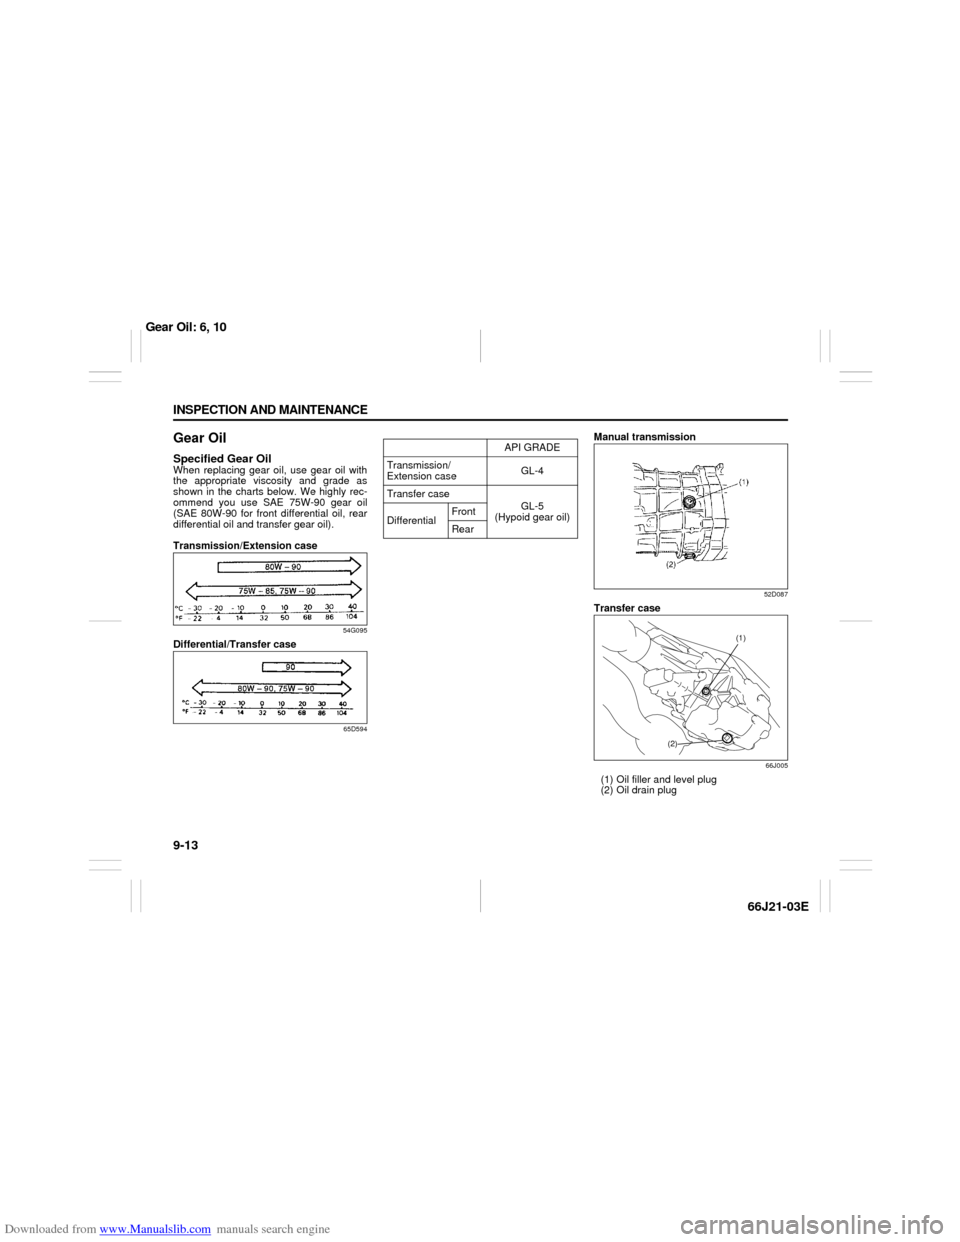
Gear OilSpecified Gear OilWhen replacing gear oil, use gear oil with
the appropriate viscosity and grade as
shown in the charts below. We highly rec-
ommend you use SAE 75W-90 gear oil
(SAE 80W-90 for front differential oil, rear
differential oil and transfer gear oil).
Transmission/Extension case
54G095
Differential/Transfer case
65D594
Manual transmission
52D087
Transfer case
66J005
(1) Oil filler and level plug
(2) Oil drain plug
API GRADE
Transmission/
Extension caseGL-4
Transfer case
GL-5
(Hypoid gear oil)
DifferentialFront
Rear
(1)
(2)
Gear Oil: 6, 10
Page 152 of 211

Downloaded from www.Manualslib.com manuals search engine 9-14 INSPECTION AND MAINTENANCE
66J21-03E
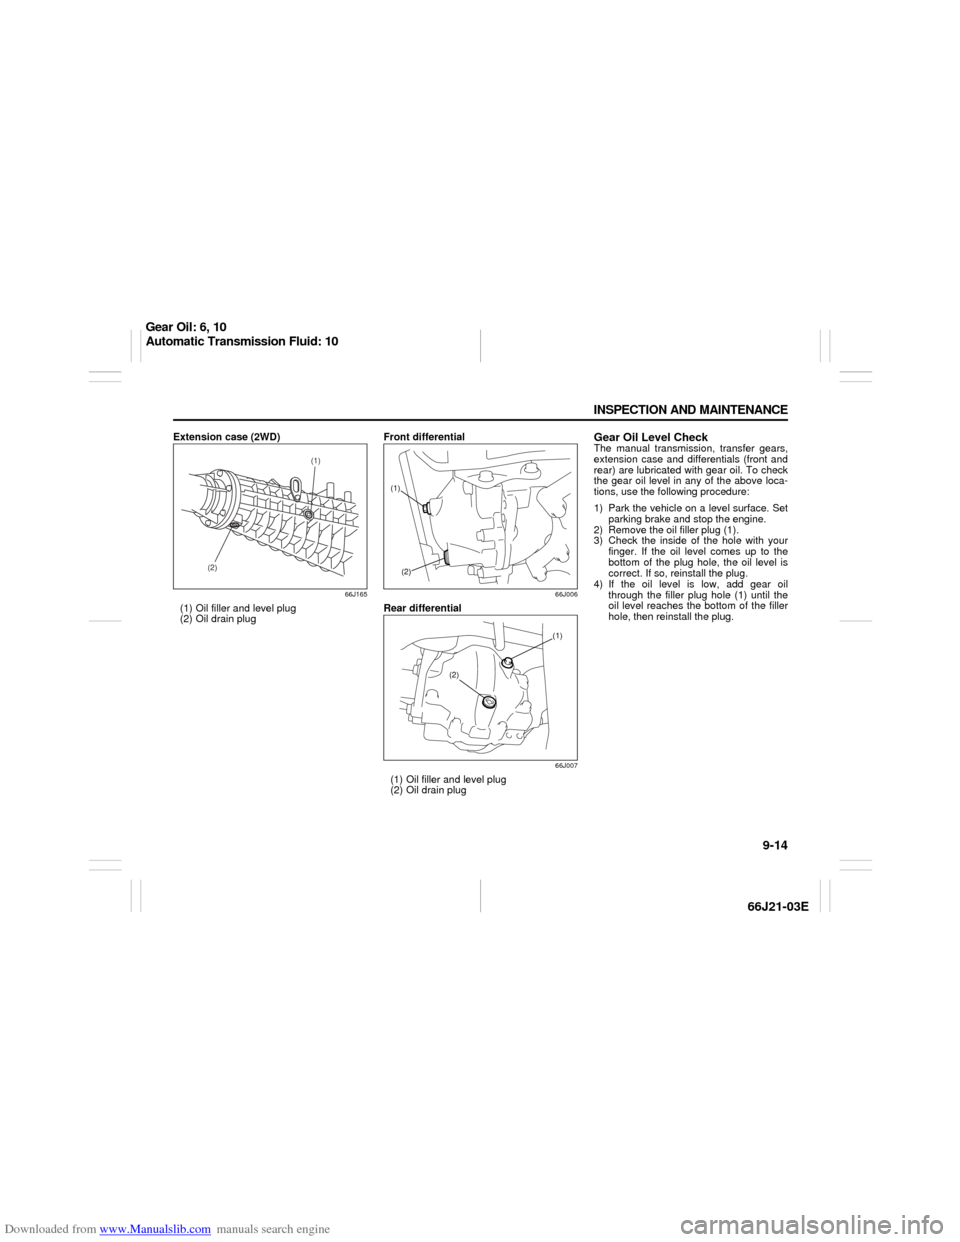
Extension case (2WD)
66J165
(1) Oil filler and level plug
(2) Oil drain plugFront differential
66J006
Rear differential
66J007
(1) Oil filler and level plug
(2) Oil drain plug
Gear Oil Level CheckThe manual transmission, transfer gears,
extension case and differentials (front and
rear) are lubricated with gear oil. To check
the gear oil level in any of the above loca-
tions, use the following procedure:
1) Park the vehicle on a level surface. Set
parking brake and stop the engine.
2) Remove the oil filler plug (1).
3) Check the inside of the hole with your
finger. If the oil level comes up to the
bottom of the plug hole, the oil level is
correct. If so, reinstall the plug.
4) If the oil level is low, add gear oil
through the filler plug hole (1) until the
oil level reaches the bottom of the filler
hole, then reinstall the plug.
(2)(1)
(1)
(2)
(1)
(2)
Gear Oil: 6, 10
Automatic Transmission Fluid: 10
Page 153 of 211

Downloaded from www.Manualslib.com manuals search engine 9-15 INSPECTION AND MAINTENANCE
66J21-03E
Gear Oil ReplacementTo change the gear oil in the manual trans-
mission, transfer case, extension case or
differential(s), use the following procedure:
1) Remove the oil filler plug (1).
2) Remove the drain plug (2), drain the oil
and reinstall the drain plug.
3) Pour new gear oil of the specified type
through the filler hole until the oil level
reaches the bottom of the filler hole.
4) Reinstall the filler plug.Tightening torque
Automatic Transmission
FluidSpecified FluidUse an automatic transmission fluid
SUZUKI ATF 3317 or Mobil ATF 3309.Fluid Level CheckYou must check the fluid level with the
automatic transmission fluid at normal
operating temperature.
To check the fluid level:
1) To warm up the transmission fluid, drive
the vehicle or idle the engine until the
temperature gauge indicates normal
operating temperature.
2) Then drive for ten more minutes.
WARNING
After driving the vehicle, gear oil tem-
perature may be high enough to burn
you. Wait until the oil filler plug is
cool enough to touch with your bare
hands before inspecting or replacing
gear oil.
CAUTION
When tightening these plugs, apply
sealing compound “SUZUKI Bond
No. 1215” or equivalent to the plug
threads to prevent oil leakage and
tighten them to the specified torque
shown below.
Oil Filler
PlugOil Drain
Plug
Manual
transmission23 Nm
(17.0 lb-ft)
(2.3 kg-m) 23 Nm
(17.0 lb-ft)
(2.3 kg-m)
Transfer23 Nm
(17.0 lb-ft)
(2.3 kg-m) 23 Nm
(17.0 lb-ft)
(2.3 kg-m)
Extension
case23 Nm
(17.0 lb-ft)
(2.3 kg-m) 23 Nm
(17.0 lb-ft)
(2.3 kg-m)
Front
differential23 Nm
(17.0 lb-ft)
(2.3 kg-m) 23 Nm
(17.0 lb-ft)
(2.3 kg-m)
Rear
differential23 Nm
(17.0 lb-ft)
(2.3 kg-m) 23 Nm
(17.0 lb-ft)
(2.3 kg-m)
CAUTION
Driving with too much or too little
fluid can damage the transmission.
CAUTION
Be sure to use the specified auto-
matic transmission fluid. Using auto-
matic transmission fluid other than
SUZUKI ATF 3317 or Mobil ATF 3309
may damage the automatic transmis-
sion of your vehicle.
Automatic Transmission Fluid: 10
Engine Coolant: 1, 2