2007 SUZUKI GRAND VITARA Wheel drive
[x] Cancel search: Wheel drivePage 124 of 211

Downloaded from www.Manualslib.com manuals search engine 7-6 DRIVING TIPS
66J21-03E
WARNING
In addition to following the driving
tips in this section, it is important to
observe the following precautions for
on-road and off-road driving.
Driver and passengers should wear
seat belts at all times.
Do not let anyone else drive your
vehicle unless they are also aware
of the vehicle characteristics and
handling differences described in
this section.
Avoid loaning your vehicle to any-
one unless you accompany them.
Make sure your tires are in good
condition and always maintain the
specified tire pressure. Refer to
“Tires” in the “INSPECTION AND
MAINTENANCE” section for
details.
Do not use tires other than those
specified by SUZUKI. Never use dif-
ferent sizes or types of tires on the
front and rear wheels. For informa-
tion regarding the specified tires,
refer to the Tire Inflation Pressure
Label located on the driver’s side
door pillar or the “SPECIFICA-
TIONS” section.
(Continued)
WARNING
(Continued)
Never use oversized tires or special
shocks and springs to raise (jack
up) your vehicle. This will raise the
center of gravity of the vehicle and
change its handling characteris-
tics. Oversized tires may also rub
against the fender over bumps,
causing vehicle damage or tire fail-
ure.
After driving through water, mud or
sandy ground, test the brakes while
driving at a slow speed to see if
they have maintained their normal
effectiveness. If the brakes are less
effective than normal, dry them by
repeatedly applying the brakes
while driving slowly until the
brakes have regained their normal
effectiveness.
Do not use “4H LOCK” or “4L
LOCK” drive for normal driving.
After extended operation in mud,
sand or water, have the brakes
inspected by your authorized
SUZUKI dealer as soon as possi-
ble.
Page 131 of 211

Downloaded from www.Manualslib.com manuals search engine 8-5 VEHICLE LOADING AND TOWING
66J21-03E
Additional Trailer Towing Warnings
WARNING
Never overload your trailer or your
vehicle. Gross Trailer Weight must
never exceed 1350 kg (3000 pounds).
Gross Combined Weight must never
exceed 3400 kg (7500 pounds) for
2WD or 3450 kg (7600 pounds) for
4WD.
Gross vehicle weight must never
exceed the Gross Vehicle Weight Rat-
ing (GVWR) listed on the Safety Certi-
fication Label. Gross axle weight for
the front and rear axles must not
exceed the Gross Axle Weight Rating
(GAWR) listed on the Safety Certifica-
tion Label.
WARNING
Do not tow a trailer having a gross
trailer weight greater than 450 kg
(1000 pounds) unless the trailer is
equipped with trailer brakes.
WARNING
Connect trailer lights and hook up
safety chains every time you tow.
WARNING
Your vehicle will handle differently
when towing a trailer. For your safety
and the safety of others, you should
observe the following precautions:
Practice turning, stopping and
backing up before you begin tow-
ing in traffic. Do not tow in traffic
until you are confident that you can
handle the vehicle and trailer
safely.
Never exceed posted towing speed
limits or 72 km/h (45 mph), which-
ever is lower.
Never drive at a speed that causes
shaking or swaying of the trailer. If
you notice even the slightest sign
of shaking or swaying, slow down.
Always have someone guide you
when backing.
(Continued)
WARNING
(Continued)
Allow adequate stopping distance.
Stopping distance is increased
when you tow a trailer. For each 16
km/h (10 mph) of speed, allow at
least one vehicle and trailer length
between you and the vehicle ahead.
Follow at a greater distance if roads
are wet or slippery.
Slow down when making turns.
Remember that a larger than nor-
mal turning radius is needed
because the trailer wheels will be
closer than the vehicle wheels to
the inside of the turn.
Avoid sudden acceleration and
stopping of the vehicle. Do not
make quick maneuvers unless they
are necessary.
Slow down in cross winds and be
prepared for wind blasts from large
passing vehicles.
Be careful when passing other
vehicles. Be sure to allow enough
room for your trailer before you
change lanes, and signal well in
advance.
Slow down and shift into a lower
gear before you reach long or steep
downhill grades. It is hazardous to
attempt downshifting while you are
descending a hill.
(Continued)
Trailer Towing: 5, 11, 13
Page 132 of 211

Downloaded from www.Manualslib.com manuals search engine 8-6 VEHICLE LOADING AND TOWING
66J21-03E
60A186
WARNING
(Continued)
Avoid “riding” the brakes. “Riding”
the brakes could cause the brakes
to overheat, resulting in reduced
braking efficiency. Use engine
braking as much as possible.
Because of the added trailer
weight, your engine may overheat
on hot days when going up long or
steep hills. Pay attention to your
engine temperature gauge. If it indi-
cates overheating, pull off the road
and stop in a safe place. Refer to
the “If the Engine Overheats” in
“EMERGENCY SERVICE” section
for details on how to proceed.
WARNING
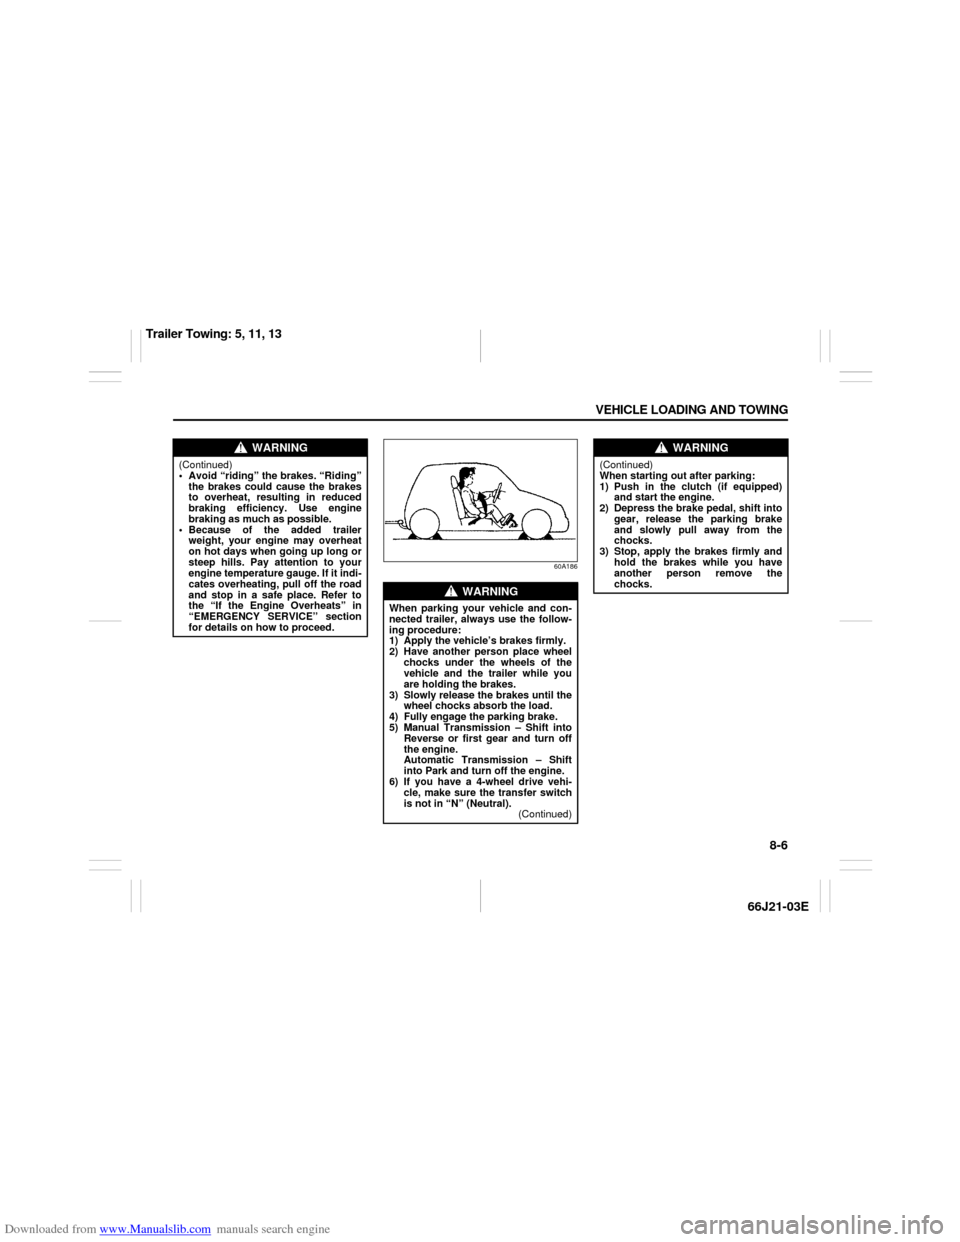
When parking your vehicle and con-
nected trailer, always use the follow-
ing procedure:
1) Apply the vehicle’s brakes firmly.
2) Have another person place wheel
chocks under the wheels of the
vehicle and the trailer while you
are holding the brakes.
3) Slowly release the brakes until the
wheel chocks absorb the load.
4) Fully engage the parking brake.
5) Manual Transmission – Shift into
Reverse or first gear and turn off
the engine.
Automatic Transmission – Shift
into Park and turn off the engine.
6) If you have a 4-wheel drive vehi-
cle, make sure the transfer switch
is not in “N” (Neutral).
(Continued)
WARNING
(Continued)
When starting out after parking:
1) Push in the clutch (if equipped)
and start the engine.
2) Depress the brake pedal, shift into
gear, release the parking brake
and slowly pull away from the
chocks.
3) Stop, apply the brakes firmly and
hold the brakes while you have
another person remove the
chocks.
Trailer Towing: 5, 11, 13
Page 133 of 211

Downloaded from www.Manualslib.com manuals search engine 8-7 VEHICLE LOADING AND TOWING
66J21-03E
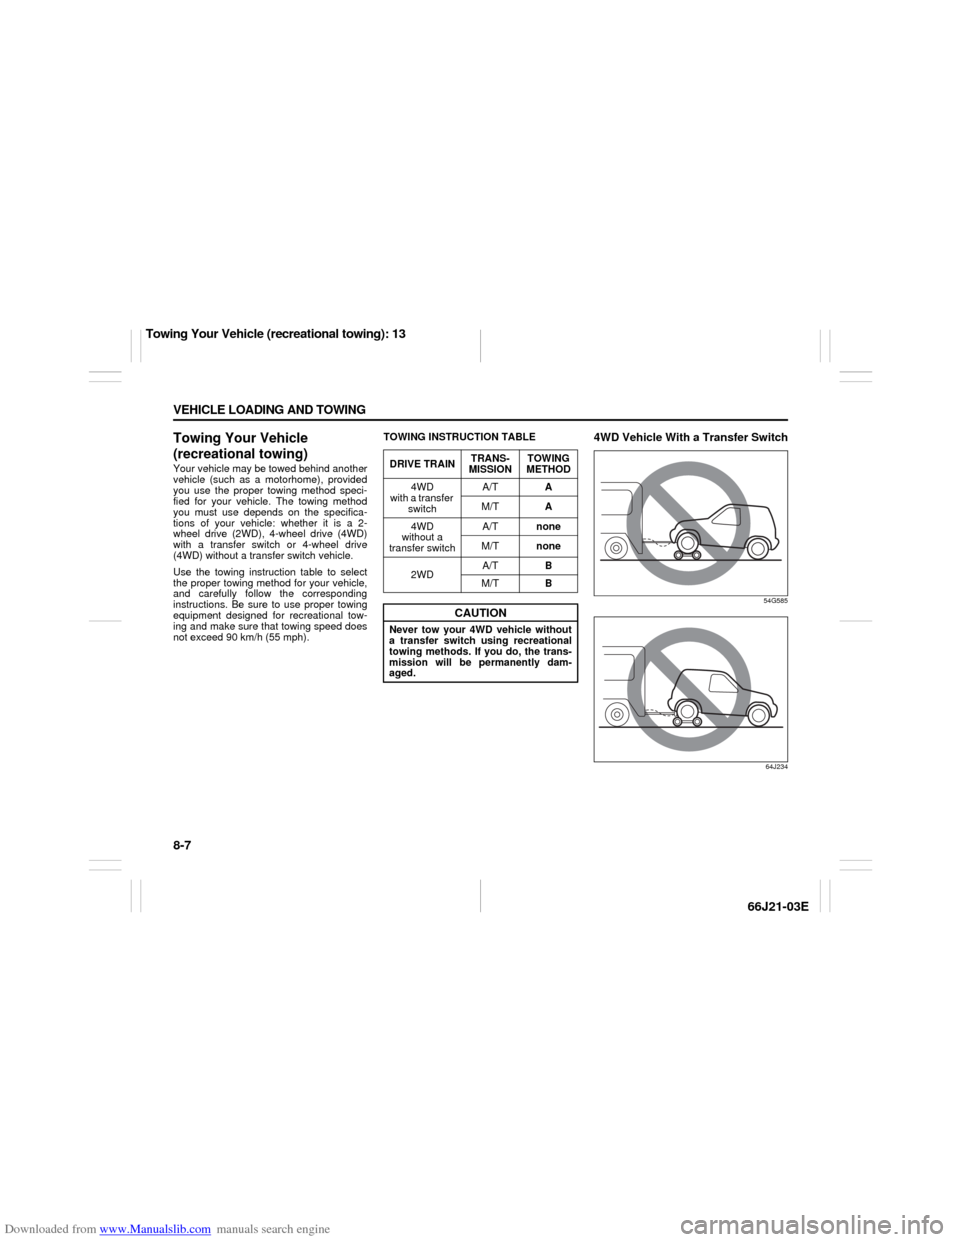
Towing Your Vehicle
(recreational towing)Your vehicle may be towed behind another
vehicle (such as a motorhome), provided
you use the proper towing method speci-
fied for your vehicle. The towing method
you must use depends on the specifica-
tions of your vehicle: whether it is a 2-
wheel drive (2WD), 4-wheel drive (4WD)
with a transfer switch or 4-wheel drive
(4WD) without a transfer switch vehicle.
Use the towing instruction table to select
the proper towing method for your vehicle,
and carefully follow the corresponding
instructions. Be sure to use proper towing
equipment designed for recreational tow-
ing and make sure that towing speed does
not exceed 90 km/h (55 mph).TOWING INSTRUCTION TABLE
4WD Vehicle With a Transfer Switch
54G585
64J234
DRIVE TRAINTRANS-
MISSIONTOWING
METHOD
4WD
with a transfer
switchA/TA
M/TA
4WD
without a
transfer switchA/Tnone
M/Tnone
2WDA/TB
M/TB
CAUTION
Never tow your 4WD vehicle without
a transfer switch using recreational
towing methods. If you do, the trans-
mission will be permanently dam-
aged.
Towing Your Vehicle (recreational towing): 13
Page 138 of 211

Downloaded from www.Manualslib.com manuals search engine INSPECTION AND MAINTENANCE
9
66J21-03E
60G410
INSPECTION AND MAINTENANCEMaintenance Schedule ....................................................... 9-2
Periodic Maintenance Schedule ........................................ 9-3
Drive Belt ............................................................................. 9-7
Engine Oil and Filter ........................................................... 9-7
Gear Oil ................................................................................ 9-11
Automatic Transmission Fluid ........................................... 9-13
Engine Coolant .................................................................... 9-15
Windshield Washer Fluid ................................................... 9-17
Air Cleaner ........................................................................... 9-18
Spark Plugs ......................................................................... 9-18
Brakes .................................................................................. 9-19
Steering Wheel .................................................................... 9-21
Clutch Pedal ........................................................................ 9-22
Tires ...................................................................................... 9-22
Battery .................................................................................. 9-33
Fuses .................................................................................... 9-33
Headlight Aiming ................................................................. 9-36
Bulb Replacement ............................................................... 9-37
Wiper Blades ....................................................................... 9-42
Air Conditioning System .................................................... 9-45
Page 143 of 211

Downloaded from www.Manualslib.com manuals search engine 9-5 INSPECTION AND MAINTENANCE
66J21-03E
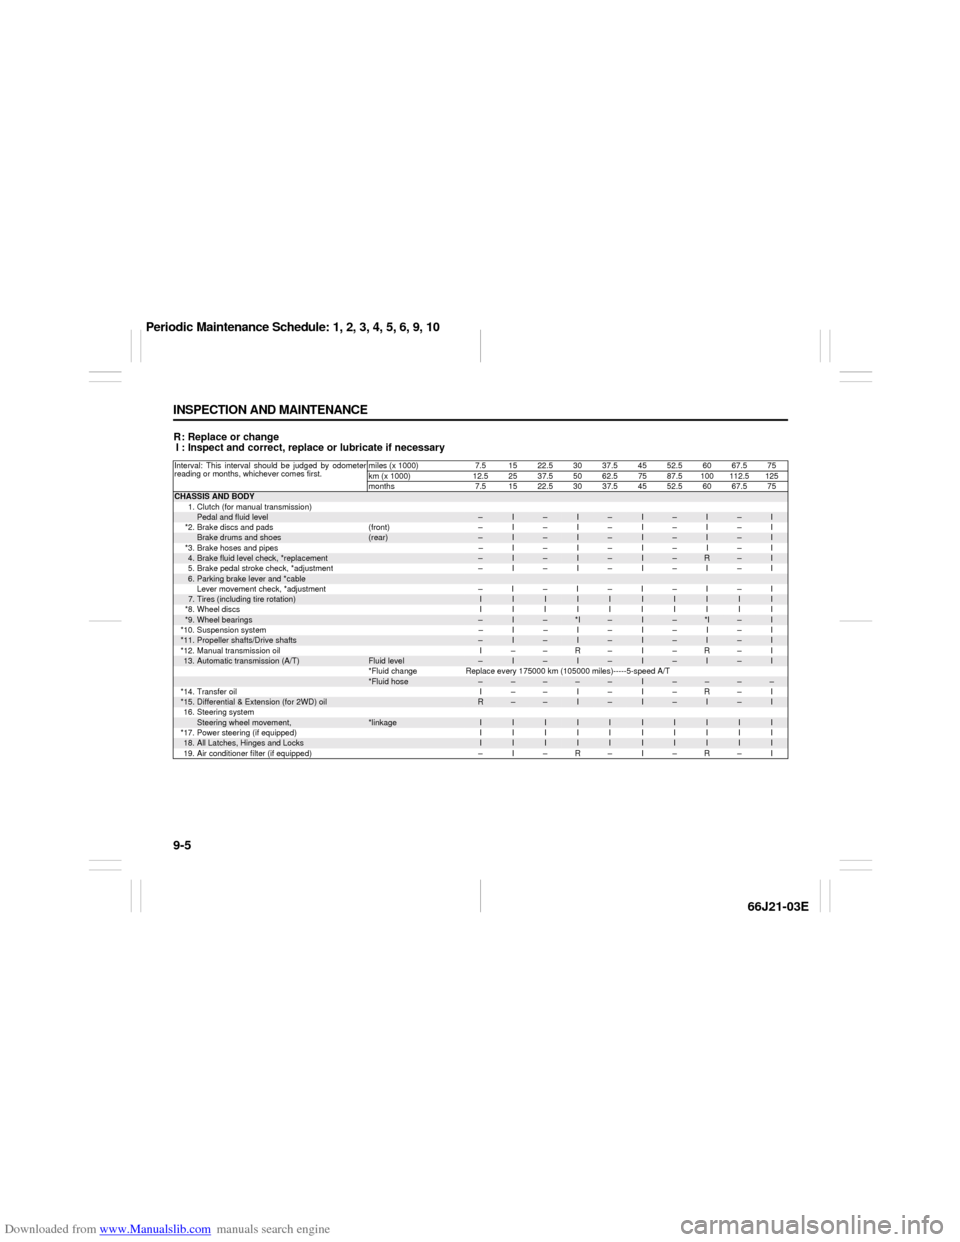
R: Replace or change
I : Inspect and correct, replace or lubricate if necessaryInterval: This interval should be judged by odometer
reading or months, whichever comes first.miles (x 1000) 7.5 15 22.5 30 37.5 45 52.5 60 67.5 75
km (x 1000) 12.52537.55062.57587.5100112.5125
months 7.5 1522.53037.54552.56067.575CHASSIS AND BODY
1. Clutch (for manual transmission)
Pedal and fluid level
–
I
–
I
–
I
–
I
–
I
*2. Brake discs and pads (front) – I – I – I – I – I
Brake drums and shoes
(rear)
–
I
–
I
–
I
–
I
–
I
*3. Brake hoses and pipes – I – I – I – I – I
4.Brake fluid level check, *replacement
–
I
–
I
–
I
–
R
–
I
5. Brake pedal stroke check, *adjustment – I – I – I – I – I
6.Parking brake lever and *cableLever movement check, *adjustment –I–I–I–I–I7.Tires (including tire rotation)
I
I
I
I
I
I
I
I
I
I
*8.Wheel discs IIIIIIIIII
*9.
Wheel bearings
–
I
–
*I
–
I
–
*I
–
I
*10. Suspension system – I – I – I – I – I
*11.
Propeller shafts/Drive shafts
–
I
–
I
–
I
–
I
–
I
*12. Manual transmission oil I – – R – I – R – I
13.
Automatic transmission (A/T)
Fluid level
–
I
–
I
–
I
–
I
–
I
*Fluid change Replace every 175000 km (105000 miles)-----5-speed A/T
*Fluid hose
–
–
–
–
–
I
–
–
–
–
*14. Transfer oil I – – I – I – R – I
*15.
Differential & Extension (for 2WD) oil
R
–
–
I
–
I
–
I
–
I
16. Steering system
Steering wheel movement,
*linkage
I
I
I
I
I
I
I
I
I
I
*17. Power steering (if equipped) I I I I I I I I I I
18.
All Latches, Hinges and Locks
I
I
I
I
I
I
I
I
I
I
19. Air conditioner filter (if equipped) – I – R – I – R – I
Periodic Maintenance Schedule: 1, 2, 3, 4, 5, 6, 9, 10
Page 144 of 211

Downloaded from www.Manualslib.com manuals search engine 9-6 INSPECTION AND MAINTENANCE
66J21-03E
R: Replace or change
I : Inspect and correct, replace or lubricate if necessary
NOTE:
This table shows the service schedule up to 250000 km (150000 miles).
Beyond 250000 km (150000 miles), perform the same services at the same intervals shown in the chart.
Beyond 250000 km (150000 miles), the maintenance services enclosed with a rectangle are required.
Item 9 *I - inspect for wear.Interval: This interval should be judged by odometer
reading or months, whichever comes first.miles (x 1000) 82.5 90 97.5 105112.5 120 127.5 135 142.5 150
km (x 1000) 137.5 150 162.5 175 187.5 200 212.5 225 237.5 250
months 82.5 90 97.5 105 112.5 120 127.5 135 142.5 150CHASSIS AND BODY
1. Clutch (for manual transmission)
Pedal and fluid level
–
I
–
I
–
I
–
I
–
I
*2. Brake discs and pads (front) – I – I – I – I – I
Brake drums and shoes
(rear)
–
I
–
I
–
I
–
I
–
I
*3. Brake hoses and pipes – I – I – I – I – I
4.Brake fluid level check, *replacement
–
I
–
I
–
R
–
I
–
I
5. Brake pedal stroke check, *adjustment – I – I – I – I – I
6.Parking brake lever and *cableLever movement check, *adjustment –I–I–I–I–I7.Tires (including tire rotation)
I
I
I
I
I
I
I
I
I
I
*8.Wheel discs IIIIIIIIII
*9.
Wheel bearings
–
*I
–
I
–
*I
–
I
–
I
*10. Suspension system – I – I – I – I – I
*11.
Propeller shafts/Drive shafts
–
I
–
I
–
I
–
I
–
I
*12. Manual transmission oil – R – I – R – I – R
13.
Automatic transmission (A/T)
Fluid level
–
I
–
I
–
I
–
I
–
I
*Fluid change Replace every 175000 km (105000 miles)-----5-speed A/T
*Fluid hose
–
I
–
–
–
–
–
I
–
–
*14. Transfer oil – I – I – R – I – I
*15.
Differential & Extension (for 2WD) oil
–
I
–
I
–
I
–
I
–
I
16. Steering system
Steering wheel movement,
*linkage
I
I
I
I
I
I
I
I
I
I
*17. Power steering (if equipped) I I I I I I I I I I
18.
All Latches, Hinges and Locks
I
I
I
I
I
I
I
I
I
I
19. Air conditioner filter (if equipped) – R – I – R – I – R
Periodic Maintenance Schedule: 1, 2, 3, 4, 5, 6, 9, 10
Page 164 of 211

Downloaded from www.Manualslib.com manuals search engine 9-26 INSPECTION AND MAINTENANCE
66J21-03E
D. Construction Code
This letter code is used to indicate the
type of ply construction in the tire. The
letter “R” means radial ply tire con-
struction, the letter “D” means diago-
nal or bias ply construction, and the
letter “B” means belted-bias ply con-
struction.
E. Rim Diameter
This two-digit number is the wheel or
rim diameter in inches.
Tire Inflation PressureTire inflation pressure should be checked
when the tire is cold. “Cold tire inflation
pressure” is the pressure in a tire that has
been driven less than 1 mile (1.6 km) or
has been standing for three hours or more.
54G307
The front, rear and spare tire pressure
specifications for your vehicle are shown
below and are listed on the Tire and Load-
ing Information Label, which is located on
the driver’s door lock pillar. The Tire and
Loading Information Label contains the fol-
lowing information:
Seating Capacity
Maximum Allowed Combined Weight of
Occupants and Cargo
Original Tire Size
Recommended Cold Tire Inflation Pres-
sure of Original TiresMeasuring air pressure
Use the following steps to achieve proper
tire inflation:
1) Identify the recommended tire pressure
on the vehicle’s Tire and Loading Infor-
mation Label or in the owner’s manual.
2) Remove the valve cap from the tire
valve stem.
3) Using a reliable pressure gauge, mea-
sure the tire inflation pressure by press-
ing the tire gauge firmly onto the valve
to get a pressure measurement.
Remember that inflation pressures
should be checked when the tires are
“cold”, meaning before they have been
driven one mile or after sitting for three
hours or more allowing the tire to cool
to ambient air temperature.
4) If the air pressure is too high, slowly
release the air by pressing on the tire
valve stem with the edge of the tire
gauge until you reach the correct pres-
sure.
WARNING
Your SUZUKI is equipped with tires
which are all the same type and size.
This is important to ensure proper
steering and handling of the vehicle.
Never mix tires of different size or
type on the four wheels of your vehi-
cle. Mixing tires could cause you to
lose control while driving which may
lead to an accident. The size and type
of tires used should be only those
approved by SUZUKI Motor Corpora-
tion as standard or optional equip-
ment for your vehicle.
Recommended Cold Tire Inflation
Pressures
Front Tires220 kPa
32 psi
Rear Tires220 kPa
32 psi
Spare220 kPa
32 psi
Tires: 6