2007 SUZUKI FORENZA air filter
[x] Cancel search: air filterPage 5 of 225
85Z03-03E
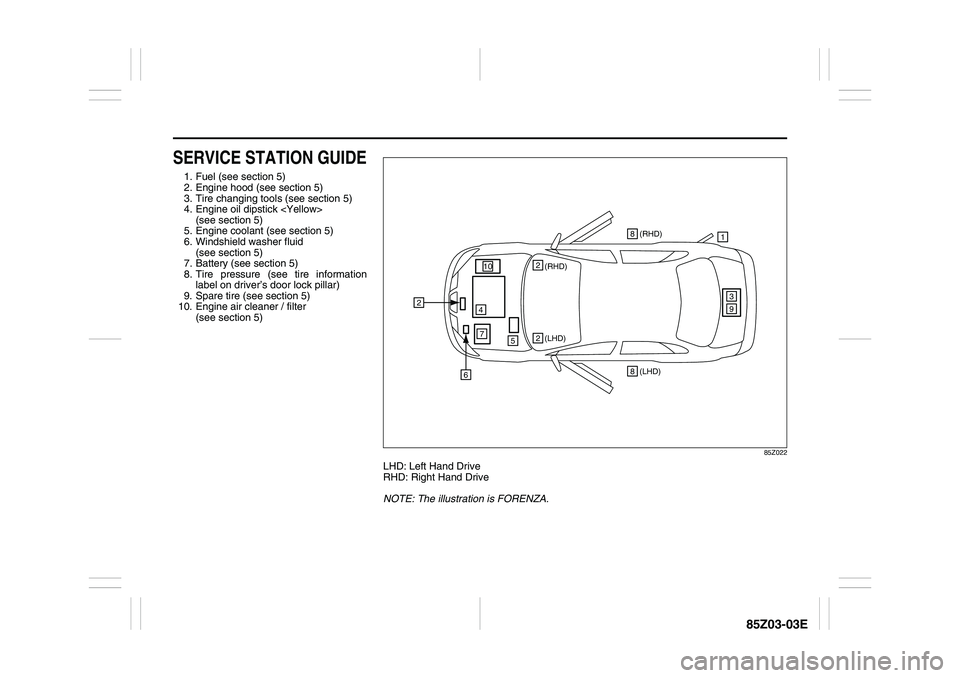
SERVICE STATION GUIDE1. Fuel (see section 5)
2. Engine hood (see section 5)
3. Tire changing tools (see section 5)
4. Engine oil dipstick
(see section 5)
5. Engine coolant (see section 5)
6. Windshield washer fluid
(see section 5)
7. Battery (see section 5)
8. Tire pressure (see tire information
label on driver’s door lock pillar)
9. Spare tire (see section 5)
10. Engine air cleaner / filter
(see section 5)
85Z022
LHD: Left Hand Drive
RHD: Right Hand Drive
NOTE: The illustration is FORENZA.
(LHD) (RHD)1
2
22
39
4
5
6
7
(LHD) 8(RHD) 8
10
Page 93 of 225
3-17 INSTRUMENT PANEL
85Z03-03E
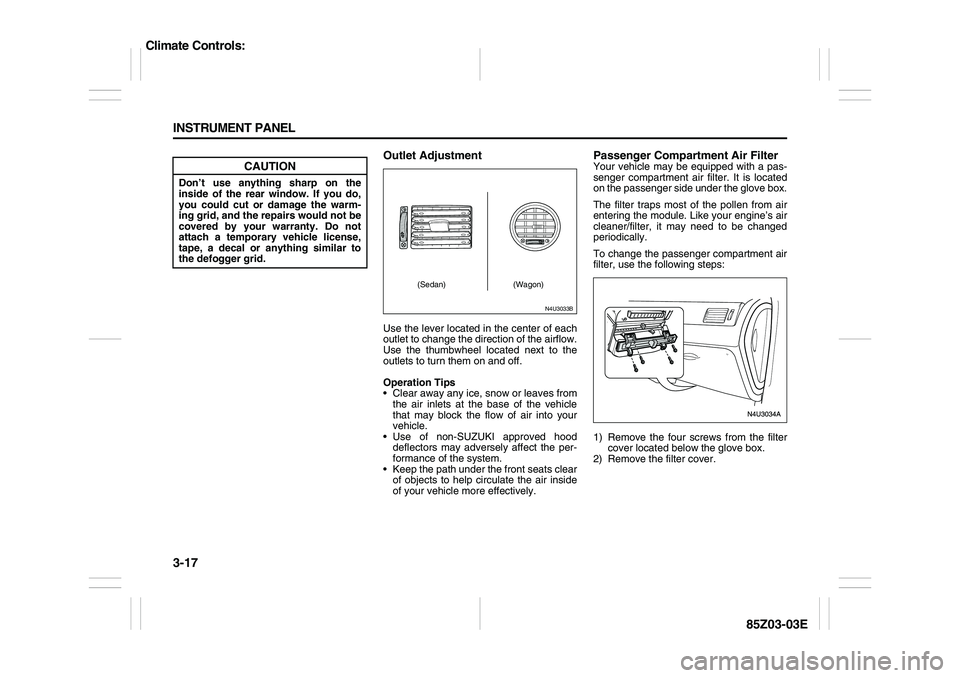
Outlet AdjustmentUse the lever located in the center of each
outlet to change the direction of the airflow.
Use the thumbwheel located next to the
outlets to turn them on and off.
Operation Tips
Clear away any ice, snow or leaves from
the air inlets at the base of the vehicle
that may block the flow of air into your
vehicle.
Use of non-SUZUKI approved hood
deflectors may adversely affect the per-
formance of the system.
Keep the path under the front seats clear
of objects to help circulate the air inside
of your vehicle more effectively.
Passenger Compartment Air FilterYour vehicle may be equipped with a pas-
senger compartment air filter. It is located
on the passenger side under the glove box.
The filter traps most of the pollen from air
entering the module. Like your engine’s air
cleaner/filter, it may need to be changed
periodically.
To change the passenger compartment air
filter, use the following steps:
1) Remove the four screws from the filter
cover located below the glove box.
2) Remove the filter cover.
CAUTION
Don’t use anything sharp on the
inside of the rear window. If you do,
you could cut or damage the warm-
ing grid, and the repairs would not be
covered by your warranty. Do not
attach a temporary vehicle license,
tape, a decal or anything similar to
the defogger grid.
N4U3033B
(Sedan) (Wagon)
Climate Controls:
Page 94 of 225
3-18 INSTRUMENT PANEL
85Z03-03E
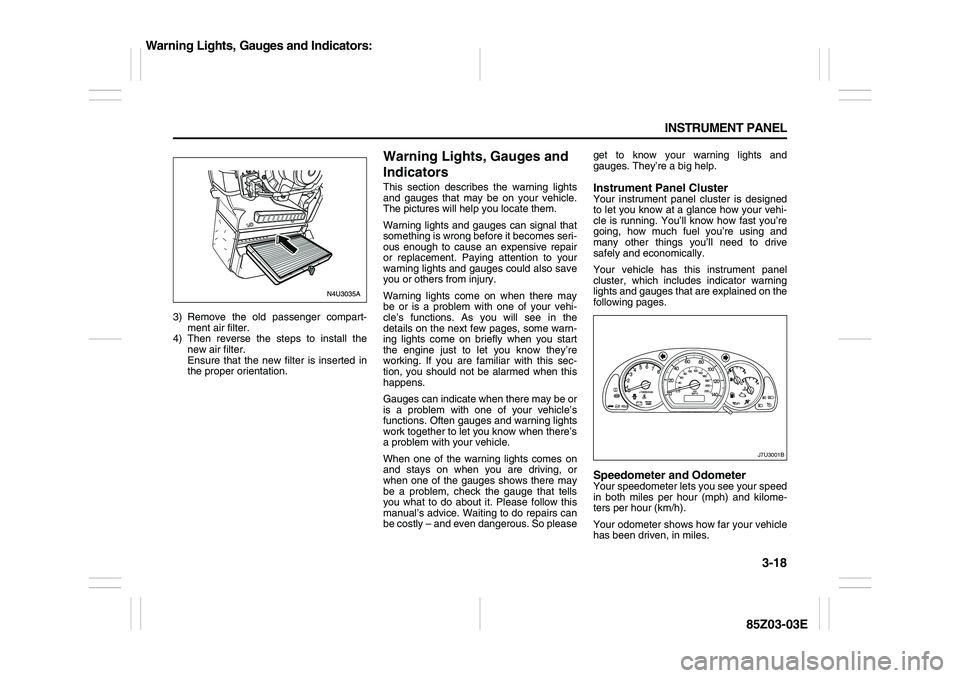
3) Remove the old passenger compart-
ment air filter.
4) Then reverse the steps to install the
new air filter.
Ensure that the new filter is inserted in
the proper orientation.
Warning Lights, Gauges and
IndicatorsThis section describes the warning lights
and gauges that may be on your vehicle.
The pictures will help you locate them.
Warning lights and gauges can signal that
something is wrong before it becomes seri-
ous enough to cause an expensive repair
or replacement. Paying attention to your
warning lights and gauges could also save
you or others from injury.
Warning lights come on when there may
be or is a problem with one of your vehi-
cle’s functions. As you will see in the
details on the next few pages, some warn-
ing lights come on briefly when you start
the engine just to let you know they’re
working. If you are familiar with this sec-
tion, you should not be alarmed when this
happens.
Gauges can indicate when there may be or
is a problem with one of your vehicle’s
functions. Often gauges and warning lights
work together to let you know when there’s
a problem with your vehicle.
When one of the warning lights comes on
and stays on when you are driving, or
when one of the gauges shows there may
be a problem, check the gauge that tells
you what to do about it. Please follow this
manual’s advice. Waiting to do repairs can
be costly – and even dangerous. So pleaseget to know your warning lights and
gauges. They’re a big help.
Instrument Panel ClusterYour instrument panel cluster is designed
to let you know at a glance how your vehi-
cle is running. You’ll know how fast you’re
going, how much fuel you’re using and
many other things you’ll need to drive
safely and economically.
Your vehicle has this instrument panel
cluster, which includes indicator warning
lights and gauges that are explained on the
following pages.Speedometer and OdometerYour speedometer lets you see your speed
in both miles per hour (mph) and kilome-
ters per hour (km/h).
Your odometer shows how far your vehicle
has been driven, in miles.
J7U3001B
Warning Lights, Gauges and Indicators:
Page 150 of 225

5-6 SERVICE AND APPEARANCE CARE
85Z03-03E
Engine Compartment OverviewWhen you open the hood on the engine, you’ll see the following:
A. Engine Air Cleaner/Filter
B. Engine Oil Filler Cap
C. Brake/Clutch Fluid Reservoir
D. Engine Coolant Surge Tank
E. Underhood Fuse BlockF. Battery
G. Windshield Washer Fluid Reservoir
H. Power Steering Fluid Reservoir
I. Engine Oil Dipstick
N5U5007A
A
B
D
EG
H
I
F
C
Checking Things Under the Hood:
Page 153 of 225
5-9 SERVICE AND APPEARANCE CARE
85Z03-03E
If you are in an area of extreme cold,
where the temperature falls below –22°F
(–30°C), it is recommended that you use
either an SAE 5W-30 synthetic oil or an
SAE 0W-30 oil. Both will provide easier
cold starting and better protection for your
engine at extremely low temperatures.
Engine Oil Additives
Don’t add anything to your oil. The recom-
mended oils with the starburst symbol are
all you will need for good performance and
engine protection.
When to Change Engine Oil
If any one of these is true for you, use the
short trip/city maintenance schedule:
Most trips are less than 5 miles (8 km).
This is particularly important when out-
side temperatures are below freezing.
Most trips include extensive idling (such
as frequent driving in stop-and-go traf-
fic).
The vehicle is used for delivery service,
police, taxi or other commercial applica-
tion.Driving under these conditions causes
engine oil to break down sooner. If any one
of these is true for your vehicle, then you
need to change your oil and filter every
3,750 miles (6,000 km) or 3 months –
whichever occurs first.
If none of them is true, use the long trip/
highway maintenance schedule. Change
the oil and filter every 7,500 miles (12,000
km) or 6 months – whichever occurs first.
Driving a vehicle with a fully warmed
engine under highway conditions will
cause engine oil to break down slower.
What to Do with Used Oil
Used engine oil contains certain elements
that may be unhealthy for your skin and
could even cause cancer. Don’t let used oil
stay on your skin for very long. Clean your
skin and nails with soap and water, or a
good hand cleaner. Wash or properly dis-
pose of clothing or rags containing used
engine oil. See the manufacturer’s warn-
ings about the use and disposal of oil prod-
ucts.
Used oil can be a threat to the environ-
ment. If you change your own oil, be sure
to drain all the oil from the filter before dis-
posal. Never dispose of oil by putting it in
the trash, pouring it on the ground, into
sewers, or into streams or bodies of water.
Instead, recycle it by taking it to a place
that collects used oil. If you have a problem
properly disposing of your used oil, askyour SUZUKI dealer, a service station or a
local recycling center for help.
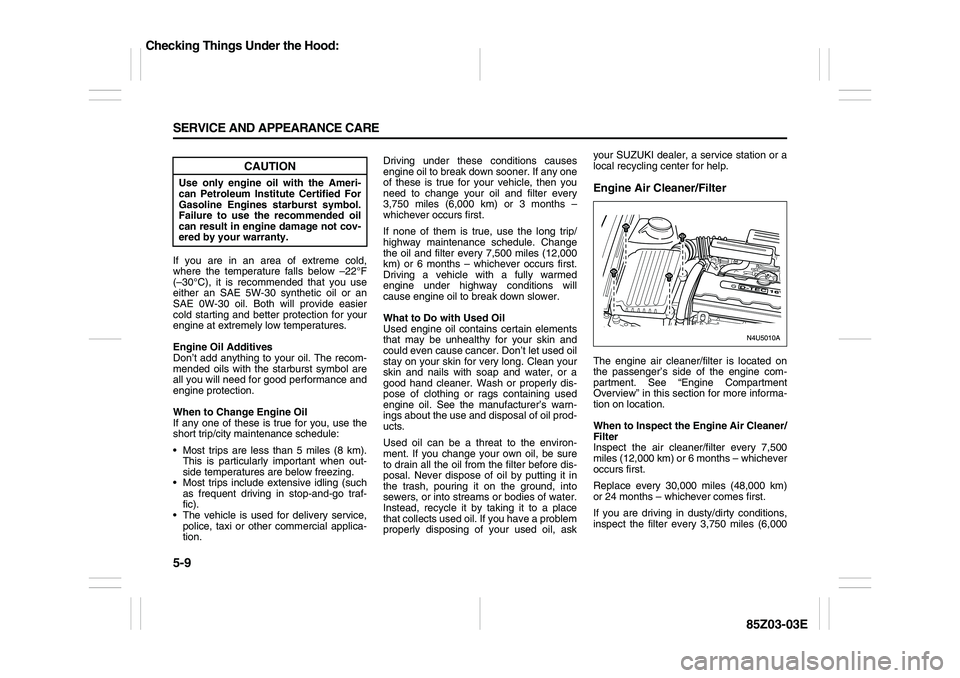
Engine Air Cleaner/FilterThe engine air cleaner/filter is located on
the passenger’s side of the engine com-
partment. See “Engine Compartment
Overview” in this section for more informa-
tion on location.
When to Inspect the Engine Air Cleaner/
Filter
Inspect the air cleaner/filter every 7,500
miles (12,000 km) or 6 months – whichever
occurs first.
Replace every 30,000 miles (48,000 km)
or 24 months – whichever comes first.
If you are driving in dusty/dirty conditions,
inspect the filter every 3,750 miles (6,000
CAUTION
Use only engine oil with the Ameri-
can Petroleum Institute Certified For
Gasoline Engines starburst symbol.
Failure to use the recommended oil
can result in engine damage not cov-
ered by your warranty.
Checking Things Under the Hood:
Page 154 of 225
5-10 SERVICE AND APPEARANCE CARE
85Z03-03E
km) or 3 months. If necessary, clean or
replace it.
How to Inspect the Engine Air Cleaner/
Filter
To inspect the air cleaner/filter, remove the
filter from the vehicle and lightly shake the
filter to release loose dust and dirt. If the fil-
ter remains “caked” with dirt, a new filter is
required.
To inspect or replace the filter, do the fol-
lowing:
1) Remove the four screws on the cover.
2) Lift off the cover.
3) Check or replace the engine air
cleaner/filter. See “Normal Mainte-
nance Replacement Parts” in this sec-
tion for replacement part numbers.
4) Reinstall the filter, put the cover back on
tightly, and tighten the screws.
Automatic Transmission FluidTo ensure proper functioning, efficiency,
and durability of the automatic transmis-
sion, be sure to keep the transmission fluid
at the proper level. Too much or too little
fluid can cause problems.
The fluid level must be checked with the
engine running and the selector lever in P
(Park). The vehicle must be up to normal
operating temperature and parked on level
ground.
The normal operating temperature for the
fluid will be reached after driving about 10
minutes.
Checking Automatic Transmission Fluid
Level
If the fluid is contaminated or discolored,
change the automatic transmission fluid.
A decrease in the fluid level indicates a
leak in the automatic transmission. If
noted, contact your SUZUKI dealer for
repair as soon as possible.1) Start the engine.
2) Warm up the engine until the tempera-
ture of the automatic transmission fluid
reaches approximately 40°C (104°F).
3) Move the selector lever from “P” to “1”
and return to “P”. Wait for a few sec-
onds at each select position until the
selected gears are fully engaged.
WARNING
Operating the engine with the air
cleaner/filter off can cause you or
others to be burned. The air cleaner
not only cleans the air, it helps to
stop flame if the engine backfires. If it
isn’t there and the engine backfires,
you could be burned. Don’t drive with
it off, and be careful working on the
engine with the air cleaner/filter off.
CAUTION
If the air cleaner/filter is off, a backfire
can cause a damaging engine fire.
And, dirt can easily get into your
engine, which will damage it. Always
have the air cleaner/filter in place
when you’re driving.
WARNING
This work requires special skill and
equipment. Before attempting to do
the work, be sure you are fully
acquainted with doing this job.
Have your SUZUKI dealer do this
work if you are not confident you can
complete the task safely.
Otherwise, you could be injured or
could damage the vehicle.
Checking Things Under the Hood:
Page 198 of 225

5-54 SERVICE AND APPEARANCE CARE
85Z03-03E
Capacities and SpecificationsThe following approximate capacities are
given in English and metric conversions. CapacitiesSpecifications
EngineChassis
ApplicationCapacities
English Metric
Air Conditioning
Refrigerant R-134a1.41 lbs 0.64 kg
Brake/Clutch Fluid 0.53
quarts0.5 L
Engine Coolant 7.9
quarts7.4 L
Engine Oil with Filter 4.2
quarts4.0 L
Fuel Tank 14.5
gallons55.0 L
Power Steering Fluid 1.2
quarts1.1 L
Automatic Transmis-
sion Fluid
(Complete Overhaul)7.3 ± 0.2
quarts6.9 ±
0.2 L
Manual Transmission
Fluid (Complete Drain
and Refill)1.9
quarts1.8 L
Wheel Nut Torque 81 lb-ft 110 N.m
All capacities are approximate. When
adding, be sure to fill to the approximately
level, as recommended in this manual. Engine 2.0 L DOHC (L6)
VIN Code Z
Type 4-Cylinder / In-Line
Valve Train DOHC 16 Valve
Displacement 121.9 in
3 (1,998 cc)
Bore x stroke 3.39 in x 3.39 in
(86 mm x 86 mm)
Compression Ratio 9.6 : 1
Octane Rating 87 (Ron 91) or
higher
Spark
plugType FLR8LDCU
Gap 0.039 in (1.0 mm)
Battery Rating 12V – 55AH
Cold
Cranking
Ampere610 CCA
Front Suspension Type McPherson
Strut Type
Rear Suspension Type Dual Link
Type
Alignment
(Curb
Weight)Front Camber –0°33’ ± 45’
Rear Camber –1°00’ ± 45’
Caster 4°00’ ± 45’
Front Toe-in 0°00’ ± 10’
Rear Toe-in 0°12’ ± 10’
Page 202 of 225

6-2 MAINTENANCE SCHEDULE
85Z03-03E
MaintenanceScheduled Maintenance ServicesMaintenance services and record retention are the owner’s responsibility. You should retain evidence that proper maintenance has been
performed on your vehicle in accordance with the scheduled maintenance services chart.Maintenance Recommended under Normal Driving ConditionsEngine Control SystemMaintenance
IntervalKilometers (miles) or time in months, whichever comes first
Months 6 1218243036424854606672788490
Maintenance
Itemx 1,000 miles 7.5 15 22.5 30 37.5 45 52.5 60 67.5 75 82.5 90 97.5 105 112.5
x 1,000 km 12 24 36 48 60 72 84 96 108 120 132 144 156 168 180
Drive Belt (Alternator, Power steering
Pump & A/C Compressor)IIIIIIIIIIIIIII
Engine Oil & Oil Filter RRRRRRRRRRRRRRR
Cooling System Hose & Connections I I I I I I I
Engine Coolant Silicate based I I I R I I I R I I I R I I I
Dex-cool Inspect every 7,500 miles (12,000 km) or 6 months, and
replace every 150,000 miles (240,000 km) or 60 months.
Fuel Filter (integrated in Fuel Pump) I* I* R*
Fuel Line & Connections I* I* I* I* I* I* I*
Air Cleaner Element I* I* I* R* I* I* I* R* I* I* I* R* I* I* I*
Spark Plugs I* R* I* R* I* R* I*
Spark Plug Wires Replace every 60,000 miles (96,000 km)
EVAP Canister and Vapor Lines I* I* I*
EVAP Canister Vent Valve Filter I* R* I*
PCV System I* I* I* I* I*
Timing Belt I R I