2007 SUZUKI FORENZA service
[x] Cancel search: servicePage 166 of 225

5-22 SERVICE AND APPEARANCE CARE
85Z03-03E
age the battery and maybe other parts,
too. And don’t connect the negative (–)
cable to the negative (–) terminal on the
dead battery because this can cause
sparks.
6) Connect the red positive (+) cable to
the positive (+) terminal of the dead
battery. Use a remote positive (+) termi-
nal if the vehicle has one.7) Don’t let the other end touch metal.
Connect it to the positive (+) terminal of
the good battery. Use a remote positive
(+) terminal if the vehicle has one.
8) Now connect the black negative (–)
cable to the negative (–) terminal of the
good battery. Use a remote negative (–)
terminal if the vehicle has one.
Don’t let the other end touch anything
until the next step. The other end of the
negative (–) cable doesn’t go to the
dead battery. It goes to a heavy,
unpainted metal engine part or to a
remote negative (–) terminal on the
vehicle with the dead battery.
9) Connect the other end of the negative
(–) cable at least 18 inches (45 cm)
away from the dead battery, but not
near engine parts that move. The elec-trical connection is just as good there,
and the chance of sparks getting back
to the battery is much less.
10)Now start the vehicle with the good bat-
tery and run the engine for a while.
11)Try to start the vehicle that had the
dead battery. If it won’t start after a few
tries, it probably needs service.
WARNING
An electric fan under the hood can
start up and injure you even when the
engine is not running. Keep hands,
clothing and tools away from any
underhood electric fan.
CAUTION
Damage to your vehicle may result
from electrical shorting if jumper
cables are removed incorrectly. To
prevent electrical shorting, take care
that the cables don’t touch each
other or any other metal. The repairs
wouldn’t be covered by your war-
ranty.
Checking Things Under the Hood:
Page 167 of 225
5-23 SERVICE AND APPEARANCE CARE
85Z03-03E
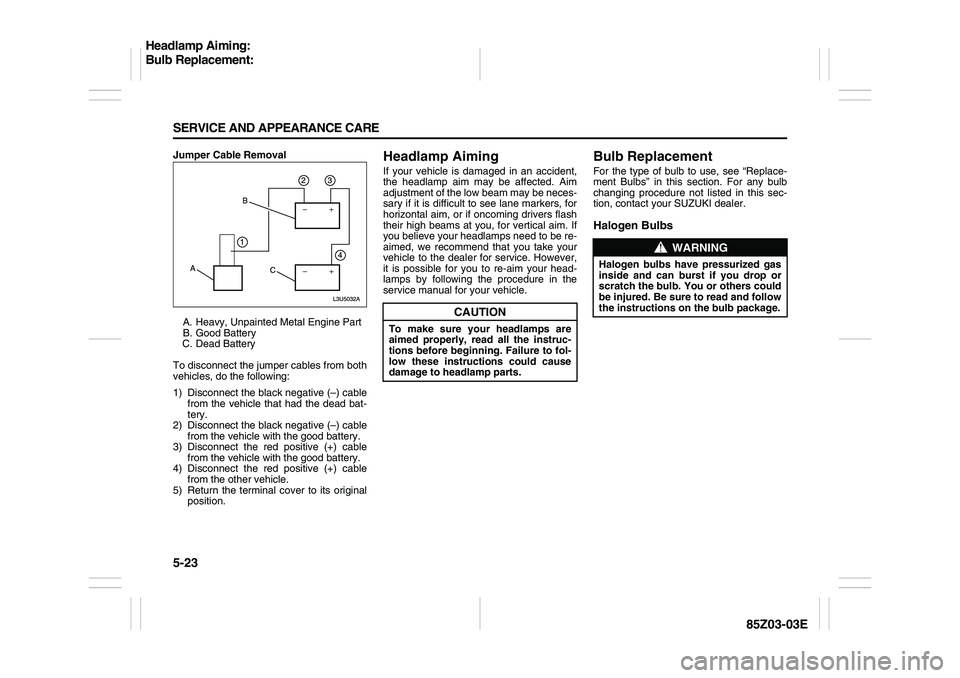
Jumper Cable Removal
A. Heavy, Unpainted Metal Engine Part
B. Good Battery
C. Dead Battery
To disconnect the jumper cables from both
vehicles, do the following:
1) Disconnect the black negative (–) cable
from the vehicle that had the dead bat-
tery.
2) Disconnect the black negative (–) cable
from the vehicle with the good battery.
3) Disconnect the red positive (+) cable
from the vehicle with the good battery.
4) Disconnect the red positive (+) cable
from the other vehicle.
5) Return the terminal cover to its original
position.
Headlamp AimingIf your vehicle is damaged in an accident,
the headlamp aim may be affected. Aim
adjustment of the low beam may be neces-
sary if it is difficult to see lane markers, for
horizontal aim, or if oncoming drivers flash
their high beams at you, for vertical aim. If
you believe your headlamps need to be re-
aimed, we recommend that you take your
vehicle to the dealer for service. However,
it is possible for you to re-aim your head-
lamps by following the procedure in the
service manual for your vehicle.
Bulb ReplacementFor the type of bulb to use, see “Replace-
ment Bulbs” in this section. For any bulb
changing procedure not listed in this sec-
tion, contact your SUZUKI dealer.Halogen Bulbs
CAUTION
To make sure your headlamps are
aimed properly, read all the instruc-
tions before beginning. Failure to fol-
low these instructions could cause
damage to headlamp parts.
WARNING
Halogen bulbs have pressurized gas
inside and can burst if you drop or
scratch the bulb. You or others could
be injured. Be sure to read and follow
the instructions on the bulb package.
Headlamp Aiming:
Bulb Replacement:
Page 168 of 225
5-24 SERVICE AND APPEARANCE CARE
85Z03-03E
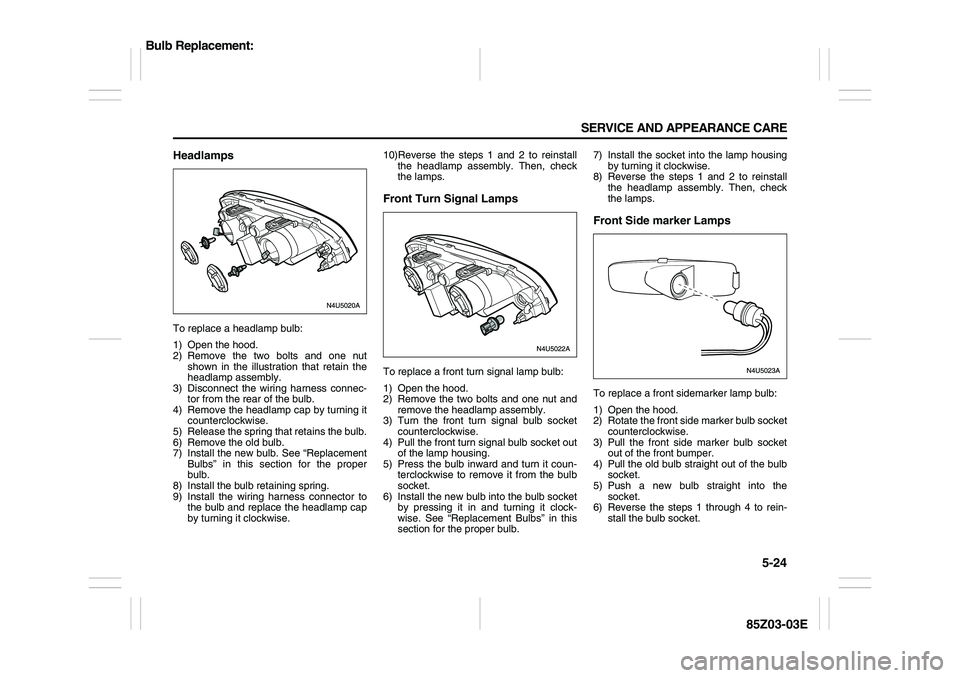
HeadlampsTo replace a headlamp bulb:
1) Open the hood.
2) Remove the two bolts and one nut
shown in the illustration that retain the
headlamp assembly.
3) Disconnect the wiring harness connec-
tor from the rear of the bulb.
4) Remove the headlamp cap by turning it
counterclockwise.
5) Release the spring that retains the bulb.
6) Remove the old bulb.
7) Install the new bulb. See “Replacement
Bulbs” in this section for the proper
bulb.
8) Install the bulb retaining spring.
9) Install the wiring harness connector to
the bulb and replace the headlamp cap
by turning it clockwise.10)Reverse the steps 1 and 2 to reinstall
the headlamp assembly. Then, check
the lamps.
Front Turn Signal LampsTo replace a front turn signal lamp bulb:
1) Open the hood.
2) Remove the two bolts and one nut and
remove the headlamp assembly.
3) Turn the front turn signal bulb socket
counterclockwise.
4) Pull the front turn signal bulb socket out
of the lamp housing.
5) Press the bulb inward and turn it coun-
terclockwise to remove it from the bulb
socket.
6) Install the new bulb into the bulb socket
by pressing it in and turning it clock-
wise. See “Replacement Bulbs” in this
section for the proper bulb.7) Install the socket into the lamp housing
by turning it clockwise.
8) Reverse the steps 1 and 2 to reinstall
the headlamp assembly. Then, check
the lamps.
Front Side marker LampsTo replace a front sidemarker lamp bulb:
1) Open the hood.
2) Rotate the front side marker bulb socket
counterclockwise.
3) Pull the front side marker bulb socket
out of the front bumper.
4) Pull the old bulb straight out of the bulb
socket.
5) Push a new bulb straight into the
socket.
6) Reverse the steps 1 through 4 to rein-
stall the bulb socket.
Bulb Replacement:
Page 169 of 225
5-25 SERVICE AND APPEARANCE CARE
85Z03-03E
Front Fog LampsTo replace a front fog lamp bulb:
1) Disconnect the wiring harness connec-
tor from the front fog lamp bulb.
2) Rotate the front fog lamp bulb counter-
clockwise and remove it.
3) Replace the bulb. See “Replacement
Bulbs” in this section for the proper
bulb.
4) Connect the wiring harness connector
to the front fog lamp bulb.
Center High-Mounted Stop Lamp
(Sedan)To replace a center high-mounted stop
lamp bulb:
1) Open the trunk lid.
2) Remove the two screws which are
recessed on the underside of the hood.
3) Disconnect the wiring harness connec-
tor before removing the lamp housing.
4) Remove the lamp housing.
5) Remove the two screws and the reflec-
tor assembly.
6) Remove the bulb by pulling it straight
out of the bulb socket.
7) Install the new bulb. See “Replacement
Bulbs” in this section for the proper
bulb.
8) Reverse the steps 1 through 5 to rein-
stall the lamp housing.
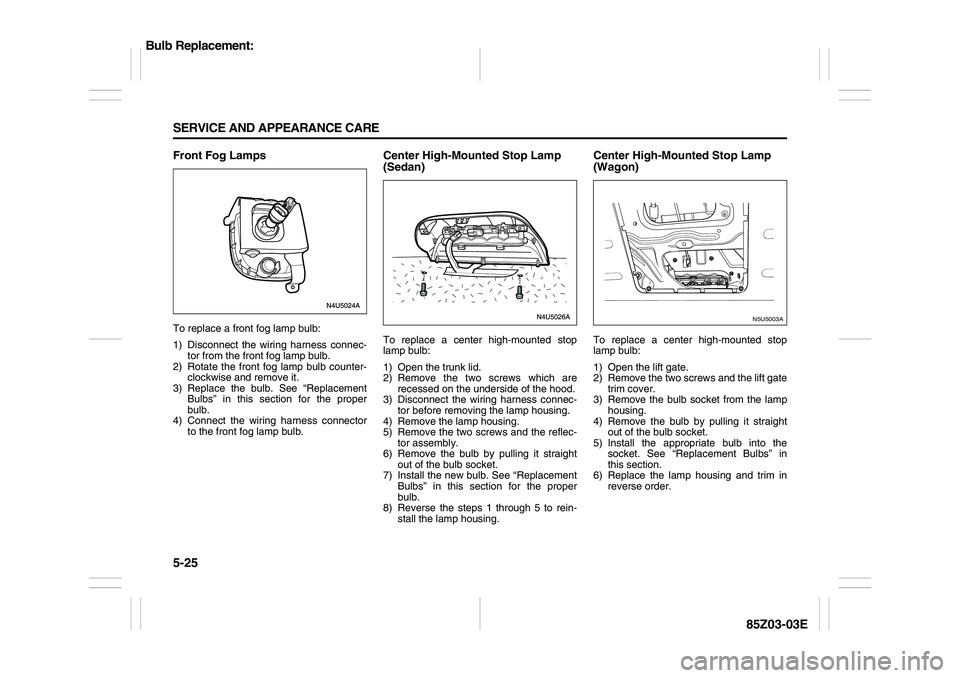
Center High-Mounted Stop Lamp
(Wagon)To replace a center high-mounted stop
lamp bulb:
1) Open the lift gate.
2) Remove the two screws and the lift gate
trim cover.
3) Remove the bulb socket from the lamp
housing.
4) Remove the bulb by pulling it straight
out of the bulb socket.
5) Install the appropriate bulb into the
socket. See “Replacement Bulbs” in
this section.
6) Replace the lamp housing and trim in
reverse order.
N5U5003A
Bulb Replacement:
Page 170 of 225
5-26 SERVICE AND APPEARANCE CARE
85Z03-03E
Luggage Compartment LampTo replace a luggage compartment lamp
bulb:
1) Use a flat screwdriver to pry the lamp
assembly from the lamp assembly
holder.
2) Replace the bulb. See “Replacement
Bulbs” in this section for the proper
bulb.
3) Reinstall the lamp assembly.
Tail/Stop Lamps, Turn Signal Lamps
and Backup Lamps (Sedan)To replace a tail/stop lamp bulb, a rear turn
signal lamp bulb, or a rear backup lamp
bulb:
1) Open the trunk.
2) Open the trim cover.
3) Remove the bulb socket by turning it
counterclockwise.
4) Remove the bulb from the socket by
pressing the bulb and turning it counter-
clockwise.
5) Install the appropriate bulb into the
socket. See “Replacement Bulbs” in
this section.
6) Replace the bulb socket into the lamp
housing. Turn the bulb socket clockwise
to secure it.
7) Replace the trim cover.
8) Close the trunk.
Tail/Stop Lamps, Turn Signal Lamps
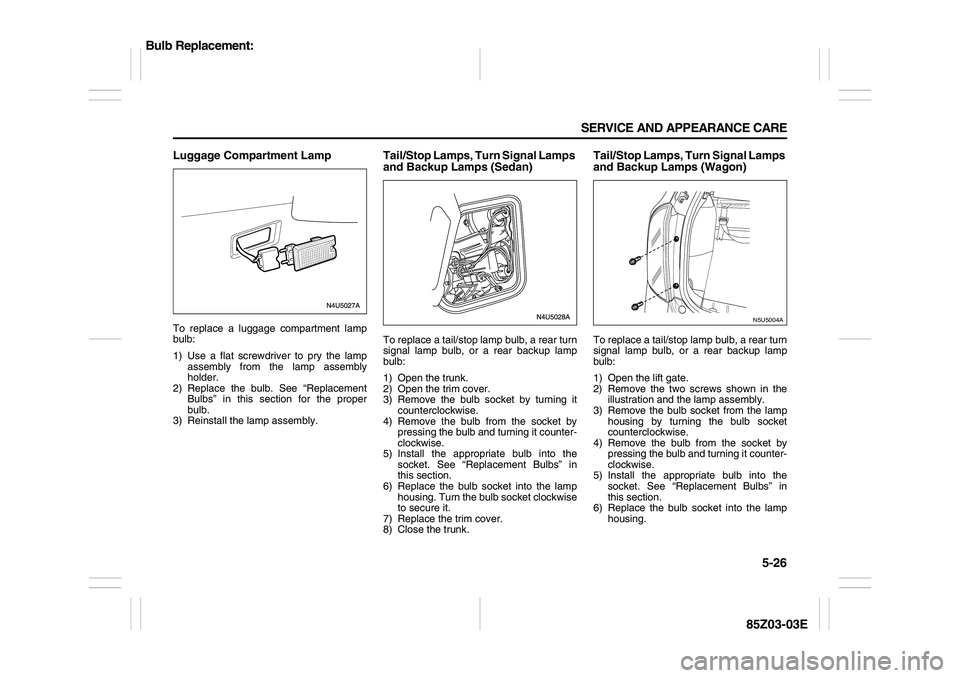
and Backup Lamps (Wagon)To replace a tail/stop lamp bulb, a rear turn
signal lamp bulb, or a rear backup lamp
bulb:
1) Open the lift gate.
2) Remove the two screws shown in the
illustration and the lamp assembly.
3) Remove the bulb socket from the lamp
housing by turning the bulb socket
counterclockwise.
4) Remove the bulb from the socket by
pressing the bulb and turning it counter-
clockwise.
5) Install the appropriate bulb into the
socket. See “Replacement Bulbs” in
this section.
6) Replace the bulb socket into the lamp
housing.
N5U5004A
Bulb Replacement:
Page 171 of 225
5-27 SERVICE AND APPEARANCE CARE
85Z03-03E
7) Replace the lamp housing into the vehi-
cle using the two screws removed ear-
lier.
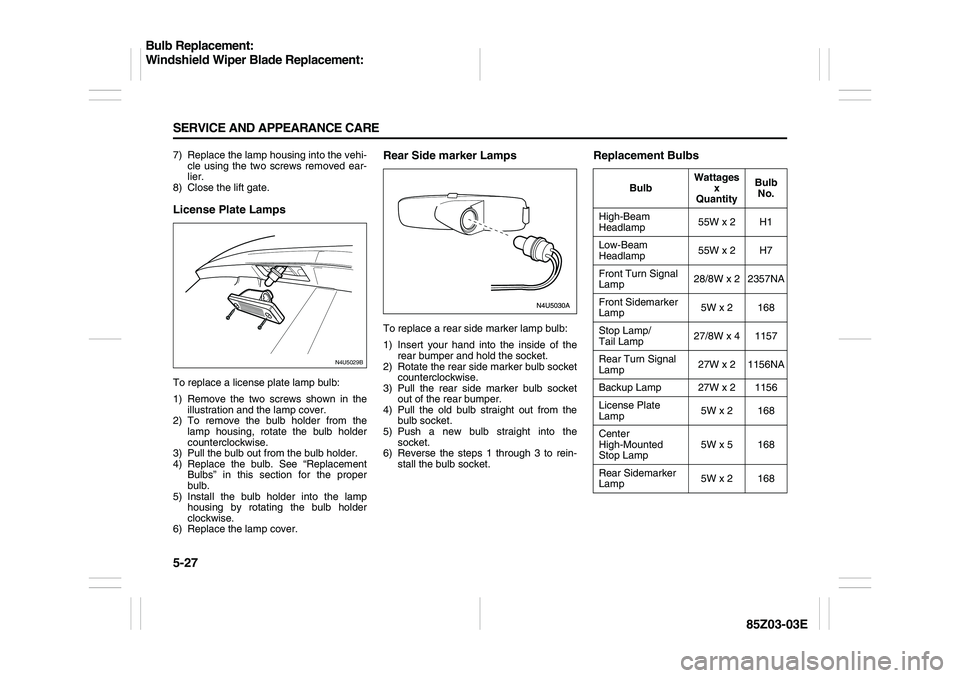
8) Close the lift gate.License Plate LampsTo replace a license plate lamp bulb:
1) Remove the two screws shown in the
illustration and the lamp cover.
2) To remove the bulb holder from the
lamp housing, rotate the bulb holder
counterclockwise.
3) Pull the bulb out from the bulb holder.
4) Replace the bulb. See “Replacement
Bulbs” in this section for the proper
bulb.
5) Install the bulb holder into the lamp
housing by rotating the bulb holder
clockwise.
6) Replace the lamp cover.
Rear Side marker LampsTo replace a rear side marker lamp bulb:
1) Insert your hand into the inside of the
rear bumper and hold the socket.
2) Rotate the rear side marker bulb socket
counterclockwise.
3) Pull the rear side marker bulb socket
out of the rear bumper.
4) Pull the old bulb straight out from the
bulb socket.
5) Push a new bulb straight into the
socket.
6) Reverse the steps 1 through 3 to rein-
stall the bulb socket.
Replacement Bulbs
N4U5029B
BulbWattages
x
QuantityBulb
No.
High-Beam
Headlamp55W x 2 H1
Low-Beam
Headlamp55W x 2 H7
Front Turn Signal
Lamp28/8W x 2 2357NA
Front Sidemarker
Lamp5W x 2 168
Stop Lamp/
Tail Lamp27/8W x 4 1157
Rear Turn Signal
Lamp27W x 2 1156NA
Backup Lamp 27W x 2 1156
License Plate
Lamp5W x 2 168
Center
High-Mounted
Stop Lamp5W x 5 168
Rear Sidemarker
Lamp5W x 2 168
Bulb Replacement:
Windshield Wiper Blade Replacement:
Page 172 of 225
5-28 SERVICE AND APPEARANCE CARE
85Z03-03E
Windshield Wiper Blade
ReplacementWindshield wiper blades should be
inspected at least twice a year for wear or
cracking. If the wiper blades become brittle
or damaged, or make streaks when wiping,
replace the wiper blades for optimum driv-
ing visibility. Replacement blades come in
different types and are removed in different
ways.
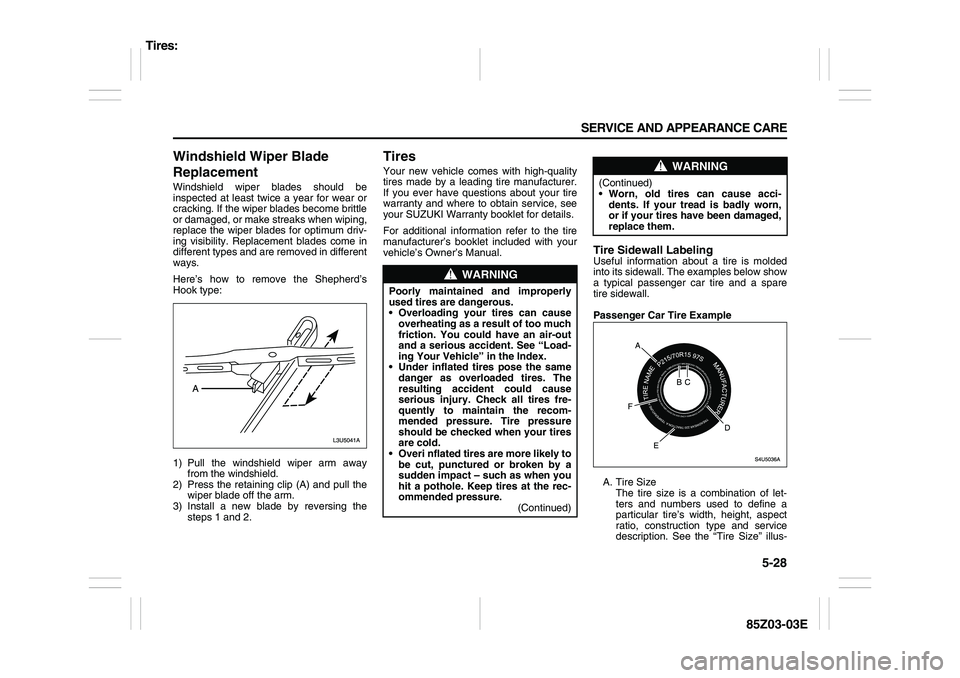
Here’s how to remove the Shepherd’s
Hook type:
1) Pull the windshield wiper arm away
from the windshield.
2) Press the retaining clip (A) and pull the
wiper blade off the arm.
3) Install a new blade by reversing the
steps 1 and 2.
TiresYour new vehicle comes with high-quality
tires made by a leading tire manufacturer.
If you ever have questions about your tire
warranty and where to obtain service, see
your SUZUKI Warranty booklet for details.
For additional information refer to the tire
manufacturer’s booklet included with your
vehicle’s Owner’s Manual.
Tire Sidewall LabelingUseful information about a tire is molded
into its sidewall. The examples below show
a typical passenger car tire and a spare
tire sidewall.
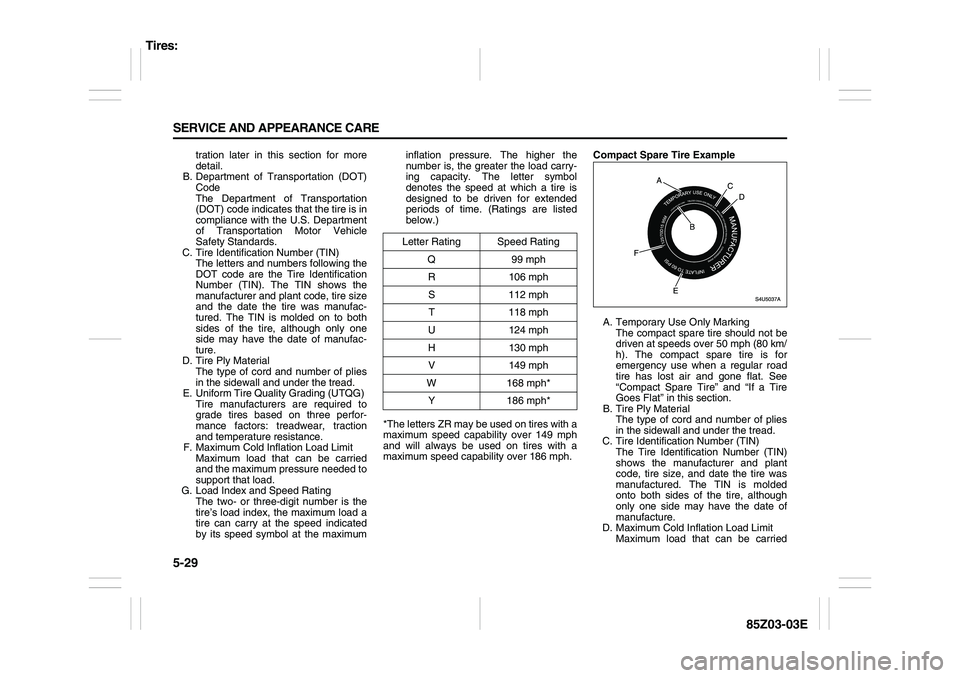
Passenger Car Tire Example
A. Tire Size
The tire size is a combination of let-
ters and numbers used to define a
particular tire’s width, height, aspect
ratio, construction type and service
description. See the “Tire Size” illus-
WARNING
Poorly maintained and improperly
used tires are dangerous.
Overloading your tires can cause
overheating as a result of too much
friction. You could have an air-out
and a serious accident. See “Load-
ing Your Vehicle” in the Index.
Under inflated tires pose the same
danger as overloaded tires. The
resulting accident could cause
serious injury. Check all tires fre-
quently to maintain the recom-
mended pressure. Tire pressure
should be checked when your tires
are cold.
Overi nflated tires are more likely to
be cut, punctured or broken by a
sudden impact – such as when you
hit a pothole. Keep tires at the rec-
ommended pressure.
(Continued)
WARNING
(Continued)
Worn, old tires can cause acci-
dents. If your tread is badly worn,
or if your tires have been damaged,
replace them.
Tires:
Page 173 of 225
5-29 SERVICE AND APPEARANCE CARE
85Z03-03E
tration later in this section for more
detail.
B. Department of Transportation (DOT)
Code
The Department of Transportation
(DOT) code indicates that the tire is in
compliance with the U.S. Department
of Transportation Motor Vehicle
Safety Standards.
C. Tire Identification Number (TIN)
The letters and numbers following the
DOT code are the Tire Identification
Number (TIN). The TIN shows the
manufacturer and plant code, tire size
and the date the tire was manufac-
tured. The TIN is molded on to both
sides of the tire, although only one
side may have the date of manufac-
ture.
D. Tire Ply Material
The type of cord and number of plies
in the sidewall and under the tread.
E. Uniform Tire Quality Grading (UTQG)
Tire manufacturers are required to
grade tires based on three perfor-
mance factors: treadwear, traction
and temperature resistance.
F. Maximum Cold Inflation Load Limit
Maximum load that can be carried
and the maximum pressure needed to
support that load.
G. Load Index and Speed Rating
The two- or three-digit number is the
tire’s load index, the maximum load a
tire can carry at the speed indicated
by its speed symbol at the maximuminflation pressure. The higher the
number is, the greater the load carry-
ing capacity. The letter symbol
denotes the speed at which a tire is
designed to be driven for extended
periods of time. (Ratings are listed
below.)
*The letters ZR may be used on tires with a
maximum speed capability over 149 mph
and will always be used on tires with a
maximum speed capability over 186 mph.Compact Spare Tire Example
A. Temporary Use Only Marking
The compact spare tire should not be
driven at speeds over 50 mph (80 km/
h). The compact spare tire is for
emergency use when a regular road
tire has lost air and gone flat. See
“Compact Spare Tire” and “If a Tire
Goes Flat” in this section.
B. Tire Ply Material
The type of cord and number of plies
in the sidewall and under the tread.
C. Tire Identification Number (TIN)
The Tire Identification Number (TIN)
shows the manufacturer and plant
code, tire size, and date the tire was
manufactured. The TIN is molded
onto both sides of the tire, although
only one side may have the date of
manufacture.
D. Maximum Cold Inflation Load Limit
Maximum load that can be carried Letter Rating Speed Rating
Q 99 mph
R106 mph
S112 mph
T118 mph
U124 mph
H130 mph
V149 mph
W 168 mph*
Y 186 mph*
Tires: