2007 SUZUKI FORENZA belt
[x] Cancel search: beltPage 52 of 225

2-4 FEATURES AND CONTROLS
85Z03-03E
Doors and LocksDoor LocksThere are several ways to lock and unlock
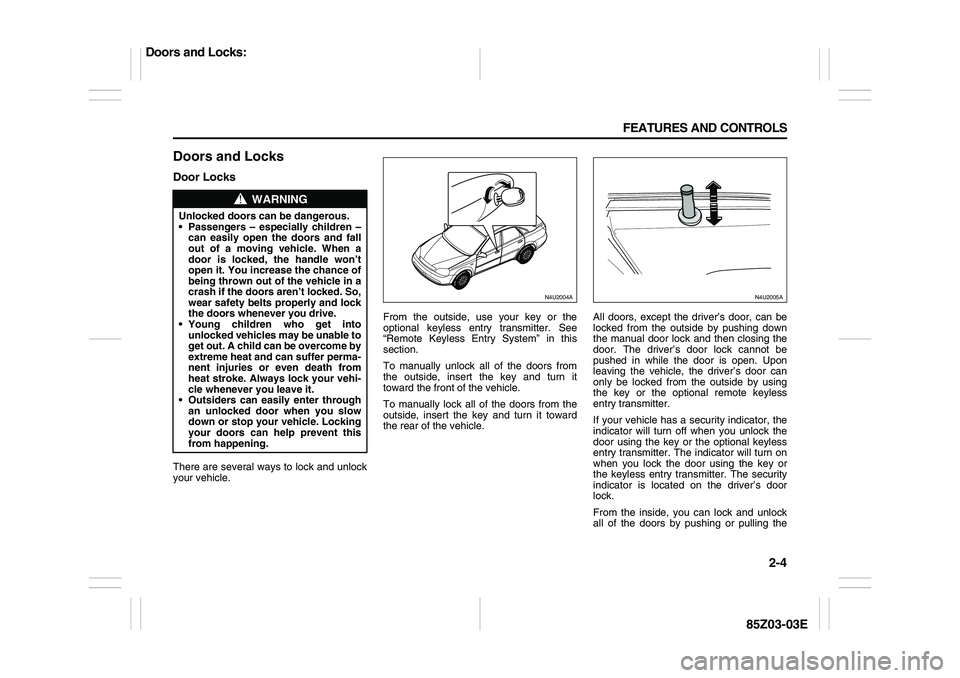
your vehicle.From the outside, use your key or the
optional keyless entry transmitter. See
“Remote Keyless Entry System” in this
section.
To manually unlock all of the doors from
the outside, insert the key and turn it
toward the front of the vehicle.
To manually lock all of the doors from the
outside, insert the key and turn it toward
the rear of the vehicle.All doors, except the driver’s door, can be
locked from the outside by pushing down
the manual door lock and then closing the
door. The driver’s door lock cannot be
pushed in while the door is open. Upon
leaving the vehicle, the driver’s door can
only be locked from the outside by using
the key or the optional remote keyless
entry transmitter.
If your vehicle has a security indicator, the
indicator will turn off when you unlock the
door using the key or the optional keyless
entry transmitter. The indicator will turn on
when you lock the door using the key or
the keyless entry transmitter. The security
indicator is located on the driver’s door
lock.
From the inside, you can lock and unlock
all of the doors by pushing or pulling the
WARNING
Unlocked doors can be dangerous.
Passengers – especially children –
can easily open the doors and fall
out of a moving vehicle. When a
door is locked, the handle won’t
open it. You increase the chance of
being thrown out of the vehicle in a
crash if the doors aren’t locked. So,
wear safety belts properly and lock
the doors whenever you drive.
Young children who get into
unlocked vehicles may be unable to
get out. A child can be overcome by
extreme heat and can suffer perma-
nent injuries or even death from
heat stroke. Always lock your vehi-
cle whenever you leave it.
Outsiders can easily enter through
an unlocked door when you slow
down or stop your vehicle. Locking
your doors can help prevent this
from happening.
N4U2004A
N4U2005A
Doors and Locks:
Page 59 of 225

2-11 FEATURES AND CONTROLS
85Z03-03E
How to Turn Off the System Alarm
If the system alarm is active, it can be
deactivated using the following methods:
Press the Lock or Unlock button on the
remote keyless entry transmitter.
Unlock the driver’s or passenger’s front
door using the key.
Otherwise, the alarm will automatically
stop after 30 seconds. The system will
then lock the doors and reactivate the
theft-deterrent system.
How to Detect a Tamper Condition
If the hazard lamps flash once when the
Lock or Unlock button on your transmitter
is pressed, that means the theft-security
system alarm was triggered while you
were away.
Daily Inspection ChecklistBefore Driving1) Make sure that windows, mirrors, lights
and reflectors are clean and unob-
structed.
2) Visually check the tires for the following
points:
– the depth of the tread groove
– abnormal wear, cracks and damage
– loose wheel nuts
– existence of foreign material such as
nails, stones, etc.
Refer to “Tires” in the “SERVICE AND
APPEARANCE CARE” section for details.
3) Look for oil or other fluid leaks.
NOTE:
It is normal for water to drip from the air
conditioning system after use.
4) Make sure the hood is fully closed and
latched.
5) Check the headlights, turn signal lights,
brake lights and horn for proper opera-
tion.
6) Lock all doors.
7) Adjust the seat and adjustable head
restraints (if equipped).
8) Check the brake pedal.
9) Adjust the mirrors.
10)Make sure that you and all passengers
have properly fastened your safety
belts.11)Make sure that all warning lights come
on as the key is turned to the “ON” or
“START” position.
12)Check all gauges.
13)Make sure that the BRAKE light turns
off when the parking brake is released.
Once a week, or each time you fill your fuel
tank, perform the following under-hood
checks:
1) Engine oil level
2) Coolant level
3) Brake fluid level
4) Power steering (if equipped) fluid level
5) Windshield washer fluid level
6) Hood latch operation
Pull the hood release handle inside the
vehicle. Make sure that you cannot
open the hood all the way without
releasing the secondary latch. Be sure
to close the hood securely after check-
ing for proper latch operation. See the
item “Lubricate Locks, Hinges & Hood
Latch” under “Chassis and Body” in the
“MAINTENANCE SCHEDULE” section
for the lubrication schedule.
WARNING
Make sure the hood is fully closed
and latched before driving. If it is not,
it can fly up unexpectedly during
driving, obstructing your view and
resulting in an accident.
Theft-Deterrent Systems:
Daily Inspection Checklist:
Page 95 of 225

3-19 INSTRUMENT PANEL
85Z03-03E
Trip OdometerThe trip odometer can record the number
of kilometers or miles traveled for up to two
trips.
The trip odometer button is located in the
lower right area of the speedometer.
There are two independent trip odometers,
which measure the distances your vehicle
has traveled since you last reset this func-
tion.
You can switch the trip odometer display
between Trip A and Trip B by pressing the
trip odometer button.
To reset each trip meter to zero, press and
hold the trip odometer button until it resets.
TachometerThe tachometer shows your engine speed
in revolutions per minute (rpm).
Safety Belt Reminder LightWhen the key is turned to ON, a chime will
come on for several seconds to remind
people to fasten their safety belts, unless
the driver’s safety belt is already buckled.
The safety belt light will also come on and
stay on until the driver’s safety belt is buck-
led.
If the driver’s belt is already buckled, nei-
ther the chime nor the light will come on.Safety Belt Reminder ToneIf your vehicle has this feature, a tone
(instead of a chime) will sound for several
seconds when the ignition is ON to remind
people to fasten their safety belts. The tone
will not sound if the driver’s safety belt is
fastened.
CAUTION
Keep track of your odometer reading
and check the maintenance schedule
regularly for required services.
Increased wear or damage to certain
parts can result from failure to per-
form required services at the proper
mileage intervals.
CAUTION
Do not operate the engine with the
tachometer in the red area, or engine
damage may occur. The damage
would not be covered by your war-
ranty.
Warning Lights, Gauges and Indicators:
Page 96 of 225

3-20 INSTRUMENT PANEL
85Z03-03E
Air Bag Readiness LightThere is an air bag readiness light on the
instrument panel. The air bag readiness
system checks the air bag’s electrical sys-
tem for malfunctions. The light tells you if
there is an electrical problem. The system
check includes the air bag sensor, the air
bag modules, the wiring and the crash
sensing and diagnostic module. For more
information on the air bag system, see “Air
Bag Systems” in section 1.
This light will come on when you start your
vehicle, and it will flash for a few seconds.
Then the light should go out. This means
the system is ready.If the air bag readiness light stays on after
you start the vehicle or comes on or
flashes when you are driving, the air bag
system may not work properly. Have your
vehicle serviced right away.
The air bag readiness light should be illu-
minated for a few seconds when you turn
the ignition key to ON. If the light doesn’t
come on then, have it fixed so it will be
ready to warn you if there is a problem.
Charging System LightThe charging system light will come on
when you turn on the ignition, and the
engine is not running, as a check to show
you it is working.
When the engine is running, the light
should go out.
If it stays on, or comes on while you are
driving, you may have a problem with the
electrical charging system. It could indicate
that you have a loose generator drive belt,
or another electrical problem. Have it
checked right away. Driving while this light
is on could drain your battery.
If you must drive a short distance with the
light on, be certain to turn off all your
accessories, such as the radio and air con-
ditioner.
WARNING
It is absolutely essential that the
driver and passengers wear their
safety belts at all times. Persons who
are not wearing safety belts have a
much greater risk of injury if an acci-
dent occurs. Make a regular habit of
buckling your safety belt before put-
ting the key in the ignition.
S4U3042A
WARNING
If the air bag readiness light stays on
after you start your vehicle, it means
the air bag system may not be work-
ing properly. The air bags in your
vehicle may not inflate in a crash, or
they could even inflate without a
crash. To help avoid injury to yourself
or others, have your vehicle serviced
right away if the air bag readiness
light stays on after you start your
vehicle.
Warning Lights, Gauges and Indicators:
Page 125 of 225

4-1 DRIVING YOUR VEHICLE
85Z03-03E
Your Driving, the Road, and
Your VehicleDefensive DrivingThe best advice anyone can give about
driving is: Drive defensively.
Please start by using a very important
safety device in your vehicle: Your safety
belt. Buckle up. See “Safety Belts: They
Are for Everyone” in section 1.
Defensive driving really means “be ready
for anything.” On city streets, rural roads or
freeways, it means “always expect the
unexpected.”
Assume that pedestrians or other drivers
are going to be careless and make mis-
takes. Anticipate what they might do. Be
ready for their mistakes.
Rear-end collisions are about the most
preventable of accidents. Yet they are com-
mon. Allow enough following distance. It’s
the best defensive driving maneuver, in
both city and rural driving. You never know
when the vehicle in front of you is going to
brake or turn suddenly.
Defensive driving requires that a driver
concentrate on the driving task. Anything
that distracts from the driving task – such
as concentrating on a cellular telephone
call, reading, or reaching for something on
the floor – makes proper defensive driving
more difficult and can even cause a colli-
sion, with resulting injury. Ask a passengerto help do things like this, or pull off the
road in a safe place to do them yourself.
These simple defensive driving tech-
niques could save your life.
Drunken DrivingDeath and injury associated with drinking
and driving is a national tragedy. It’s the
number one contributor to the highway
death toll, claiming thousands of victims
every year.
Alcohol affects four things that everyone
needs to drive a vehicle:
Judgment
Muscular Coordination
Vision
Attentiveness.
Police records show that almost half of all
motor vehicle-related deaths involve alco-
hol. In most cases, these deaths are the
result of someone who was drinking and
driving. In recent years, more than 16,000
annual motor vehicle-related deaths have
been associated with the use of alcohol,
with more than 300,000 people injured.
Many adults – by some estimates, nearly
half the adult population – choose never to
drink alcohol, so they never drive after
drinking. For persons under 21, it is
against the law in every U.S. state to drink
alcohol. There are good medical, psycho-
logical and developmental reasons for
these laws.The obvious way to eliminate the leading
highway safety problem is for people never
to drink alcohol and then drive. But what if
people do? How much is “too much” if
someone plans to drive? It’s a lot less than
many might think. Although it depends on
each person and situation, here is some
general information on the problem.
The Blood Alcohol Concentration (BAC) of
someone who is drinking depends upon
four things:
The amount of alcohol consumed
The drinker’s body weight
The amount of food that is consumed
before and during drinking
The length of time it has taken the
drinker to consume the alcohol.
According to the American Medical Associ-
ation, a 180 lb (82 kg) person who drinks
three 12 ounce (355 ml) bottles of beer in
an hour will end up with a BAC of about
0.06 percent. The person would reach the
same BAC by drinking three 4 ounce (120
ml) glasses of wine or three mixed drinks if
each had 1-1/2 ounces (45 ml) of liquors
like whiskey, gin or vodka.
Your Driving, the Road, and Your Vehicle:
Page 130 of 225

4-6 DRIVING YOUR VEHICLE
85Z03-03E
Steering in Emergencies
There are times when steering can be
more effective than braking. For example,
you come over a hill and find a truck
stopped in your lane, or a car suddenly
pulls out from nowhere, or a child darts out
from between parked cars and stops right
in front of you. You can avoid these prob-
lems by braking – if you can stop in time.
But sometimes you can’t; there isn’t room.
That’s the time for evasive action – steer-
ing around the problem.
Your vehicle can perform very well in emer-
gencies like these. First apply your brakes
but, unless you have anti-lock, not enough
to lock your wheels.
See “Braking” in this section. It is better to
remove as much speed as you can from a
possible collision. Then steer around the
problem, to the left or right depending on
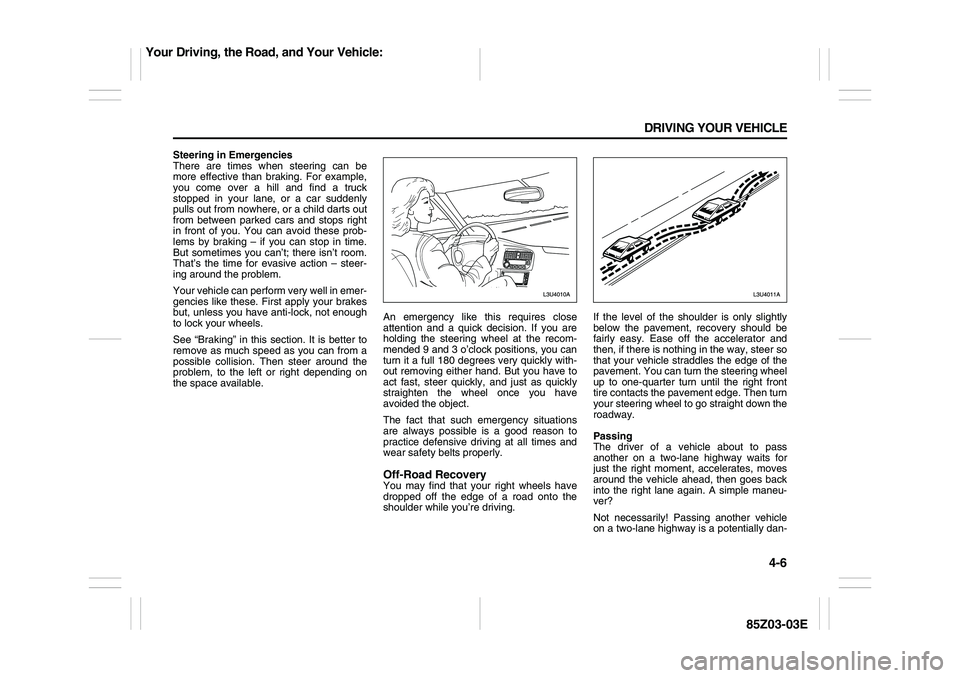
the space available.An emergency like this requires close
attention and a quick decision. If you are
holding the steering wheel at the recom-
mended 9 and 3 o’clock positions, you can
turn it a full 180 degrees very quickly with-
out removing either hand. But you have to
act fast, steer quickly, and just as quickly
straighten the wheel once you have
avoided the object.
The fact that such emergency situations
are always possible is a good reason to
practice defensive driving at all times and
wear safety belts properly.
Off-Road RecoveryYou may find that your right wheels have
dropped off the edge of a road onto the
shoulder while you’re driving.If the level of the shoulder is only slightly
below the pavement, recovery should be
fairly easy. Ease off the accelerator and
then, if there is nothing in the way, steer so
that your vehicle straddles the edge of the
pavement. You can turn the steering wheel
up to one-quarter turn until the right front
tire contacts the pavement edge. Then turn
your steering wheel to go straight down the
roadway.
Passing
The driver of a vehicle about to pass
another on a two-lane highway waits for
just the right moment, accelerates, moves
around the vehicle ahead, then goes back
into the right lane again. A simple maneu-
ver?
Not necessarily! Passing another vehicle
on a two-lane highway is a potentially dan-
Your Driving, the Road, and Your Vehicle:
Page 174 of 225

5-30 SERVICE AND APPEARANCE CARE
85Z03-03E
and the maximum pressure needed to
support that load. See “Compact
Spare Tire” in this section and “Load-
ing Your Vehicle” in section 4.
E. Tire Inflation Pressure
The temporary use tire or compact
spare tire should be inflated to 60 psi
(420 kPa). For more information on
tire pressure and inflation, see “Tire
Inflation Pressure” in this section.
F. Tire Size
A combination of letters and numbers
defining a tire’s width, height, aspect
ratio, construction type and service
description. The letter “T” as the first
character in the tire size means the
tire is for temporary use only.
Tire Size
The following illustration shows an exam-
ple of a typical passenger car tire size.
A. Tire Type
This letter code indicates the primary
intended use of the tire. The “P” as
the first character in the tire size
means a passenger vehicle tire engi-
neered to standards set by the U.S.
Tire and Rim Association.
B. Tire Width
The three-digit number indicates the
tire section width in millimeters from
sidewall to sidewall.
C. Aspect Ratio
A two-digit number that indicates the
tire height-to-width measurements.
For example, if the tire size aspect
ratio is “70”, as shown in item “C” of
the illustration, it would mean that thetire’s sidewall is 70% as high as it is
wide.
D. Construction Code
A letter code is used to indicate the
type of ply construction in the tire. The
letter “R” means radial ply construc-
tion, the letter “D” means diagonal or
bias ply construction; and the letter
“B” means belted-bias ply construc-
tion.
E. Rim Diameter
Diameter of the wheel in inches.
F. Service Description
These characters represent the load
range and the speed rating of a tire.
The load range represents the load
carrying capacity a tire is certified to
carry. The speed rating is the maxi-
mum speed a tire is certified to carry
a load. Speed ratings range from “A”
to “Z”.
WARNING
Your SUZUKI is equipped with tires
which are all the same type and size.
This is important to ensure proper
steering and handling of the vehicle.
Never mix tires of different size or
type on the four wheels of your vehi-
cle. Mixing tires could cause you to
lose control while driving which may
lead to an accident. The size and type
of tires used should be only those
approved by SUZUKI Motor Corpora-
tion as standard or optional equip-
ment for your vehicle.
Tires:
Page 175 of 225

5-31 SERVICE AND APPEARANCE CARE
85Z03-03E
Glossary of Tire TerminologyAir Pressure:
The amount of air inside the tire pressing
outward on each square inch of the tire. Air
pressure is expressed in pounds per
square inch (psi) or kilopascal (kPa).
Accessory Weight:
This means the combined weight of
optional accessories. Some examples of
optional accessories are automatic trans-
mission, power steering, power brakes,
power windows, power seats, and air con-
ditioning.
Aspect Ratio:
The relationship of a tire’s height to its
width.
Belt:
A rubber coated layer of cords that is
located between the plies and the tread.
Cords may be made from steel or other
reinforcing materials.
Bead:
The tire bead contains steel wires wrapped
by steel cords that hold the tire onto the
rim.
Bias Ply Tire:
A pneumatic tire in which the plies are laid
at alternate angles less than 90 degrees to
the centerline of the tread.Cold Inflation Pressure:
The amount of air pressure in a tire, mea-
sured in pounds per square inch (psi)
before a tire has built up heat from driving.
Curb Weight:
This means the weight of a motor vehicle
with standard and optional equipment
including the maximum capacity of fuel, oil
and coolant, but without passengers and
cargo.
DOT Markings:
A code molded into the sidewall of a tire
signifying that the tire is in compliance with
the U.S. Department of Transportation
motor vehicle safety standards. The DOT
code includes the Tire Identification Num-
ber (TIN), an alphanumeric designator
which can also identify the tire manufac-
turer, production plant, brand and date of
production.
GVWR:
Gross Vehicle Weight Rating.
This is the maximum permissible overall
weight of the fully loaded vehicle (including
all occupants, accessories and cargo).
GAWR:
Gross Axle Weight Rating.
This is the maximum permissible weight on
an individual axle.
Intended Outboard Sidewall:
The side of an asymmetrical tire that must
always face outward when mounted on a
vehicle.Kilopascal (kPa):
The metric unit for air pressure. There are
6.9 kPa’s to one psi.
Light Truck (LT-Metric) Tire:
A tire used on light duty trucks and some
multipurpose passenger vehicles.
Load Index:
An assigned number ranging from 1 to 279
that corresponds to the load carrying
capacity of a tire.
Maximum Inflation Pressure:
The maximum air pressure to which a cold
tire may be inflated. The maximum air
pressure is molded onto the sidewall.
Maximum Load Rating:
The load rating for a tire at the maximum
permissible inflation pressure for that tire.
Maximum Loaded Vehicle Weight:
The sum of curb weight; accessory weight;
vehicle capacity weight; and production
options weight.
Normal Occupant Weight:
The number of occupants a vehicle is
designed to seat multiplied by 150 pounds
(68 kg).
Occupant Distribution:
Distribution of occupants in a vehicle as
specified in the third column of Table 1
(shown below).
Outward Facing Sidewall:
The side of a asymmetrical tire that has a
particular side that faces outward when
Tires: