2007 SUZUKI FORENZA spare tire
[x] Cancel search: spare tirePage 177 of 225

5-33 SERVICE AND APPEARANCE CARE
85Z03-03E
Tire Pressure Monitoring
SystemIf your vehicle is equipped with a tire pres-
sure monitoring system, it uses pressure
sensors containing a unique identification
code to monitor the inflation pressure of
the tires. When the inflation pressure of
one or more tires indicates significant
under-inflation, the tire pressure warning
light comes on. If the warning light blinks,
for approximately one minute and then illu-
minates continuously, the monitoring sys-
tem may not be working. For more
information, see “Tire Pressure Monitoring
System Warning Light” in section 3.
The tire pressure monitoring system does
not replace normal tire maintenance. See
“Inflation – Tire Pressure & Correcting the
Tire Pressure” in this section for more
information.
The tire pressure warning light can come
on due to normal causes such as natural
air leaks and pressure changes caused by
changes in temperature or atmospheric
pressure. Adjusting the air pressure in the
tires to the pressure shown on the tire and
loading information label should cause the
tire pressure warning light to turn off.
If you use new wheels with new tire infla-
tion pressure sensors, their ID codes must
be programmed into the tire pressure mon-
WARNING
If the tire pressure warning light does
not come on when the ignition is
turned to the “ON” position, or
comes on and blinks while driving
there may be a problem with the tire
pressure monitoring system. Have
your vehicle inspected by an autho-
rized dealer.
WARNING
If the tire pressure warning light
comes on and stays on, reduce your
speed and avoid abrupt steering and
braking. Stop in a safe place as soon
as possible and check your tires.
If you have a flat tire, replace it with
a spare tire. Refer to “Changing a
Flat Tire” in section 5.
If one or more of your tires is
under-inflated, adjust the inflation
pressure in all of your tires to the
recommended inflation pressure as
soon as possible.
Be aware that driving on a signifi-
cantly under-inflated tire can cause
the tire to overheat and can lead to
tire failure, and may affect steering
control and brake effectiveness. This
could lead to an accident, resulting in
severe injury or death.
CAUTION
Do not use liquid sealants for a flat
tire as air pressure sensors can be
damaged.
In case of tire a bursting or sudden
pressure drops, the tire pressure
monitoring system warning light
may not come on immediately.
The inflation pressures vary with
the ambient temperature. If the
vehicle is subjected to large varia-
tions in ambient temperature, the
tire
inflation pressure may be
under-inflated when the ambient
temperature is relatively low. If the
warning light comes on, adjust the
tire inflation pressure.
The tire pressure sensors can be
damaged by the installation or
removal of tires. When tires must
be repaired or replaced, we highly
recommend that you have them
repaired or replaced by your
SUZUKI dealer.
If the tire pressure warning light
comes on or blinks frequently,
there may be something wrong
with one of the tires or with the
monitoring system. Have your vehi-
cle inspected by your SUZUKI
dealer.
Tires:
Page 179 of 225

5-35 SERVICE AND APPEARANCE CARE
85Z03-03E
Tire Inflation PressureThe Tire and Loading Information label
shows the correct inflation pressures for
your tires when they’re cold. “Cold” means
your vehicle has been sitting for at least
three hours or driven no more than 1 mile
(1.6 km). See “Loading Your Vehicle” in
section 4.
When to Check
Check your tires each time you fill your fuel
tank or at least once a month using a tire
pressure gauge.
Don’t forget your compact spare tire. It
should be at 60 psi (420 kPa).
How to check
Use a good quality pocket-type gauge to
check tire pressure. You can’t tell if your
tires are properly inflated simply by looking
at them. Radial tires may look properly
inflated even when they’re under inflated.
Check the tire’s inflation pressure when the
tires are cold. Cold means your vehicle has
been sitting for at least three hours or
driven no more than 1 mile (1.6 km).Remove the valve cap from the tire valve
stem. Press the tire gauge firmly onto the
valve to get a pressure measurement. If
the cold tire inflation pressure is low, add
air until you reach the recommended pres-
sure.
If you overfill the tire, release air by push-
ing on the metal stem in the center of the
tire valve. Recheck the tire pressure with
the tire gauge.
Be sure to put the valve caps back on the
valve stems. They help prevent leaks by
keeping out dirt and moisture.
Tire Inspection and RotationInspect your vehicle’s tires at least once a
month.
Tires should be rotated every 7,500 miles
(12,000 km).
Any time you notice unusual wear, rotate
your tires as soon as possible and check
wheel alignment. Also check for damaged
tires or wheels. See “When It Is Time for
New Tires” and “Wheel Replacement” in
this section for more information.
The purpose of regular rotation is to
achieve more uniform wear for all tires on
the vehicle. The first rotation is the most
important. See “Scheduled Maintenance
Services” in section 6, for scheduled rota-
tion intervals. Tire
Pressure195/55R15
(Sedan)Front30 psi
(210 kPa)
Rear30 psi
(210 kPa)
195/55R15
(Wagon)Front32 psi
(220 kPa)
Rear32 psi
(220 kPa)
T125/70D15
(Temporary)Front60 psi
(420 kPa)
Rear60 psi
(420 kPa)
WARNING
Air pressures should be checked
when the tires are cold or you may
get inaccurate readings.
Check the inflation pressure from
time to time while inflating the tire
gradually, until the specified pres-
sure is obtained.
(Continued)
WARNING
(Continued)
Never underinflate or overinflate
the tires.
Underinflation can cause unusual
handling characteristics or can
cause the rim to slip on the tire
bead, resulting in an accident or
damage to the tire or rim.
Underinflation can also cause tires
to overheat, leading to tire failure.
Overinflation can cause the tire to
burst, resulting in personal injury.
Overinflation can also cause
unusual handling characteristics
which may result in an accident.
Tires:
Page 180 of 225

5-36 SERVICE AND APPEARANCE CARE
85Z03-03E
When rotating your tires, always use the
correct rotation pattern shown here.
Don’t include the compact spare tire in
your tire rotation.
After the tires have been rotated, adjust
the front and rear inflation pressures as
shown on the Tire and Loading Information
label. Make certain that all wheel nuts are
properly tightened. See “Wheel Nut
Torque” under “Capacities and Specifica-
tions” in this section.
Vehicle LoadingThe tires on your vehicle, when they are
inflated to the recommended tire inflation
pressure, have a load-carrying capacity
that is greater than the load that will be on
the tires when the vehicle is at its GVWR
or GAWR limit. Never use replacement
tires that have a load-carrying capacity
less than the original tires on your vehicle.
Tire load-carrying capacity information is
molded into the tire sidewall typically
shown as “Max. Load”. Use of replacement
tires with a lower load-carrying capacity
than the original tires, or failure to keep the
tires inflated to the recommended tire pres-
sure, may reduce the GVWR or GAWR
limit of your vehicle.NOTE:
Use of replacement tires with a higher
load-carrying capacity than the original
tires, or using a tire inflation pressure
higher than the recommended tire inflation
pressure, will not increase the GVWR or
GAWR limit of your vehicle.
When It Is Time for New TiresOne way to tell when it’s time for new tires
is to check the tread wear indicators, which
will appear when your tires have only 1/16
inch (1.6 mm) or less of tread remaining.
You need a new tire if any of the following
statements are true:
You can see the indicators at three or
more places around the tire.
You can see cord or fabric showing
through the tire’s rubber.
WARNING
Rust or dirt on a wheel, or on the
parts to which it is fastened, can
make wheel nuts become loose after
a time. The wheel could come off and
cause an accident. When you change
a wheel, remove any rust or dirt from
places where the wheel attaches to
the vehicle. In an emergency, you can
use a cloth or a paper towel to do
this, but be sure to use a scraper or
wire brush later, if you need to, to get
all the rust or dirt off. See “Changing
a Flat Tire” in this section.
Tires:
Page 181 of 225

5-37 SERVICE AND APPEARANCE CARE
85Z03-03E
The tread or sidewall is cracked, cut or
snagged deep enough to show cord or
fabric.
The tire has a bump, bulge or split.
The tire has a puncture, cut or other
damage that can’t be repaired well
because of the size or location of the
damage.Buying New TiresTo find out what kind and size of tires you
need, look at the Tire and Loading Infor-
mation label.
Make sure the replacements are the same
size, load range, speed rating and con-
struction type (bias, bias-belted or radial)
as your original tires.
Uniform Tire Quality GradingQuality grades can be found where appli-
cable on the tire sidewall between the
tread shoulder and the maximum section
width. For example:
Tread wear 200 Traction AA Tempera-
ture A
The following information relates to the
system developed by the United States
National Highway Traffic Safety Adminis-
tration, which grades tires by tread wear,
traction and temperature performance.
(This applies only to vehicles sold in the
United States.) The grades are molded on
the sidewalls of most passenger car tires.
The Uniform Tire Quality Grading system
does not apply to deep tread, winter-type
snow tires, space-saver or temporary use
spare tires, tires with nominal rim diame-
ters of 10 to 12 inches (25 to 30 cm), or to
some limited-production tires.
While the tires available on SUZUKI vehi-
cles may vary with respect to these grades,
they all conform to federal safety require-
ments.
Tread wear
The tread wear grade is a comparative rat-
ing based on the wear rate of the tire when
tested under controlled conditions on a
specified government test course. For
example, a tire graded 150 would wear one
and a half (1.5) times as well on the gov-
ernment course as a tire graded 100. The
WARNING
Your SUZUKI is equipped with tires
which are all the same type and size.
This is important to ensure proper
steering and handling of the vehicle.
Never mix tires of different size or
type on the four wheels of your vehi-
cle. The size and type of tires used
should be only those approved by
SUZUKI Motor Corporation as stan-
dard or optional equipment for your
vehicle.
WARNING
Replacing the wheels and tires
equipped on your vehicle with certain
combinations of aftermarket wheels
and tires can significantly change the
steering and handling characteris-
tics of your vehicle. Oversized tires
may also rub against the fender over
bumps, causing vehicle damage or
tire failure. Therefore, use only those
wheel and tire combinations
approved by SUZUKI Motor Corpora-
tion as standard or optional equip-
ment for your vehicle. For
information regarding the specified
tires, refer to the Tire Information
Label located on the driver’s side
door pillar or “Tire Inflation Pres-
sure” in this section.
CAUTION
Replacing the original tires with tires
of a different size may result in false
speedometer or odometer readings.
Check with your SUZUKI dealer
before purchasing replacement tires
that differ in size from the original
tires.
Tires:
Page 184 of 225

5-40 SERVICE AND APPEARANCE CARE
85Z03-03E
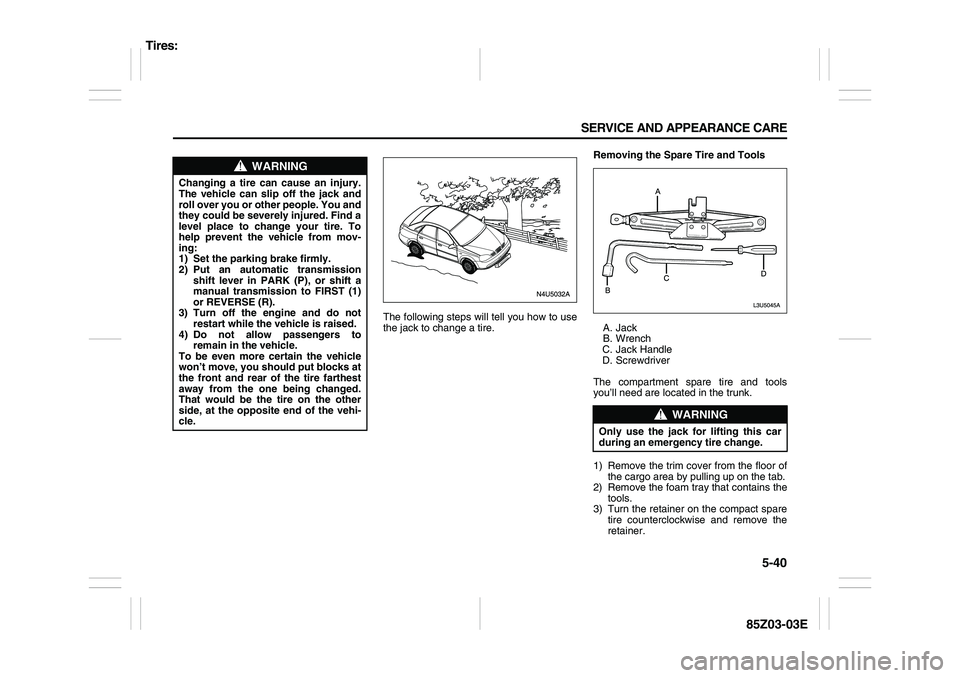
The following steps will tell you how to use
the jack to change a tire.Removing the Spare Tire and Tools
A. Jack
B. Wrench
C. Jack Handle
D. Screwdriver
The compartment spare tire and tools
you’ll need are located in the trunk.
1) Remove the trim cover from the floor of
the cargo area by pulling up on the tab.
2) Remove the foam tray that contains the
tools.
3) Turn the retainer on the compact spare
tire counterclockwise and remove the
retainer.
WARNING
Changing a tire can cause an injury.
The vehicle can slip off the jack and
roll over you or other people. You and
they could be severely injured. Find a
level place to change your tire. To
help prevent the vehicle from mov-
ing:
1) Set the parking brake firmly.
2) Put an automatic transmission
shift lever in PARK (P), or shift a
manual transmission to FIRST (1)
or REVERSE (R).
3) Turn off the engine and do not
restart while the vehicle is raised.
4) Do not allow passengers to
remain in the vehicle.
To be even more certain the vehicle
won’t move, you should put blocks at
the front and rear of the tire farthest
away from the one being changed.
That would be the tire on the other
side, at the opposite end of the vehi-
cle.
WARNING
Only use the jack for lifting this car
during an emergency tire change.
Tires:
Page 185 of 225

5-41 SERVICE AND APPEARANCE CARE
85Z03-03E
4) Remove the compact spare tire. See
“Compact Spare Tire” in this section for
more information.
5) Remove the jack, jack handle and the
wheel wrench. The jack is located in the
cargo area. Turn the jack retainer,
located on the right side of the jack,
counterclockwise to release it. The jack
handle and the wheel wrench are
located inside the foam tray.
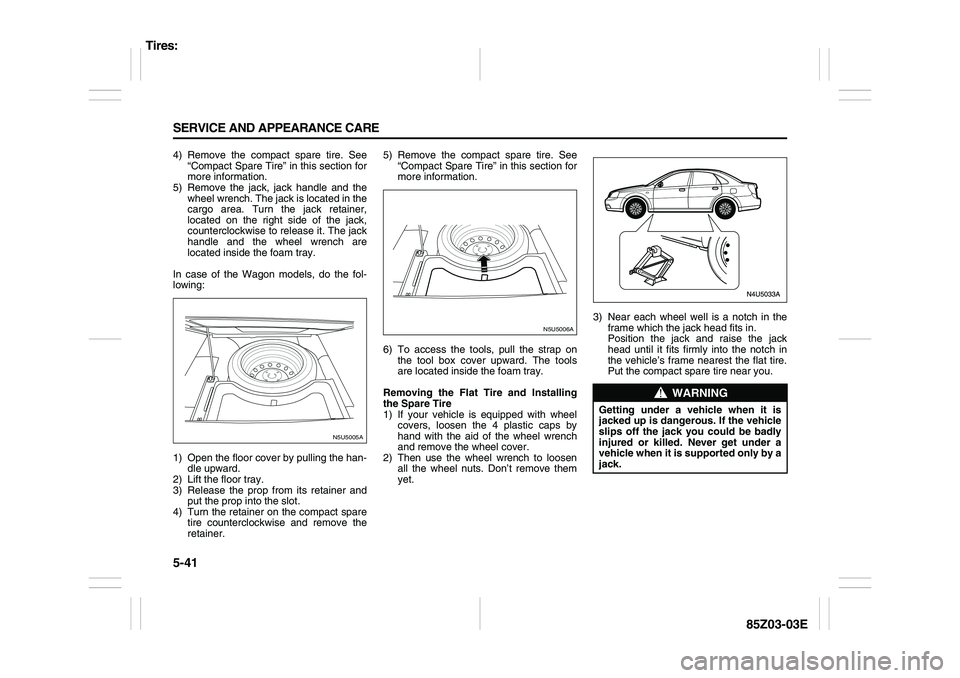
In case of the Wagon models, do the fol-
lowing:
1) Open the floor cover by pulling the han-
dle upward.
2) Lift the floor tray.
3) Release the prop from its retainer and
put the prop into the slot.
4) Turn the retainer on the compact spare
tire counterclockwise and remove the
retainer.5) Remove the compact spare tire. See
“Compact Spare Tire” in this section for
more information.
6) To access the tools, pull the strap on
the tool box cover upward. The tools
are located inside the foam tray.
Removing the Flat Tire and Installing
the Spare Tire
1) If your vehicle is equipped with wheel
covers, loosen the 4 plastic caps by
hand with the aid of the wheel wrench
and remove the wheel cover.
2) Then use the wheel wrench to loosen
all the wheel nuts. Don’t remove them
yet.3) Near each wheel well is a notch in the
frame which the jack head fits in.
Position the jack and raise the jack
head until it fits firmly into the notch in
the vehicle’s frame nearest the flat tire.
Put the compact spare tire near you.
N5U5005A
N5U5006A
WARNING
Getting under a vehicle when it is
jacked up is dangerous. If the vehicle
slips off the jack you could be badly
injured or killed. Never get under a
vehicle when it is supported only by a
jack.
Tires:
Page 186 of 225

5-42 SERVICE AND APPEARANCE CARE
85Z03-03E
4) Insert the jack handle and the wheel
wrench into the jack.
5) Raise the vehicle by turning the jack
handle clockwise. Raise the vehicle far
enough off the ground so there is
enough room for the compact spare tire
to fit underneath the wheel well.
6) Remove all of the wheel nuts by turning
them counterclockwise.
7) Remove the flat tire.8) Remove any rust or dirt from the wheel
bolts, mounting surfaces and spare
wheel.9) Place the compact spare tire on the
wheel-mounting surface.
10)Reinstall the wheel nuts with the
rounded end of the nuts toward the
wheel. Tighten each wheel nut by turn-
ing it clockwise with your hand until the
wheel is held against the hub.
11)Lower the vehicle by turning the wheel
handle counterclockwise. Lower the
jack completely.
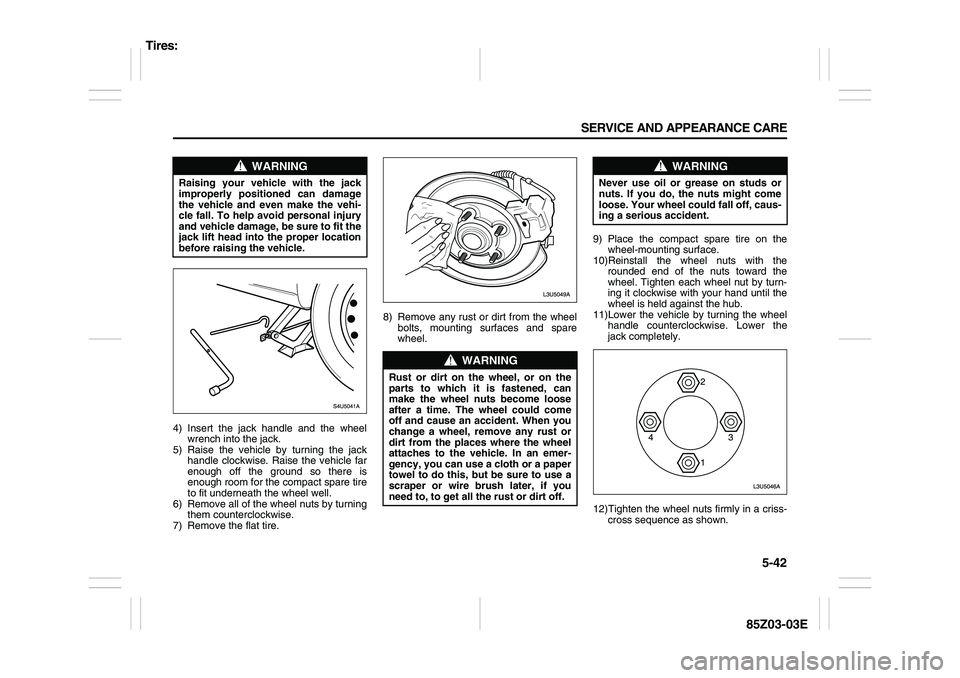
12)Tighten the wheel nuts firmly in a criss-
cross sequence as shown.
WARNING
Raising your vehicle with the jack
improperly positioned can damage
the vehicle and even make the vehi-
cle fall. To help avoid personal injury
and vehicle damage, be sure to fit the
jack lift head into the proper location
before raising the vehicle.
WARNING
Rust or dirt on the wheel, or on the
parts to which it is fastened, can
make the wheel nuts become loose
after a time. The wheel could come
off and cause an accident. When you
change a wheel, remove any rust or
dirt from the places where the wheel
attaches to the vehicle. In an emer-
gency, you can use a cloth or a paper
towel to do this, but be sure to use a
scraper or wire brush later, if you
need to, to get all the rust or dirt off.
WARNING
Never use oil or grease on studs or
nuts. If you do, the nuts might come
loose. Your wheel could fall off, caus-
ing a serious accident.
Tires:
Page 187 of 225

5-43 SERVICE AND APPEARANCE CARE
85Z03-03E
Don’t try to put a wheel cover on your com-
pact spare tire. It won’t fit. Store the wheel
cover in the trunk until you have the flat tire
repaired or replaced.Storing the Flat Tire and Tools
Store the flat tire in the compact spare tire
compartment. Place the tire in the com-
partment, then secure the retainer. Store
the jack in its housing in the cargo area.
Secure the jack by turning the retainer
clockwise. Store the tools securely in the
foam tray and place the tray on top of the
tire. Replace the trim cover.
Storing the Spare Tire and Tools
The compact spare tire is for temporary
use only. Replace the compact spare tire
with a full-size tire as soon as you can. See
“Compact Spare Tire” in this section.
WARNING
Incorrect wheel nuts or improperly
tightened wheel nuts can cause the
wheel to come loose and even come
off. This could lead to an accident. Be
sure to use the correct wheel nuts. If
you have to replace them, be sure to
get new SUZUKI original equipment
wheel nuts. Stop somewhere as soon
as you can and have the nuts tight-
ened with a torque wrench to the
proper torque specification. See
“Capacities and Specifications” in
the Index for the wheel nut torque
specification.
CAUTION
Improperly tightened wheel nuts can
lead to brake pulsation and rotor
damage. To avoid expensive brake
repairs, evenly tighten the wheel nuts
in the proper sequence and to the
proper torque specification. See
“Capacities and Specifications” in
the index for the wheel nut torque
specification.
CAUTION
If you install a full-size tire rather than
your compact spare tire, reinstall the
wheel cover as follows:
1) Put the wheel cover on the full-
size tire.
2) Fasten the 4 plastic caps snugly
by hand.
3) Tighten the caps by turning them
an additional 90° with the wheel
wrench.
– The proper tightening torque is a
maximum of 5.9 lb-ft (8 N·m).
– Tightening to the improper
torque can cause damage to the
plastic caps.
CAUTION
Wheel covers will not fit on your com-
pact spare. If you try to put a wheel
cover on the compact spare, you
could damage the cover or the spare.
WARNING
Improperly storing a jack, a tire, or
other equipment in the passenger
compartment of the vehicle could
cause injury. In a sudden stop or col-
lision, loose equipment could strike
someone. Store all these items in the
proper place.
WARNING
Storing a jack, a tire, or other equip-
ment in the passenger compartment
of the vehicle could cause injury. In a
sudden stop or collision, loose
equipment could strike someone.
Store all these in the proper place.
Appearance Care: