2007 SUZUKI ALTO Specification
[x] Cancel search: SpecificationPage 1 of 139

Downloaded from www.Manualslib.com manuals search engine 159K,76G,844-74ETABLE OF CONTENTS
1
MAINTENANCE SERVICE RECORD
2
WARRANTY POLICY
3
BEFORE DRIVING
4
STEERING COLUMN CONTROLS
5
INSTRUMENT PANEL
6
OTHER CONTROLS AND EQUIPMENT
7
OPERATING YOUR VEHICLE
8
DRIVING TIPS AND SAFE DRIVING
9
INSPECTION AND MAINTENANCE
10
EMERGENCY SERVICE
11
BODY WORK CARE
12
GENERAL INFORMATION
13
SPECIFICATION
Page 9 of 139

Downloaded from www.Manualslib.com manuals search engine 959K,76G,844-74E
Maruti Suzuki offers the Emission Warranty on all Maruti Suzuki vehicles (apart from the Regular warranty and will run parallel
to the regular product warranty) only in four metropolitan cities (New Delhi, Kolkata, Mumbai and Chennai) with effect from
July 1st, 2001.
Terms:
The Emission Warranty will be applicable for 80,000 kms or 3 years (Which ever comes earlier) from the date of delivery to
the first owner. The remaining warranty terms will be valid in case of any change in ownership provided the production of all
valid document.
Conditions:1. Under Emission Warranty, Warranty claims will be admitted for a prima facie examination, in case vehicle fails to meet to the
Emission Standard as specified in sub rule (2) of rule no. 115 of Central Motor Vehicles Rules (CMVR), 1989.
2. The warranty claims will only be accepted after examination carried out by Maruti Suzuki or it's dealer which leads to firm conclusions
that the
a) Original settings have not been tempered in any case.
b) Part (as given in Annexure-A) has a manufacturing defect.
c) Vehicle is unable to meet the Emission Standards (as given in 1.), inspite of the vehicle having been maintained and used
in accordance with the instructions as specified in Owner's Manual and Service Booklet and the used fuel and different oils
(Engine oil, Transmission oil, Brake oil etc.) are also as per specification.
3. The method of examination for deciding the warranty of the parts will be at the sole discretion of Maruti Suzuki and it's dealer
and results of the examination will be final and binding. If after examination, the warrantable condition is not established, Maruti
Suzuki and it's dealer has the right to charge all, or part of the cost of such examination.
4. Under Emission Warranty, the parts (as given in Annexure-A) will be changed free of cost, but the consumables will be charged
as per actual.
5. If the part covered under Emission Warranty or the associated parts, are not independently replaceable, on account of these being
integral parts a complete assembly, Maruti Suzuki and it's dealer will have the sole discretion to replace entire assembly or by
using some of the parts of the system through suitable repair or modifications.
EMISSION WARRANTY
2-3
Page 10 of 139

Downloaded from www.Manualslib.com manuals search engine 10
59K,76G,844-74E
6. Any consequential repairs or replacement of parts which may be found necessary to establish compliance of Emission Warranty,
will not be considered under warranty, unless the same is under product warranty. The consumable will be charged as per actual
under such repair or replacement.
7. Maruti Suzuki will not be responsible for the cost of transportation of the vehicle to the nearest Maruti Suzuki dealer workshop
or any loss due to non-availability of the vehicle during the period of lodging of a warranty claim and examination and/or repair
by Maruti Suzuki dealer.
8. Maruti Suzuki will not be responsible for any penalty that may be charged by statutory authorities on account of failure to comply
with the EMISSION STANDARDS.
9. Emission Warranty will not be affected on the change of owner, provided all the documents are available.
10. All maintenance actions (as specified in the Owner's Manual and Service Booklet) need to be followed and recorded in the manual
for emission warranty.
11. The customer needs to produce the PUC (Pollution Under Control) certificate valid for the period preceding the test during which
the failure is discovered. The receipts (for the maintenance of the vehicle as per specification in Owner's Manual and Service
Booklet from the date of original purchase of the vehicle) will also be required.Condition Under which the Emission Warranty is not APPLICABLE
1. In the absence of valid PUC certificate.
2. Vehicle not serviced from Maruti Suzuki authorised workshop as per the schedule specified in the Owner's Manual.
3. Vehicle subjected to abnormal use (accident, motor race, rallies or for the purpose of establishing the records etc.)
4. Use of non MGP (Maruti Genuine Part).
5. Vehicle tempered in an unauthorised manner.
6. Tampering with odometer so that the actual kilometer reading can not be read.
7. Use of adulterated fuel and/or unspecified oils (Engine oil, Transmission oil and Brake oil etc.)EMISSION WARRANTY
2-4
Page 35 of 139

Downloaded from www.Manualslib.com manuals search engine 36
76G-74E
STEERING COLUMN CONTROLS4-7ELECTRIC POWER STEERING
(If equipped)Depending on specifications, your vehicle is
equipped with electric power steering
system to reduce the steering effort while
driving.
76G-04-013
Page 92 of 139

Downloaded from www.Manualslib.com manuals search engine 9376G-74E
INSPECTION AND MAINTENANCE
9-10
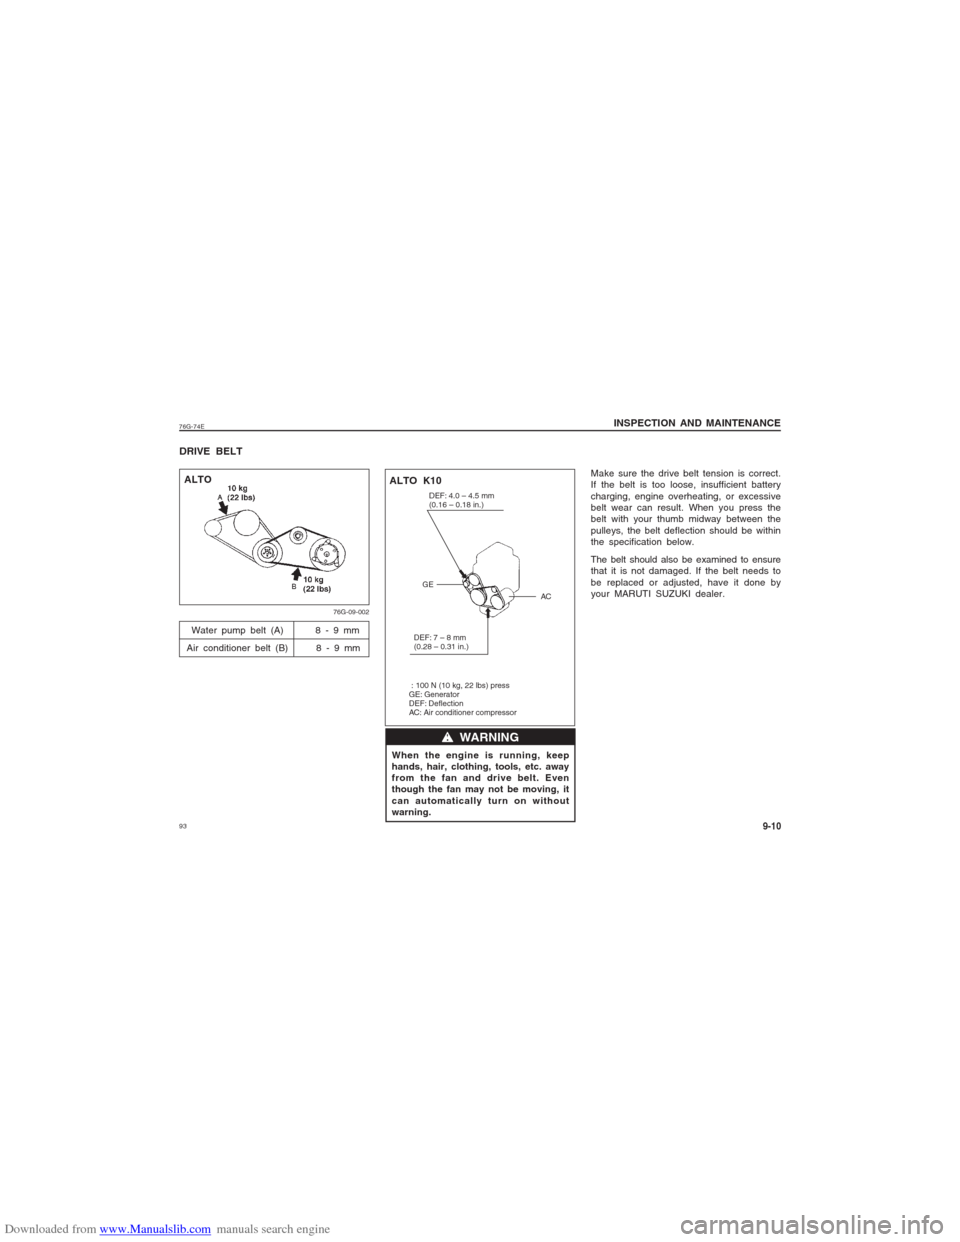
DRIVE BELT
When the engine is running, keep
hands, hair, clothing, tools, etc. away
from the fan and drive belt. Even
though the fan may not be moving, it
can automatically turn on without
warning. Water pump belt (A) 8 - 9 mm
Air conditioner belt (B) 8 - 9 mm
w ww w
w WARNING
76G-09-002
Make sure the drive belt tension is correct.
If the belt is too loose, insufficient battery
charging, engine overheating, or excessive
belt wear can result. When you press the
belt with your thumb midway between the
pulleys, the belt deflection should be within
the specification below.
The belt should also be examined to ensure
that it is not damaged. If the belt needs to
be replaced or adjusted, have it done by
your MARUTI SUZUKI dealer.
DEF: 4.0 – 4.5 mm
(0.16 – 0.18 in.)
DEF: 7 – 8 mm
(0.28 – 0.31 in.)
: 100 N (10 kg, 22 lbs) press
GE: Generator
DEF: Deflection
AC: Air conditioner compressorGE
AC
ALTO K10 ALTO
Page 95 of 139

Downloaded from www.Manualslib.com manuals search engine 96
76G-74E
INSPECTION AND MAINTENANCE9-13Replace the oil filter
1) Using an oil filter wrench, turn the oil
filter counterclockwise and remove it.
2) Using a clean rag, wipe off the mounting
surface on the engine where the new
filter will be seated.
3) Smear a little engine oil around the
rubber gasket of the new oil filter.
4) Screw on the new filter by hand until the
filter gasket contacts the mounting
surface.
To tighten the oil filter properly, it is
important to accurately identify the
position at which the filter gasket
first contacts the mounting surface.
5. Tighten the filter specified turn from the
point of contact with the mounting sur-
face (or to the specified torque) using an
oil filter wrench.
Tightening torque for oil filter
1 turn or
14 Nm (1.4 kg-m, 10.5 lb-ft)
CAUTION
Refill with oil and check for leaks.
1) Pour oil through the filler hole and install
the filler cap.
For the approximate capacity of the oil,
refer to the "CAPACITIES" item in the
"SPECIFICATIONS" section.
2) Start the engine and look carefully for
leaks at the oil filter and drain plug. Run
the engine at various speeds for at least
5 minutes.
3) Stop the engine and wait for 5 minutes.
Check the oil level again and add oil if
necessary. Check for leaks again.
When replacing the oil filter, it is
recommended that you use a genuine
MARUTI replacement filter.
Oil leaks from around the oil filter or
drain plug indicate incorrect installa-
tion or gasket damage. If you find any
leaks or are not sure that the filter
has been properly tightened, have the
vehicle inspected by your MARUTI
SUZUKI dealer.
CAUTIONCAUTIONCAUTION
76G-09-007 76G-09-008
To prevent oil leakage, make sure
that the oil filter is tight, but do not
overtighten it.
(1) Oil filter
(2) 1 Turn
Page 102 of 139

Downloaded from www.Manualslib.com manuals search engine 10376G-74E
76G-09-020
ALTO K10EXAMPLETo access the spark plugs,
For Alto
1. Disconnect the coupler while pushing the
release lever,
2. Remove the bolts, and
3. Pull the spark plug boots.
For Alto K10
1. Unclamp and remove the air cleaner case.
2. If necessary, disconnect the coupler (1)
while pushing the release lever.
3. Remove the ignitor bolts.
4. Pull the spark plug boots out.
CAUTION
76G-09-021
Spark Plug gap "a"
Alto - 0.85 ± 0.5 mm
Alto K10 - 1.0 ± 0.05 mm
INSPECTION AND MAINTENANCE
9-20
ALTO
EXAMPLE
When disconnecting the spark plug
cables, pull on the boot, not on the
cable itself. Pulling on the cable can
damage it.
When installing the spark plugs,
screw them in with your fingers to
avoid stripping the threads. Tighten
with a torque wrench to :
Alto - 13.0–22.0 N-m (1.3–2.2 kg-m,
9.4–15.9 lb-ft)
Alto K10 - 25 N-m (2.5 kg-m, 18.0
lb-ft).
Do not allow contaminants to enter
the engine through the spark plug
holes when the plugs are removed.
Never use spark plugs with the
wrong thread size or length.
CAUTION
When replacing spark plugs, you
should use the brand and type
specified for your vehicle. For the
specified plugs, refer to the
“SPECIFICATIONS” section at the end
of this book.NOTE:
When installation, make sure the wires,
couplers, sealing rubber of top cover and
washers, are correctly returned in place.
Page 105 of 139

Downloaded from www.Manualslib.com manuals search engine 106
76G-74E
INSPECTION AND MAINTENANCE9-23NOTE:
When measuring the distance between the
brake pedal and floor wall, be sure not to
include any floor covering other than
silencer mat in the measurement.If you experience any of the following
problems with your vehicle’s brake
system, have the vehicle inspected
immediately by your MARUTI SUZUKI
dealer.
Poor braking performance
Uneven braking (Brakes not working
uniformly on all wheels.)
Excessive pedal travel
Brake dragging
Excessive noise
Pedal pulsation (Pedal pulsates
when depressed.)
w ww w
w WARNING
Ratchet tooth specification "b"
4th- 9th
Lever pull force (1)
200 N (20kg. 44 lbs)
Check the parking brake for proper
adjustment by counting the number of clicks
made by the ratchet teeth as you slowly pull
up on the parking brake lever to the point
of full engagement. The parking brake lever
should stop between the specified ratchet
teeth and the rear wheels should be
securely locked. If the parking brake is not
properly adjusted or the brakes drag after
the lever has been fully released, have the
parking brake inspected and/or adjusted by
your MARUTI SUZUKI dealer.
76G-09-027
STEERINGCheck the play of the steering wheel by
gently turning it from left to right and
measuring the distance that it moves before
you feel slight resistance. The play should
be between 0 – 30 mm (0.0 – 1.2 in).
Check that the steering wheel turns easily
and smoothly without rattling by turning it
all the way to the right and to the left while
driving very slowly in an open area. If the
amount of free play is outside the
specification or you find anything else to be
wrong, an inspection must be performed by
your MARUTI SUZUKI dealer.
76G-09-028
EXAMPLE
PARKING BRAKE