2007 SUZUKI AERIO lights
[x] Cancel search: lightsPage 16 of 232

Downloaded from www.Manualslib.com manuals search engine 2-3 BEFORE DRIVING
54G27-03E
Keyless Entry System (if equipped)
52D209
(1) “LOCK” button
(2) “UNLOCK” button
(3) “PANIC” button
You can lock or unlock all doors simulta-
neously by operating the transmitter near
the vehicle.
To lock the doors, push the “LOCK” but-
ton on the transmitter.
To unlock the driver’s door, push the
“UNLOCK” button on the transmitter
once.
To unlock other doors, wait a second or
two, then push the “UNLOCK” button a
second time. If you “double-click” too
fast, the doors will not unlock.
When the doors are locked, the turn signal
lights will flash once.When the door(s) is(are) unlocked:
The turn signal lights will flash twice.
If the interior light switch is in the middle
position, the interior light will turn on for
about 15 seconds and then fade out. If
you insert the key into the ignition switch
during this time, the light will start to fade
out immediately.
Be sure the doors are locked after you
operate the “LOCK” button. If no door is
opened within about 30 seconds after the
“UNLOCK” button is operated, the doors
will automatically lock again.
NOTE:
The maximum operating distance is
about 5 m (16 ft.), but this can vary
depending on the surroundings, espe-
cially near other transmitting devices
such as radio towers or CB (Citizen’s
Band) radios.
The door locks can not be operated with
the transmitter if the ignition key is
inserted in the ignition switch.
If you lose one of the transmitters, ask
your SUZUKI dealer as soon as possible
for a replacement and to have the lost
one deactivated, or perform the pro-
gramming procedure yourself.“PANIC” button function
This function is to get the attention of oth-
ers.
Press the “PANIC” button for more than 1
second. The headlights, parking lights, and
taillights will blink for about 30 seconds.
Also, the horn will sound intermittently for
about 30 seconds at the same time.
To cancel the “PANIC” mode, press any
button (PANIC, LOCK or UNLOCK) on the
transmitter. You can also insert the key in
the ignition switch and turn to the “ON”
position to cancel the “PANIC” mode.
NOTE:
The “PANIC” button function will not acti-
vate when the key is in the ignition switch.
(1)
(2)
(3)
CAUTION
The transmitter is a sensitive elec-
tronic instrument. To avoid damaging
the transmitter, do not expose it to
impacts, moisture or high tempera-
ture (such as on the dashboard under
direct sunlight).
Door Locks: 3, 5, 8
Page 23 of 232

Downloaded from www.Manualslib.com manuals search engine 2-10 BEFORE DRIVING
54G27-03E
MirrorsInside Rearview Mirror
65D410
65D409
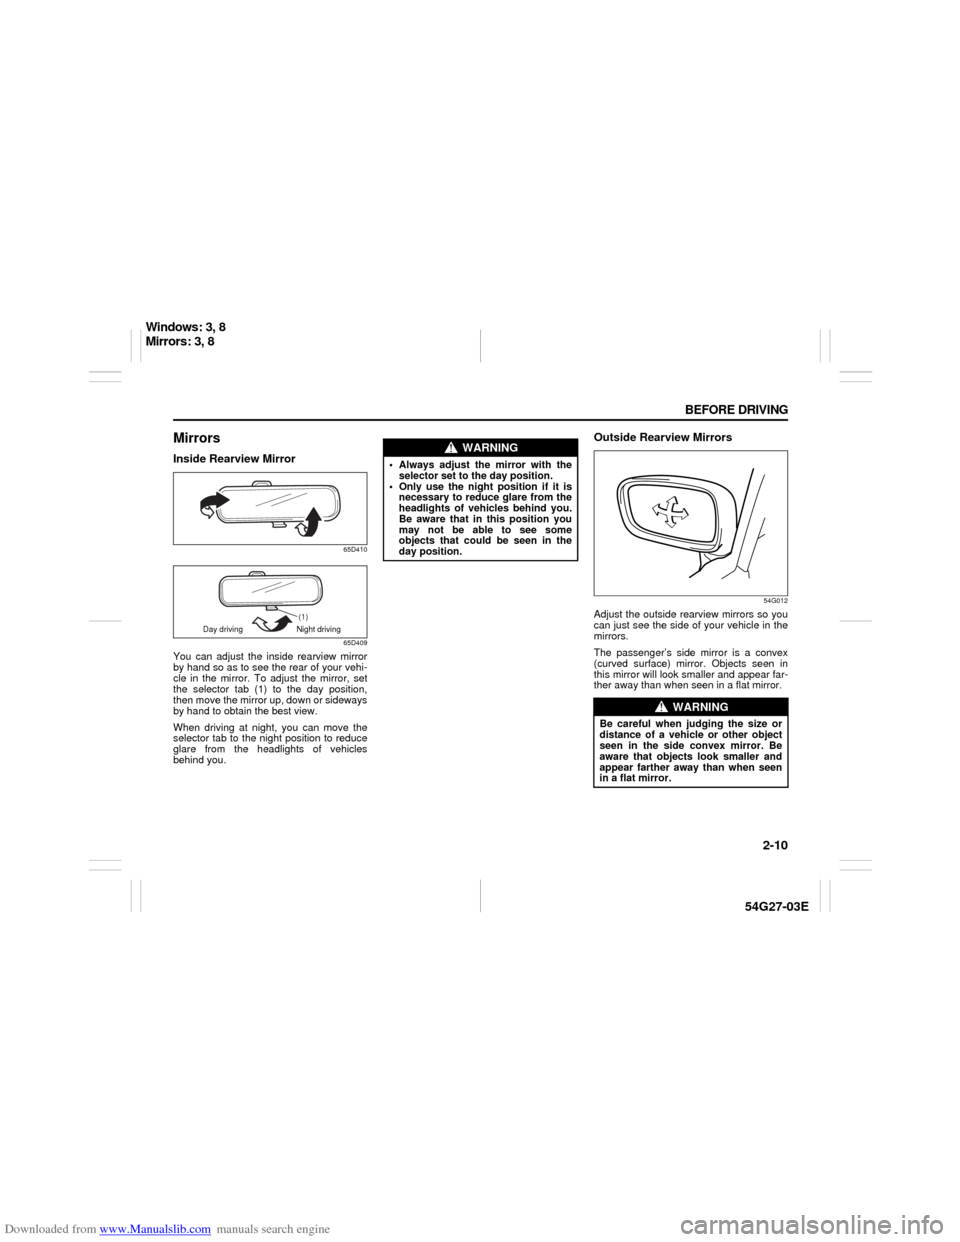
You can adjust the inside rearview mirror
by hand so as to see the rear of your vehi-
cle in the mirror. To adjust the mirror, set
the selector tab (1) to the day position,
then move the mirror up, down or sideways
by hand to obtain the best view.
When driving at night, you can move the
selector tab to the night position to reduce
glare from the headlights of vehicles
behind you.
Outside Rearview Mirrors
54G012
Adjust the outside rearview mirrors so you
can just see the side of your vehicle in the
mirrors.
The passenger’s side mirror is a convex
(curved surface) mirror. Objects seen in
this mirror will look smaller and appear far-
ther away than when seen in a flat mirror.
(1)
Day driving Night driving
WARNING
Always adjust the mirror with the
selector set to the day position.
Only use the night position if it is
necessary to reduce glare from the
headlights of vehicles behind you.
Be aware that in this position you
may not be able to see some
objects that could be seen in the
day position.
WARNING
Be careful when judging the size or
distance of a vehicle or other object
seen in the side convex mirror. Be
aware that objects look smaller and
appear farther away than when seen
in a flat mirror.
Windows: 3, 8
Mirrors: 3, 8
Page 58 of 232

Downloaded from www.Manualslib.com manuals search engine 3-3 STEERING COLUMN CONTROLS
54G27-03E
Lighting/Turn Signal Control
LeverThis control lever is located on the out-
board side of the steering column. Operate
the lever as described below.Lighting Operation
54G030
To turn the lights on or off, twist the knob
on the end of the lever. There are three
positions: in the “OFF” position all lights
are off; in the middle position the front
parking lights, tail-lights, license plate light
and instrument lights are on, but the head-
lights are off; in the third position the head-
lights come on in addition to the other
lights.
54G031
With the headlights on, push the lever for-
ward to switch to the high beams or pull
the lever toward you to switch to the low
beams. When the high beams are on, a
light on the instrument panel will come on.
To momentarily activate the high beams as
a passing signal, pull the lever slightly
toward you and release it when you have
completed the signal.
Daytime Running Light (D.R.L.) Sys-
temThe headlights light, but are dimmer than
the low beam, when the following three
conditions are all met. Also, the D.R.L. indi-
cator light on the instrument panel comes
on.
Conditions for D.R.L. system operation:
1) The engine is running.
2) The parking brake is released.
3) The lighting switch is at either the “OFF”
or the “Middle” position.
NOTE:
Be sure to turn the lighting switch to the
third position at night or at any time of the
day when driving or weather conditions
require the headlights to operate at full
brightness and the taillights to be on.
Lights “On” reminder
A buzzer sounds to remind you to turn off
the lights if they are left on when the igni-
tion key is removed and the driver’s door is
opened.
HIGH
LOW
PASS
Lighting/Turn Signal Control Lever: 8
Page 65 of 232

Downloaded from www.Manualslib.com manuals search engine INSTRUMENT PANEL
4
54G27-03E
60G406
INSTRUMENT PANELInstrument Panel ................................................................. 4-1
Instrument Cluster .............................................................. 4-2
Warning and Indicator Lights ............................................ 4-3
A/T Selector Position Indicator (if equipped) ................... 4-7
Speedometer/Odometer/Trip meter ................................... 4-7
Brightness Control .............................................................. 4-8
Tachometer .......................................................................... 4-9
Fuel Gauge ........................................................................... 4-9
Temperature Gauge ............................................................ 4-10
Hazard Warning Switch ...................................................... 4-10
Rear Window Defroster Switch (if equipped) ................... 4-10
Outside Rearview Mirrors Defroster Switch
(if equipped) ......................................................................... 4-11
Fog Light Switch (if equipped) ........................................... 4-11
Cigarette Lighter and Ashtray (if equipped) ..................... 4-11
Information Display ............................................................. 4-12
Glove Box ............................................................................ 4-14
Heating and Air Conditioning System ............................... 4-15
Heating System ................................................................... 4-16
Manual Heating and Air Conditioning System ................. 4-19
Automatic Heating and Air Conditioning System
(Climate Control) ................................................................. 4-22
Audio Systems .................................................................... 4-26
Page 67 of 232

Downloaded from www.Manualslib.com manuals search engine 4-2 INSTRUMENT PANEL
54G27-03E
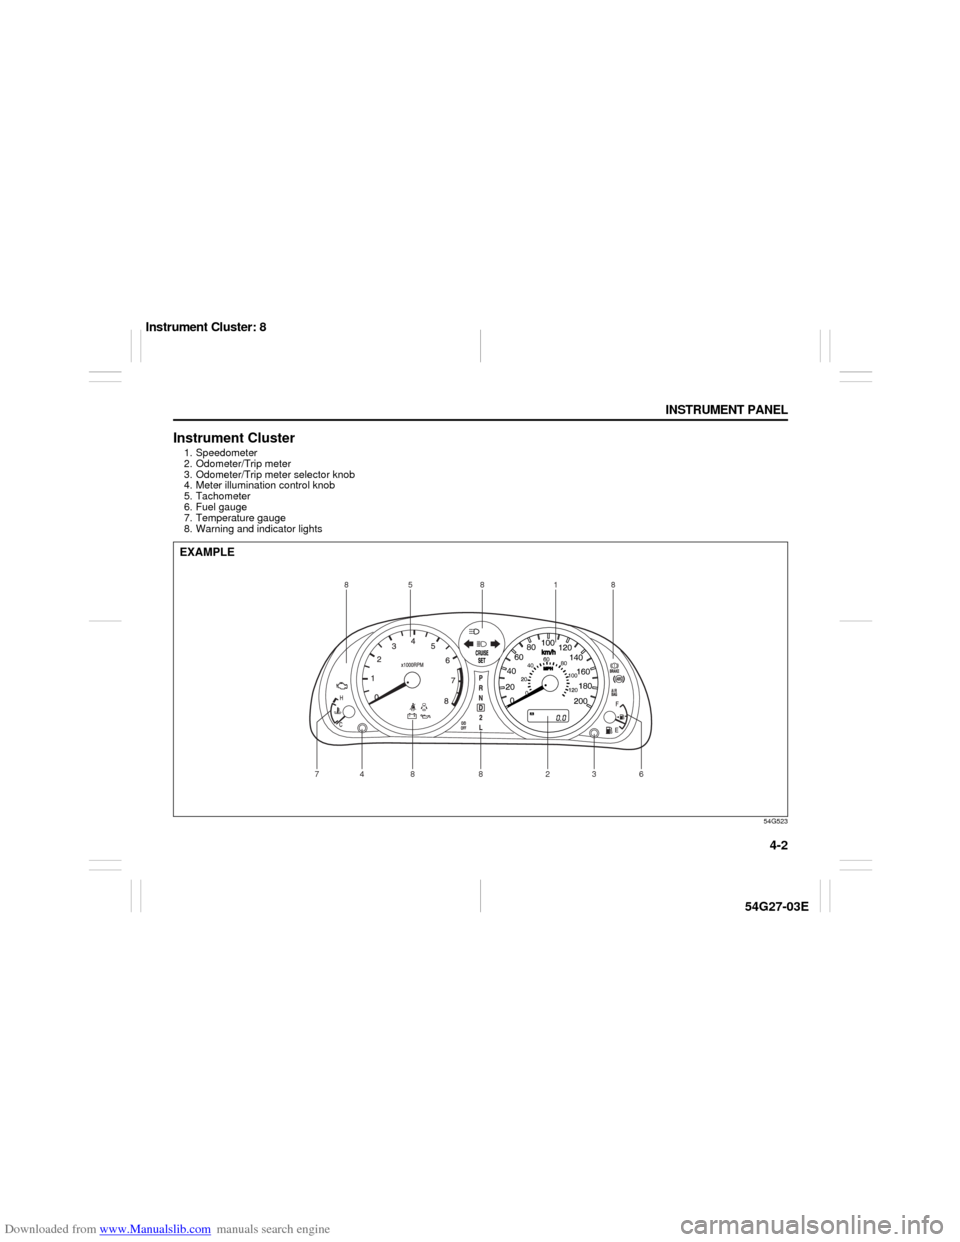
Instrument Cluster1. Speedometer
2. Odometer/Trip meter
3. Odometer/Trip meter selector knob
4. Meter illumination control knob
5. Tachometer
6. Fuel gauge
7. Temperature gauge
8. Warning and indicator lights
54G523
EXAMPLE
88
7
1
5
8
48 2836
Instrument Cluster: 8
Page 68 of 232

Downloaded from www.Manualslib.com manuals search engine 4-3 INSTRUMENT PANEL
54G27-03E
Warning and Indicator LightsBrake System Warning Light
65D477
This light comes on briefly when the igni-
tion switch is turned to the “ON” position.
The light also comes on under the follow-
ing conditions: 1) when the parking brake
is engaged and 2) when the fluid in the
brake fluid reservoir falls below the speci-
fied level. The light should go out after fully
releasing the parking brake, if the fluid
level in the brake fluid reservoir is ade-
quate.
If this light and the ABS warning light stay
on, or come on simultaneously when driv-
ing, then there may be something wrong
with both the rear brake proportioning
valve function and anti-lock function of the
ABS.
If the brake system warning light comes on
while you are driving the vehicle, it may
mean that there is something wrong with
the vehicle’s brake system. If this happens,
you should:
1) Pull off the road and stop carefully.2) Test the brakes by carefully starting and
stopping on the shoulder of the road.
3) If you determine that it is safe, drive
cautiously at low speed to the nearest
dealer for repairs,
or
4) Have the vehicle towed to the nearest
dealer for repairs.NOTE:
Because the disc brake system is self-
adjusting, the fluid level will drop as the
brake pads become worn.
Replenishing the brake fluid reservoir is
considered normal periodic maintenance.
Anti-Lock Brake System (ABS)
Warning Light (if equipped)
65D529
When the ignition switch is turned to the
“ON” position, the light comes on briefly so
you can check that the light is working. If
the light stays on, or comes on when driv-
ing, there may be something wrong with
the ABS.
If the ABS light and the brake system
warning light stay on, or come on simulta-
neously when driving, then there may be
something wrong with both the rear brake
proportioning valve function and anti-lock
function of the ABS.
If one of these happens, have the system
inspected by your SUZUKI dealer. If the
ABS becomes inoperative, the brake sys-
tem will function as an ordinary brake sys-
tem that has no ABS.
WARNING
Remember that stopping distance
may be longer, you may have to push
harder on the pedal, and the pedal
may go down farther than normal.
WARNING
If any of the following conditions
occur, you should immediately ask
your SUZUKI dealer to inspect the
brake system.
If the brake system warning light
does not go out after the parking
brake has been fully released.
If the brake system warning light
does not come on when the igni-
tion switch is turned to the “ON”
position.
If the brake system warning light
comes on at any time during vehi-
cle operation.
Warning and Indicator Lights: 8
Page 69 of 232

Downloaded from www.Manualslib.com manuals search engine 4-4 INSTRUMENT PANEL
54G27-03E
For details of the ABS, refer to “Anti-Lock
Brake System (ABS)” in the “OPERATING
YOUR VEHICLE” section.Oil Pressure Light
50G051
This light comes on when the ignition
switch is turned to the “ON” position, and
goes out when the engine is started. The
light will come on and remain on if there is
insufficient oil pressure. If the light comes
on when driving, pull off the road as soon
as you can and stop the engine. Check the
oil level and add oil if necessary. If there is
enough oil, the lubrication system should
be inspected by your SUZUKI dealer
before you drive the vehicle again.
Charging Light
50G052
This light comes on when the ignition
switch is turned to the “ON” position, and
goes out when the engine is started. The
light will come on and remain on if there is
something wrong with the battery charging
system. If the light comes on when the
engine is running, the charging system
should be inspected immediately by your
SUZUKI dealer.
Driver’s Seat Belt Reminder Light
60G049
If the driver’s seat belt is unbuckled when
the ignition switch is turned to the “ON”
position, this light will come on and then
blink. When the light comes on, a buzzer
will also sound intermittently for about 6
seconds. The reminder will repeat several
times under certain conditions until the
driver’s seat belt is buckled. After repeating
several times, the reminder will be can-
celed even if the driver’s seat belt remains
unbuckled.
For details about the seat belt reminder,
refer to “Seat Belts and Child Restraint
Systems” in the “BEFORE DRIVING” sec-
tion.
CAUTION
If you operate the engine with this
light on, severe engine damage can
result.
Do not rely on the Oil Pressure
Light to indicate the need to add
oil. Be sure to periodically check
the engine oil level.
WARNING
It is absolutely essential that the
driver and passengers wear their seat
belts at all times. Persons who are
not wearing seat belts have a much
greater risk of injury if an accident
occurs. Make a regular habit of buck-
ling your seat belt before putting the
key in the ignition.
Warning and Indicator Lights: 8
Page 70 of 232

Downloaded from www.Manualslib.com manuals search engine 4-5 INSTRUMENT PANEL
54G27-03E
“AIR BAG” Light
60G300
The “AIR BAG” light monitors inflators,
crash sensors, seat belt pretensioners, the
front passenger sensing system, and cor-
responding electrical circuit.
This light blinks for several seconds when
the ignition switch is turned to the “ON”
position so you can check if the light is
working. The light will come on and stay on
if there is a problem in the air bag system
or the seat belt pretensioner system.
Malfunction Indicator Light
65D530
Your vehicle has a computer-controlled
emission control system. A malfunction
indicator light is provided on the instrument
panel to indicate when it is necessary to
have the emission control system serviced.
The malfunction indicator light comes on
when the ignition switch is turned to the
“ON” position to let you know the light is
working and goes out when the engine is
started.
If the malfunction indicator light comes on
or blinks when the engine is running, ser-
vice to the emission control system is nec-
essary. Bring the vehicle to your SUZUKI
dealer to have the emission control system
serviced right away and avoid hard accel-
eration until the service is performed.NOTE:
If the fuel filler cap is not installed fully, the
electrical system gets wet (such as by driv-
ing through a deep puddle of water) or the
fuel tank gets nearly empty, the malfunc-
tion indicator light may come on. If so, the
light will go off after driving a few times
after the fuel filler cap is installed fully, the
electrical system dries out or the fuel tank
is filled.
Low Fuel Warning Light
54G343
If this light comes on, fill the fuel tank
immediately.
NOTE:
The activation point of this light varies
depending on road conditions (for exam-
ple, slope or curve) and driving conditions
because of fuel moving in the tank.
WARNING
If the “AIR BAG” light does not blink
when the ignition switch is turned to
the “ON” position or stays on or
comes on when driving, the air bag
system or the seat belt pretensioner
system may not work properly. Have
both systems inspected by an autho-
rized SUZUKI dealer.
CAUTION
Continuing to drive the vehicle when
the malfunction indicator light is on
or blinking can cause permanent
damage to the vehicle’s emission
control system, and can affect fuel
economy and driveability.
Warning and Indicator Lights: 8