2007 SUBARU OUTBACK fuel cap
[x] Cancel search: fuel capPage 301 of 442
8-14Driving tips
possible.
. When you carry something inside
the vehicle, secure it whenever
you can to prevent it from being
thrown around inside the vehicle
during sudden stops, sharp turns
or in an accident.
. Do not pile heavy loads on the
roof. These loads raise the vehi-cle ’s center of gravity and make it
more prone to tip over.
. Secure lengthy items properly to
prevent them from shooting for-
ward and causing serious injury
during a sudden stop.
. Never exceed the maximum load
limit. If you do, some parts on
your vehicle can break, or it can
change the way your vehicle
handles. This could result in loss
of control and cause personal
injury. Also, overloading can
shorten the life of your vehicle. .
Do not place anything on the rear
shelf behind the rear seatback
(for Sedan) or the extended lug-
gage cover (for Station wagon).
Such items could tumble forward
in the event of a sudden stop or a
collision. This could cause ser-
ious injury.
CAUTION
Do not carry spray cans, containers
with flammable or corrosive liquids
or any other dangerous items inside
the vehicle.
NOTE
For better fuel economy, do not carry
unneeded cargo. &
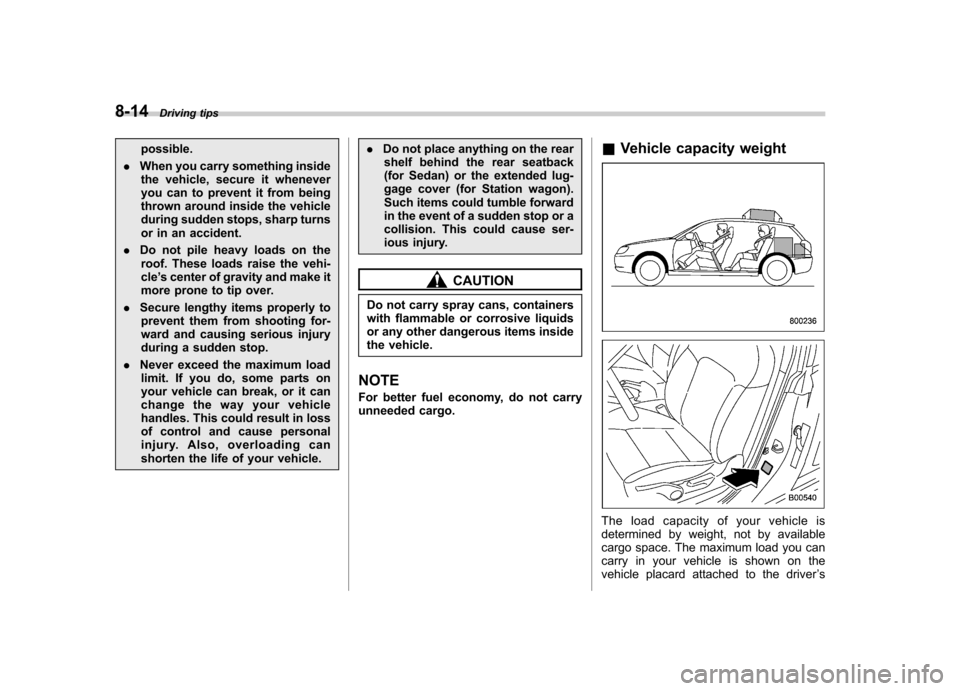
Vehicle capacity weight
The load capacity of your vehicle is
determined by weight, not by available
cargo space. The maximum load you can
carry in your vehicle is shown on the
vehicle placard attached to the driver ’s
Page 302 of 442
side door pillar. It includes the total weight
of the driver and all passengers and their
belongings, any optional equipment such
as a trailer hitch, roof rack or bike carrier,
etc., and the tongue load of a trailer. &GVWR and GAWR (Gross
Vehicle Weight Rating and
Gross Axle Weight Rating)
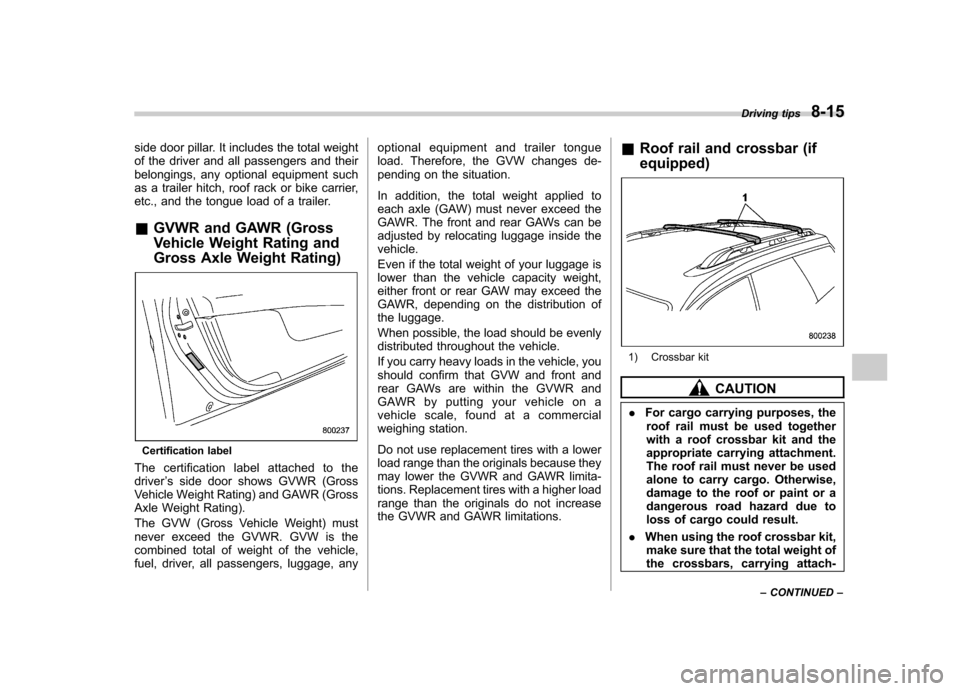
Certification label
The certification label attached to the driver ’s side door shows GVWR (Gross
Vehicle Weight Rating) and GAWR (Gross
Axle Weight Rating).
The GVW (Gross Vehicle Weight) must
never exceed the GVWR. GVW is the
combined total of weight of the vehicle,
fuel, driver, all passengers, luggage, any optional equipment and trailer tongue
load. Therefore, the GVW changes de-
pending on the situation.
In addition, the total weight applied to
each axle (GAW) must never exceed the
GAWR. The front and rear GAWs can be
adjusted by relocating luggage inside thevehicle.
Even if the total weight of your luggage is
lower than the vehicle capacity weight,
either front or rear GAW may exceed the
GAWR, depending on the distribution of
the luggage.
When possible, the load should be evenly
distributed throughout the vehicle.
If you carry heavy loads in the vehicle, you
should confirm that GVW and front and
rear GAWs are within the GVWR and
GAWR by putting your vehicle on a
vehicle scale, found at a commercial
weighing station.
Do not use replacement tires with a lower
load range than the originals because they
may lower the GVWR and GAWR limita-
tions. Replacement tires with a higher load
range than the originals do not increase
the GVWR and GAWR limitations.
&
Roof rail and crossbar (if equipped)
1) Crossbar kit
CAUTION
. For cargo carrying purposes, the
roof rail must be used together
with a roof crossbar kit and the
appropriate carrying attachment.
The roof rail must never be used
alone to carry cargo. Otherwise,
damage to the roof or paint or a
dangerous road hazard due to
loss of cargo could result.
. When using the roof crossbar kit,
make sure that the total weight of
the crossbars, carrying attach- Driving tips
8-15
– CONTINUED –
Page 308 of 442
WARNING
Do not connect safety chains to part
of the vehicle other than the safety
chain hooks.
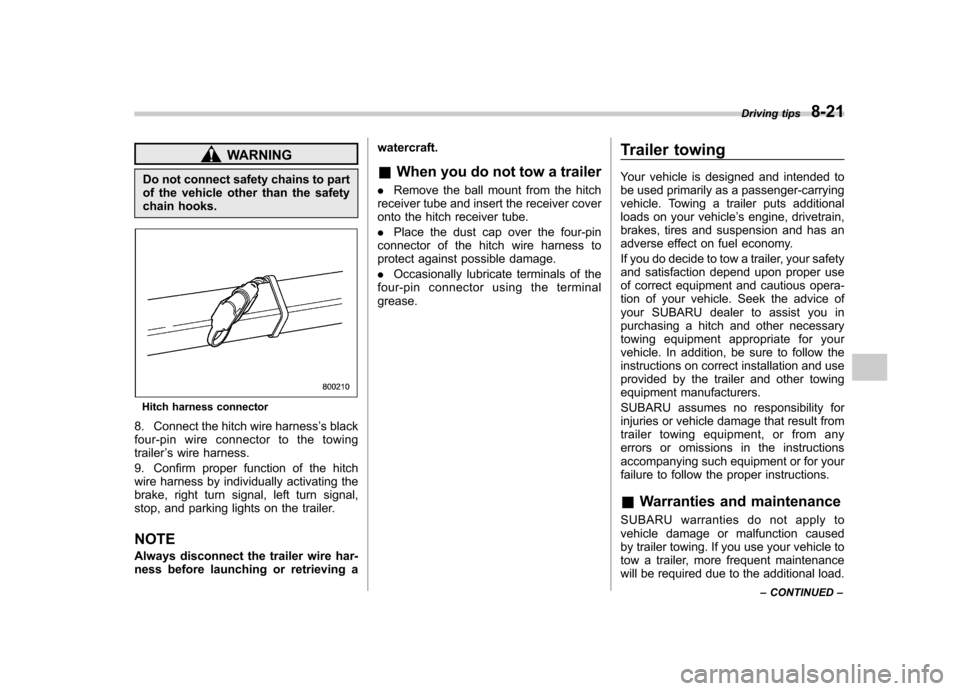
Hitch harness connector
8. Connect the hitch wire harness ’s black
four-pin wire connector to the towing trailer ’s wire harness.
9. Confirm proper function of the hitch
wire harness by individually activating the
brake, right turn signal, left turn signal,
stop, and parking lights on the trailer. NOTE
Always disconnect the trailer wire har-
ness before launching or retrieving a watercraft.
& When you do not tow a trailer
. Remove the ball mount from the hitch
receiver tube and insert the receiver cover
onto the hitch receiver tube. . Place the dust cap over the four-pin
connector of the hitch wire harness to
protect against possible damage. . Occasionally lubricate terminals of the
four-pin connector using the terminal grease. Trailer towing
Your vehicle is designed and intended to
be used primarily as a passenger-carrying
vehicle. Towing a trailer puts additional
loads on your vehicle
’s engine, drivetrain,
brakes, tires and suspension and has an
adverse effect on fuel economy.
If you do decide to tow a trailer, your safety
and satisfaction depend upon proper use
of correct equipment and cautious opera-
tion of your vehicle. Seek the advice of
your SUBARU dealer to assist you in
purchasing a hitch and other necessary
towing equipment appropriate for your
vehicle. In addition, be sure to follow the
instructions on correct installation and use
provided by the trailer and other towing
equipment manufacturers.
SUBARU assumes no responsibility for
injuries or vehicle damage that result from
trailer towing equipment, or from any
errors or omissions in the instructions
accompanying such equipment or for your
failure to follow the proper instructions.
& Warranties and maintenance
SUBARU warranties do not apply to
vehicle damage or malfunction caused
by trailer towing. If you use your vehicle to
tow a trailer, more frequent maintenance
will be required due to the additional load. Driving tips
8-21
– CONTINUED –
Page 355 of 442

11-12Maintenance and service
Oil capacity (Guideline):
2.5-liter models: 4.2 US qt (4.0 liters, 3.5
Imp qt)
3.0-liter models: 5.8 US qt (5.5 liters, 4.8
Imp qt)
The oil quantity indicated above is only a
guideline. The necessary quantity of oil
depends on the quantity of oil that has
been drained. The quantity of drained oil
differs slightly depending on the tempera-
ture of the oil and the time the oil is left
flowing out. After refilling the engine with
oil, therefore, you must use the dipstick to
confirm that the level is correct.
13. Start the engine and make sure that no
oil leaks appear around the filter ’s rubber
seal and drain plug.
14. Run the engine until it reaches the
normal operating temperature. Then stop
the engine and wait a few minutes to allow
the oil drain back. Check the oil level
again and if necessary, add more engineoil. &
Recommended grade and viscosity
CAUTION
Use only engine oil with the recom-
mended grade and viscosity.
Oil grade: ILSAC GF-4, which can be identified with
the ILSAC certification mark (Starburst mark)
or API classification SM with the words“ENERGY CONSERVING ”
These recommended oil grades can be
identified by looking for either or both of
the following marks displayed on the oil
container.
ILSAC Certification Mark (Starburst Mark)
API Service label
1) Indicates the oil quality by API designa- tions
2) Indicates the SAE oil viscosity grade
3) Indicates that the oil has fuel saving capabilities
Page 356 of 442
In choosing an oil, you want the proper
quality and viscosity, as well as one that
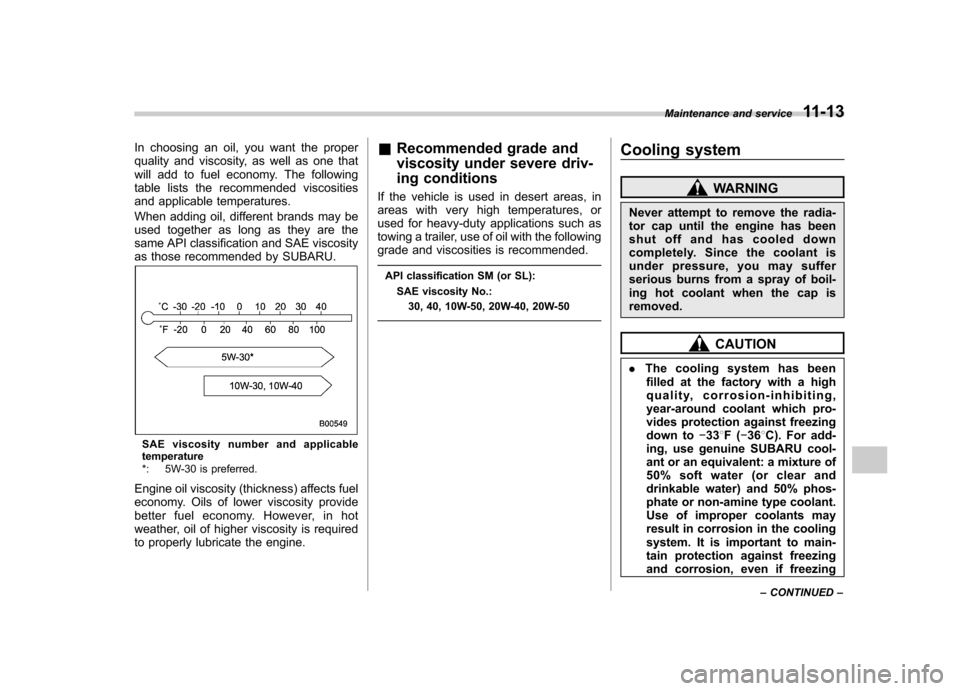
will add to fuel economy. The following
table lists the recommended viscosities
and applicable temperatures.
When adding oil, different brands may be
used together as long as they are the
same API classification and SAE viscosity
as those recommended by SUBARU.
SAE viscosity number and applicable
temperature
*: 5W-30 is preferred.
Engine oil viscosity (thickness) affects fuel
economy. Oils of lower viscosity provide
better fuel economy. However, in hot
weather, oil of higher viscosity is required
to properly lubricate the engine. &
Recommended grade and
viscosity under severe driv-
ing conditions
If the vehicle is used in desert areas, in
areas with very high temperatures, or
used for heavy-duty applications such as
towing a trailer, use of oil with the following
grade and viscosities is recommended.
API classification SM (or SL): SAE viscosity No.: 30, 40, 10W-50, 20W-40, 20W-50 Cooling system
WARNING
Never attempt to remove the radia-
tor cap until the engine has been
shut off and has cooled down
completely. Since the coolant is
under pressure, you may suffer
serious burns from a spray of boil-
ing hot coolant when the cap isremoved.
CAUTION
. The cooling system has been
filled at the factory with a high
quality, corrosion-inhibiting,
year-around coolant which pro-
vides protection against freezing
down to �33 8F( �36 8C). For add-
ing, use genuine SUBARU cool-
ant or an equivalent: a mixture of
50% soft water (or clear and
drinkable water) and 50% phos-
phate or non-amine type coolant.
Use of improper coolants may
result in corrosion in the cooling
system. It is important to main-
tain protection against freezing
and corrosion, even if freezing Maintenance and service
11-13
– CONTINUED –
Page 357 of 442
11-14Maintenance and service
temperatures are not expected.
Never mix different kinds of cool-ant.
. Do not splash the engine coolant
over painted parts. The alcohol
contained in the engine coolant
may damage the paint surface.
& Hose and connections
Your vehicle employs an electric cooling
fan which is thermostatically controlled to
operate when the engine coolant reaches
a specific temperature.
If the radiator cooling fan does not operate
even when the engine coolant tempera-
ture gauge exceeds the normal operating
range, the cooling fan circuit may be
defective. Check the fuse and replace it
if necessary. If the fuse is not blown, have
the cooling system checked by your
SUBARU dealer.
If frequent addition of coolant is neces-
sary, there may be a leak in the engine
cooling system. It is recommended that
the cooling system and connections be
checked for leaks, damage, or looseness. &
Engine coolant
! Checking the coolant level
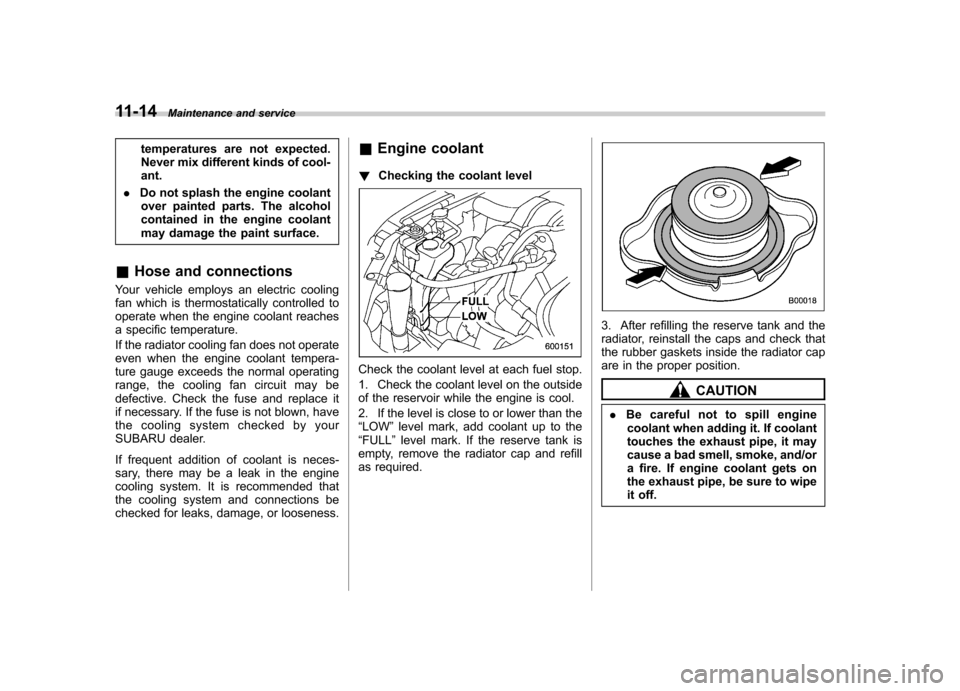
Check the coolant level at each fuel stop.
1. Check the coolant level on the outside
of the reservoir while the engine is cool.
2. If the level is close to or lower than the “LOW ”level mark, add coolant up to the
“ FULL ”level mark. If the reserve tank is
empty, remove the radiator cap and refill
as required.
3. After refilling the reserve tank and the
radiator, reinstall the caps and check that
the rubber gaskets inside the radiator cap
are in the proper position.
CAUTION
. Be careful not to spill engine
coolant when adding it. If coolant
touches the exhaust pipe, it may
cause a bad smell, smoke, and/or
a fire. If engine coolant gets on
the exhaust pipe, be sure to wipe
it off.
Page 407 of 442
12-4Specifications
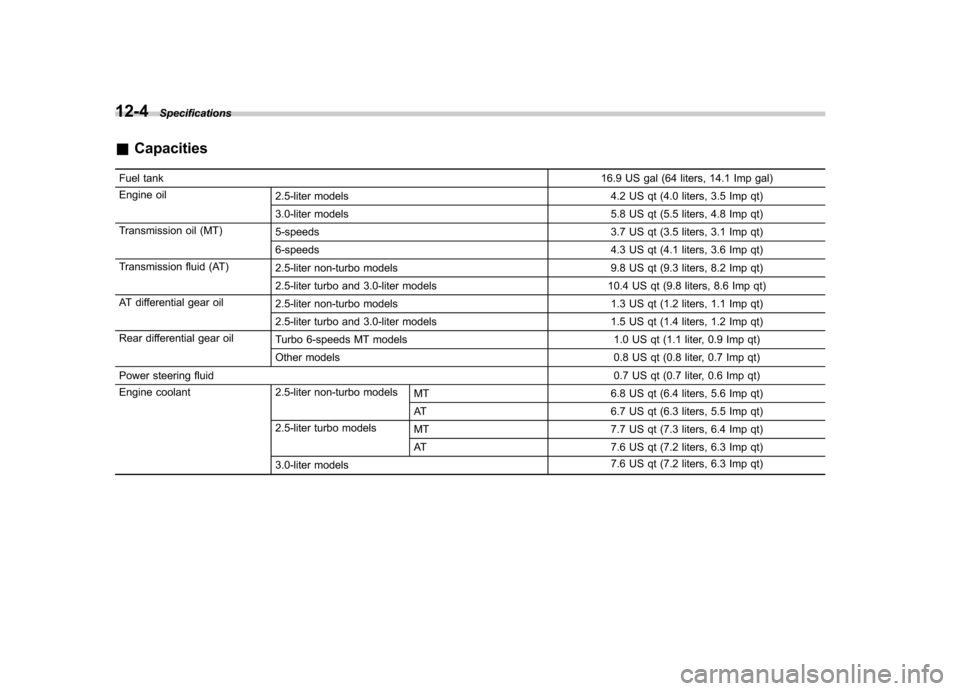
&Capacities
Fuel tank 16.9 US gal (64 liters, 14.1 Imp gal)
Engine oil 2.5-liter models 4.2 US qt (4.0 liters, 3.5 Imp qt)
3.0-liter models 5.8 US qt (5.5 liters, 4.8 Imp qt)
Transmission oil (MT) 5-speeds 3.7 US qt (3.5 liters, 3.1 Imp qt)
6-speeds 4.3 US qt (4.1 liters, 3.6 Imp qt)
Transmission fluid (AT) 2.5-liter non-turbo models 9.8 US qt (9.3 liters, 8.2 Imp qt)
2.5-liter turbo and 3.0-liter models 10.4 US qt (9.8 liters, 8.6 Imp qt)
AT differential gear oil 2.5-liter non-turbo models 1.3 US qt (1.2 liters, 1.1 Imp qt)
2.5-liter turbo and 3.0-liter models 1.5 US qt (1.4 liters, 1.2 Imp qt)
Rear differential gear oil Turbo 6-speeds MT models 1.0 US qt (1.1 liter, 0.9 Imp qt)
Other models 0.8 US qt (0.8 liter, 0.7 Imp qt)
Power steering fluid 0.7 US qt (0.7 liter, 0.6 Imp qt)
Engine coolant 2.5-liter non-turbo models MT6.8 US qt (6.4 liters, 5.6 Imp qt)
AT 6.7 US qt (6.3 liters, 5.5 Imp qt)
2.5-liter turbo models MT 7.7 US qt (7.3 liters, 6.4 Imp qt)
AT 7.6 US qt (7.2 liters, 6.3 Imp qt)
3.0-liter models 7.6 US qt (7.2 liters, 6.3 Imp qt)
Page 422 of 442
an asymmetrical tire that has a
particular side that must always
face outward when mounting on a
vehicle.
. Accessory weight
The combined weight (in excess of
those standard items which may be
replaced) of floor mats, leather seats
and cross bars to the extent that these
items are available as factory-in-
stalled equipment (whether installed
or not). . Curb weight
The weight of a motor vehicle with
standard equipment including the
maximum capacity of fuel, oil, and
coolant and air conditioning. . Maximum loaded vehicle weight
The sum of curb weight, accessory
weight, vehicle capacity weight and
production options weight. . Normal occupant weight
150 lbs (68 kg) times the number of
occupants (3 occupants). . Occupant distribution
Distribution of occupants in a vehicle,
2 in front, 1 in rear seat. . Production options weight The combined weight of those in-
stalled regular production options
weighing over 5.1 lbs (2.3 kg) in
excess of those standards items
which they replace, not previously
considered in curb weight or acces-
sory weight. .
Vehicle capacity weight
The total weight of cargo, luggage
and occupants that can be added to
the vehicle. . Vehicle maximum load on a tire
Load on an individual tire that is
determined by distributing to each
axle its share of the maximum loaded
vehicle weight and dividing by two. . Vehicle normal load on a tire
Load on an individual tire that is
determined by distributing to each
axle its share of the curb weight,
accessory weight, and normal occu-
pant weight and dividing by two. & Tire care –maintenance and
safety practices
. Check on a daily basis that the tires
are free from serious damage, nails,
and stones. At the same time, check
the tires for abnormal wear. .
Inspect the tire tread regularly and
replace the tires before their tread
wear indicators become visible. When
a tire ’s tread wear indicator becomes
visible, the tire is worn beyond the
acceptable limit and must be replaced
immediately. With a tire in this condi-
tion, driving at even low speeds in wet
weather can cause the vehicle to
hydroplane. Possible resulting loss
of vehicle control can lead to an
accident. . To maximize the life of each tire
and ensure that the tires wear uni-
formly, it is best to rotate the tires
every 7,500 miles (12,500 km). Rotat-
ing the tires involves switching the
front and rear tires on the right-hand
side of the vehicle and similarly
switching the front and rear tires on
the left-hand side of the vehicle.
(Each tire must be kept on its original
side of the vehicle.) Replace any
damaged or unevenly worn tire at
the time of rotation. After tire rotation,
adjust the tire pressures and make
sure the wheel nuts are correctly
tightened. A tightening torque specifi-
cation and a tightening sequence
Consumer information and Reporting safety defects
13-7
– CONTINUED –