2007 SUBARU IMPREZA maintenance
[x] Cancel search: maintenancePage 171 of 364
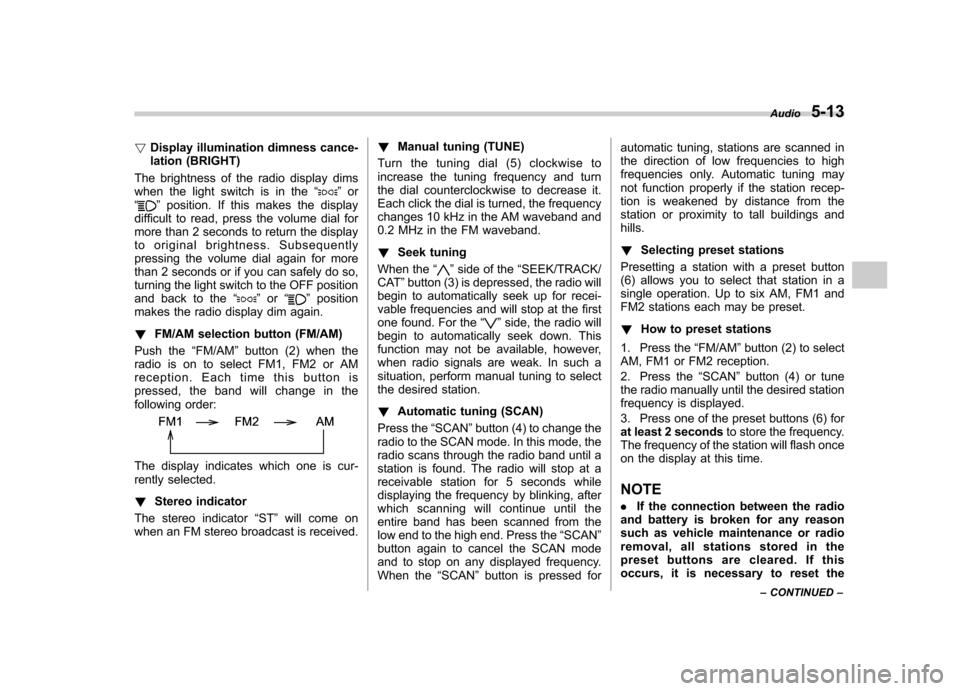
!Display illumination dimness cance-
lation (BRIGHT)
The brightness of the radio display dims
when the light switch is in the “
”or
“” position. If this makes the display
difficult to read, press the volume dial for
more than 2 seconds to return the display
to original brightness. Subsequently
pressing the volume dial again for more
than 2 seconds or if you can safely do so,
turning the light switch to the OFF position
and back to the “
”or “”position
makes the radio display dim again. ! FM/AM selection button (FM/AM)
Push the “FM/AM ”button (2) when the
radio is on to select FM1, FM2 or AM
reception. Each time this button is
pressed, the band will change in the
following order:
The display indicates which one is cur-
rently selected. ! Stereo indicator
The stereo indicator “ST ”will come on
when an FM stereo broadcast is received. !
Manual tuning (TUNE)
Turn the tuning dial (5) clockwise to
increase the tuning frequency and turn
the dial counterclockwise to decrease it.
Each click the dial is turned, the frequency
changes 10 kHz in the AM waveband and
0.2 MHz in the FM waveband. ! Seek tuning
When the “
”side of the “SEEK/TRACK/
CAT ”button (3) is depressed, the radio will
begin to automatically seek up for recei-
vable frequencies and will stop at the first
one found. For the “
”side, the radio will
begin to automatically seek down. This
function may not be available, however,
when radio signals are weak. In such a
situation, perform manual tuning to select
the desired station. ! Automatic tuning (SCAN)
Press the “SCAN ”button (4) to change the
radio to the SCAN mode. In this mode, the
radio scans through the radio band until a
station is found. The radio will stop at a
receivable station for 5 seconds while
displaying the frequency by blinking, after
which scanning will continue until the
entire band has been scanned from the
low end to the high end. Press the “SCAN ”
button again to cancel the SCAN mode
and to stop on any displayed frequency.
When the “SCAN ”button is pressed for automatic tuning, stations are scanned in
the direction of low frequencies to high
frequencies only. Automatic tuning may
not function properly if the station recep-
tion is weakened by distance from the
station or proximity to tall buildings andhills. !
Selecting preset stations
Presetting a station with a preset button
(6) allows you to select that station in a
single operation. Up to six AM, FM1 and
FM2 stations each may be preset. ! How to preset stations
1. Press the “FM/AM ”button (2) to select
AM, FM1 or FM2 reception.
2. Press the “SCAN ”button (4) or tune
the radio manually until the desired station
frequency is displayed.
3. Press one of the preset buttons (6) for
at least 2 seconds to store the frequency.
The frequency of the station will flash once
on the display at this time. NOTE . If the connection between the radio
and battery is broken for any reason
such as vehicle maintenance or radio
removal, all stations stored in the
preset buttons are cleared. If this
occurs, it is necessary to reset the Audio
5-13
– CONTINUED –
Page 227 of 364
New vehicle break-in driving–the first
1,000 miles (1,600 km) ..................................... 8-2
Fuel economy hints ............................................ 8-2
Engine exhaust gas (Carbon monoxide) ........... 8-2
Catalytic converter .............................................. 8-3
Periodic inspections ........................................... 8-4
Driving in foreign countries ............................... 8-4
Driving tips for AWD vehicles ............................ 8-5
Off road driving ................................................... 8-6
All AWD models except OUTBACK SPORT .......... 8-6
OUTBACK SPORT ............................................... 8-6
Winter driving ...................................................... 8-8
Operation during cold weather ............................. 8-8
Driving on snowy and icy roads .......................... 8-9
Corrosion protection .......................................... 8-10
Snow tires ......................................................... 8-10
Tire chains ......................................................... 8-11 Rocking the vehicle
........................................... 8-12
Loading your vehicle ......................................... 8-12
Vehicle capacity weight ...................................... 8-13
GVWR and GAWR (Gross Vehicle Weight Rating and Gross Axle Weight Rating) ........................ 8-14
Roof rail and crossbar (if equipped) ................... 8-14
Trailer hitch (if equipped) .................................. 8-17
Connecting a trailer ........................................... 8-18
When you do not tow a trailer .. .......................... 8-19
Trailer towing ..................................................... 8-20
Warranties and maintenance .............................. 8-20
Maximum load limits .......................................... 8-20
Trailer hitches .................................................... 8-23
Connecting a trailer ........................................... 8-24
Trailer towing tips .............................................. 8-25
STI front lip spoiler (if equipped) ...................... 8-28Driving tips
8
Page 230 of 364
8-4Driving tips
.Keep everyone and flammable
materials away from the exhaust
pipe while the engine is running.
The exhaust gas is very hot. Periodic inspections
To keep your vehicle in the best condition
at all times, always have the recom-
mended maintenance services listed in
the maintenance schedule in the
“War-
ranty and Maintenance Booklet ”per-
formed at the specified time or mileageintervals. Driving in foreign countries
When planning to use your vehicle in
another country: .
Confirm the availability of the correct
fuel. (Refer to the “Fuel requirements ”
section in chapter 7.). Comply with all regulations and re-
quirements of each country.
Page 233 of 364
with your fingers and thumbs on the
outside of the rim. .If driving through water, such as when
crossing shallow streams, first check the
depth of the water and the bottom of the
stream bed for firmness and ensure that
the bed of the stream is flat. Drive slowly
and completely through the stream. The
water should be shallow enough that it
does not reach the vehicle ’s undercar-
riage. Water entering the engine air intake
or the exhaust pipe or water splashing
onto electrical parts may damage your
vehicle and may cause it to stall. Never
attempt to drive through rushing water;
regardless of its depth, it can wash away
the ground from under your tires, resulting
in possible loss of traction and even
vehicle rollover. . Always check your brakes for effec-
tiveness immediately after driving in sand,
mud or water. Do this by driving slowly
and stepping on the brake pedal. Repeat
that process several times to dry out the
brake discs and brake pads. . Do not drive or park over or near
flammable materials such as dry grass or
fallen leaves, as they may burn easily. The
exhaust system is very hot while the
engine is running and right after the
engine stops. This could create a firehazard. .
After driving through tall grass, mud,
rocks, sand, rivers, etc., check that there
is no grass, bush, paper, rags, stones,
sand, etc. adhering to or trapped on the
underbody. Clear off any such matter from
the underbody. If the vehicle is used with
these materials trapped or adhering to the
underbody, a mechanical breakdown or
fire could occur. . Secure all cargo carried inside the
vehicle and make certain that it is not
piled higher than the seatbacks. During
sudden stops or jolts, unsecured cargo
could be thrown around in the vehicle and
cause injury. Do not pile heavy loads on
the roof. Those loads raise the vehicle ’s
center of gravity and make it more prone
to tip over. . If you must rock the vehicle to free it
from sand or mud, depress the accelerator
pedal slightly and move the selector lever
back and forth between “D ” and “R ”
repeatedly. Do not race the engine. For
the best possible traction, avoid spinning
the wheels when trying to free the vehicle.
When the road surface is extremely
slippery, you can obtain better traction by
starting the vehicle with the transmission
in 2nd than 1st (both for MT and AT). . Never equip your vehicle with tires
larger than those specified in this manual.. Frequent driving of an AWD vehicle under hard-driving conditions such as
rough roads or off roads will necessitate
more frequent replacement of engine oil,
brake fluid and transmission oil than that
specified in the maintenance schedule
described in the
“Warranty and Mainte-
nance Booklet ”.
Remember that damage done to your
Subaru while operating it off-road and
not using common sense precautions
such as those listed above is not eligible
for warranty coverage. . Wash the vehicle ’s underbody after off-
road driving. Suspension components are
particularly prone to dirt buildup, so they
need to be washed thoroughly. Driving tips
8-7
Page 246 of 364
8-20Driving tips
Trailer towing
Your vehicle is designed and intended to
be used primarily as a passenger-carrying
vehicle. Towing a trailer puts additional
loads on your vehicle ’s engine, drivetrain,
brakes, tires and suspension and has an
adverse effect on fuel economy.
If you do decide to tow a trailer, your safety
and satisfaction depend upon proper use
of correct equipment and cautious opera-
tion of your vehicle. Seek the advice of
your SUBARU dealer to assist you in
purchasing a hitch and other necessary
towing equipment appropriate for your
vehicle. In addition, be sure to follow the
instructions on correct installation and use
provided by the trailer and other towing
equipment manufacturers.
SUBARU assumes no responsibility for
injuries or vehicle damage that result from
trailer towing equipment, or from any
errors or omissions in the instructions
accompanying such equipment or for your
failure to follow the proper instructions.
& Warranties and maintenance
SUBARU warranties do not apply to
vehicle damage or malfunction caused
by trailer towing. If you use your vehicle to
tow a trailer, more frequent maintenance
will be required due to the additional load. (Refer to
“Maintenance schedule under
severe driving conditions ”in the “Warranty
and Maintenance Booklet ”.)
Under no circumstances should a trailer
be towed with a new vehicle or a vehicle
with any new powertrain component (en-
gine, transmission, differential, wheel
bearings, etc.) for the first 1,000 miles
(1,600 km) of driving.
& Maximum load limits
WARNING
Never exceed the maximum load
limits explained in the following.
Exceeding the maximum load limits
could cause personal injury and/or
vehicle damage.
CAUTION
. Adequate size trailer brakes are
required when the trailer and its
cargo exceed 1,000 lbs (453 kg)
total weight.
. Before towing a trailer, check the
trailer total weight, GVW, GAWs
and tongue load. Make sure the
load and its distribution in your
vehicle and trailer are accepta- ble.
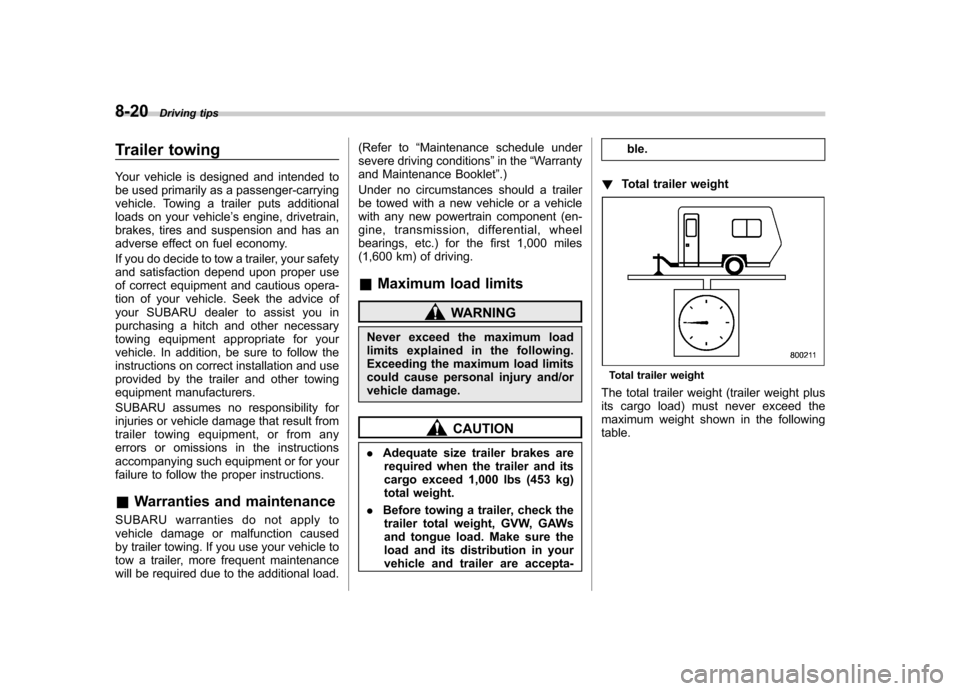
! Total trailer weight
Total trailer weight
The total trailer weight (trailer weight plus
its cargo load) must never exceed the
maximum weight shown in the followingtable.
Page 255 of 364

If you park your vehicle in case of anemergency ........................................................ 9-2
Temporary spare tire ........................................... 9-2
Flat tires ............................................................... 9-4
Changing a flat tire .............................................. 9-4
Jump starting ...................................................... 9-8
How to jump start ................................................ 9-9
Engine overheating ............................................ 9-11
If steam is coming from the engine compartment .................................................... 9-11 If no steam is coming from the engine
compartment ................................................... 9-11
Towing ................................................................ 9-11
Towing and tie-down hooks. ............................... 9-12
Using a flat-bed truck. ........................................ 9-13
Towing with all wheels on the ground ................. 9-14
Rear gate –if the rear gate cannot be
unlocked .......................................................... 9-14
Moonroof –if the moonroof cannot be
closed .............................................................. 9-15
Maintenance tools ............................................. 9-16
Jack and jack handle ......................................... 9-16
In case of emergency
9
Page 270 of 364
9-16In case of emergency
Maintenance tools
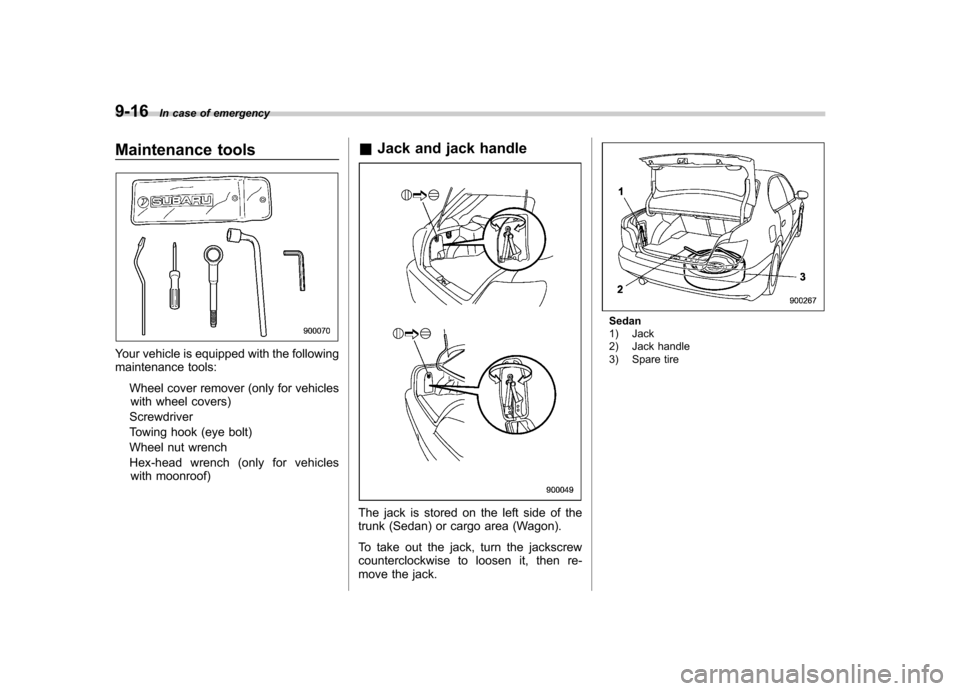
Your vehicle is equipped with the following
maintenance tools:
Wheel cover remover (only for vehicleswith wheel covers)
Screwdriver
Towing hook (eye bolt)
Wheel nut wrench
Hex-head wrench (only for vehicles with moonroof) &
Jack and jack handle
The jack is stored on the left side of the
trunk (Sedan) or cargo area (Wagon).
To take out the jack, turn the jackscrew
counterclockwise to loosen it, then re-
move the jack.
Sedan
1) Jack
2) Jack handle
3) Spare tire
Page 275 of 364
10-4Appearance care
Corrosion protection
Your SUBARU has been designed and
built to resist corrosion. Special materials
and protective finishes have been used on
most parts of the vehicle to help maintain
fine appearance, strength, and reliableoperation. &Most common causes of corrosion
The most common causes of corrosion are:
1. The accumulation of moisture retain-
ing dirt and debris in body panel sections,
cavities, and other areas.
2. Damage to paint and other protective
coatings caused by gravel and stone
chips or minor accidents.
Corrosion is accelerated on the vehicle when:
1. It is exposed to road salt or dust
control chemicals, or used in coastal
areas where there is more salt in the air,
or in areas where there is considerable
industrial pollution.
2. It is driven in areas of high humidity,
especially when temperatures range just
above freezing.
3. Dampness in certain parts of the
vehicle remains for a long time, even though other parts of the vehicle may be
dry.
4. High temperatures will cause corro-
sion to parts of the vehicle which cannot
dry quickly due to lack of proper ventila-tion.
& To help prevent corrosion
Wash the vehicle regularly to prevent
corrosion of the body and suspension
components. Also, wash the vehicle
promptly after driving on any of the
following surfaces: . roads that have been salted to prevent
them from freezing in winter. mud, sand, or gravel
. coastal roads
After the winter has ended, it is recom-
mended that the underbody be given a
very thorough washing.
Before the beginning of winter, check the
condition of underbody components, such
as the exhaust system, fuel and brake
lines, brake cables, suspension, steering
system, floor pan, and fenders. If any of
them are found to be rusted, they should
be given an appropriate rust prevention
treatment or should be replaced. Contact
your SUBARU dealer to perform this kind
of maintenance and treatment if you need assistance.
Repair chips and scratches in the paint as
soon as you find them.
Check the interior of the vehicle for water
and dirt accumulation under the floor mats
because that could cause corrosion.
Occasionally check under the mats to
make sure the area is dry.
Keep your garage dry. Do not park your
vehicle in a damp, poorly ventilated
garage. In such a garage, corrosion can
be caused by dampness. If you wash the
vehicle in the garage or put the vehicle
into the garage when wet or covered with
snow, that can cause dampness.
If your vehicle is operated in cold weather
and/or in areas where road salts and other
corrosive materials are used, the door
hinges and locks, trunk lid lock, and hood
latch should be inspected and lubricated
periodically.