2007 SUBARU IMPREZA brake light
[x] Cancel search: brake lightPage 191 of 364
which are designed for 12V DC.
The maximum power rating of an
appliance that can be connected
varies among outlets as shown in
the following. Do not use an
appliance which exceeds the in-
dicated wattage for each outlet.
Outlet beside front pocket: 80W
or less
Outlet in cargo area: 120W or less
When using appliances con-
nected to two outlets simulta-
neously, the total power con-
sumed by them must not exceed
120W. Overloading the accessory
power outlet can cause a short
circuit. Do not use dual adapters
or more than one electrical appli-ance.
. If the plug on your electric appli-
ance is either too loose or too
tight for the accessory power
outlet, this can result in a poor
contact or cause the plug to get
stuck. Only use plugs that fit
properly.
. Use of an electric appliance in the
accessory power outlet for a long
period of time while the engine is
not running can cause battery discharge.
. Before driving your vehicle, make
sure that the plug and the cord
on your electrical appliance will
not interfere with your shifting
gears and operating the accel-
erator and brake pedals. If they
do, do not use the electrical
appliance while driving.
& Use with a cigarette lighter
(Canada only, if equipped)
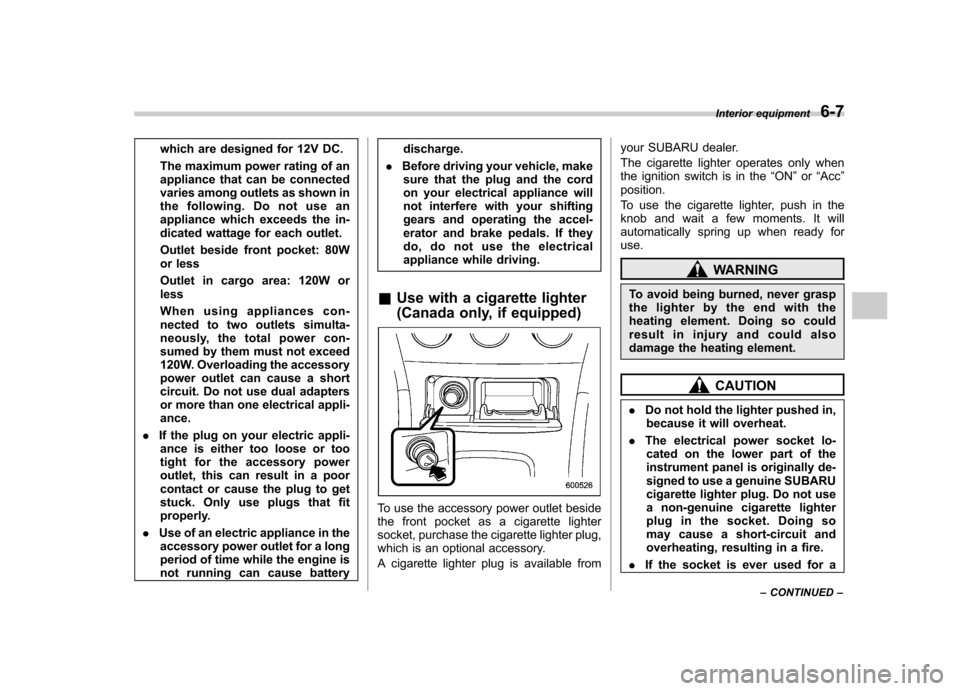
To use the accessory power outlet beside
the front pocket as a cigarette lighter
socket, purchase the cigarette lighter plug,
which is an optional accessory.
A cigarette lighter plug is available from your SUBARU dealer.
The cigarette lighter operates only when
the ignition switch is in the
“ON ”or “Acc ”
position.
To use the cigarette lighter, push in the
knob and wait a few moments. It will
automatically spring up when ready foruse.
WARNING
To avoid being burned, never grasp
the lighter by the end with the
heating element. Doing so could
result in injury and could also
damage the heating element.
CAUTION
. Do not hold the lighter pushed in,
because it will overheat.
. The electrical power socket lo-
cated on the lower part of the
instrument panel is originally de-
signed to use a genuine SUBARU
cigarette lighter plug. Do not use
a non-genuine cigarette lighter
plug in the socket. Doing so
may cause a short-circuit and
overheating, resulting in a fire.
. If the socket is ever used for a Interior equipment
6-7
– CONTINUED –
Page 198 of 364

Fuel...................................................................... 7-2
Fuel requirements ............................................... 7-2
Fuel filler lid and cap ........................................... 7-4
State emission testing (U.S. only) ...................... 7-5
Preparing to drive ............................................... 7-6
Starting the engine .............................................. 7-7
Manual transmission vehicle ................................ 7-7
Automatic transmission vehicle ........................... 7-7
Stopping the engine ............................................ 7-8
Manual transmission –6 speeds (WRX-STI) ..... 7-9
Selecting reverse gear ......................................... 7-9
Shifting speeds ................................................... 7-9
Driving tips ........................................................ 7-10
Manual transmission –5 speeds (except
WRX-STI) .......................................................... 7-11
Shifting speeds .................................................. 7-11
Driving tips ........................................................ 7-12
Driver ’s Control Center Differential (DCCD)
(WRX-STI) ........................................................ 7-12
Auto mode ......................................................... 7-13
Manual mode ..................................................... 7-13
Temporary release .............................................. 7-15
Automatic transmission ..................................... 7-15
Selector lever ..................................................... 7-16 Shift lock release
............................................... 7-19
Limited slip differential (LSD) (if equipped) .................................................... 7-20
Power steering ................................................... 7-20
Braking ............................................................... 7-20
Braking tips ....................................................... 7-20
Brake system .................................................... 7-21
Disc brake pad wear warning indicators ............. 7-21
ABS (Anti-lock Brake System) .......................... 7-21
ABS system self-check ...................................... 7-22
ABS warning light .............................................. 7-22
Electronic Brake Force Distribution (EBD) system ............................................................. 7-23
Steps to take if EBD system fails ....................... 7-23
Parking your vehicle ......................................... 7-24
Parking brake .................................................... 7-24
Parking tips ....................................................... 7-25
Cruise control .................................................... 7-26
To set cruise control .......................................... 7-26
To temporarily cancel the cruise control ............. 7-27
To turn off the cruise control .............................. 7-27
To change the cruising speed .. .......................... 7-28
Starting and operating
7
Page 203 of 364
7-6Starting and operating
CAUTION
Resultant vehicle damage due to
improper testing is not covered
under the SUBARU Limited War-
ranty and is the responsibility of
the state inspection program or its
contractors or licensees.
The EPA has issued regulations for
inspecting the On-Board Diagnostic
(OBD) system as part of the state emis-
sions inspection. The OBD system is
designed to detect engine and transmis-
sion problems that might cause vehicle
emissions to exceed allowable limits.
These inspections apply to all 1996 model
year and newer passenger cars and light
trucks. Over 30 states plus the District of
Columbia have implemented the OBD
system inspection. . The inspection of the OBD system
consists of a visual operational check of the “CHECK ENGINE ”warning light/mal-
function indicator lamp (MIL) and an
examination of the OBD system with an
electronic scan tool while the engine isrunning. . Avehicle
passes the OBD system
inspection if proper the “CHECK ENGINE ”
warning light/MIL illumination is observed,
there is nostored diagnostic trouble codes, and the OBD system readiness
monitors are complete. .
A vehicle
fails the OBD inspection if the
“ CHECK ENGINE ”warning light/MIL is
not properly operating or there are one or
more diagnostic trouble codes stored in
the vehicle ’s computer with the “CHECK
ENGINE ”warning light/MIL illuminated.
. A state emission inspection may reject
(not pass or fail) a vehicle if the number of
OBD system readiness monitors “Not
Ready ”is greater than one. Under this
condition, the vehicle operator should be
instructed to drive his/her vehicle for a few
days to set the monitors and return for an
emission re-inspection. . Owners of rejected or failing vehicles
should contact their SUBARU Dealer for service. Preparing to drive
You should perform the following checks
and adjustments every day before you
start driving.
1. Check that all windows, mirrors, and
lights are clean and unobstructed.
2. Check the appearance and condition
of the tires. Also check tires for properinflation.
3. Look under the vehicle for any sign of leaks.
4. Check that the hood, trunk (Sedan)
and rear gate (Wagon) are fully closed.
5. Check the adjustment of the seat.
6. Check the adjustment of the inside
and outside mirrors.
7. Fasten your seatbelt. Check that your
passengers have fastened their seatbelts.
8. Check the operation of the warning
and indicator lights when the ignition
switch is turned to the
“ON ”position.
9. Check the gauges, indicator and warn-
ing lights after starting the engine.
NOTE
Engine oil, engine coolant, brake fluid,
washer fluid and other fluid levels
should be checked daily, weekly or at
fuel stops.
Page 204 of 364

Starting the engine
CAUTION
Do not operate the starter motor
continuously for more than 10 sec-
onds. If the engine fails to start after
operating the starter for 5 to 10
seconds, wait for 10 seconds or
more before trying again.
& Manual transmission vehicle
1. Apply the parking brake.
2. Turn off unnecessary lights and ac- cessories.
3. Press the clutch pedal to the floor and
shift the shift lever into neutral. Hold the
clutch pedal to the floor while starting theengine.
The starter motor will only operate when
the clutch pedal is pressed fully to the
floor.
4. Turn the ignition switch to the “ON ”
position and check the operation of the
warning and indicator lights. Refer to the“ Warning and indicator lights ”section
(chapter 3).
5. Turn the ignition switch to the “START ”
position without depressing the accelera-
tor pedal. Release the key immediately after the engine has started.
If the engine does not start, try the following.
(1) Turn the ignition switch to the“OFF ”position and wait for at least
10 seconds. After checking that the
parking brake is firmly set, turn the
ignition switch to the “START ”position
while depressing the accelerator pedal
slightly (approximately a quarter of the
full stroke). Release the accelerator
pedal as soon as the engine starts.
(2) If this fails to start the engine, turn
the ignition switch back to the “OFF ”
position and wait for at least 10
seconds. Then fully depress the accel-
erator pedal and turn the ignition
switch to the “START ”position. If the
engine starts, quickly release the
accelerator pedal.
(3) If this fails to start the engine, turn
the ignition switch again to the “OFF ”
position. After waiting for 10 seconds
or longer, turn the ignition switch to the“ START ”position without depressing
the accelerator pedal.
(4) If the engine still refuses to start,
contact your nearest SUBARU dealer
for assistance.
6. Confirm that all warning and indicator
lights have gone off after the engine has
started. The fuel injection system auto- matically lowers the idle speed as the
engine warms up.
NOTE
The engine may be difficult to start
when the battery has been discon-
nected and reconnected (for mainte-
nance or other purposes). This diffi-
culty is caused by the electronically
controlled throttle ’s self-diagnosis
function. To overcome it, keep the
ignition switch in the “ON ”position
for approximately 10 seconds before
starting the engine. & Automatic transmission ve- hicle
1. Apply the parking brake.
2. Turn off unnecessary lights and ac- cessories.
3. Shift the selector lever to the “P ”or “N ”
position (preferably “P ”position).
The starter motor will only operate when
the selector lever is at the “P ” or “N ”
position.
4. Turn the ignition switch to the “ON ”
position and check the operation of the
warning and indicator lights. Refer to the“ Warning and indicator lights ”section
(chapter 3).
5. Turn the ignition switch to the “START ”
Starting and operating
7-7
– CONTINUED –
Page 205 of 364
7-8Starting and operating
position without depressing the accelera-
tor pedal. Release the key immediately
after the engine has started.
If the engine does not start, try the following.
(1) Turn the ignition switch to the“OFF ”position and wait for at least
10 seconds. After checking that the
parking brake is firmly set, turn the
ignition switch to the “START ”position
while depressing the accelerator pedal
slightly (approximately a quarter of the
full stroke). Release the accelerator
pedal as soon as the engine starts.
(2) If this fails to start the engine, turn
the ignition switch back to the “OFF ”
position and wait for at least 10
seconds. Then fully depress the accel-
erator pedal and turn the ignition
switch to the “START ”position. If the
engine starts, quickly release the
accelerator pedal.
(3) If this fails to start the engine, turn
the ignition switch again to the “OFF ”
position. After waiting for 10 seconds
or longer, turn the ignition switch to the“ START ”position without depressing
the accelerator pedal.
(4) If the engine still refuses to start,
contact your nearest SUBARU dealer
for assistance. 6. Confirm that all warning and indicator
lights have gone out after the engine has
started. The fuel injection system auto-
matically lowers the idle speed as the
engine warms up.
While the engine is warming up, make
sure that the selector lever is at the
“P ”or
“ N ”position and that the parking brake is
applied.
NOTE
The engine may be difficult to start
when the battery has been discon-
nected and reconnected (for mainte-
nance or other purposes). This diffi-
culty is caused by the electronically
controlled throttle ’s self-diagnosis
function. To overcome it, keep the
ignition switch in the “ON ”position
for approximately 10 seconds before
starting the engine.
CAUTION
If you restart the engine while the
vehicle is moving, shift the selector
lever into the “N ” position. Do not
attempt to place the selector lever of
a moving vehicle into the “P ” posi-
tion. Stopping the engine
The ignition switch should be turned off
only when the vehicle is stopped and the
engine is idling.
WARNING
Do not stop the engine when the
vehicle is moving. This will cause
loss of power to the power steering
and the brake booster, making steer-
ing and braking more difficult. It
could also result in accidental acti-
vation of the “LOCK ”position on the
ignition switch, causing the steering
wheel to lock.
Page 209 of 364
7-12Starting and operating
Turbo models
mph (km/h)
1st 34 (54)
2nd 59 (95) 3rd 85 (136)
WARNING
When shifting down a gear, ensure
that the vehicle is not travelling at a
speed exceeding the Maximum Al-
lowable Speed for the gear which is
about to be selected. Failure to
observe this precaution can lead to
engine over-revving and this in turn
can result in engine damage.
In addition, sudden application of
engine brakes when the vehicle is
travelling on a slippery surface can
lead to wheel locking; as a conse-
quence, control of the vehicle may
be lost and the risk of an accidentincreased.
& Driving tips
Do not drive with your foot resting on the
clutch pedal and do not use the clutch to
hold your vehicle at a standstill on an
upgrade. Either of those actions may
cause clutch damage. Do not drive with your hand resting on the
shift lever. This may cause wear on the
transmission components.
When it is necessary to reduce vehicle
speed due to slow traffic, turning corners,
or driving up steep hills, downshift to a
lower gear before the engine starts to
labor.
On steep downgrades, downshift the
transmission to 4th, 3rd or 2nd gear as
necessary; this helps to maintain a safe
speed and to extend brake pad life.
In this way, the engine provides a braking
effect. Remember, if you
“ride ”(over use)
the brakes while descending a hill, they
may overheat and not work properly.
The engine may, on rare occasions, knock
when the vehicle rapidly accelerates or
rapidly pulls away from a standstill. This
phenomenon is not an indication of a
problem in your vehicle. Driver
’s Control Center Dif-
ferential (DCCD) (WRX-STI)
WARNING
Always use the utmost care when
driving. Being overconfident be-
cause you are driving a vehicle with
a driver ’s control center differential
could easily lead to a serious acci-dent.
CAUTION
In the event of failure of the driver ’s
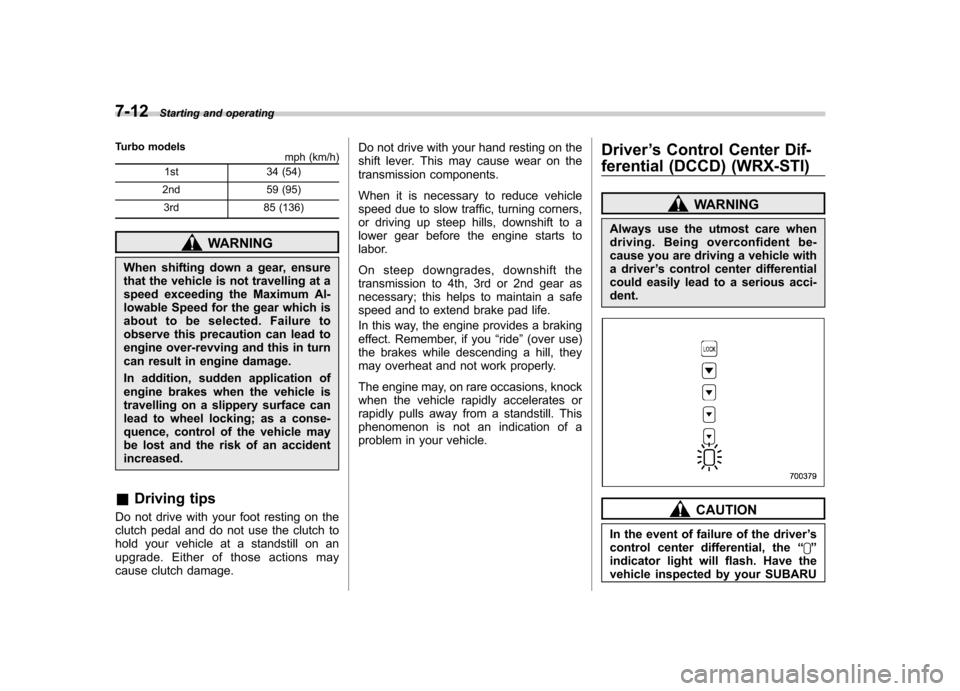
control center differential, the “
”
indicator light will flash. Have the
vehicle inspected by your SUBARU
Page 210 of 364
dealer.
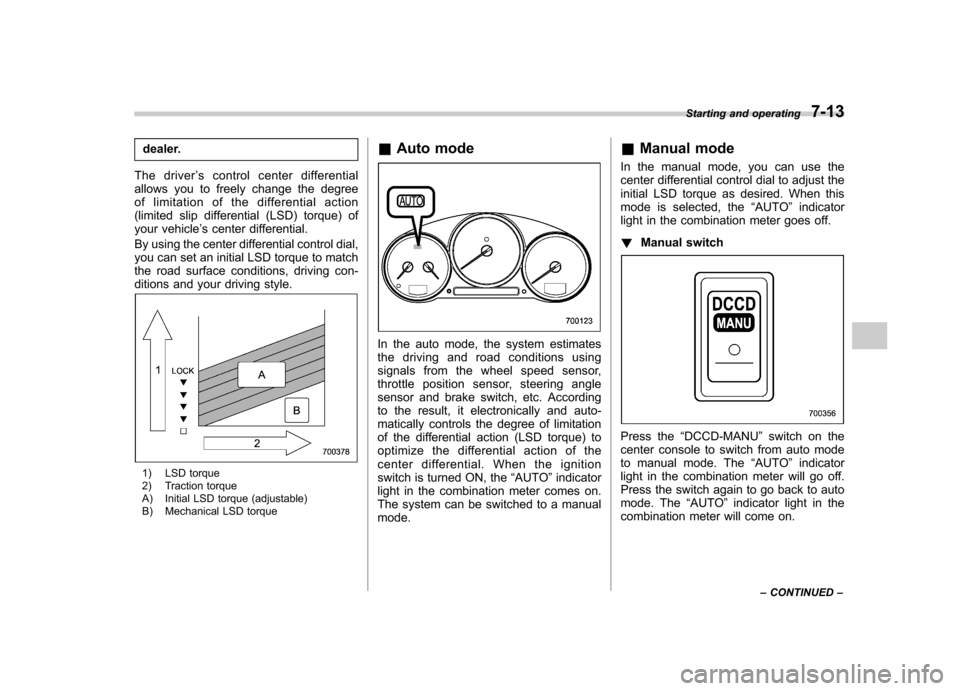
The driver ’s control center differential
allows you to freely change the degree
of limitation of the differential action
(limited slip differential (LSD) torque) of
your vehicle ’s center differential.
By using the center differential control dial,
you can set an initial LSD torque to match
the road surface conditions, driving con-
ditions and your driving style.
1) LSD torque
2) Traction torque
A) Initial LSD torque (adjustable)
B) Mechanical LSD torque &
Auto mode
In the auto mode, the system estimates
the driving and road conditions using
signals from the wheel speed sensor,
throttle position sensor, steering angle
sensor and brake switch, etc. According
to the result, it electronically and auto-
matically controls the degree of limitation
of the differential action (LSD torque) to
optimize the differential action of the
center differential. When the ignition
switch is turned ON, the “AUTO ”indicator
light in the combination meter comes on.
The system can be switched to a manual mode. &
Manual mode
In the manual mode, you can use the
center differential control dial to adjust the
initial LSD torque as desired. When this
mode is selected, the “AUTO ”indicator
light in the combination meter goes off. ! Manual switch
Press the “DCCD-MANU ”switch on the
center console to switch from auto mode
to manual mode. The “AUTO ”indicator
light in the combination meter will go off.
Press the switch again to go back to auto
mode. The “AUTO ”indicator light in the
combination meter will come on. Starting and operating
7-13
– CONTINUED –
Page 211 of 364
7-14Starting and operating
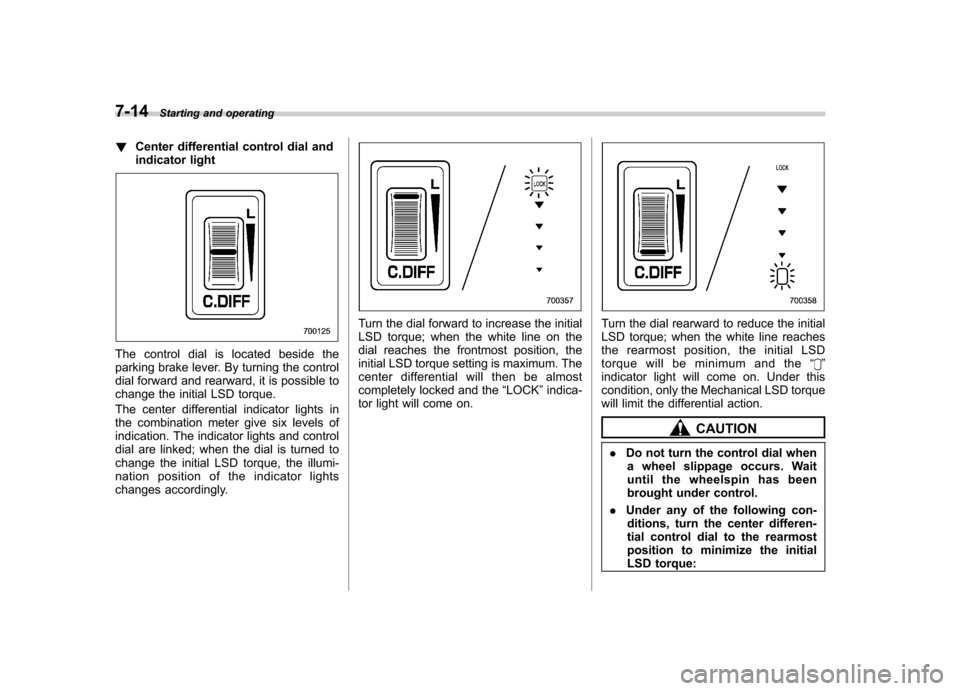
!Center differential control dial and
indicator light
The control dial is located beside the
parking brake lever. By turning the control
dial forward and rearward, it is possible to
change the initial LSD torque.
The center differential indicator lights in
the combination meter give six levels of
indication. The indicator lights and control
dial are linked; when the dial is turned to
change the initial LSD torque, the illumi-
nation position of the indicator lights
changes accordingly.
Turn the dial forward to increase the initial
LSD torque; when the white line on the
dial reaches the frontmost position, the
initial LSD torque setting is maximum. The
center differential will then be almost
completely locked and the “LOCK ”indica-
tor light will come on.Turn the dial rearward to reduce the initial
LSD torque; when the white line reaches
the rearmost position, the initial LSD
torque will be minimum and the “
”
indicator light will come on. Under this
condition, only the Mechanical LSD torque
will limit the differential action.
CAUTION
. Do not turn the control dial when
a wheel slippage occurs. Wait
until the wheelspin has been
brought under control.
. Under any of the following con-
ditions, turn the center differen-
tial control dial to the rearmost
position to minimize the initial
LSD torque: