2007 SUBARU FORESTER set clock
[x] Cancel search: set clockPage 111 of 356

3
Instruments and controls
Ignition switch .................................................... 3-3LOCK ....................................................................... 3-3
ACC .......................................................................... 3-4
ON ............................................................................ 3-4
START ...................................................................... 3-4
Key reminder chime ............................................... 3-5
Ignition switch light (if equipped) ......................... 3-5
Key interlock release (AT vehicles only) .............. 3-5
Hazard warning flasher ...................................... 3-6
Meters and gauges ............................................. 3-6 Speedometer ........................................................... 3-6
Odometer/Trip meter .............................................. 3-6
Tachometer ............................................................. 3-7
Fuel gauge ............................................................... 3-7
Temperature gauge ................................................ 3-8
Outside temperature indicator .............................. 3-8
Warning and indicator lights ............................. 3-9 Seatbelt warning light and chime .......................... 3-9
SRS airbag system warning light .......................... 3-10
Front passenger’s frontal airbag ON and OFF indicators .............................................................. 3-11
CHECK ENGINE warning light/Malfunction indicator lamp ....................................................... 3-11
Charge warning light .............................................. 3-12
Oil pressure warning light ..................................... 3-12
AT OIL TEMPerature warning light (AT vehicles) ......................................................... 3-12
ABS warning light ................................................... 3-13
Brake system warning light ................................... 3-13
Door open warning lights ...................................... 3-14 Low fuel warning light ............................................ 3-14
All-Wheel Drive warning light (AT vehicles) ......... 3-15
Shift position indicator (AT vehicles) ................... 3-15
Turn signal indicator lights .................................... 3-15
High beam indicator light ....................................... 3-15
Cruise control indicator light ................................. 3-15
Cruise control set indicator light .......................... 3-16
Clock .................................................................... 3-16
Light control switch ........................................... 3-17 Headlights ............................................................... 3-17
High/low beam change (dimmer) .......................... 3-17
Headlight flasher ..................................................... 3-18
Daytime running light system ............................... 3-18
Turn signal lever ................................................. 3-19
Illumination brightness control ......................... 3-19
Headlight beam leveler (Canada-spec. 2.5XT) ............................................................... 3-20
Parking light switch ........................................... 3-20
Front fog light button ......................................... 3-20
Wiper and washer ............................................... 3-21 Windshield wiper and washer switches ............... 3-22
Rear window wiper and washer switch ................ 3-23
Windshield wiper deicer (if equipped) .............. 3-24
Rear window defogger button ........................... 3-24
Mirrors ................................................................. 3-25 Inside mirror ............................................................ 3-25
Outside mirrors ....................................................... 3-27
Page 126 of 356

3-16 Instruments and controls
�„Cruise control set indica-
tor light
The cruise control set indicator light
comes on when the ignition switch is
turned to the “ON” position and goes out
after approximately three seconds.
This light comes on when vehicle speed
has been set.Clock
To adjust the clock, open the small article
storage compartment in the dashboard
with the vehicle parked in a safe place. To set the hour, press the “H” button. To
set the minutes, press the “M” button. To
reset the minutes to “00” with a radio time
signal, push the “Reset” button.
NOTE
The clock uses a liquid-crystal display.
You will find time indications hard to
see if you wear polarized glasses.
300578
HMRESET
300579 To ensure safety, do not attempt to
set the time while driving, as an ac-
cident from inadequate attention to
the road could result.
Page 149 of 356

Climate control 4-9
– CONTINUED –
�„
Fan speed control dial
The fan operates only with the ignition
switch in the ON position. The fan speed
control dial is used to select the AUTO
(automatic control) mode or to select the
desired fan speed. The dial’s positions
and their functions are as follows:
OFF: The fan does not operate.
AUTO: The fan speed is adjusted auto-
matically in accordance with the air tem-
perature inside and outside the passenger
compartment, the intensity of sunlight,
and other factors. SUBARU recommends
using the AUTO position.
Other positions: The fan speed can be
adjusted in seven steps.
NOTE
With the fan speed control dial in the AUTO position and the air flow control
dial in the “ ”, “ ”, or “ ” po-
sition, the fan does not operate during
engine warm-up until the engine cool-
ant temperature exceeds approx. 122
�qF
(50 �qC).
�„ Temperature control dial
This dial is used to set the desired interior
temperature. With the dial set to your de-
sired temperature, the system automati-
cally adjusts the temperature of air sup-
plied from the outlets such that the desired
temperature is achieved and maintained.
If the dial is turned fully counterclockwise,
the system gives maximum cooling perfor-
mance. If the dial is turned fully clockwise,
the system gives maximum heating per- formance. �„
Air flow control dial
This dial has the following six positions.
The outlets from which air is supplied in
each position are as follows: AUTO: The air flow control is adjusted au-
tomatically in accordance with the air tem-
perature inside and outside the passenger
compartment, the intensity of sunlight,
and other factors. SUBARU recommends
using the AUTO position.
: Instrument panel outlets: Instrument panel outlets and foot out-
lets
: Foot outlets and windshield defroster
outlets (relatively little air from windshield
400154
65 75
85
400549
400156
Page 166 of 356
5-12 Audio
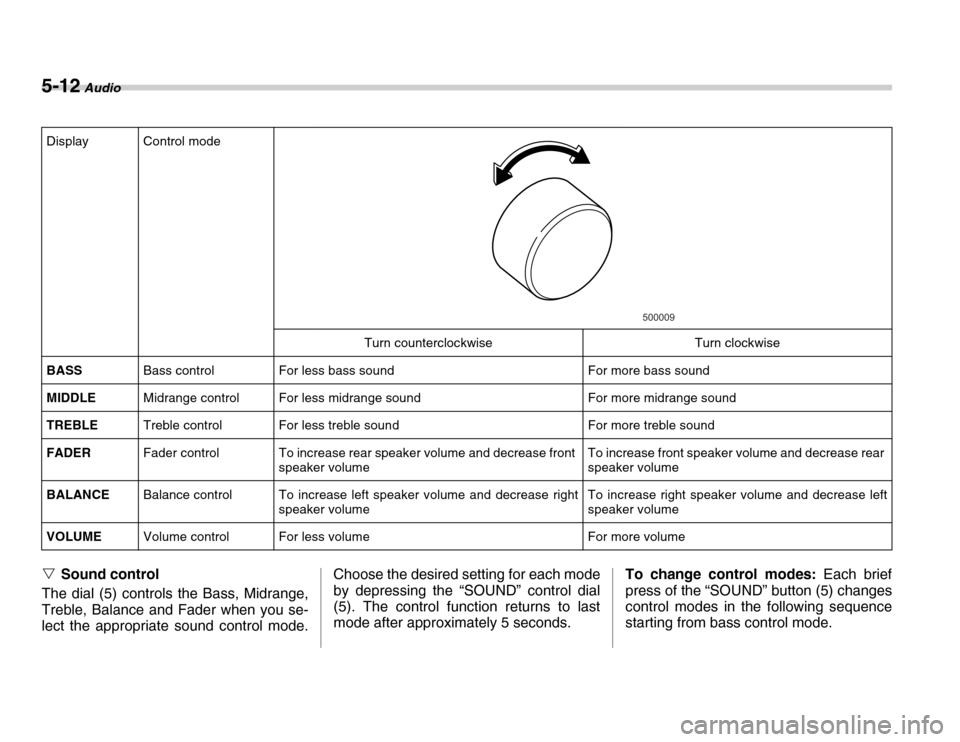
�VSound control
The dial (5) controls the Bass, Midrange,
Treble, Balance and Fader when you se-
lect the appropriate sound control mode. Choose the desired setting for each mode
by depressing the “SOUND” control dial
(5). The control function returns to last
mode after approximately 5 seconds.
To change control modes:
Each brief
press of the “SOUND” button (5) changes
control modes in the following sequence
starting from bass control mode.
Display Control mode
Turn counterclockwise Turn clockwise
BASS Bass control For less bass sound For more bass sound
MIDDLE Midrange control For less midrange sound For more midrange sound
TREBLE Treble control For less treble sound For more treble sound
FADER Fader control To increase rear speaker volume and decrease front
speaker volume To increase front speaker volume and decrease rear
speaker volume
BALANCE Balance control To increase left speaker volume and decrease right
speaker volume To increase right speaker volume and decrease left
speaker volume
VOLUME Volume control For less volume For more volume
500009
Page 167 of 356
Audio 5-13
– CONTINUED –
�V
Display illumination dimness can-
cellation (BRIGHT)
The brightness of the radio display dims
when the light switch is in the “ ” or
“ ” position. If this makes the display
difficult to read, press the volume dial for
more than 2 seconds to return the display
to original brightness. Subsequently
pressing the volume dial again for more
than 2 seconds or if you can safely do so,
turning the light switch to the OFF position
and back to the “ ” or “ ” posi-
tion makes the radio display dim again. �T FM/AM selection button (FM/AM)
Push the “FM/AM” button (2) when the ra-
dio is on to select FM1, FM2 or AM recep-
tion. Each time this button is pressed, the
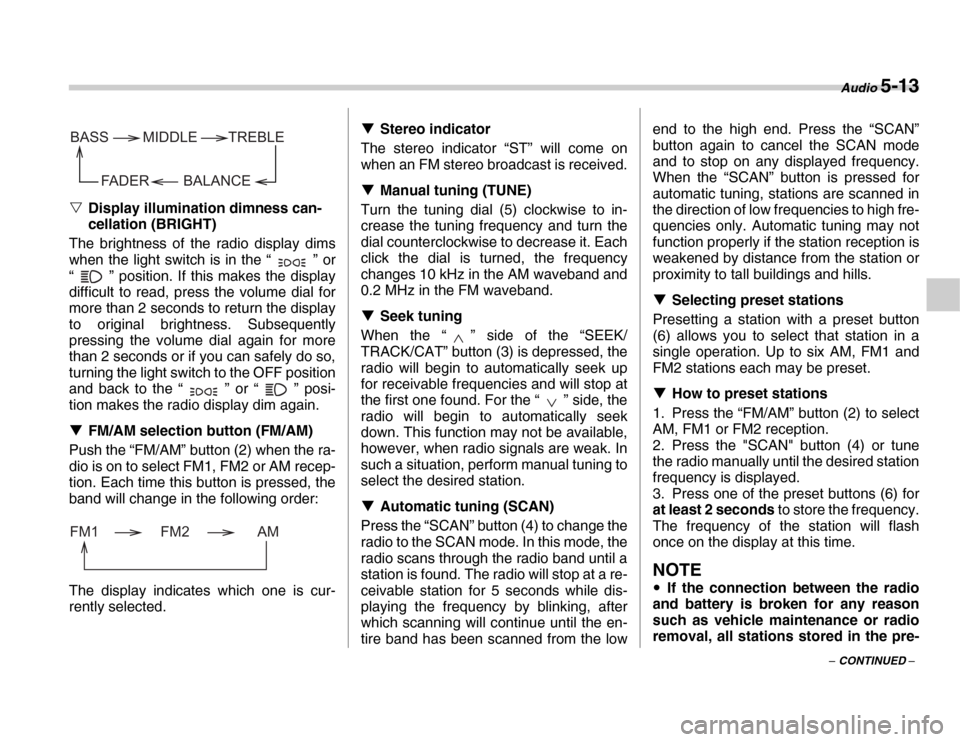
band will change in the following order:
The display indicates which one is cur-
rently selected. �T
Stereo indicator
The stereo indicator “ST” will come on
when an FM stereo broadcast is received. �T Manual tuning (TUNE)
Turn the tuning dial (5) clockwise to in-
crease the tuning frequency and turn the
dial counterclockwise to decrease it. Each
click the dial is turned, the frequency
changes 10 kHz in the AM waveband and
0.2 MHz in the FM waveband. �T Seek tuning
When the “ ” side of the “SEEK/
TRACK/CAT” button (3) is depressed, the
radio will begin to automatically seek up
for receivable frequencies and will stop at
the first one found. For the “ ” side, the
radio will begin to automatically seek
down. This function may not be available,
however, when radio signals are weak. In
such a situation, perform manual tuning to
select the desired station. �T Automatic tuning (SCAN)
Press the “SCAN” button (4) to change the
radio to the SCAN mode. In this mode, the
radio scans through the radio band until a
station is found. The radio will stop at a re-
ceivable station for 5 seconds while dis-
playing the frequency by blinking, after
which scanning will continue until the en-
tire band has been scanned from the low end to the high end. Press the “SCAN”
button again to cancel the SCAN mode
and to stop on any displayed frequency.
When the “SCAN” button is pressed for
automatic tuning, stations are scanned in
the direction of low frequencies to high fre-
quencies only. Automatic tuning may not
function properly if the station reception is
weakened by distance from the station or
proximity to tall buildings and hills. �T
Selecting preset stations
Presetting a station with a preset button
(6) allows you to select that station in a
single operation. Up to six AM, FM1 and
FM2 stations each may be preset. �T How to preset stations
1. Press the “FM/AM” button (2) to select
AM, FM1 or FM2 reception.
2. Press the "SCAN" button (4) or tune
the radio manually until the desired station
frequency is displayed.
3. Press one of the preset buttons (6) for
at least 2 seconds to store the frequency.
The frequency of the station will flash
once on the display at this time.
NOTE
�y If the connection between the radio
and battery is broken for any reason
such as vehicle maintenance or radio
removal, all stations stored in the pre-
BALANCE
BASS
FADER TREBLE
MIDDLE
FM1 FM2 AM
Page 176 of 356
5-22 Audio
However, you may still experience recep-
tion problems in some areas. �VDisplaying Sirius ID of tuner
When you activate Sirius, you should
have your Sirius tuner ID ready because
each tuner is identified by its unique Sirius
tuner ID.
The Sirius ID will be needed when you ac-
tivate Sirius and receive Sirius customer
support.
The Sirius ID can be found on the audio
display by tuning the channel to “0”.
Turn the “TUNE/FOLDER/CH” dial (23) to
select the satellite radio channel. �V Channel selection
Turn the “TUNE/FOLDER/CH” dial (23) to
select the radio channel. Turn the tuning
dial clockwise to change the channel up-
ward and turn the dial counterclockwise to
change the channel downward with each
click of the dial. �V Category selection
Press the “SEEK/TRACK/CAT” button
(18) to select the category of radio chan-
nel. Press the “” side of the button
(18) to change the category upward and
the “” side of the button to downward
with each press of the button. �V
Channel preset
Presetting a channel with a preset button
(22) allows you to select that station in a
single operation. Up to six SR1, SR2 and
SR3 channels each may be preset.
Press one of the preset buttons for at
least 2 seconds to store the channel. The
number of the channel will flash once on
the display, and the unit produces a beep
sound at this time. �V Channel scan
Press the “SCAN” button (19) to change
the radio to the SCAN mode. In this mode,
the radio scans through the channel until
a station is found. The radio will stop at the
station for 5 seconds while displaying the
channel number, after which scanning will
continue until the entire channel has been
scanned from the low end to the high end.
Press the “SCAN” button (19) again to
cancel the SCAN mode and to stop on any
displayed station.
When the “SCAN” button is pressed for
automatic tuning, stations are only
scanned in an upward direction. �V Category mode
Press the “CAT” button (21) for at least 2
seconds to turn the category mode on. In
this mode, the radio operations (channel
selection, channel scan) are performed only in the selected category. To cancel
the category mode, press the “CAT” but-
ton (21) for at least 2 seconds again. �V
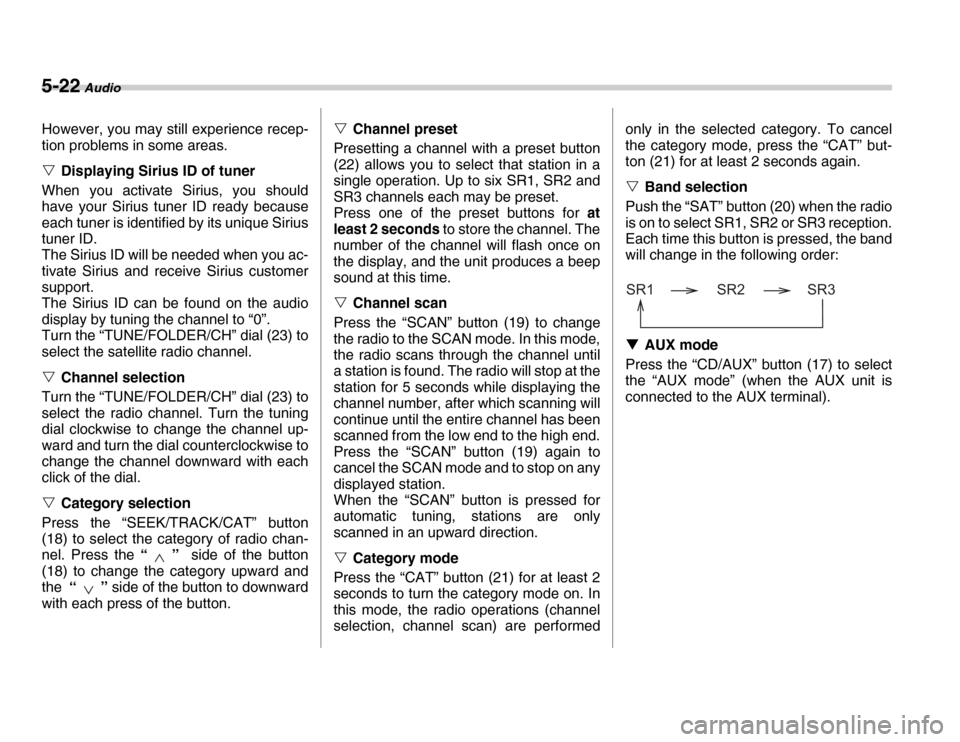
Band selection
Push the “SAT” button (20) when the radio
is on to select SR1, SR2 or SR3 reception.
Each time this button is pressed, the band
will change in the following order: �T AUX mode
Press the “CD/AUX” button (17) to select
the “AUX mode” (when the AUX unit is
connected to the AUX terminal).
SR1 SR2 SR3
Page 254 of 356
9-4 In case of emergency
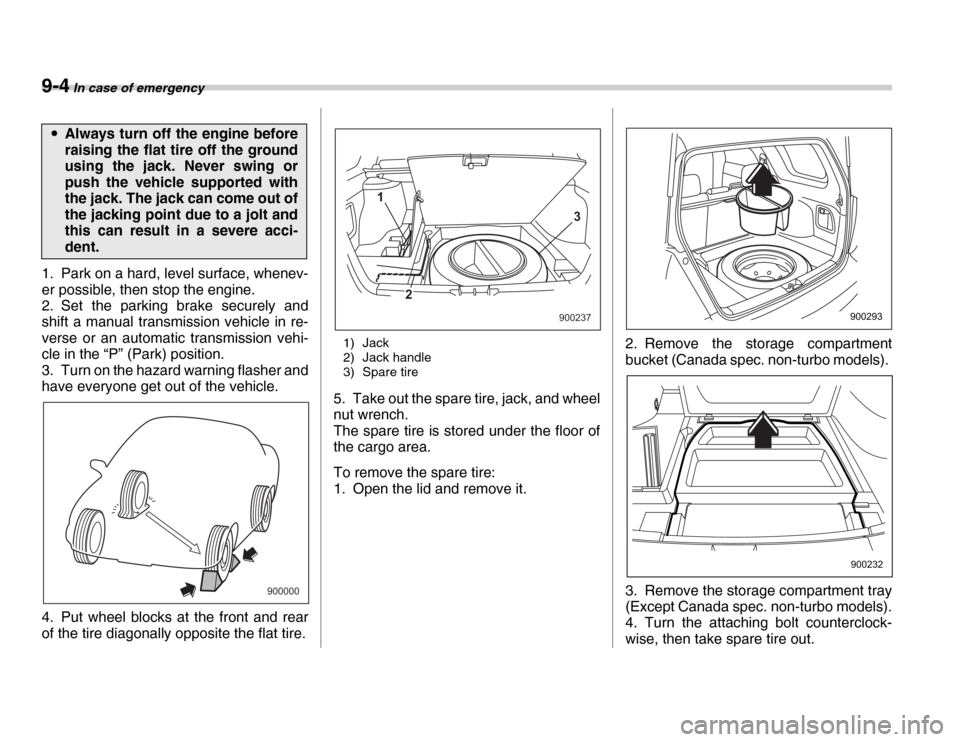
1. Park on a hard, level surface, whenev-
er possible, then stop the engine.
2. Set the parking brake securely and
shift a manual transmission vehicle in re-
verse or an automatic transmission vehi-
cle in the “P” (Park) position.
3. Turn on the hazard warning flasher and
have everyone get out of the vehicle.
4. Put wheel blocks at the front and rear
of the tire diagonally opposite the flat tire.1) Jack
2) Jack handle
3) Spare tire
5. Take out the spare tire, jack, and wheel
nut wrench.
The spare tire is stored under the floor of
the cargo area.
To remove the spare tire:
1. Open the lid and remove it. 2. Remove the storage compartment
bucket (Canada spec. non-turbo models).
3. Remove the storage compartment tray
(Except Canada spec. non-turbo models).
4. Turn the attaching bolt counterclock-
wise, then take spare tire out.
�y
Always turn off the engine before
raising the flat tire off the ground
using the jack. Never swing or
push the vehicle supported with
the jack. The jack can come out of
the jacking point due to a jolt and
this can result in a severe acci-
dent.
900000
1
3
2
900237900293
900232
Page 319 of 356
Maintenance and service 11 - 47
– CONTINUED –
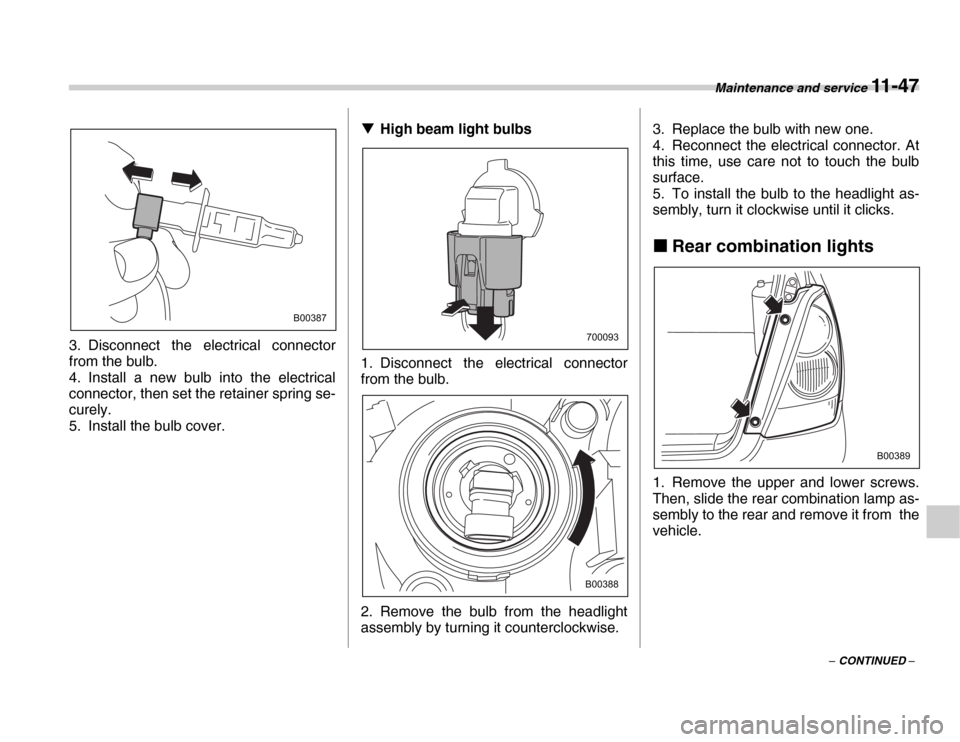
3. Disconnect the electrical connector
from the bulb.
4. Install a new bulb into the electrical
connector, then set the retainer spring se-
curely.
5. Install the bulb cover.
�T
High beam light bulbs
1. Disconnect the electrical connector
from the bulb.
2. Remove the bulb from the headlight
assembly by turning it counterclockwise. 3. Replace the bulb with new one.
4. Reconnect the electrical connector. At
this time, use care not to touch the bulb
surface.
5. To install the bulb to the headlight as-
sembly, turn it clockwise until it clicks. �„
Rear combination lights
1. Remove the upper and lower screws.
Then, slide the rear combination lamp as-
sembly to the rear and remove it from the
vehicle.
B00387
700093
B00388
B00389