2007 SKODA OCTAVIA belt
[x] Cancel search: beltPage 72 of 288
Seats and Stowage71
Using the systemSafetyDriving TipsGeneral MaintenanceBreakdown assistanceTechnical Data
Head restraints
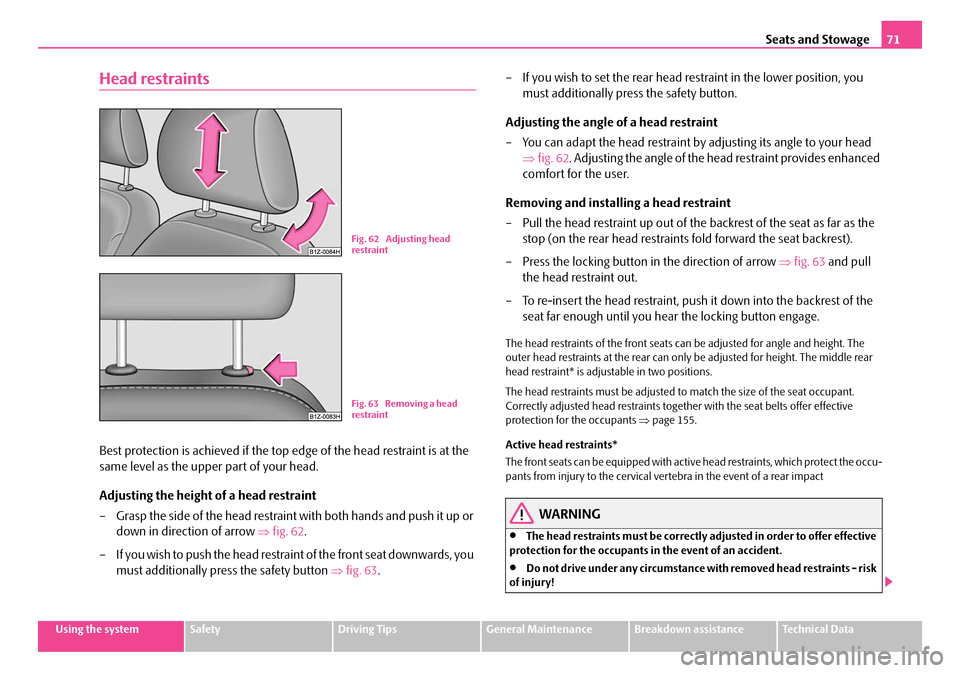
Best protection is achieved if the top edge of the head restraint is at the
same level as the upper part of your head.
Adjusting the height of a head restraint
– Grasp the side of the head restraint with both hands and push it up or
down in direction of arrow ⇒fig. 62 .
– If you wish to push the head restra int of the front seat downwards, you
must additionally press the safety button ⇒fig. 63 . – If you wish to set the rear head restraint in the lower position, you
must additionally press the safety button.
Adjusting the angle of a head restraint
– You can adapt the head restraint by adjusting its angle to your head
⇒ fig. 62 . Adjusting the angle of the head restraint provides enhanced
comfort for the user.
Removing and installing a head restraint
– Pull the head restraint up out of the backrest of the seat as far as the
stop (on the rear head restraints fold forward the seat backrest).
– Press the locking button in the direction of arrow ⇒fig. 63 and pull
the head restraint out.
– To re-insert the head restraint, push it down into the backrest of the
seat far enough until you hear the locking button engage.
The head restraints of the front seats can be adjusted for angle and height. The
outer head restraints at the rear can only be adjusted for height. The middle rear
head restraint* is adjustable in two positions.
The head restraints must be adjusted to match the size of the seat occupant.
Correctly adjusted head restraints together with the seat belts offer effective
protection for the occupants ⇒page 155.
Active head restraints*
The front seats can be equipped with active head restraints, which protect the occu-
pants from injury to the cervical vertebra in the event of a rear impact
WARNING
•The head restraints must be correctly adjusted in order to offer effective
protection for the occupants in the event of an accident.
•Do not drive under any circumstance with removed head restraints - risk
of injury!
Fig. 62 Adjusting head
restraint
Fig. 63 Removing a head
restraint
NKO A5 20 MR08.book Page 71 Wednesday, April 11, 2007 2:54 PM
Page 74 of 288

Seats and Stowage73
Using the systemSafetyDriving TipsGeneral MaintenanceBreakdown assistanceTechnical Data
Rear seats
Folding the rear seats forwards
To enlarge the luggage compartment , the rear seats can be folded
forwards, if necessary remove the rear seats. The rear seats can be folded
forward individually on vehicl es with divided rear seats*.
Folding the rear seats forwards
– Before folding the rear seats forwar d adjust the front seats in such a
way that they are not damaged when folding forward the rear seats. – Pull up the rear seats in the direction of arrow and fold forwards in
direction of arrow ⇒ fig. 65.
– Press the unlocking knob and fold the rear seat backrest forwards ⇒fig. 66 .
If the front seats are too far back, we recommend that you have the rear head
restraints removed before the seat backrests are folded forward. Store the removed
head restraints in such a way that they cannot be damaged or soiled. Please refer to
the guidelines ⇒page 76, “luggage compartment”.
Folding the rear seats back into position
Folding the rear seats back into position
– Install the head restraint in the slightly lifted rear seat backrest.
– Place the rear lateral seat belt behind the edge of the side trim
panel ⇒fig. 67 .
– Then push the seat backrest back into the upright position until the
securing knob clicks into place - check by pulling on the rear seat
backrest.
– Make sure that the red pin is covered ⇒fig. 66 .
Fig. 65 Folding the rear
seat forwards
Fig. 66 Unlock the seat
backrest
A1
A2
AA
Fig. 67 Lock the seat
backrest
AC
AB
NKO A5 20 MR08.book Page 73 Wednesday, April 11, 2007 2:54 PM
Page 75 of 288

Seats and Stowage
74
– Fold the rear seat back into its original position.
WARNING
•The belts and the belt locks must be in their original position after folding
back the rear seats and seat backre sts - they must be ready to use.
•The seat backrests must be securely interlocked in position so that no
objects in the luggage compartment ca n slide into the passenger compart-
ment if there is sudden braking - risk of injury!
•Pay attention that the rear seat backresst are correctly interlocked. It is
only then that the three-point seat belt for the middle seat can reliably fulfil
its function.
•Before folding the seat backrest back into the secure position, place the
rear lateral seat belt behind the edge of the side trim panel. Take suitable
measures to prevent that the seat belt is jammed between the seat backrest
and the side trim panel is thus damaged.
Remove the rear seat
You can enlarge the luggage compartment on vehicles with divided rear
seats* by removing the rear seat. Removing
– Fold the rear seat forwards.
– Press the wire clamps in the direction of the arrow
⇒fig. 68 and
remove the rear seat from its holder.
Installing
– Press the wire clamp in the direct ion of the arrow and place the seat
upholstery in its holder.
– Fold the rear seat back into its original position.
Caution
For vehicles with heated rear seats* it is necessary to disconnect the plug connec-
tion for the power supply before removing th e rear seat bench. For re-installation it
is necessary to re-connect the plug connection.
Rear seat armrest*
– You can fold down the armrest at the loop to enhance occupant comfort ⇒fig. 69 .
Fig. 68 Remove the rear
seatsFig. 69 Rear seats:
Armrest
NKO A5 20 MR08.book Page 74 Wednesday, April 11, 2007 2:54 PM
Page 84 of 288

Seats and Stowage83
Using the systemSafetyDriving TipsGeneral MaintenanceBreakdown assistanceTechnical Data
– In the same way, fix the cross rod to the other side of the vehicle,
mount .
– Fold the stowage compartment cover downwards.
Rolling up
– Fold down the stowage compartment cover behind the rear seats ⇒fig. 86 .
– Pull the cross rod back slightly, first on the one side then on the other side and take the cross rod out of the mount ⇒fig. 87 .
– Hold the cross rod in such a way that the net partition can roll up
slowily and without damage into housing .
– Fold the stowage compartment cover downwards.
If you wish to use the entire luggage compartment, you can remove the luggage
compartment cover ⇒page 81, fig. 84 .
WARNING
•First check for yourself that the cross road is inserted into the mounts
in the front position!
•Pay attention that the rear seat backrest is correctly interlocked. It is only
then that the three-point seat belt for the middle seat can reliably fulfil its
function.
Use behind the front seats
Unrolling
– Fold the rear seats forwards ⇒page 73
– Pull the net partiton net at the plate out of the housing ⇒fig. 88 .
– Insert the cross rod into the mount first on the one side and push the cross rod forward.
– In the same way, fix the cross rod to the other side of the vehicle, mount .
Rolling up
– Pull the cross rod back slightly, first on the one side then on the other side and take the cross rod out of the mount ⇒fig. 88 .
– Hold the cross rod in such a way that the net partition can roll up
slowily and without damage into housing .
– Fold the rear seats back into its original position.
AC
AC
AB
AC
Fig. 88 Unrolling net
partition
AAAB
AC
AC
AC
AB
NKO A5 20 MR08.book Page 83 Wednesday, April 11, 2007 2:54 PM
Page 85 of 288

Seats and Stowage
84
WARNING
•The belt locks and the belts must be in their original position after folding
back the rear seats and seat backre sts - they must be ready to use.
•The seat backrests must be securely interlocked in position so that no
objects in the luggage compartment ca n slide into the passenger compart-
ment if there is sudden braking - risk of injury!
•Pay attention that the rear seat backrest is correctly interlocked. It is only
then that the three-point seat belt for the middle seat can reliably fulfil its
function.
•First check for yourself that the cros s road is inserted into the mounts
in the front position!
Removing and installing net partition housing
Removing
– Fold the rear seats forwards ⇒page 73
– Open the right rear door.
– Push the net partition housing ⇒fig. 89 in the direction of arrow
and take it out of the mounts of the rear seat backrests in the direc-
tion of the arrow . Installing
– Position the net partition housing in
to the mounts of the seat backrest.
– Push the net partition housing in the opposite direction of arrow
as far as the stop.
– Fold the rear seats back into its original position.
The roof rack*
Description
Pay attention to the following points if you wish to transport luggage or other items
on the roof of your vehicle:
•A special roof luggage rack system was developed for the vehicle, that is why
you should only use a roof luggage rack which has been released for use by Škoda
Auto a.s.
•The base carrier is the basis for a comple te roof luggage rack system. Separate
additional holders are required for safety reasons for transporting luggage, bikes,
surfboards, skis and boats.
•The basic version of the roof luggage rack system and further components are
obtainable as accessories from Škoda Service Partners.
Caution
•If you use other roof rack systems or if th e roof bars are not properly fitted, then
any damage which may result to your ca r is not covered by the warranty agree-
ments. It is therefore essential to pay atte ntion to the fitting instructions supplied
with the roof luggage rack system.
•On models fitted with a power sliding/tilting roof, ensure that the opened
sliding/tilting roof does not strike any items of luggage transported on the roof.
•Ensure that the opened boot lid do es not collide with the roof load.
AC
Fig. 89 Rear seats: Net
partition housing
AA
A1
A2
A1
NKO A5 20 MR08.book Page 84 Wednesday, April 11, 2007 2:54 PM
Page 98 of 288

Seats and Stowage97
Using the systemSafetyDriving TipsGeneral MaintenanceBreakdown assistanceTechnical Data
Through-loading bag*
Loading
– Open the boot lid/luggage compartment door.
– Push the unlock button downwards ⇒fig. 114 and fold the lid
(with armrest) to the front.
– Place the empty through-loading bag in such a way that the end of the bag with the zip lies in the boot.
– Push the objects into the thro ugh-loading bag from the boot ⇒. Securing
– Insert the securing belt of the through-loading bag into the middle
seat belt buckle ⇒fig. 115 .
– Place the securing belt on ski sport articles in the middle between the bindings ⇒.
– Pull the securing belt tight at the free end of the belt .
Stowing
– Fold the lid and the armrest up to the stop in upward direction - the lid must click into place audibly. You can recognize this on the fact that
the red field above the unlocking button of the luggage compart-
ment is not visible ⇒fig. 114 .
– Carefully fold the empty (dry) through-loading bag together, place it in the luggage compartment and secure it to prevent it slipping.
WARNING
•After placing items into the through- loading bag, you must secure the
bag with the securing belt .
•The securing belt must hold the items tight.
•Ensure that the securing belt on ski sport articles lies in the middle
between the bindings (see imprin t on the through-loading bag).
Note
•Place the skis with the tips facing the fr ont, snowboards and ski sticks with the
tips facing the rear into the through-loading bag.
•If there are several pairs of skis in the through-loading bag, ensure that the bind-
ings are positioned at the same height.
•The through-loading bag must never be folded together or stowed when
moist.
Fig. 114 Luggage
compartment: Unlock
button
Fig. 115 Attaching
through-loading bag to
middle seat belt buckle
of rear seats
AA
AA
AC
AB
AA
AA
NKO A5 20 MR08.book Page 97 Wednesday, April 11, 2007 2:54 PM
Page 154 of 288

Passive Safety153
Using the systemSafetyDriving TipsGeneral MaintenanceBreakdown assistanceTechnical Data
Safety
Passive Safety
Basic information
Driving the safe way
Passive safety measures reduce the risk of injury in accident situa-
tions.
In this section you will find important inform ation, tips and notes on the subject of
passive safety in your vehicle. We ha ve combined everything here which you
should be familiar with, for example, regarding seat belts, airbags, child seats and
safety of children. It is therefore importan t, in particular, to comply with the notes
and warnings in this section for your own interest and in the interest of those trav-
elling with you.
WARNING
•This chapter contains important information on how to use the vehicle
for the driver and his occupants. You will find further information on safety,
which concerns you and those travelling with you, in the following chapters
of this Owner's Manual.
•The complete on-board literature should always be in the vehicle. This
applies in particular, if you rent out or sell the vehicle.
Safety equipment
The safety equipment is part of the occupant protection and it can
reduce the risk of injuries in accident situations.
“Do not put at risk” your safety and the safety of those travelling with you . In the
event of an accident, the safety equipmen t can reduce the risk of injuries. The
following list contains part of th e safety equipment in your vehicle:
•Three-point seat belts for all the seats,
•belt force limiter for front and outer rear seats*,
•belt tensioner for front and outer rear seats*,
•seat belt height adjuster for front seats,
•front airbag for the driver and the front seat passenger*,
•Side airbags*,
•head airbags*,
•anchoring points for child seat using the “ISOFIX” system,
•anchoring points for child seat using the “Top Tether” system,
•head restraint adjustable for height,
•adjustable steering column.
The specified safety equipment works toge ther, in order to optimally protect you
and those travelling with you in accident situations. The safety equipment does not
protect you or the people travelling with you, if you or your occupants adopt an
incorrect seated position or the equipmen t is not correctly adjusted or used.
Fo r t h i s re a s o n y o u w i l l b e p ro v i d e d w i th i n fo rm a ti o n o n w hy t h i s e q u i p m e nt i s v e r y
important, how it protects you and the o ccupants, what should be observed when
using the equipment and how you and the pe ople travelling with you can make full
use of the existing safety equipment. This Owner's Manual contains important
warning notes, which you and those travelli ng with you should pay attention to in
order to reduce a risk of injury.
Safety concerns everybody!
NKO A5 20 MR08.book Page 153 Wednesday, April 11, 2007 2:54 PM
Page 155 of 288

Passive Safety
154
Before setting off
The driver is always fully respon sible for his occupants and for the
operating safety of the vehicle.
For your own safety and the safety of the people travelling with you, please pay
attention to the following points before setting off:
•Ensure that the lighting and the turn signal system are functioning properly.
•Inspect the tyre inflation pressure.
•Ensure that all the windows offer a good visibility to the outside.
•Safely attach the items of luggage ⇒page 76, “Loading the luggage compart-
ment”.
•Ensure that no objects can obstruct the pedal.
•Adjust the mirror, the front seat and the head restraint to match your body size.
•Point out to your occupants that the head restraints must be adjusted to match
their body size.
•Protect the children in suitable child se ats with correctly fastened seat belts
⇒ page 173, “Transporting children safely”.
•Adopt the correct seated position ⇒page 155, “Correct seated position”. Also
inform your occupants to adopt the correct seated position.
•Fasten the seat belt correctly. Also inform your occupants to properly fasten the
seat belts ⇒page 160, “How are seat belts correctly fastened?”.
What influences the driving safety?
The driving safety is primarily dete rmined by the style of driving and
the personal behaviour of all the occupants.
The driver is fully responsible for himself and his occupants. If your driving safety is
effected, you place yourself and the oncomi ng traffic at risk. Please refer to the
following guidelines.
•Do not get distracted from concentrating on the traffic situation, e.g. by your
occupants or mobile phone calls.
•Never drive when your driving ability is impaired, e.g. through medication,
alcohol, drugs.
•Keep to the traffic regulations and the permissible speed limit.
•Adjust the driving speed at all times to the road condition as well as to the traffic
and weather conditions.
•Take regular breaks on long journe ys - at the latest every two hours.
NKO A5 20 MR08.book Page 154 Wednesday, April 11, 2007 2:54 PM