Page 40 of 70

Apple* iPod ® connection37
•If the iPod® does not work correctly despite being a compatible model,
we recommend updating the firmware. For more information, consult the
Apple Computer Inc webpage.
•The iPod® controls will not work when it is attached to the adaptor.
Remove the iPod® from the adaptor
– First change the input source for the sound system, for example
from CD to FM or to the radio.
– Open the compartment where the iPod
® adaptor is fitted.
– Remove the iPod
® from the adaptor �Ÿ
– Close the compartment.
WARNING
It is vital that attention is not diverted from the traffic. Use the iPod ® only
when the situation allows. Any distraction may lead to an accident, with
the risk of injury.
•Never lose visual contact with the road in order to adjust or use the
iPod® and the sound system.
•Use the iPod® only when the state of the road, the weather and traffic
conditions permit.
•Never detach the iPod ® while driving.
Caution
•Detaching the iPod ® from the adaptor will leave marks.
•Never detach the iPod® when the sound source selected is the adaptor
(CD). Otherwise the iPod® memory could be damaged.
Apple iPod® connector
Select adaptor
Various iPod® adaptors are included to guarantee the safe attachment of the
connector.
Use the large adaptor for the smallest iPod
®. Insert the adaptor into the
connector and then place the iPod®.
The larger iPods
® use the smaller adaptors when necessary. These adaptors
can be entered with the widest side upwards in the central connector dock. If
necessary use a lateral spacer to stabilise it.
Check which of the adaptors supplied is best for your iPod
® and position it
safely.
Page 41 of 70

Apple* iPod ® connection 38
Attach the iPod®
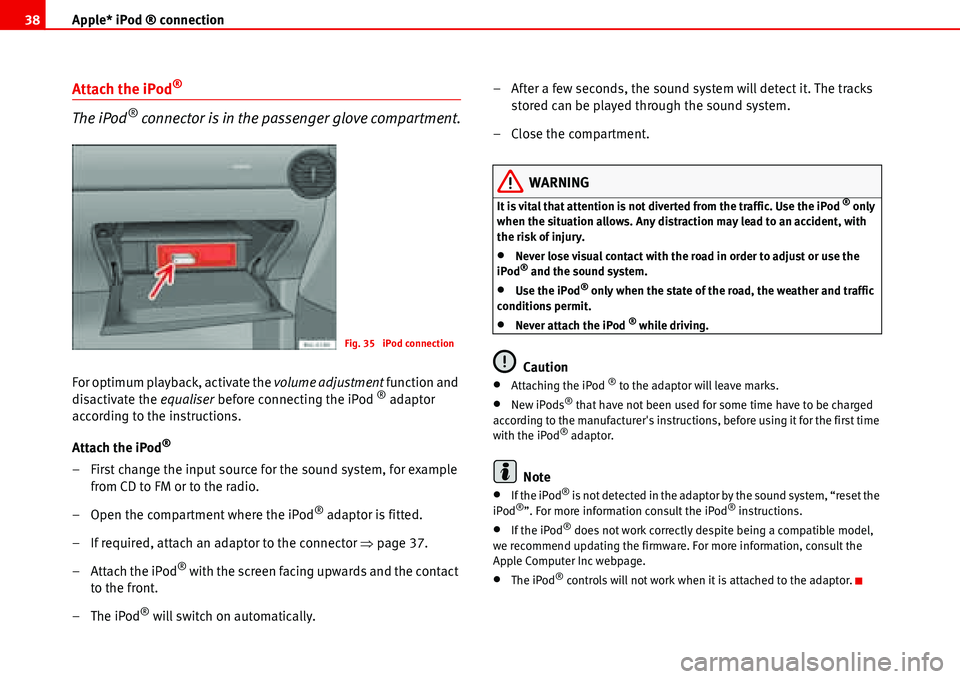
The iPod® connector is in the passenger glove compartment.
For optimum playback, activate the volume adjustment function and
disactivate the equaliser before connecting the iPod ® adaptor
according to the instructions.
Attach the iPod
®
– First change the input source for the sound system, for example
from CD to FM or to the radio.
– Open the compartment where the iPod
® adaptor is fitted.
– If required, attach an adaptor to the connector �Ÿpage 37.
– Attach the iPod
® with the screen facing upwards and the contact
to the front.
–The iPod
® will switch on automatically.– After a few seconds, the sound system will detect it. The tracks
stored can be played through the sound system.
– Close the compartment.
WARNING
It is vital that attention is not diverted from the traffic. Use the iPod ® only
when the situation allows. Any distraction may lead to an accident, with
the risk of injury.
•Never lose visual contact with the road in order to adjust or use the
iPod® and the sound system.
•Use the iPod® only when the state of the road, the weather and traffic
conditions permit.
•Never attach the iPod ® while driving.
Caution
•Attaching the iPod ® to the adaptor will leave marks.
•New iPods® that have not been used for some time have to be charged
according to the manufacturer's instructions, before using it for the first time
with the iPod
® adaptor.
Note
•If the iPod® is not detected in the adaptor by the sound system, “reset the
iPod®”. For more information consult the iPod® instructions.
•If the iPod® does not work correctly despite being a compatible model,
we recommend updating the firmware. For more information, consult the
Apple Computer Inc webpage.
•The iPod® controls will not work when it is attached to the adaptor.
Fig. 35 iPod connection
Page 47 of 70

USB* Connection 44
Authorised radio equipment
To guarantee optimum performance your vehicle should have an RCD series
SEAT radio or an RNS series SEAT navigator.
If your vehicle uses other brands we cannot guarantee their performance.
Compatible music formats
The following are the compatible music formats:
•mp3 (MPEG1 Layer3 32 to 320 kbps)
•wma (8 to 192 kbps)
•wav (sample frequency: 16 kHz with 16 bit coding, stereo)
•ogg vorbis (to q10, 48 kHz, stereo)
DRM formats are not supported.
Caution
Never store vital data in the memory stick or MP3 player SEAT will not accept
any responsibility for data or files that are corrupted or lost.
Note
If unauthorised memory sticks or MP3 players are used, the music may not
play, or play poorly
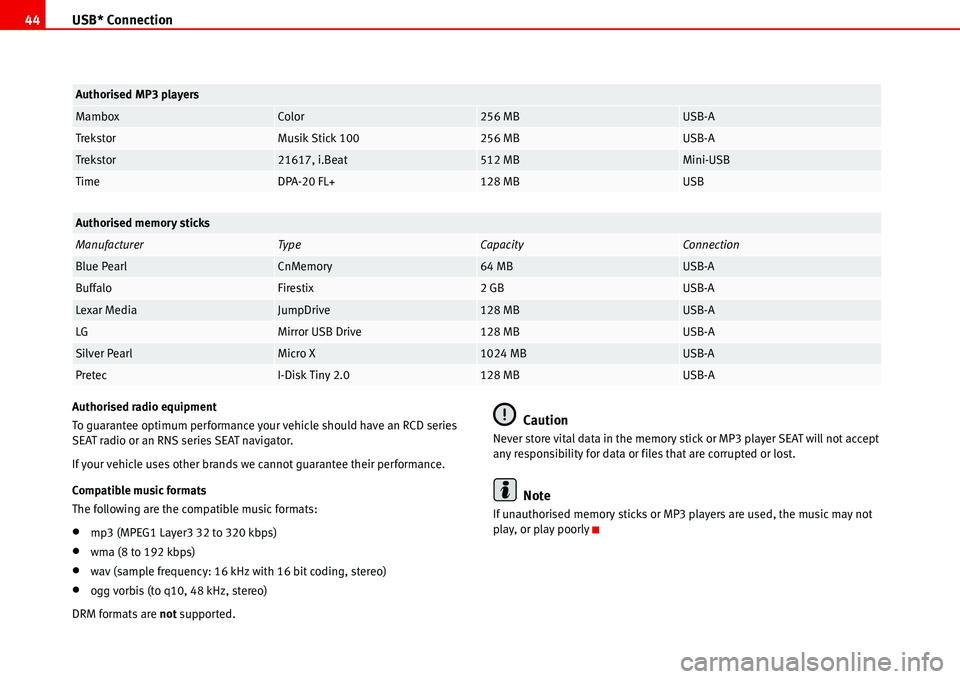
MamboxColor256 MBUSB-A
TrekstorMusik Stick 100256 MBUSB-A
Trekstor21617, i.Beat512 MBMini-USB
TimeDPA-20 FL+128 MBUSB
Authorised memory sticks
ManufacturerTy peCapacityConnection
Blue PearlCnMemory64 MBUSB-A
BuffaloFirestix2 GBUSB-A
Lexar MediaJumpDrive128 MBUSB-A
LGMirror USB Drive128 MBUSB-A
Silver PearlMicro X1024 MBUSB-A
PretecI-Disk Tiny 2.0128 MBUSB-A
Authorised MP3 players
Page 61 of 70
Coding 58
Select and activate the CODE function
Select and activate the CODE function:
Briefly press the buttons or to select the function CODE. Press the
button briefly. “1000” flashes on the display.
Entering the safety code
To enter the safety code:
Enter the Radio Card number by repeatedly pressing buttons to until the
correct number appears on the display.
By pressing button the first position of the code is entered, with button ,
the second, ...
Briefly pressing the button corresponding to a number increases its value by
one unit. (After the display returns to “0”).
Holding down the button corresponding to a number reduces its value by one
unit. (After “0” the display returns to “9”).
Example: number 1703.
Do not press button , as this number is already correctly entered. “1000”
appears on the display.
Press button seven times. “1700” appears on the display.
Fig. 49 Select and acti-
vate the CODE function
�‚�bPTY
Fig. 50 Entering the
safety code
14
12
9
1
2