2007 Seat Altea XL catalytic converter
[x] Cancel search: catalytic converterPage 208 of 298

Checking and refilling levels
206
− Insert the fuel nozzle into the mouth of the canister as far as
possible.
− If the spare fuel canister is made of metal, the filling nozzle must be
in contact with the canister during filling. This helps prevent an electro-
static charge building up.
− Never spill fuel in the vehicle or in the luggage compartment. Fuel
vapours are explosive. Danger of death.Caution
•
Fuel spills should be removed from the paintwork immediately.
•
Never run the tank completely dry. An irregular fuel supply could cause
misfiring. As a result, unburnt fuel could enter the catalytic converter and
cause damage.For the sake of the environment
Do not try to put in more fuel after the automatic filler nozzle has switched off;
this may cause the fuel to overflow if it becomes warm.PetrolPetrol types
The correct petrol types are listed on a sticker inside the fuel
tank flap.Only unleaded petrol, corresponding to the standard DIN EN 228 , may be
used for vehicles with catalytic converters (EN = “European Norm”). Petrol types are categorised according to their
octane number, e. g. 91, 95,
98 RON (RON = “research octane number”). You may use petrol with a higher
octane number than the one recommended for your engine. However, this
has no advantage in terms of fuel consumption and engine power.
Caution
•
Even one full tank of leaded fuel would permanently impair the efficiency
of the catalytic converter.
•
High engine speed and full throttle can damage the engine when using
petrol with an octane rating lower than the correct grade for the engine.For the sake of the environment
Just one full tank of leaded fuel would seriously impair the efficiency of the
catalytic converter.Petrol additives
Petrol additives improve the quality of the petrol.The quality of the petrol influences running behaviour, performance and
service life of the engine. For this reason you should use good quality petrol
containing additives. These additives will help to prevent corrosion, keep the
fuel system clean and prevent deposits from building up in the engine.
If good quality petrol with additives is not available or engine problems occur,
the required additives must be added during refuelling.
WARNING (continued)
AlteaXL_DEF_ingles Seite 206 Freitag, 25. August 2006 2:19 14
Page 216 of 298

Checking and refilling levels
214
CautionIf the oil level is above the area do not start the engine. This could result
in damage to the engine and catalytic converter. Contact an Authorised
Service Centre.Topping up engine oil
Top up gradually with small quantities of oil.Before opening the bonnet, read and observe the warnings ⇒ in
“Safety instructions on working in the engine compartment” on
page 208 .
– Unscrew cap from oil fi ll er
open ing ⇒ fig
. 161.
– Top-
up oil in small amounts, using the correct oil. – To avoid over-filling with engine oil, you should top-up using
small quantities, wait a while and check the oil level before
adding any more oil.
– As soon as the oil level is in area , carefully close the cap.
The position of the oil filler opening is shown in the corresponding engine
compartment diagram ⇒ page 270.
Engine oil specification ⇒page 211.
WARNING
Oil is highly inflammable! Ensure that no oil comes into contact with hot
engine components when topping up.
Caution
If the oil level is above the area do not start the engine. This could result
in damage to the engine and catalytic converter. Contact a qualified work-
shop.
For the sake of the environment
The oil level must never be above area . Otherwise oil can be drawn in
through the crankcase breather and escape into the atmosphere via the
exhaust system.
AA
Fig. 161 In the engine
compartment: Engine oil
filler cap
AB
AA
AA
AlteaXL_DEF_ingles Seite 214 Freitag, 25. August 2006 2:19 14
Page 263 of 298
If and when261
Safety First
Operating instructions
Tips and Maintenance
Te c h n i c a l D a t a
Towing and tow-startingTo w - s t a r t i n g
The use of jump leads is preferable to tow-starting.We recommend that you do not tow-start your vehicle. Jump-starting
is preferable ⇒page 258.
However, if your vehicle has to be tow-started:
–Engage the 2
nd or the 3
rd gear.
– Keep the clutch pressed down.
– Switch on the ignition.
– Once both vehicles are mo ving, release the clutch.
– As soon as the engine starts, press the clutch and move the gear lever into neutral. This helps to prevent driving into the towing
vehicle.
WARNING
The risk of accidents is high when tow-starting. The vehicle being towed
can easily collide with the towing vehicle.
Caution
When tow-starting, fuel could enter the catalytic converter and damage it.
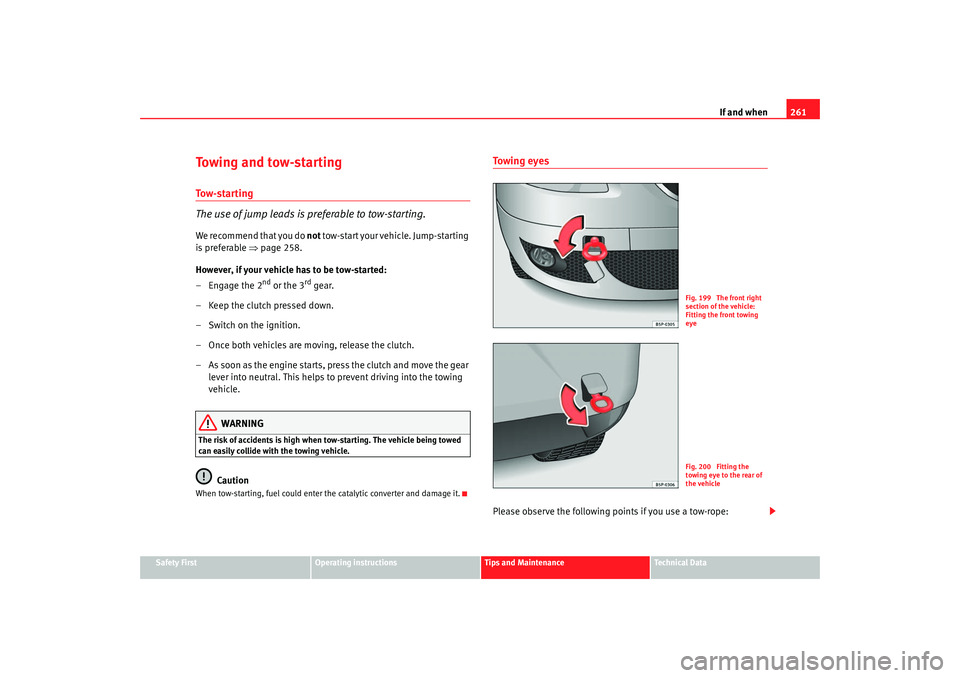
Towing eyesPlease observe the following points if you use a tow-rope:
Fig. 199 The front right
section of the vehicle:
Fitting the front towing
eyeFig. 200 Fitting the
towing eye to the rear of
the vehicle
AlteaXL_DEF_ingles Seite 261 Freitag, 25. August 2006 2:19 14
Page 290 of 298

Index
288Bulb changes
general notes . . . . . . . . . . . . . . . . . . . . . . . 249
Bulb defect warning lamp . . . . . . . . . . . . . . . . . . . . . . . . . 76
Buzzer . . . . . . . . . . . . . . . . . . . . . . . . . . . . 116, 161CCar care Exterior . . . . . . . . . . . . . . . . . . . . . . . . . . . . . 193
Car care products . . . . . . . . . . . . . . . . . . . . . . . 192
Car phone . . . . . . . . . . . . . . . . . . . . . . . . . . . . . 202
Car washes . . . . . . . . . . . . . . . . . . . . . . . . . . . . 193
Catalytic converter . . . . . . . . . . . . . . . . . . . . . . 184
CD changer . . . . . . . . . . . . . . . . . . . . . . . . . . . . 134
Central locking . . . . . . . . . . . . . . . . . . . . . . . . . . 93 Automatic speed dependent locking and un-locking system* . . . . . . . . . . . . . . . . . . . . . 95
Emergency unlocking system . . . . . . . . . . . . 95
Locking system for invo luntary unlocking . . 95
Selective unlocking system* . . . . . . . . . . . . 94
Central locking button Central locking . . . . . . . . . . . . . . . . . . . . . . . 97
unlocking . . . . . . . . . . . . . . . . . . . . . . . . . . . . 97
Central locking system Automatic speed dependent locking and un-locking system* . . . . . . . . . . . . . . . . . . . . . 95
Centre arm rest . . . . . . . . . . . . . . . . . . . . . . . . . 134
Cetane number . . . . . . . . . . . . . . . . . . . . . . . . . 207
Changing gear See Manual gearbox . . . . . . . . . . . . . . . . . . 165 Changing the lamps
Main headlight lamps . . . . . . . . . . . . . . . . . 250
rear lights . . . . . . . . . . . . . . . . . . . . . . . . . . 253
Changing the main headlight lamps dipped beam lights . . . . . . . . . . . . . . . . . . . 251
main beam lights . . . . . . . . . . . . . . . . . . . . 252
Side lights . . . . . . . . . . . . . . . . . . . . . . . . . . 253
turn signal lamps . . . . . . . . . . . . . . . . . . . . 251
Changing the rear light lamps Position light, fog ligh t and rear light on the
tailgate . . . . . . . . . . . . . . . . . . . . . . . . . . . 255
Changing the rear lights Indicator, side and brake lights on the bodywork . . . . . . . . . . . . . . . . . . . . . . . . . 254
luggage compartment lights . . . . . . . . . . . 256
Changing windscreen wiper blades . . . . . . . . . 219
Chassis number . . . . . . . . . . . . . . . . . . . . . . . . 266
Checking . . . . . . . . . . . . . . . . . . . . . . . . . . . . . . 224
Checking battery electrolyte level . . . . . . . . . . 224
Checking engine oil level . . . . . . . . . . . . . . . . . 213
Child safety . . . . . . . . . . . . . . . . . . . . . . . . . . . . . 46
Child seat . . . . . . . . . . . . . . . . . . . . . . . . . . . . . . . 48 Categorisation in groups . . . . . . . . . . . . . . . 48
Group 1 . . . . . . . . . . . . . . . . . . . . . . . . . . . . . 49
Group 2 . . . . . . . . . . . . . . . . . . . . . . . . . . . . . 49
Group 3 . . . . . . . . . . . . . . . . . . . . . . . . . . . . . 49
Groups 0 and 0+ . . . . . . . . . . . . . . . . . . . . . . 48
Safety notes . . . . . . . . . . . . . . . . . . . . . . . . . . 47
Securing . . . . . . . . . . . . . . . . . . . . . . . . . . . . . 50 Child seats
ISOFIX and Toptether system . . . . . . . . . . . . 51
on the front passenger seat . . . . . . . . . . . . . 31
Cigarette lighter* . . . . . . . . . . . . . . . . . . . . . . . 142
Cinturones de seguridad . . . . . . . . . . . . . . . . . . 19 testigo de control . . . . . . . . . . . . . . . . . . . . . 19
Cleaning alloy wheels . . . . . . . . . . . . . . . . . . . . 197
Cleaning and caring for your vehicle . . . . . . . . 192
Cleaning chrome . . . . . . . . . . . . . . . . . . . . . . . . 196
Cleaning cloth seat covers . . . . . . . . . . . . . . . . 199
Cleaning dash panel . . . . . . . . . . . . . . . . . . . . . 198
Cleaning engine compartment . . . . . . . . . . . . . 198
Cleaning fabric trim . . . . . . . . . . . . . . . . . . . . . 199
Cleaning leather . . . . . . . . . . . . . . . . . . . . . . . . 199
Cleaning plastic parts . . . . . . . . . . . . . . . . . . . . 198
Cleaning seat belts . . . . . . . . . . . . . . . . . . . . . . 200
Cleaning steel wheels . . . . . . . . . . . . . . . . . . . . 196
Cleaning windows . . . . . . . . . . . . . . . . . . . . . . . 195
Cleaning wooden trim . . . . . . . . . . . . . . . . . . . . 199
Climatic* . . . . . . . . . . . . . . . . . . . . . . . . . . . . . . 151
Climatronic General notes . . . . . . . . . . . . . . . . . . . . . . . 158
Clock . . . . . . . . . . . . . . . . . . . . . . . . . . . . . . . . . . 58
Clothes hook . . . . . . . . . . . . . . . . . . . . . . . . . . . 137
Cockpit . . . . . . . . . . . . . . . . . . . . . . . . . . . . . . . . . 55
Conector para el iPod de Apple . . . . . . . . . . . . 144
Control Light switches . . . . . . . . . . . . . . . . . . . . . . . 111
Control lamps . . . . . . . . . . . . . . . . . . . . . . . . . . . 72
Control lighting . . . . . . . . . . . . . . . . . . . . . . . . . . 55
AlteaXL_DEF_ingles Seite 288 Freitag, 25. August 2006 2:19 14