2007 SATURN VUE HYBRID radio
[x] Cancel search: radioPage 223 of 438

Remote Control
To use the remote control, aim it at the transmitter
window below the video screen and press the
desired button. Direct sunlight or very bright light
could affect the ability of the RSE transmitter
to receive signals from the remote control. If the
remote control does not seem to be working,
the batteries might need to be replaced.
See “Battery Replacement” later in this section.
Objects blocking the line of sight could also affect
the function of the remote control.
The DVD player can only be turned on by pressing
the DVD/AUX button on the radio.
Notice:Storing the remote control in a hot
area or in direct sunlight can damage it,
and the repairs will not be covered by your
warranty. Keep the remote control stored in a
cool, dry place.
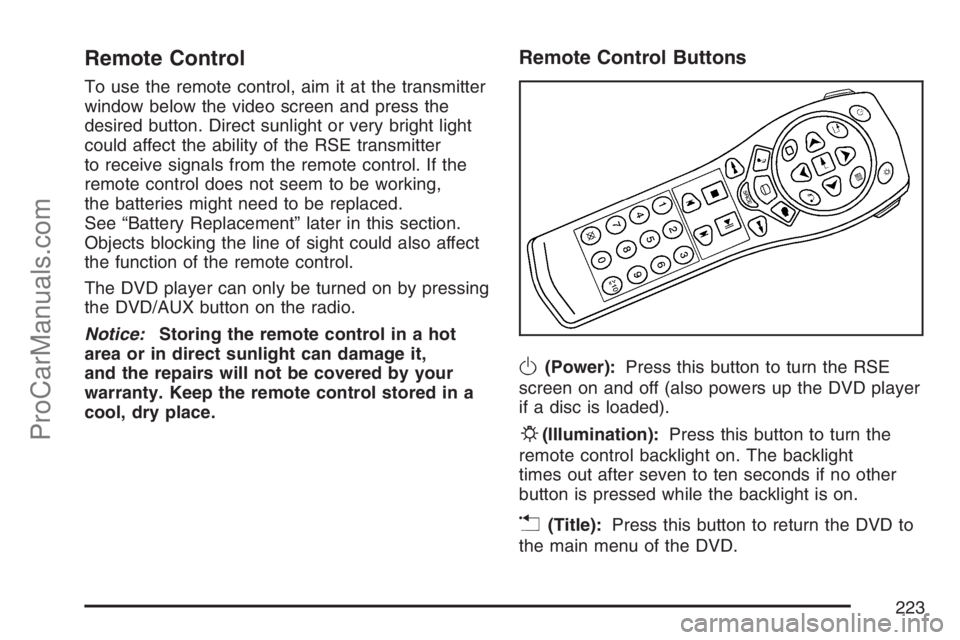
Remote Control Buttons
O(Power):Press this button to turn the RSE
screen on and off (also powers up the DVD player
if a disc is loaded).
P(Illumination):Press this button to turn the
remote control backlight on. The backlight
times out after seven to ten seconds if no other
button is pressed while the backlight is on.
v(Title):Press this button to return the DVD to
the main menu of the DVD.
223
ProCarManuals.com
Page 226 of 438

DVD Player Error Messages
The video screen could display one of the
following:
Disc Load/Eject Error:This message displays
when there are disc load or eject problems.
Disc Format Error:This message displays, if the
disc is inserted with the disc label wrong side
up, or if the disc is damaged.
Disc Region Error:This message displays, if the
disc is not from a correct region.
No Disc Inserted:This message displays, if no
disc is present when the EJECT or DVD/AUX
button is pressed on the radio.
DVD Distortion
Video distortion could occur when operating
cellular phones, scanners, CB radios, Global
Position Systems (GPS)*, two-way radios,
mobile fax, or walkie talkies.
It might be necessary to turn off the DVD player
when operating one of these devices in or near
the vehicle.
*Excludes the OnStar
®System.
Cleaning the DVD Player
When cleaning the outside DVD faceplate and
buttons, use only a clean cloth dampened
with clean water.
Cleaning the Video Screen
When cleaning the video screen, use only a clean
cloth dampened with clean water. Use care
when directly touching or cleaning the screen, as
damage could result.
226
ProCarManuals.com
Page 227 of 438

Audio Steering Wheel Controls
Some audio controls
can be adjusted at
the steering wheel.
They include the
following:
xw:Press the up or the down arrow to go to
the next or to the previous radio station and
stay there. The radio seeks stations only with a
strong signal that are in the selected band.
To scan stations, press and hold either arrow for
two seconds until SCAN displays and a beep
sounds. The radio goes to a station, plays for a
few seconds, then goes to the next station.
Press either arrow again to stop scanning.While a CD is playing, press the up or the down
arrow to go to the next or previous track.
To scan the current CD, press and hold either
up or down arrow for more than two seconds.
The CD goes to the next track, plays the �rst
10 seconds, then goes to the next track. Press
either up or down arrow again to stop scanning.
To scan all of the CDs loaded, press and
hold either up or down arrow for more than
four seconds. The CD goes to the next CD, plays
the �rst 10 seconds of each track, then goes to the
next CD. Press either up or down arrow again to
stop scanning.
+−(Volume):Press the plus or minus button to
increase or to decrease the volume.
g(Mute):Press this button to silence the system.
Press this button again, to turn the sound on.
227
ProCarManuals.com
Page 228 of 438

Radio Reception
Frequency interference and static during normal
radio reception can occur if items such as
cellphone chargers, vehicle convenience
accessories, and external electronic devices are
plugged into the accessory power outlet. If there is
interference or static, unplug the item from the
accessory power outlet.
AM
The range for most AM stations is greater than for
FM, especially at night. The longer range can
cause station frequencies to interfere with each
other. For better radio reception, most AM
radio stations boost the power levels during the
day, and then reduce these levels during the night.
Static can also occur when things like storms
and power lines interfere with radio reception.
When this happens, try reducing the treble on
your radio.
FM Stereo
FM stereo gives the best sound, but FM signals
will reach only about 10 to 40 miles (16 to 65 km).
Tall buildings or hills can interfere with FM
signals, causing the sound to fade in and out.
XM™ Satellite Radio Service
XM™ Satellite Radio Service gives digital radio
reception from coast-to-coast in the 48 contiguous
United States, and in Canada. Just as with FM,
tall buildings or hills can interfere with satellite
radio signals, causing the sound to fade in and out.
In addition, traveling or standing under heavy
foliage, bridges, garages, or tunnels could
cause loss of XM signal for a period of time.
The radio might display NO XM SIGNAL to
indicate interference.
228
ProCarManuals.com
Page 229 of 438

Care of Your CDs and DVDs
Handle CDs carefully. Store them in their original
cases or other protective cases and away from
direct sunlight and dust. The CD player scans the
bottom surface of the disc. If the surface of a
CD is damaged, such as cracked, broken,
or scratched, the CD does not play properly or not
at all. If the surface of a CD is soiled, take a
soft, lint free cloth or dampen a clean, soft cloth in
a mild, neutral detergent solution mixed with
water, and clean it. Make sure the wiping process
starts from the center to the edge.
Do not touch the bottom side of a CD while
handling it; this could damage the surface. Pick up
CDs by grasping the outer edges or the edge of
the hole and the outer edge.
Care of the CD and DVD Player
The use of CD lens cleaners for CDs is not
advised, due to the risk of contaminating the lens
of the CD optics with lubricants internal to the
CD mechanism.
Fixed Mast Antenna
The �xed mast antenna can withstand most car
washes without being damaged. If the mast should
ever become slightly bent, straighten it out by
hand. If the mast is badly bent, replace it.
Check occasionally to make sure the mast is still
tightened to the antenna base. If tightening is
required, tighten by hand.
XM™ Satellite Radio Antenna System
The XM™ Satellite Radio antenna is located on
the roof of your vehicle. Keep this antenna clear of
snow and ice build up for clear radio reception.
A vehicle with a sunroof might not get the
best performance from the XM™ system if the
sunroof is open.
Loading items onto the roof of your vehicle can
interfere with the performance of the XM™ system.
Make sure the XM™ Satellite Radio antenna is
not obstructed.
229
ProCarManuals.com
Page 324 of 438

Notice:If you leave your radio or other
accessories on during the jump starting
procedure, they could be damaged. The repairs
would not be covered by your warranty.
Always turn off your radio and other
accessories when jump starting your vehicle.
3. Turn off the ignition on both vehicles. Unplug
unnecessary accessories plugged into the
cigarette lighter or the accessory power outlet.
Turn off the radio and all lamps that are not
needed. This will avoid sparks and help save
both batteries. And it could save the radio!
4. Open each vehicle’s hood and locate the
positive (+) and negative (−) terminal
locations of the other vehicle. Your vehicle
has a remote positive (+) 12-volt jump starting
terminal and a remote negative (−) jump
starting terminal. You should always use these
remote terminals instead of the terminals on
the battery. The remote positive (+) terminal
is located under the engine cover on the
driver’s side of the engine compartment.To access the remote positive (+) terminal,
remove the engine cover by pulling up on the
cover and lifting it off the engine. Locate
the underhood fuse block and lift off cover.
The remote positive (+) terminal cover has a
red “+” on it. Remove the red rubber cap
to expose the jump start terminal.
5. The remote negative (−) terminal is located
on the generator on the passenger’s side
of the engine compartment. SeeEngine
Compartment Overview on page 296for more
information on location of the positive (+)
and negative (−) terminals.
324
ProCarManuals.com
Page 365 of 438

15. Stow the air compressor accessory plug back
in the air compressor. To do this, wrap the air
compressor accessory plug, snap in the
plug, and then push in the bottom and then
the top of the wrapped air compressor
accessory plug.
16. If the �at tire was
able to in�ate to the
recommended
in�ation pressure,
remove the
maximum speed
label from the
sealant canister.
The maximum speed label reminds you to
drive cautiously and not to exceed 55 mph
(90 km/h) until you have the damaged
tire inspected and repaired.
17. Place it in a highly visible location such as the
inside of the upper left corner of the windshield
or to the face of the radio/clock.18. Return the equipment to the proper storage
location in the rear of your vehicle. To do
this, insert the tire in�ator kit back into
the foam container and place the foam
container onto the storage bracket. Securely
tighten down the foam container with the
foam retainer bolt.
{CAUTION:
Storing the tire in�ator kit or other
equipment in the passenger compartment
of the vehicle could cause injury. In a
sudden stop or collision, loose equipment
could strike someone. Store the tire
in�ator kit in the proper place.
19. Reverse Steps 1 through 4 under Accessing
the Tire In�ator Kit earlier in this section.
365
ProCarManuals.com
Page 380 of 438

Electrical System
Add-On Electrical Equipment
Notice:Do not add anything electrical to your
vehicle unless you check with your retailer
�rst. Some electrical equipment can damage
your vehicle and the damage would not
be covered by your warranty. Some add-on
electrical equipment can keep other
components from working as they should.
Your vehicle has an airbag system. Before
attempting to add anything electrical to your
vehicle, seeServicing Your Airbag-Equipped
Vehicle on page 92.
Windshield Wiper Fuses
The windshield wiper motor is protected by a
circuit breaker and a fuse. If the motor overheats
due to heavy snow or ice, the wiper will stop
until the motor cools. If the overload is caused by
some electrical problem, have it �xed.
Power Windows and Other Power
Options
Circuit breakers in the fuse panel protect the
power windows and other power accessories.
When the current load is too heavy, the circuit
breaker opens and closes, protecting the circuit
until the problem is �xed.
Fuses and Circuit Breakers
The wiring circuits in your vehicle are protected
from short circuits by a combination of fuses,
circuit breakers and fusible thermal links.
This greatly reduces the chance of �res caused by
electrical problems.
Be sure you replace a bad fuse with a new one of
the identical size and rating.
If you ever have a problem on the road and do not
have a spare fuse, you can borrow one that has
the same amperage. Just pick some feature of
your vehicle that you can get along without,
like the radio or cigarette lighter, and use its fuse,
if it is the correct amperage. Replace it as soon
as you can.
380
ProCarManuals.com