2007 SATURN RELAY remote start
[x] Cancel search: remote startPage 301 of 570

Playing a Disc
To play a disc, gently insert the disc, with the label
side up, into the loading slot. The DVD player
will continue loading the disc and the player will
automatically start if the vehicle is in
ACCESSORY, RUN, or RAP.
If a disc is already in the player, make sure that
the DVD player is on, then press the play/pause
button on the player faceplate or on the remote
control. You can also, press the CD AUX button on
the radio faceplate, until RSE appears on the
display, to start playing a disc.
Some DVDs will not allow fast forwarding or
skipping of the copyright information or previews.
Some DVDs will begin playing after the previews
have �nished. If the DVD does not begin playing at
the main title, refer to the on-screen instructions.
Stopping and Resuming Playback
To stop playing a disc, press and release the stop
button on the DVD player faceplate or the
remote control.
To resume playback, press the play/pause button
on the DVD player faceplate or the remote
control. The movie should resume play from where
it was last stopped if the disc has not been
ejected.
If the disc has been ejected, the disc will resume
play at the beginning of the disc.
Ejecting a Disc
Press the eject button on the DVD player
faceplate, when the disc is stopped, to eject the
disc. There is not an eject button on the
remote control.
If a disc is ejected from the player, but not
removed, the DVD player will reload the disc after
a short period of time.
301
ProCarManuals.com
Page 316 of 570

l(Fast Forward):Press this button to fast
forward the DVD and CD. To stop forwarding,
press the play or stop button. This button may not
work when the DVD is playing the copyright
information or the previews.
MENU (Disc):Press this button to view the main
DVD menu. The menu is different on every
disc. Use the up, down, right, and left arrow
buttons to move the cursor around the menu. After
making a selection, press the enter button.
r(Enter/Select):Press this button to select
the choice that is highlighted in any menu.
z(Display Control Button):For vehicles
without rear seat climate control, this button will
take the place of the fan/temp button. For vehicles
with rear seat climate control, this button is also
found on the remote control. Press this button
to open the RSE On-Screen Display (OSD) menus
to adjust the color, tint, brightness, contrast, and
display modes.
Playing a Disc
To play a disc, gently insert the disc, with the label
side up, into the loading slot. The DVD player
will continue loading the disc and the player will
automatically start if the vehicle is in
ACCESSORY, RUN, or RAP.
If a disc is already in the player, make sure that
the DVD player is on, then press the play/pause
button on the player faceplate or on the remote
control. You can also press the DVD AUX button
on the player faceplate, or the CD AUX button
on the radio faceplate until RSE appears on
the display, to start playing a disc.
Some DVDs will not allow fast forwarding or
skipping of the copyright information or previews.
Some DVDs will begin playing after the previews
have �nished. If the DVD does not begin playing at
the main title, refer to the on-screen instructions.
316
ProCarManuals.com
Page 326 of 570

The DVD or auxiliary device will always be
available on channel (CHA or CH1) of the wireless
headphones. All other RSA sources are available
on CHB or CH2 of the wireless headphones,
as well as the wired headphones. If the RSA is
off, the wired headphones will provide DVD
or auxiliary device audio. The rear seat
passengers will not be able to listen to XM, on
CHB or CH2, if the front passenger is listening to
a DVD or auxiliary device.
The remote control will not operate any of the
RSA features.RSAO(Power):Press this button to turn the
RSA system on or off. RSA CHB or RSA CH2 will
appear on the display when the system is on to
indicate the channel to receive audio for the
wireless headphones. Pressing this button will also
silence the rear speakers.
BAND:Press this button to switch between FM1,
FM2, AM, or XM1 or XM2 (if equipped). The
selected radio station will appear on the display.
If the front passengers are listening to the
radio, the RSA will not switch between the bands
and cannot change the station.
tr/[u(Tune):When listening to the
radio, press the right or the left arrow to go to the
next or the previous station and stay there.
This function is inactive if the front seat
passengers are listening to the radio.
When a CD is playing, press the left arrow to go
to the start of the current track or to the previous
track. Press the right arrow to go to the next
track on the CD. This function is inactive if the front
seat passengers are listening to a CD.
326
ProCarManuals.com
Page 333 of 570

Quick Start Guide
Selecting Your Mobile Digital Media as the
Active Source
Your radio and rear seat entertainment system
communicate with the GM Mobile Digital
Media system, as one compact unit that can be
accessed by everyone seated inside the vehicle.
The GM Mobile Digital Media system can hold
thousands of songs, hours of videos, and
hundreds of games.
To help use this system, see the following “Quick
Start” information:
Front seat driver and passenger, use the radio
and steering wheel controls to access the
music collection with PhatNoise Voice Index™
technology. The preset buttons can be used
to select the browsing category. The Next,
Previous, and Seek buttons can be used to
browse within a browsing category. Browse the
music collection by artist, album, genre, or
custom playlist as the system uses the voice
mode to announce these selections. See
“Using the GM Mobile Digital Media System
for Front Seat Audio Entertainment” later
in this manual.
Rear seat passengers, use the wireless DVD
remote control to navigate the menu displayed
on the overhead DVD video screen, then
select to play music, videos, or games.
A dedicated game controller is included with
the Mobile Digital Media package. See
“Using the GM Mobile Digital Media System
for Rear Seat Entertainment” later in this
manual.
Your vehicle may have audio steering wheel
controls. Some audio controls can be adjusted at
the steering wheel. SeeAudio Steering Wheel
Controls on page 353in your owner manual.
If your vehicle has the OnStar
®/Mute audio
steering wheel control, read the following
instructions.
333
ProCarManuals.com
Page 339 of 570

Starting the System for Rear Seat
Entertainment
The GM Mobile Digital Media system is available
through the auxiliary mode of the DVD player.
To begin using the system, follow the instruction
list below:
1. Insert the DMS cartridge into the GM Mobile
Digital Media player.
2. Turn on your video screen by pressing the
power button.
3. Switch to the DMS mode by pressing the
AUX button.
Navigating the On-Screen Menus Using
the DVD Remote Control
The on-screen menus provide access to the
Audio, Video, and Game content on your digital
media storage (DMS) cartridge. Use the DVD
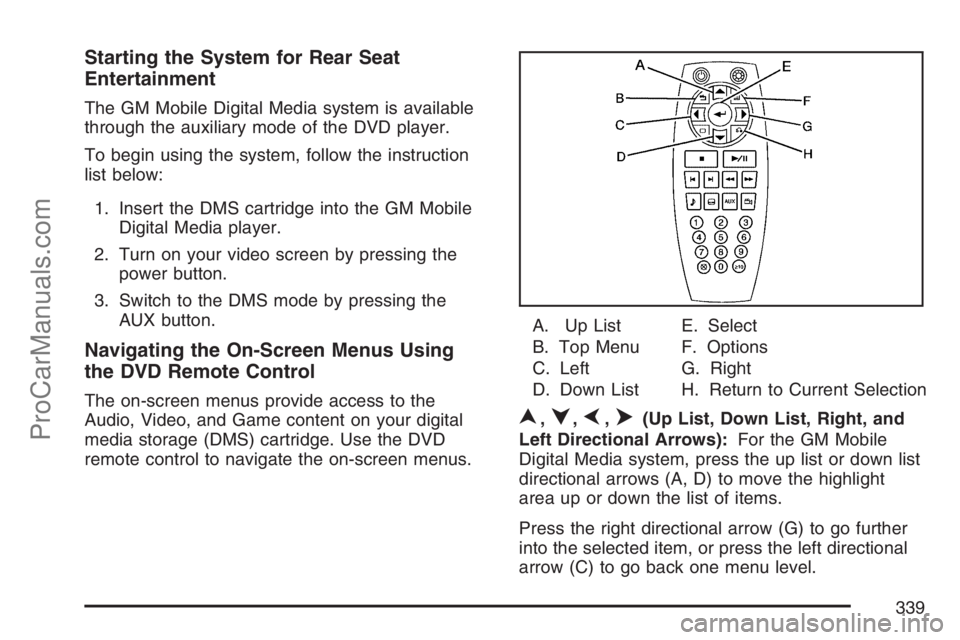
remote control to navigate the on-screen menus.A. Up List
B. Top Menu
C. Left
D. Down ListE. Select
F. Options
G. Right
H. Return to Current Selection
n,q,p,o(Up List, Down List, Right, and
Left Directional Arrows):For the GM Mobile
Digital Media system, press the up list or down list
directional arrows (A, D) to move the highlight
area up or down the list of items.
Press the right directional arrow (G) to go further
into the selected item, or press the left directional
arrow (C) to go back one menu level.
339
ProCarManuals.com
Page 340 of 570

r(Enter/Select):For the GM Mobile Digital
Media system, press the enter/select button (E) to
go into any selected menu item.
v(Title/Top Menu):For the GM Mobile Digital
Media system, press the title/top menu button (B)
to jump to the start screen.
q(Return/Current Selection):For the
GM Mobile Digital Media system, if audio is playing
or in the pause mode, press the return/current
selection button (H) to go back to the current
selection.
y(Menu/Options):For the GM Mobile Digital
Media system, press the menu/options button (F)
to display the options list.
c(Stop):For the GM Mobile Digital Media
system, press this button to stop playback of the
selected option.
r/j(Play/Pause):For the GM Mobile Digital
Media system, press this button to start playback of
a selected option. Press this button while an option
is in the play mode to pause it. Press it again to
continue playback of the current option.
DVD Remote Control Batteries
If the remote control does not seem to be working,
the batteries may need to be replaced. See
Remote Control, “Battery Replacement” in your
vehicle’s owner manual.
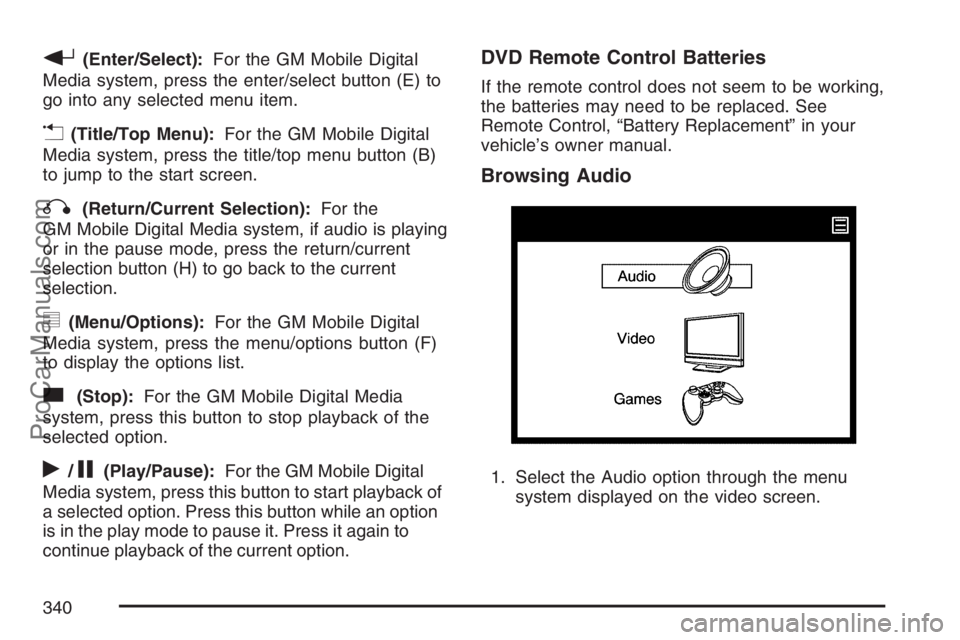
Browsing Audio
1. Select the Audio option through the menu
system displayed on the video screen.
340
ProCarManuals.com
Page 423 of 570

A. Underhood Fuse Block. SeeUnderhood Fuse
Block on page 514.
B. Remote Positive (+) Terminal. SeeJump
Starting on page 450.
C. Windshield Washer Fluid Reservoir. See
“Adding Washer Fluid” underWindshield
Washer Fluid on page 444.
D. Radiator Pressure Cap. SeeRadiator Pressure
Cap on page 435.
E. Power Steering Fluid Reservoir. SeePower
Steering Fluid on page 443.
F. Engine Oil Fill Cap. See “When to Add Engine
Oil” underEngine Oil on page 423.
G. Engine Oil Dipstick. See “Checking Engine Oil”
underEngine Oil on page 423.
H. Automatic Transaxle Fluid Dipstick. See
“Checking the Fluid Level” underAutomatic
Transaxle Fluid on page 430.
I. Brake Master Cylinder Reservoir. See “Brake
Fluid” underBrakes on page 445.
J. Engine Air Cleaner/Filter. SeeEngine Air
Cleaner/Filter on page 428.
K. Engine Coolant Recovery Tank. SeeCooling
System on page 438.Engine Oil
Checking Engine Oil
It is a good idea to check the engine oil every time
you get fuel. In order to get an accurate reading,
the oil must be warm and the vehicle must be
on level ground.
The engine oil dipstick handle is a yellow loop.
SeeEngine Compartment Overview on page 422
for the location of the engine oil dipstick.
1. Turn off the engine and give the oil
several minutes to drain back into the oil pan.
If you do not do this, the oil dipstick might
not show the actual level.
2. Pull out the dipstick and clean it with a paper
towel or cloth, then push it back in all the
way. Remove it again, keeping the tip down,
and check the level.
423
ProCarManuals.com
Page 451 of 570

Trying to start your vehicle by pushing or
pulling it will not work, and it could damage
your vehicle.
1. Check the other vehicle. It must have a
12-volt battery with a negative ground system.
Notice:If the other vehicle’s system is not a
12-volt system with a negative ground,
both vehicles can be damaged. Only use
vehicles with 12-volt systems with negative
grounds to jump start your vehicle.
2. Get the vehicles close enough so the jumper
cables can reach, but be sure the vehicles are
not touching each other. If they are, it could
cause a ground connection you do not
want. You would not be able to start your
vehicle, and the bad grounding could damage
the electrical systems.
To avoid the possibility of the vehicles rolling,
set the parking brake �rmly on both vehicles
involved in the jump start procedure. Put
an automatic transaxle in PARK (P) or
a manual transaxle in NEUTRAL before
setting the parking brake.Notice:If you leave your radio or other
accessories on during the jump starting
procedure, they could be damaged. The repairs
would not be covered by your warranty.
Always turn off your radio and other
accessories when jump starting your vehicle.
3. Turn off the ignition on both vehicles.
Unplug unnecessary accessories plugged into
the cigarette lighter or the accessory power
outlet. Turn off the radio and all lamps that are
not needed. This will avoid sparks and help
save both batteries. And it could save
the radio!
4. Open the hoods and locate the batteries.
Find the positive (+) and negative (−)
terminal locations on each vehicle.
You will not need to access your battery for
jump starting. Your vehicle has a remote
positive (+) jump starting terminal for
that purpose.
451
ProCarManuals.com