2007 SAAB 9-3 brake light
[x] Cancel search: brake lightPage 217 of 304

217 Car care
Wipers and washersWiper bladesCheck and clean all wiper blades regularly.
If poor wiper performance is experienced,
clean the windshield with washer fluid. This
is particularly important if the car has been
through an automatic car wash, as these
sometimes leave a wax coating on the wind-
shield.
If wiper performance is still unsatisfactory,
fit new blades.
Windshield1 Press in the catch (1).
2 Pull the complete wiper blade down-
wards so that it comes away from the
wiper arm. Slide the entire blade out
from the arm.
Rear window, SportCombi1 Detach the blade from the arm by press-
ing on the mounting for the blade from
below.
2 Fit the new blade by pressing the shaft
of the blade into the arm's mounting.
The washer jet, which is located next to the
high-mounted brake light, is not adjustable.
Change of wiper blades, windshield
Change of wiper blades, rear window,
SportCombi
93_U S _M 07.book Page 217 W ednesday, April 12, 2006 9:30 AM
ProCarManuals.com
Page 219 of 304

219 Car careChanging bulbs
Autochecking of lightsThe bulbs that are most important from the
point of view of traffic safety are monitored
by the car’s electrical system. If one of these
bulbs should fail, a message will be dis-
played on the SID.
Example of SID message:
The following bulbs are not checked: park-
ing lights, front fog lights, reversing lights,
license plate lighting, side marker lights and
side direction indicators.
SportCombi
The tail lights and brake lights consist of
LEDs. If approx. 3/4 of the LEDs on one side
are broken then this is indicated in the SID.
If a stop light bulb fails
Sport Sedan: If a stop light bulb fails, the
adjacent taillight will act as a stop light to
ensure traffic safety. Change the broken
bulb when possible.
All rear light bulbs are of the same type and
rated 21 W, with the exception of the license
plate lighting which is rated 5 W.Wrong bulb fitted
If a low or main beam bulb of too high a
rating is fitted, a bulb failure message will be
shown on the SID (a too high wattage bulb
can damage the reflector).
If the following message is displayed but the
bulb shines, it is most likely that an incorrect
bulb has been fitted.
Note:
When changing bulbs, fit the same type
of bulb (e.g. Long-Life) as that removed.
Headlight aiming, page 269.
WARNING
Before changing a bulb in the engine
bay, switch off the engine to avoid the
danger of fingers and hands being
injured by moving parts.
The radiator fan can cut in even when the
engine is switched off.NOTICESwitch off the ignition before changing a
bulb, to avoid possible short-circuiting.
Left low beam failure.
Right high beam failure.
93_U S _M 07.book Page 219 W ednesday, April 12, 2006 9:30 AM
ProCarManuals.com
Page 233 of 304

233 Car care
Bulb tableNo. Designation Watt-
age
1 H7 55 Headlight
2 H3 55 Front fog lights3
3 P21W 21 Taillights; rear fog light; brake lights;
reversing lights
4 PY21W 21 Direction indicator, front/rear
5 R10W 10 Rear dome lighting; courtesy
lighting3; glove box lighting; trunk
lighting, Convertible
6 R5W 5 License plate lighting; trunk lighting,
Sport Sedan
7 T4W 4 Reading light, rear
8 WY5W/W5W 5 Side-mounted turn signal (yellow);
parking lights; front dome lightingNOTICEOnly fit lamps of the specified rating. Lamps of the wrong wattage
could damage the wiring harness and electronics.
93_U S _M 07.book Page 233 W ednesday, April 12, 2006 9:30 AM
ProCarManuals.com
Page 236 of 304

236 Car care
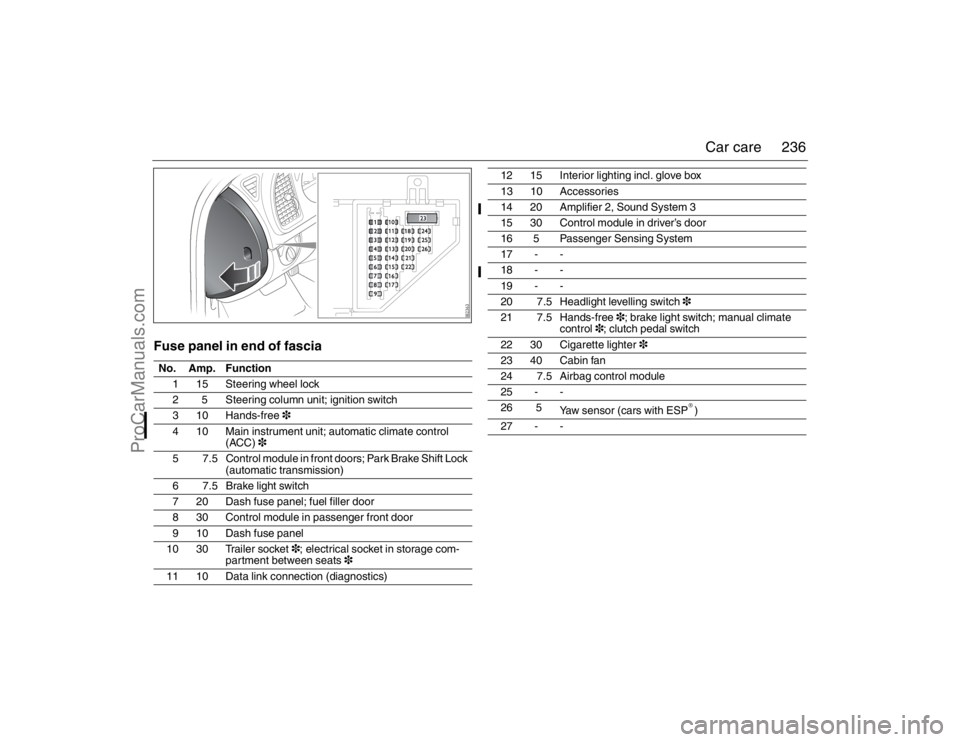
Fuse panel in end of fasciaNo. Amp. Function
1 15 Steering wheel lock
2 5 Steering column unit; ignition switch
3 10 Hands-free3
4 10 Main instrument unit; automatic climate control
(ACC)3
5 7.5 Control module in front doors; Park Brake Shift Lock
(automatic transmission)
6 7.5 Brake light switch
7 20 Dash fuse panel; fuel filler door
8 30 Control module in passenger front door
9 10 Dash fuse panel
10 30 Trailer socket3; electrical socket in storage com-
partment between seats3
11 10 Data link connection (diagnostics)
12 15 Interior lighting incl. glove box
13 10 Accessories
14 20 Amplifier 2, Sound System 3
15 30 Control module in driver’s door
16 5 Passenger Sensing System
17 - -
18 - -
19 - -
20 7.5 Headlight levelling switch3
21 7.5 Hands-free3; brake light switch; manual climate
control3; clutch pedal switch
22 30 Cigarette lighter3
23 40 Cabin fan
24 7.5 Airbag control module
25 - -
26 5
Yaw sensor (cars with ESP
®)
27 - -
93_U S _M 07.book Page 236 W ednesday, April 12, 2006 9:30 AM
ProCarManuals.com
Page 237 of 304

237 Car care
Trunk fuse panel, left-hand sideNo. Amp. Function
1–5 MAXI -
6 30 Control module in left rear door
7 30 Control module in right rear door
820Trailer3
9--
10 30 Left-hand brake light; rear right turn signal; right tail-
light; right reversing light; high-mounted brake light;
trailer lights
11 - -
12 - -
13 - -
14 - -
15 15 Seat heating, left seat3
16 15 Seat heating, right seat3
17 7.5 Autodimming rearview mirror3; rain sensor3
18 15 Moonroof3
19 - -
20 7.5 XM-radio3, TMC-tuner3
21 7.5 Saab Parking Assistance (SPA)3; control module in
rear doors; dome light (Convertible)
22 30 Radio3; navigation3
23 - -
24 10 Movement sensor3; tilt sensor3; dome light (Con-
ver tible)
25 30 Electrically adjustable driver’s seat with memory3
Trunk fuse panel, Sport Sedan93_U S _M 07.book Page 237 W ednesday, April 12, 2006 9:30 AM
ProCarManuals.com
Page 239 of 304

239 Car careFuse panel in engine bayNo. Amp. Function
1--
2 10 Engine control module; automatic transmission con-
trol module3
320Horn
4 10 Engine control module; battery disconnect switch3
5--
6 10 Selector lever, automatic transmission3; clutch pedal
switch
7--
8 5 Relay for vacuumpump (brake system)3
9--
10 - -
11 - -
12 10 Washer fluid pump, rear window3
13 - -
14 - -
15 30 Washer fluid pump, headlights3
16 30 Front right parking light; front right turn signal; left and
right side turn signal; right high beam; left low beam;
front left fog light3
17 30 Windshield wiper motor, low speed
18 30 Windshield wiper motor, high speed
19 20 Parking heater; auxiliary heater3
20 10 Headlight levelling3
21 - -
22 30 Washer fluid pump, windshield
23 - -
24 20 Flash-to-pass
25 20 Amplifier, sound system II3
26 30 Front left turn signal; front left parking light; front right
fog light3; right low beam; left high beam
27
–37MAXI
93_U S _M 07.book Page 239 W ednesday, April 12, 2006 9:30 AM
ProCarManuals.com
Page 257 of 304

257 Car care
Changing a tire
WARNING
Lifting a vehicle and getting under it to do
maintenance or repairs is dangerous
without the appropriate safety equipment
and training. The jack provided with your
vehicle is designed only for changing a
flat tire. If it is used for anything else, you
or others could be badly injured or killed if
the vehicle slips off the jack. Use the jack
provided with your vehicle only for chang-
ing a flat tire.
Changing a tire can be dangerous. The
vehicle can slip off the jack and roll over
or fall on you or other people. You and
they could be badly injured or even killed.
Find a level place to change your tire. To
help prevent the vehicle from moving:
1 Set the parking brake firmly.
2 If you have an automatic transmis-
sion, put the shift lever in PARK (P).
For a manual transmission, leave the
car in gear (1st or REVERSE (R)).
3 Turn off the engine and do not restart
while the vehicle is raised.
4 Do not allow passengers to remain in
the vehicle.
To be even more certain the vehicle won't
move, you should put blocks at the front
and rear of the tire farthest away from the
one being changed. That would be the
tire, on the other side, at the opposite end
of the vehicle.
The car jack is designed solely for use
in changing a tire or fitting snow
chains. It must not be used to
support the car during repair work
or servicing.
Never crawl under a car that is
supported only by a jack. Always use
axle stands.
Raising your vehicle too high or with
the jack improperly positioned can
damage the vehicle and even make
the vehicle fall. To help avoid personal
injury and vehicle damage, be sure to
fit the jack lift head into the proper
location before raising the vehicle, and
raise the vehicle only far enough off
the ground so there is enough room for
the spare tire to fit (no more than
25 mm or 1 inch clearance between
the ground and the bottom of the tire).
Switch on the hazard warning lights if
the car is on a road.
The jack should be stored correctly
under the carpeting in the trunk. If it
lies loose in the car, it could thrown
forward and cause personal injury in
the event of a crash or if the car rolls
over.
Grit, salt and rust can clog the inner
threads of the wheel bolts if the car has
been driven for several years exclu-
sively with alloy wheels.
If steel wheels are being installed, the
bolt hole threads in the brake hubs
should be cleaned before the thinner
steel wheels are fitted. It may other-
wise not be possible to achieve the
correct clamping force, despite tight-
ening the wheel bolts to the correct
torque.
93_U S _M 07.book Page 257 W ednesday, April 12, 2006 9:30 AM
ProCarManuals.com
Page 258 of 304

258 Car careWhen the car has to be lifted, the jack must
be positioned at one of the four jacking
points (front or rear) under the sill members.
If a floor jack is used, the lifting plate must
be positioned under the normal jacking
points, see illustration. If the car is equipped
with a towbar, the jack can also be placed
under this.
1 Wind the jack up to a suitable height
before placing it under the jacking point.
Each jacking point is indicated by an
arrow on the sill (see illustration).
Make sure that the jack fully engages
the jacking point in the underside of the
sill member and that the entire foot of the
jack is steady and flat on the ground.
The jack must not stand on snow, ice or
similar.
Wind up the jack until it just begins to lift
the car.2 It is not necessary to remove the wheel
cover.
If, none the less, you wish to remove the
wheel cover, take hold of the outer edge
and pull it straight out.
Remove the plastic wheel bolt covers.
Loosen the wheel bolts half a turn.
3 Wind the jack to raise the wheel clear of
the ground. Remove the wheel bolts and
lift off the wheel.4 Clean any rust or dirt from the contact
surfaces between the wheel and brake
disc. Do not wipe away the grease in the
wheel hub.
5 Add a thin layer of grease on the bolts
before fitting, see page 260. Fit the
wheel and screw in the bolts in the
sequence shown on page 260 (opposite
pairs).
Tighten the bolts enough for the bolts
and wheel to be seated correctly.
6 Lower the car and tighten the wheel
bolts to torque in sequence as shown on
page 260.
Tightening torque:
Light-alloy wheels: 80 ft.lb. (110 Nm).
Steel wheels: 80 ft.lb. (110 Nm).
Refit the plastic wheel bolt covers.NOTICEApply the jack only to the jacking points
indicated on the body.
Jacking points
Marking of jacking points
93_U S _M 07.book Page 258 W ednesday, April 12, 2006 9:30 AM
ProCarManuals.com