2007 PONTIAC G6 instrument panel
[x] Cancel search: instrument panelPage 265 of 486

StabiliTrak®System
Your vehicle may be equipped with a vehicle
stability enhancement system called StabiliTrak®.
It is an advanced computer controlled system
that assists you with directional control of
the vehicle in difficult driving conditions.
StabiliTrak
®activates when the computer senses
a discrepancy between your intended path
and the direction the vehicle is actually traveling.
StabiliTrak
®selectively applies braking pressure
at any one of the vehicle’s brakes to help steer the
vehicle in the direction which you are steering.
This symbol will appear
when the StabiliTrak
®
system is activated.
When you �rst start your vehicle and begin to
drive away, the system performs several diagnostic
checks to insure there are no problems. You
may hear or feel the system working. This
is normal and does not mean there is a problem
with your vehicle.This light is located on
the instrument panel
cluster.
When the system is on, this light will come on to let
you know if there’s a problem, or if the system has
been turned off.
StabiliTrak
®comes on automatically whenever
you start your vehicle. To help assist you
with directional control of the vehicle, you should
always leave the system on. You can turn the
traction control system and StabiliTrak
®off if you
ever need to by pressing and holding the TC
(traction control) on/off button. press the TC button
again to turn StabiliTrak
®and the traction control
system back on. SeeTraction Control System
(TCS) on page 262for more information.
If your vehicle is in cruise control when the
StabiliTrak
®activates, the cruise control will
automatically disengage. When road conditions
allow you to safely use it again, you may reengage
the cruise control. SeeCruise Control on
page 171for more information.
265
Page 295 of 486

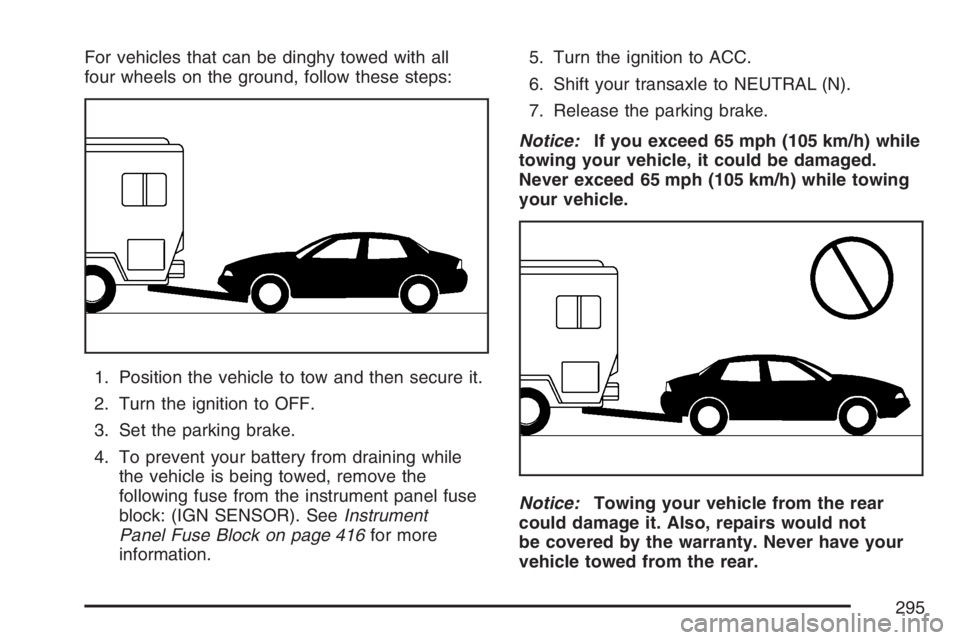
For vehicles that can be dinghy towed with all
four wheels on the ground, follow these steps:
1. Position the vehicle to tow and then secure it.
2. Turn the ignition to OFF.
3. Set the parking brake.
4. To prevent your battery from draining while
the vehicle is being towed, remove the
following fuse from the instrument panel fuse
block: (IGN SENSOR). SeeInstrument
Panel Fuse Block on page 416for more
information.5. Turn the ignition to ACC.
6. Shift your transaxle to NEUTRAL (N).
7. Release the parking brake.
Notice:If you exceed 65 mph (105 km/h) while
towing your vehicle, it could be damaged.
Never exceed 65 mph (105 km/h) while towing
your vehicle.
Notice:Towing your vehicle from the rear
could damage it. Also, repairs would not
be covered by the warranty. Never have your
vehicle towed from the rear.
295
Page 302 of 486

Making Turns
Notice:Making very sharp turns while
trailering could cause the trailer to come in
contact with the vehicle. Your vehicle could be
damaged. Avoid making very sharp turns
while trailering.
When you are turning with a trailer, make wider
turns than normal. Do this so your trailer will not
strike soft shoulders, curbs, road signs, trees or
other objects. Avoid jerky or sudden maneuvers.
Signal well in advance.
Turn Signals When Towing a Trailer
When you tow a trailer, your vehicle may need a
different turn signal �asher and/or extra wiring.
Check with your dealer. The arrows on your
instrument panel will �ash whenever you signal a
turn or lane change. Properly hooked up, the
trailer lamps will also �ash, telling other drivers you
are about to turn, change lanes or stop.When towing a trailer, the arrows on your
instrument panel will �ash for turns even if the bulbs
on the trailer are burned out. Thus, you may think
drivers behind you are seeing your signal when
they are not. It is important to check occasionally to
be sure the trailer bulbs are still working.
Driving On Grades
When towing a trailer on long uphill grades and
the outside temperature is above 85°F (29°C),
reduce your vehicle speed to 45 mph (72 km/h) to
avoid overheating the engine cooling system.
Reduce speed and shift to a lower gearbeforeyou
start down a long or steep downgrade. If you do
not shift down, you might have to use your brakes
so much that they would get hot and no longer
work well.
302
Page 306 of 486

Center High-Mounted Stoplamp (CHMSL)
(Retractable Hardtop and Coupe)........... 364
Taillamps, Turn Signal, Sidemarker,
Stoplamps and Back-up
Lamps (Sedan)...................................... 364
Taillamps, Turn Signal, Sidemarker,
Stoplamps and Back-up Lamps (Coupe) ... 365
Taillamps, Turn Signal, Sidemarker,
Stoplamps and Back-up Lamps
(Retractable Hardtop)............................. 367
License Plate Lamp................................... 368
Replacement Bulbs................................... 368
Windshield Wiper Blade Replacement....... 369
Tires............................................................ 370
Winter Tires.............................................. 372
Tire Sidewall Labeling............................... 372
Tire Terminology and De�nitions............... 376
In�ation - Tire Pressure............................. 379
High-Speed Operation............................... 381
Tire Inspection and Rotation...................... 381
When It Is Time for New Tires.................. 383
Buying New Tires...................................... 383
Different Size Tires and Wheels................ 385Uniform Tire Quality Grading..................... 386
Wheel Alignment and Tire Balance............ 387
Wheel Replacement.................................. 388
Tire Chains............................................... 389
If a Tire Goes Flat.................................... 390
Changing a Flat Tire................................. 390
Removing the Spare Tire and Tools.......... 392
Removing the Flat Tire and Installing
the Spare Tire....................................... 394
Storing a Flat or Spare Tire
and Tools.............................................. 400
Compact Spare Tire.................................. 403
Appearance Care........................................ 404
Cleaning the Inside of Your Vehicle.......... 404
Fabric/Carpet............................................. 406
Leather...................................................... 407
Instrument Panel, Vinyl, and Other Plastic
Surfaces................................................ 407
Care of Safety Belts.................................. 408
Weatherstrips............................................ 408
Washing Your Vehicle............................... 408
Cleaning Exterior Lamps/Lenses................ 409
Finish Care............................................... 409
Windshield and Wiper Blades.................... 410
Section 5 Service and Appearance Care
306
Page 307 of 486

Aluminum Wheels...................................... 410
Tires......................................................... 411
Sheet Metal Damage................................. 411
Finish Damage.......................................... 411
Underbody Maintenance............................ 412
Chemical Paint Spotting............................ 412
Vehicle Care/Appearance Materials............ 413
Vehicle Identi�cation.................................. 414
Vehicle Identi�cation Number (VIN)........... 414
Service Parts Identi�cation Label............... 414Electrical System........................................ 415
Add-On Electrical Equipment..................... 415
Windshield Wiper Fuses............................ 415
Power Windows and Other Power
Options.................................................. 415
Fuses........................................................ 415
Instrument Panel Fuse Block..................... 416
Engine Compartment Fuse Block............... 418
Rear Compartment Fuse Block.................. 421
Capacities and Speci�cations.................... 424
Section 5 Service and Appearance Care
307
Page 317 of 486

Hood Release
To open the hood, do the following:
1. Pull the handle with
this symbol on it. It
is located under
the instrument panel
on the driver’s
side of the vehicle.
2. Then go to the front of the vehicle and push
the secondary hood release lever to the right.
3. Lift the hood, release the hood prop rod from
its retainer and put the hood prop into the slot
in the hood marked with an arrow.
Before closing the hood, be sure all the �ller caps
are on properly. Then lift the hood to relieve
pressure on the hood prop. Remove the hood prop
from the slot in the hood and return the prop to
its retainer. Then let the hood down and close
it �rmly.
317
Page 342 of 486

Adding Coolant
If you need more coolant, add the proper
DEX-COOL®coolant mixture at the surge tank,
but only when the engine is cool. If the surge tank
is empty, a special �ll procedure is necessary.
SeeEngine Overheating on page 342andCooling
System on page 345.
{CAUTION:
You can be burned if you spill coolant
on hot engine parts. Coolant contains
ethylene glycol, and it will burn if the
engine parts are hot enough. Do not spill
coolant on a hot engine.
When replacing the pressure cap, make sure it is
hand-tight and fully seated.
Pressure Cap
Notice:If the pressure cap is not tightly
installed, coolant loss and possible engine
damage may occur. Be sure the cap is properly
and tightly secured.
SeeEngine Compartment Overview on page 318
for more information on location.
Engine Overheating
You will �nd an engine coolant temperature gage
on your vehicle’s instrument panel. SeeEngine
Coolant Temperature Gage on page 203.
342
Page 407 of 486

Leather
A soft cloth dampened with water may be used
to remove dust. If a more thorough cleaning is
necessary, a soft cloth dampened with a mild soap
solution can be used. Allow the leather to dry
naturally. Do not use heat to dry. Never use steam
to clean leather. Never use spot lifters or spot
removers on leather. Many commercial leather
cleaners and coatings that are sold to preserve and
protect leather may permanently change the
appearance and feel of your leather and are not
recommended. Do not use silicone or wax-based
products, or those containing organic solvents to
clean your vehicle’s interior because they can alter
the appearance by increasing the gloss in a
non-uniform manner. Never use shoe polish
on your leather.
Instrument Panel, Vinyl, and Other
Plastic Surfaces
A soft cloth dampened with water may be used
to remove dust. If a more thorough cleaning is
necessary, a clean soft cloth dampened with a mild
soap solution can be used to gently remove dust
and dirt. Never use spot lifters or removers on
plastic surfaces. Many commercial cleaners and
coatings that are sold to preserve and protect soft
plastic surfaces may permanently change the
appearance and feel of your interior and are not
recommended. Do not use silicone or wax-based
products, or those containing organic solvents to
clean your vehicle’s interior because they can alter
the appearance by increasing the gloss in a
non-uniform manner.
Some commercial products may increase gloss
on your instrument panel. The increase in
gloss may cause annoying re�ections in the
windshield and even make it difficult to see through
the windshield under certain conditions.
407