2007 NISSAN XTERRA ECO mode
[x] Cancel search: ECO modePage 187 of 304

cWhen the warning light comes on, the
2WD mode may be engaged even if the
4WD shift switch is in 4H. Be especially
careful when driving. If corresponding
parts are malfunctioning, the 4WD
mode will not be engaged even if the
4WD shift switch is shifted.
cDo not drive the vehicle in the 4H or 4LO
position on dry hard surface roads. Driv-
ing on dry, hard surfaces in 4H or 4LO
may cause unnecessary noise, tire wear
and increased fuel consumption.
If the 4WD warning light turns on when
you are driving on dry hard surface
roads:
– in the 4H position, shift the 4WD shift
switch to 2WD.
– in the 4LO position for automatic
transmission vehicles, stop the ve-
hicle and shift the transmission se-
lector to the N position with the
brake pedal depressed and shift the
4WD shift switch to 2WD.– in the 4LO position for manual trans-
mission vehicles, stop the vehicle
and shift the transmission shift lever
to the N position with the clutch
pedal depressed and shift the 4WD
shift switch to 2WD.
cIf the warning light is still on after the
above operation, have your vehicle
checked by a NISSAN dealer as soon as
possible.The E-Lock system can provide additional trac-
tion and should only be used when a vehicle has
become or is becoming stuck. This system oper-
ates by electronically “locking” the two rear drive
wheels together, allowing them to turn at the
same speed. The system is used when it is not
possible to free a stuck vehicle even when using
the 4LO position (4 wheel drive vehicles) .
When added traction is required, activate the
E-Lock system by pushing the switch ON. See
“Electronic Locking Rear Differential (E-Lock)
system switch” in the “Instruments and Controls”
section. Once the system fully engages, the indi-
cator light in the instrument panel will remain ON.
When the system is activated, both rear wheels
will engage, providing added traction.
The rear wheels may momentarily slip or move to
engage the system, and the system will only
engage up to approximately 4 MPH (7 km/h) .
Once the vehicle is free, the system should be
turned OFF and driving resumed.
The Anti-Lock Brake (ABS) system is disabled
and the ABS light illuminates when the E-Lock
system is ON. Also, the Vehicle Dynamic Control
(VDC) system is disabled and the VDC light
illuminates when the E-Lock system is ON.
ELECTRONIC LOCKING REAR
DIFFERENTIAL (E-Lock) SYSTEM (if
so equipped)
Starting and driving5-27
ZREVIEW COPYÐ2007 Xterra(xtr)
Owners ManualÐUSA_English(nna)
02/27/07Ðdebbie
X
Page 189 of 304
WARNING
cDo not stop or park the vehicle over
flammable materials such as dry grass,
waste paper or rags. They may ignite
and cause a fire.
cSafe parking procedures require that
both the parking brake be set and the
transmission placed into P (Park) for
automatic transmission models or in an
appropriate gear for manual transmis-
sion models. Failure to do so could
cause the vehicle to move unexpectedly
or roll away and result in an accident.
Make sure the shift lever has beenpushed as far forward as it can go and
cannot be moved without depressing
the foot brake pedal.
cNever leave the engine running while
the vehicle is unattended.
cDo not leave children unattended inside
the vehicle. They could unknowingly ac-
tivate switches or controls. Unattended
children could become involved in seri-
ous accidents.
1. Firmly apply the parking brake.
2.Manual transmission models:Place the shift lever in the R (Reverse) posi-
tion. When parking on an uphill grade, place
the shift lever in 1st gear.
Automatic transmission models:
Move the shift selector lever to the P (Park)
position.
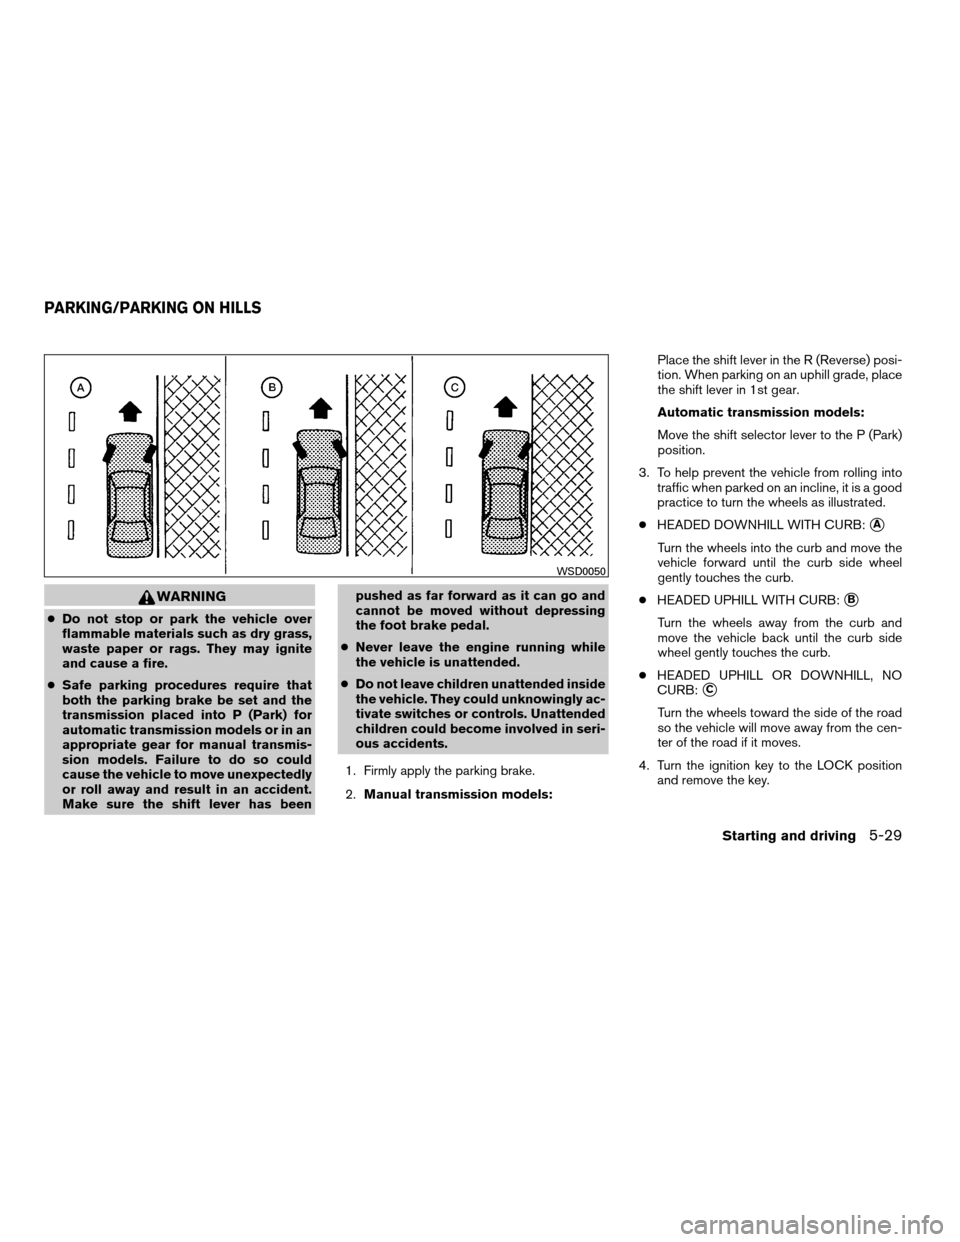
3. To help prevent the vehicle from rolling into
traffic when parked on an incline, it is a good
practice to turn the wheels as illustrated.
cHEADED DOWNHILL WITH CURB:
sA
Turn the wheels into the curb and move the
vehicle forward until the curb side wheel
gently touches the curb.
cHEADED UPHILL WITH CURB:
sB
Turn the wheels away from the curb and
move the vehicle back until the curb side
wheel gently touches the curb.
cHEADED UPHILL OR DOWNHILL, NO
CURB:
sC
Turn the wheels toward the side of the road
so the vehicle will move away from the cen-
ter of the road if it moves.
4. Turn the ignition key to the LOCK position
and remove the key.
WSD0050
PARKING/PARKING ON HILLS
Starting and driving5-29
ZREVIEW COPYÐ2007 Xterra(xtr)
Owners ManualÐUSA_English(nna)
02/27/07Ðdebbie
X
Page 192 of 304
When the ABS senses that one or more wheels
are close to locking up, the system electronically
controls the pressure applied to each brake.
This action is similar to pumping the brakes very
quickly. You may feel a pulsation in the brake
pedal and hear a noise from under the hood or
feel a vibration from the actuator when it is oper-
ating. This is normal and indicates that the ABS is
operating properly. However, the pulsation may
indicate that road conditions are hazardous and
extra care is required while driving.cABLS is a form of traction control using
sensors from the Anti-lock Brake System
(ABS) to transfer power from a slipping drive
wheel to a wheel with more traction. The
ABLS system applies braking to the slipping
wheel, which helps redirect power to an-
other wheel.
cOn 4WD models the ABLS system operates
in both 4H and 4LO modes. If 4WD mode is
engaged, the ABLS system will operate for
both drive axles. On 2WD vehicles, the
ABLS system operates on the drive axle
only.
cThe ABLS system is always ON unless the
system detects brake pad overheating. If
high brake pad temperature is detected, it
will turn OFF, but normal brake function will
continue. ABLS will function even when the
VDC system (if so equipped) is turned OFF.
WARNING
The ABLS system provides increased trac-
tion, but will not prevent accidents due to
abrupt steering operation or by careless
driving or dangerous driving practices.
Reduce vehicle speed and be especially
careful when driving and cornering on
slippery surfaces, and always drive
carefully.When accelerating or driving on slippery sur-
faces, the tires may spin or slide. With the Vehicle
Dynamic Control (VDC) system, sensors detect
these movements and control the braking and
engine output to help improve vehicle stability.
cWhen the vehicle dynamic control (VDC)
system is operating, theSLIPindicator in
the instrument panel blinks.
cIf the 4WD transfer case is shifted into 4LO
the
indicator light will come on and
the VDC system will be turned off. See
“Transfer case shifting procedures” earlier in
this section.
cIf the SLIP indicator blinks, the road condi-
tions are slippery. Be sure to adjust your
speed and driving to these conditions. See
“Slip indicator light”, and “Vehicle dynamic
control (VDC) off indicator light” in the “In-
struments and controls” section.
If the battery is removed or discharged, the trac-
tion control system may be disabled and the
SLIPand
indicator lights will not turn off
after 2 seconds when the ignition switch is turned
to the ON position.
Perform the following procedure to reset the
system:
cStart the engine and set the steering wheel
in the straight forward position.
ACTIVE BRAKE LIMITED SLIP (ABLS)
SYSTEM (if so equipped)VEHICLE DYNAMIC CONTROL (VDC)
SYSTEM
5-32Starting and driving
ZREVIEW COPYÐ2007 Xterra(xtr)
Owners ManualÐUSA_English(nna)
02/27/07Ðdebbie
X
Page 210 of 304
TOWING RECOMMENDED BY
NISSANTwo-wheel drive models
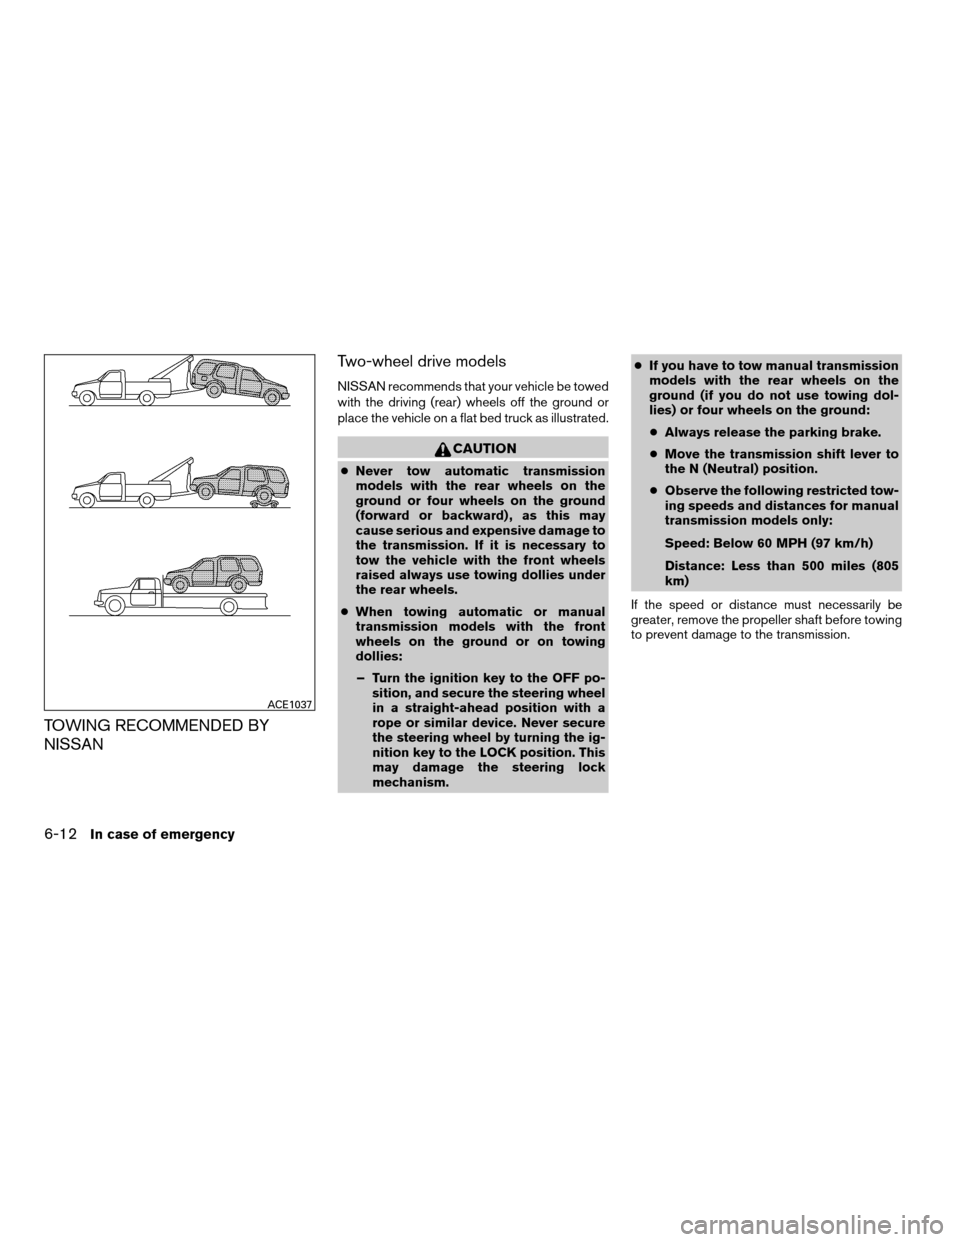
NISSAN recommends that your vehicle be towed
with the driving (rear) wheels off the ground or
place the vehicle on a flat bed truck as illustrated.
CAUTION
cNever tow automatic transmission
models with the rear wheels on the
ground or four wheels on the ground
(forward or backward) , as this may
cause serious and expensive damage to
the transmission. If it is necessary to
tow the vehicle with the front wheels
raised always use towing dollies under
the rear wheels.
cWhen towing automatic or manual
transmission models with the front
wheels on the ground or on towing
dollies:
– Turn the ignition key to the OFF po-
sition, and secure the steering wheel
in a straight-ahead position with a
rope or similar device. Never secure
the steering wheel by turning the ig-
nition key to the LOCK position. This
may damage the steering lock
mechanism.cIf you have to tow manual transmission
models with the rear wheels on the
ground (if you do not use towing dol-
lies) or four wheels on the ground:
cAlways release the parking brake.
cMove the transmission shift lever to
the N (Neutral) position.
cObserve the following restricted tow-
ing speeds and distances for manual
transmission models only:
Speed: Below 60 MPH (97 km/h)
Distance: Less than 500 miles (805
km)
If the speed or distance must necessarily be
greater, remove the propeller shaft before towing
to prevent damage to the transmission.
ACE1037
6-12In case of emergency
ZREVIEW COPYÐ2007 Xterra(xtr)
Owners ManualÐUSA_English(nna)
02/27/07Ðdebbie
X
Page 211 of 304
Four-wheel drive models
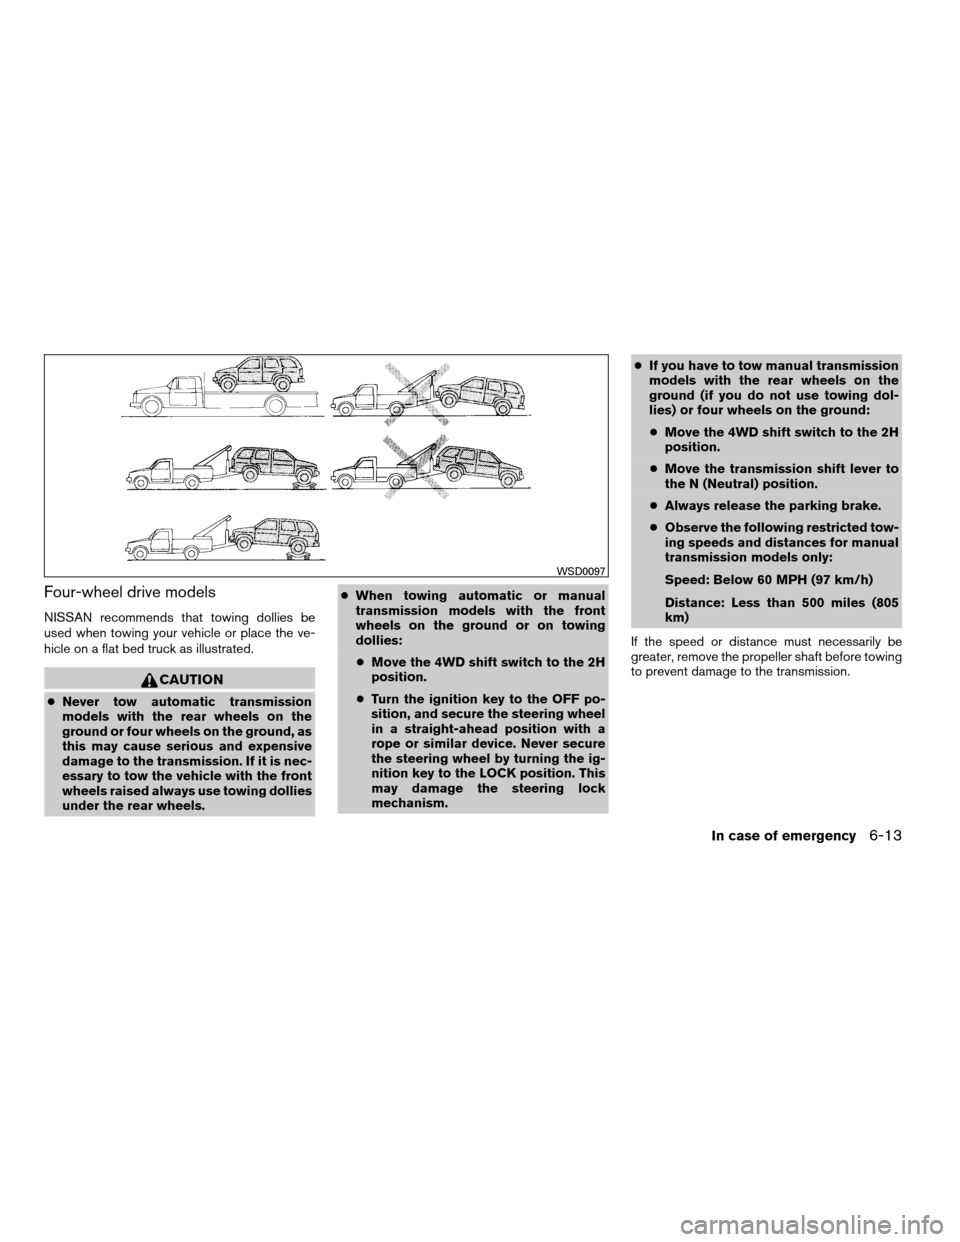
NISSAN recommends that towing dollies be
used when towing your vehicle or place the ve-
hicle on a flat bed truck as illustrated.
CAUTION
cNever tow automatic transmission
models with the rear wheels on the
ground or four wheels on the ground, as
this may cause serious and expensive
damage to the transmission. If it is nec-
essary to tow the vehicle with the front
wheels raised always use towing dollies
under the rear wheels.cWhen towing automatic or manual
transmission models with the front
wheels on the ground or on towing
dollies:
cMove the 4WD shift switch to the 2H
position.
cTurn the ignition key to the OFF po-
sition, and secure the steering wheel
in a straight-ahead position with a
rope or similar device. Never secure
the steering wheel by turning the ig-
nition key to the LOCK position. This
may damage the steering lock
mechanism.cIf you have to tow manual transmission
models with the rear wheels on the
ground (if you do not use towing dol-
lies) or four wheels on the ground:
cMove the 4WD shift switch to the 2H
position.
cMove the transmission shift lever to
the N (Neutral) position.
cAlways release the parking brake.
cObserve the following restricted tow-
ing speeds and distances for manual
transmission models only:
Speed: Below 60 MPH (97 km/h)
Distance: Less than 500 miles (805
km)
If the speed or distance must necessarily be
greater, remove the propeller shaft before towing
to prevent damage to the transmission.
WSD0097
In case of emergency6-13
ZREVIEW COPYÐ2007 Xterra(xtr)
Owners ManualÐUSA_English(nna)
02/27/07Ðdebbie
X
Page 216 of 304
Occasionally remove loose dust from the interior
trim, plastic parts and seats using a vacuum
cleaner or soft bristled brush. Wipe the vinyl and
leather surfaces with a clean, soft cloth damp-
ened in mild soap solution, then wipe clean with a
dry, soft cloth.
Regular care and cleaning is required in order to
maintain the appearance of the leather.
Before using any fabric protector, read the manu-
facturer’s recommendations. Some fabric pro-
tectors contain chemicals that may stain or
bleach the seat material.
Use a cloth dampened only with water to clean
the meter and gauge lens.
CAUTION
cNever use benzine, thinner or any simi-
lar material.
cSmall dirt particles can be abrasive and
damaging to leather surfaces and
should be removed promptly. Do not
use saddle soap, car waxes, polishes,
oils, cleaning fluids, solvents, deter-
gents or ammonia-based cleaners as
they may damage the leather’s natural
finish.cNever use fabric protectors unless rec-
ommended by the manufacturer.
cDo not use glass or plastic cleaner on
meter or gauge lens covers. It may dam-
age the lens cover.
FLOOR MATS
The use of genuine NISSAN floor mats can ex-
tend the life of your vehicle carpet and make it
easier to clean the interior.No matter what
mats are used, be sure they are fitted for
your vehicle and are properly positioned in
the footwell to prevent interference with
pedal operation.Mats should be maintained
with regular cleaning and replaced if they be-
come excessively worn.
Floor mat positioning aid (driver’s side
only)
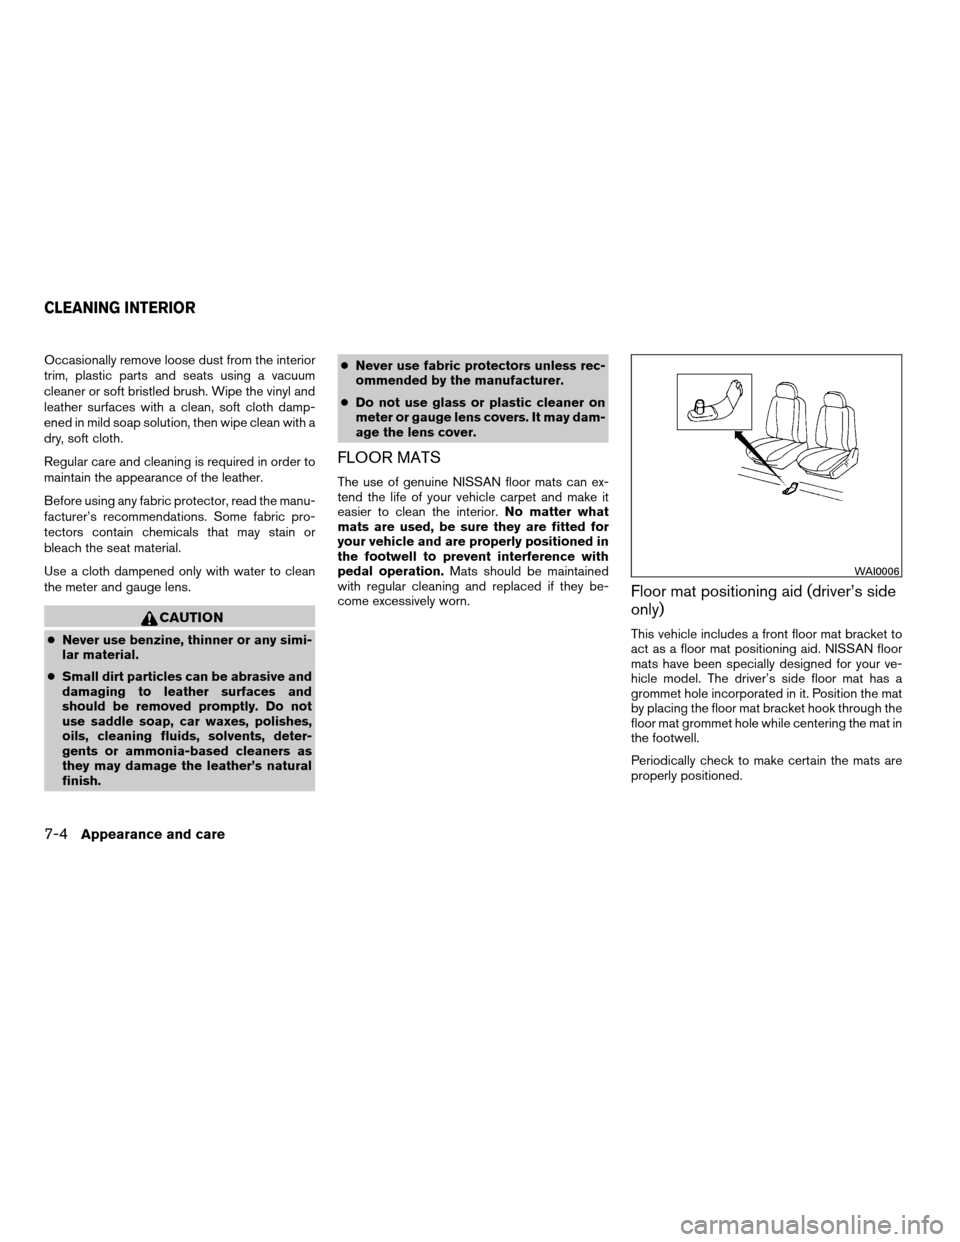
This vehicle includes a front floor mat bracket to
act as a floor mat positioning aid. NISSAN floor
mats have been specially designed for your ve-
hicle model. The driver’s side floor mat has a
grommet hole incorporated in it. Position the mat
by placing the floor mat bracket hook through the
floor mat grommet hole while centering the mat in
the footwell.
Periodically check to make certain the mats are
properly positioned.
WAI0006
CLEANING INTERIOR
7-4Appearance and care
ZREVIEW COPYÐ2007 Xterra(xtr)
Owners ManualÐUSA_English(nna)
02/27/07Ðdebbie
X
Page 249 of 304
If you have a flat tire, see the “In case of
emergency” section of this manual.
TIRE PRESSURE
Tire Pressure Monitoring System
(TPMS)
This vehicle is equipped with the Tire
Pressure Monitoring System (TPMS) . It
monitors tire pressure of all tires except
the spare. When the low tire pressure
warning light is lit, one or more of your
tires is significantly under-inflated.
The TPMS will activate only when the
vehicle is driven at speeds above 16 MPH
(25 km/h) . Also, this system may not de-
tect a sudden drop in tire pressure (for
example a flat tire while driving) .
For more details, refer to “Low tire pres-
sure warning light” in the “Instruments and
controls” section, “Tire pressure informa-
tion” in the “Display screen, heater, air
conditioner and audio systems” section,
“Tire Pressure Monitoring System
(TPMS)” in the “Starting and driving” sec-
tion, and “Flat tire” in the “In case of emer-
gency” section.
Tire inflation pressure
Check the tire pressures (including the
spare) often and always prior to long dis-
tance trips. The recommended tire pres-
sure specifications are shown on the
F.M.V.S.S./C.M.V.S.S. label or the Tire
and Loading Information label under the
9Cold Tire Inflation Pressure9heading.
The Tire and Loading Information label is
affixed to the driver side center pillar. Tire
pressures should be checked regularly
because:
cMost tires naturally lose air over time.
cTires can lose air suddenly when
driven over potholes or other objects
or if the vehicle strikes a curb while
parking.
The tire pressures should be checked
when the tires are cold. The tires are
considered COLD after the vehicle has
been parked for 3 or more hours, or driven
less than 1 mile (1.6 km) at moderate
speeds.Incorrect tire pressure, including un-
der inflation, may adversely affect
tire life and vehicle handling.
WARNING
cImproperly inflated tires can fail
suddenly and cause an accident.
cThe Gross Vehicle Weight Rating
(GVWR) is located on the
F.M.V.S.S./C.M.V.S.S. label. The
vehicle weight capacity is indi-
cated on the Tire and Loading
Information label. Do not load
your vehicle beyond this capac-
ity. Overloading your vehicle may
result in reduced tire life, unsafe
operating conditions due to pre-
mature tire failure, or unfavor-
able handling characteristics and
could also lead to a serious acci-
dent. Loading beyond the speci-
fied capacity may also result in
failure of other vehicle
components.
WHEELS AND TIRES
Maintenance and do-it-yourself8-31
ZREVIEW COPYÐ2007 Xterra(xtr)
Owners ManualÐUSA_English(nna)
02/27/07Ðdebbie
X
Page 250 of 304

cBefore taking a long trip, or
whenever you heavily load your
vehicle, use a tire pressure gauge
to ensure that the tire pressures
are at the specified level.
cDo not drive your vehicle over 85
MPH (137 km/h) unless it is
equipped with high speed rated
tires. Driving faster than 85 MPH
(137 km/h) may result in tire fail-
ure, loss of control and possible
injury.
cFor additional information re-
garding tires, refer to “Important
Tire Safety Information” (US) or
“Tire Safety Information”
(Canada) in the Warranty Infor-
mation Booklet.
Tire and loading information label
s1Seating capacity: The maximum num-
ber of occupants that can be seated
in the vehicle.
s2Vehicle load limit: See loading infor-
mation in the “Technical and con-
sumer information” section.
s3Original tire size: The size of the tires
originally installed on the vehicle at
the factory.
s4Cold tire pressure: Inflate the tires to
this pressure when the tires are cold.
Tires are considered COLD after the
vehicle has been parked for 3 or more
hours, or driven less than 1 mile (1.6
km) at moderate speeds. The recom-
mended cold tire inflation is set by the
manufacturer to provide the best bal-
ance of tire wear, vehicle handling,
driveability, tire noise, etc., up to the
vehicle’s GVWR.
s5Tire size – refer to “Tire labeling” later
in this section.
LDI0485
8-32Maintenance and do-it-yourself
ZREVIEW COPYÐ2007 Xterra(xtr)
Owners ManualÐUSA_English(nna)
02/27/07Ðdebbie
X