2007 NISSAN XTERRA stop start
[x] Cancel search: stop startPage 128 of 304
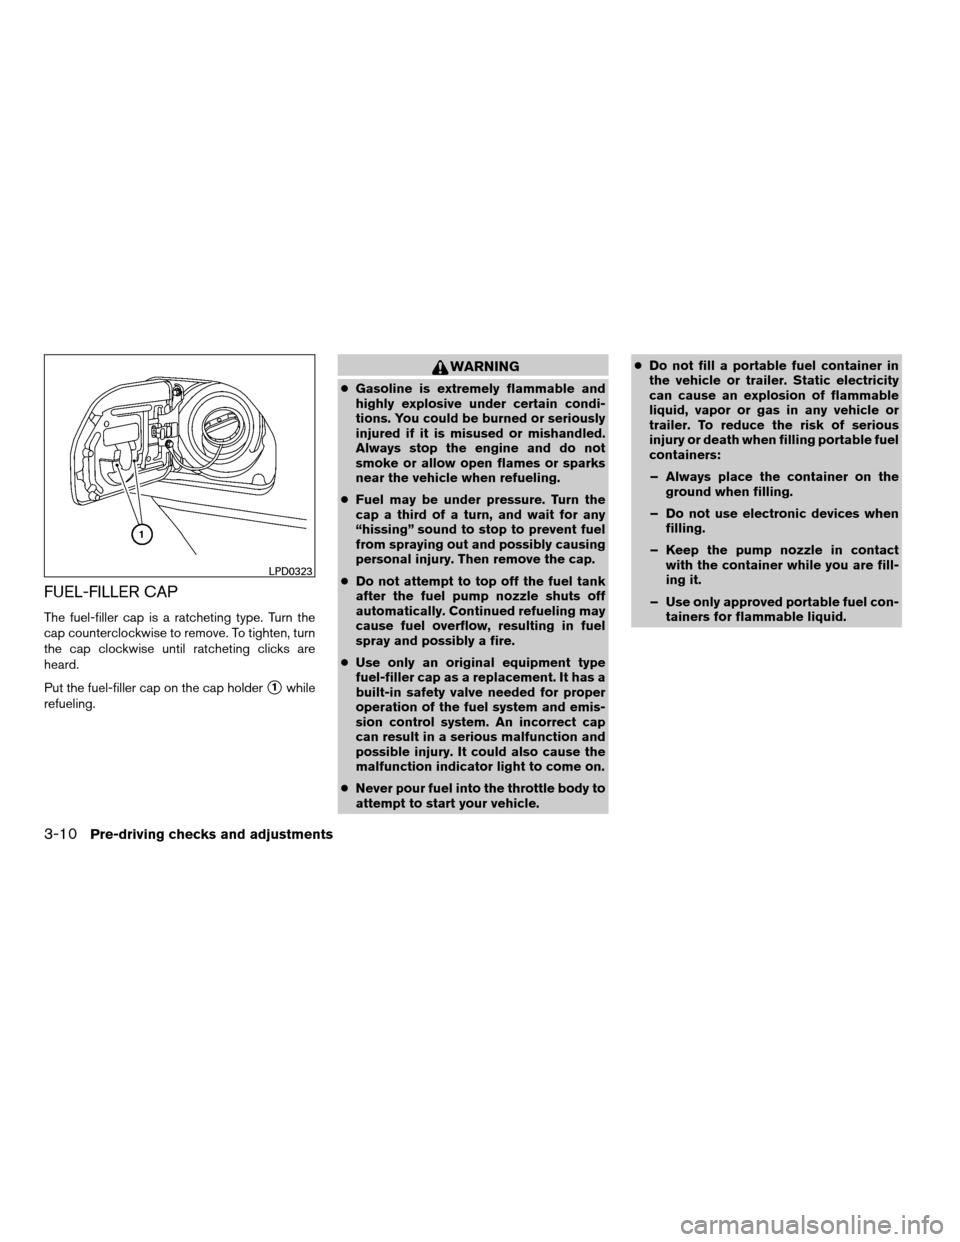
FUEL-FILLER CAP
The fuel-filler cap is a ratcheting type. Turn the
cap counterclockwise to remove. To tighten, turn
the cap clockwise until ratcheting clicks are
heard.
Put the fuel-filler cap on the cap holder
s1while
refueling.
WARNING
cGasoline is extremely flammable and
highly explosive under certain condi-
tions. You could be burned or seriously
injured if it is misused or mishandled.
Always stop the engine and do not
smoke or allow open flames or sparks
near the vehicle when refueling.
cFuel may be under pressure. Turn the
cap a third of a turn, and wait for any
“hissing” sound to stop to prevent fuel
from spraying out and possibly causing
personal injury. Then remove the cap.
cDo not attempt to top off the fuel tank
after the fuel pump nozzle shuts off
automatically. Continued refueling may
cause fuel overflow, resulting in fuel
spray and possibly a fire.
cUse only an original equipment type
fuel-filler cap as a replacement. It has a
built-in safety valve needed for proper
operation of the fuel system and emis-
sion control system. An incorrect cap
can result in a serious malfunction and
possible injury. It could also cause the
malfunction indicator light to come on.
cNever pour fuel into the throttle body to
attempt to start your vehicle.cDo not fill a portable fuel container in
the vehicle or trailer. Static electricity
can cause an explosion of flammable
liquid, vapor or gas in any vehicle or
trailer. To reduce the risk of serious
injury or death when filling portable fuel
containers:
– Always place the container on the
ground when filling.
– Do not use electronic devices when
filling.
– Keep the pump nozzle in contact
with the container while you are fill-
ing it.
– Use only approved portable fuel con-
tainers for flammable liquid.
LPD0323
3-10Pre-driving checks and adjustments
ZREVIEW COPYÐ2007 Xterra(xtr)
Owners ManualÐUSA_English(nna)
02/27/07Ðdebbie
X
Page 149 of 304

level. You can also use the SEEK/TRACK button
to adjust Fader and Balance modes. Fader ad-
justs the sound level between the front and rear
speakers and Balance adjusts the sound be-
tween the right and left speakers.
Once you have adjusted the sound quality to the
desired level, press the AUDIO button repeatedly
until the radio or CD display reappears. Other-
wise, the radio or CD display will automatically
reappear after about 7 seconds.
Clock set
1. Press and hold the MENU button until it
beeps (for more than 2 seconds) to enter the
clock set mode.
2. The hours will start flashing. Press the
SEEK/TRACK button
orto ad-
just the hours.
3. Press the MENU button until the radio beeps
to switch to the minute adjustment.
4. The minutes will start flashing. Press the
SEEK/TRACK button
orto ad-
just the minutes.
5. Press the MENU button again to exit the
clock set mode.
The display will return to the regular clock display
after 7 seconds, or press the MENU button again
to return to the regular clock display.
FM/AM radio operation
FM/AM band select:
Pressing the BAND button will change the band
as follows:
AMÃ!FM
When the BAND button is pressed while the
ignition switch is in the ACC or ON position, the
radio will come on at the station last played.
If a compact disc is playing when the BAND
button is pressed, the compact disc will auto-
matically be turned off and the last radio station
played will come on.
The FM stereo indicator, ST, illuminates during
FM stereo reception. When the stereo broadcast
signal is weak, the radio automatically changes
from stereo to monaural reception.
MENU button:
Press the MENU button while the radio is playing
to change the tuning mode as follows:
SEEK tuning mode!TUNE mode!SCAN
tuning mode
TUNE and SCAN are shown in the display win-
dow for each mode. No icon is displayed for
SEEK tuning.
SEEK tuning
While in SEEK tuning mode, press the
SEEK/TRACK button
orfor less
than 1.5 seconds. SEEK tuning begins from low
to high frequencies or high to low frequencies,
depending on which button is pressed, and stops
at the next broadcasting station. Press the
button, once the highest broadcasting station is
reached, the radio continues in the SEEK mode
at the lowest broadcasting station. Press
the
button, once the lowest broadcasting
station is reached, the radio continues in the
SEEK mode at the highest broadcasting station.
Manual tuning
While in TUNE mode, press the SEEK/TRACK
button
orfor manual tuning. Press
and hold the SEEK/TRACK button
orto move quickly through the channels.
SCAN tuning
While in SCAN tuning mode, press and hold the
SEEK/TRACK button
orfor more
than 1.5 seconds.
Scan tuning begins from low to high frequencies
or high to low frequencies, depending on which
SEEK/TRACK button
oris pressed.
scan tuning stops at each broadcasting station
Heater, air conditioner and audio systems4-17
ZREVIEW COPYÐ2007 Xterra(xtr)
Owners ManualÐUSA_English(nna)
02/27/07Ðdebbie
X
Page 150 of 304

for 5 seconds. When scanning, SCAN illumi-
nates in the display and the radio station blinks.
When temporarily stopped on a station, SCAN
blinks and the radio station display is solid.
Pressing the SEEK/TRACK button
oragain during this 5 second period stops
scan tuning and the radio remains tuned to that
radio station.
Station memory operations:
18 stations can be set for the FM and AM radio to
the A, B and C preset button in any combination
of AM or FM stations.
1. Press the PRESET A·B·C button to change
between storage banks. The radio displays
the icon A, B or C to indicate which set of
presets are active.
2. Tune to the desired station using manual
TUNE or SEEK tuning. Press and hold any of
the desired station memory buttons (1 – 6)
until a beep sound is heard. (The radio mutes
when the select button is pressed.)
3. The channel indicator will then come on and
the sound will resume. Programming is now
complete.
4. Other buttons can be set in the same man-
ner.If the battery cable is disconnected, or if the fuse
opens, the radio memory will be canceled. In that
case, reset the desired stations.
Compact disc (CD) player operation
Turn the ignition key to the ACC or ON position,
and carefully insert the compact disc into the slot
with the label side up. The compact disc is auto-
matically pulled into the slot and starts to play.
If the radio is already operating, it automatically
turns off and the compact disc begins to play.
CD button:
When the CD button is pressed with a compact
disc loaded and the radio playing, the radio turns
off and the compact disc starts to play.
SEEK/TRACK button:
When the SEEK/TRACK button
is
pressed while the compact disc is playing, the
next track following the present one starts to play
from the beginning. Press SEEK/TRACK
button
several times to skip several tracks.
Each time the button is pressed, the CD ad-
vances 1 additional track. The track number ap-
pears in the display window. (When the last track
on the compact disc is skipped, the first track is
played.)When SEEK/TRACK button
is pressed,
the track being played returns to the beginning.
Press SEEK/TRACK button
several times
to skip back several tracks. Each time the button
is pressed the CD moves back 1 track.
SEEK/TRACK (FF/REV)
button:
Press and hold the SEEK/TRACK button
orwhile a compact disc is playing, the
compact disc plays at an increased speed while
fast forwarding or rewinding. When the button is
released, the compact disc returns to normal play
speed.
MENU button:
When the MENU button is pressed while the
compact disc is playing, the play pattern changes
as follows:
RPTÃ!MIXÃ!Normal
RPT: The track that is currently playing will be
repeated.
MIX: The order of the tracks on the disc will be
mixed during play, not following the sequence on
the compact disc. The same track may be re-
peated twice. Press the
button while in the
MIX mode and tracks will be chosen at random.
When a new compact disc is inserted, the play
pattern automatically changes to normal.
4-18Heater, air conditioner and audio systems
ZREVIEW COPYÐ2007 Xterra(xtr)
Owners ManualÐUSA_English(nna)
02/27/07Ðdebbie
X
Page 162 of 304
WARNING
cDo not leave children or adults who
would normally require the assistance
of others alone in your vehicle. Pets
should also not be left alone. They
could accidentally injure themselves or
others through inadvertent operation of
the vehicle. Also, on hot, sunny days,
temperatures in a closed vehicle could
quickly become high enough to cause
severe or possibly fatal injuries to
people or animals.
cProperly secure all cargo with ropes or
straps to help prevent it from sliding or
shifting. Do not place cargo higher than
the seatbacks. In a sudden stop or col-
lision, unsecured cargo could cause
personal injury.
EXHAUST GAS (carbon monoxide)
WARNING
cDo not breathe exhaust gases; they
contain colorless and odorless carbon
monoxide. Carbon monoxide is danger-
ous. It can cause unconsciousness or
death.cIf you suspect that exhaust fumes are
entering the vehicle, drive with all win-
dows fully open, and have the vehicle
inspected immediately.
cDo not run the engine in closed spaces
such as a garage.
cDo not park the vehicle with the engine
running for any extended length of time.
cKeep the lift gate and rear windows
closed while driving, otherwise exhaust
gases could be drawn into the passen-
ger compartment. If you must drive with
the lift gate or rear windows open, fol-
low these precautions:
1. Open all the windows.
2. Set the
air recirculation but-
ton (if so equipped) to off and the fan
control dial to 4 (high) to circulate
the air.
cIf electrical wiring or other cable con-
nections must pass to a trailer through
the seal on the lift gate or the body,
follow the manufacturer’s recommen-
dation to prevent carbon monoxide en-
try into the vehicle.cThe exhaust system and body should be
inspected by a qualified mechanic
whenever:
a. The vehicle is raised for service.
b. You suspect that exhaust fumes are
entering into the passenger
compartment.
c. You notice a change in the sound of
the exhaust system.
d. You have had an accident involving
damage to the exhaust system, un-
derbody, or rear of the vehicle.
THREE-WAY CATALYST
The three-way catalyst is an emission control
device installed in the exhaust system. Exhaust
gases in the three-way catalyst are burned at
high temperatures to help reduce pollutants.
WARNING
cThe exhaust gas and the exhaust sys-
tem are very hot. Keep people, animals
or flammable materials away from the
exhaust system components.
PRECAUTIONS WHEN STARTING
AND DRIVING
5-2Starting and driving
ZREVIEW COPYÐ2007 Xterra(xtr)
Owners ManualÐUSA_English(nna)
02/27/07Ðdebbie
X
Page 163 of 304
cDo not stop or park the vehicle over
flammable materials such as dry grass,
waste paper or rags. They may ignite
and cause a fire.
CAUTION
cDo not use leaded gasoline. Deposits
from leaded gasoline will seriously re-
duce the three-way catalyst’s ability to
help reduce exhaust pollutants.
cKeep your engine tuned up. Malfunc-
tions in the ignition, fuel injection, or
electrical systems can cause overrich
fuel flow into the three-way catalyst,
causing it to overheat. Do not keep driv-
ing if the engine misfires, or if notice-
able loss of performance or other un-
usual operating conditions are
detected. Have the vehicle inspected
promptly by a NISSAN dealer.
cAvoid driving with an extremely low fuel
level. Running out of fuel could cause
the engine to misfire, damaging the
three-way catalyst.
cDo not race the engine while warming it
up.
cDo not push or tow your vehicle to start
the engine.
TIRE PRESSURE MONITORING
SYSTEM (TPMS)
Each tire, including the spare (if provided) ,
should be checked monthly when cold and in-
flated to the inflation pressure recommended by
the vehicle manufacturer on the vehicle placard
or tire inflation pressure label. (If your vehicle has
tires of a different size than the size indicated on
the vehicle placard or tire inflation pressure label,
you should determine the proper tire inflation
pressure for those tires.)
As an added safety feature, your vehicle has been
equipped with a Tire Pressure Monitoring System
(TPMS) that illuminates a low tire pressure telltale
when one or more of your tires is significantly
under-inflated. Accordingly, when the low tire pres-
sure telltale illuminates, you should stop and check
your tires as soon as possible, and inflate them to
the proper pressure. Driving on a significantly
under-inflated tire causes the tire to overheat and
can lead to tire failure. Under-inflation also reduces
fuel efficiency and tire tread life, and may affect the
vehicle’s handling and stopping ability.
Please note that the TPMS is not a substitute for
proper tire maintenance, and it is the driver’s
responsibility to maintain correct tire pressure,
even if under-inflation has not reached the level to
trigger illumination of the TPMS low tire pressure
telltale.Your vehicle has also been equipped with a
TPMS malfunction indicator to indicate when the
system is not operating properly. The TPMS mal-
function indicator is combined with the low tire
pressure telltale. When the system detects a
malfunction, the telltale will flash for approxi-
mately one minute and then remain continuously
illuminated. This sequence will continue upon
subsequent vehicle start-ups as long as the mal-
function exists. When the malfunction indicator is
illuminated, the system may not be able to detect
or signal low tire pressure as intended. TPMS
malfunctions may occur for a variety of reasons,
including the installation of replacement or alter-
nate tires or wheels on the vehicle that prevent
the TPMS from functioning properly. Always
check the TPMS malfunction telltale after replac-
ing one or more tires or wheels on your vehicle to
ensure that the replacement or alternate tires and
wheels allow the TPMS to continue to function
properly.
Additional information:
cThe TPMS does not monitor the tire pres-
sure of the spare tire.
cThe TPMS will activate only when the vehicle
is driven at speeds above 16 MPH (25
km/h) . Also, this system may not detect a
sudden drop in tire pressure (for example a
flat tire while driving) .
Starting and driving5-3
ZREVIEW COPYÐ2007 Xterra(xtr)
Owners ManualÐUSA_English(nna)
02/27/07Ðdebbie
X
Page 164 of 304
cThe low tire pressure warning light does not
automatically turn off when the tire pressure
is adjusted. After the tire is inflated to the
recommended pressure, the vehicle must be
driven at speeds above 16 MPH (25 km/h)
to activate the TPMS and turn off the low tire
pressure warning light. Use a tire pressure
gauge to check the tire pressure.
cTire pressure rises and falls depending on
the heat caused by the vehicle’s operation
and the outside temperature. Low outside
temperature can lower the temperature of
the air inside the tire which can cause a
lower tire inflation pressure. This may cause
the low tire pressure warning light to illumi-
nate. If the warning light illuminates in low
ambient temperature, check the tire pres-
sure for all four tires.
cYou can also check the pressure of all tires
(except the spare tire) on the display screen.
The order of the tire pressure figures dis-
played on the screen does not correspond
with the actual order of the tire position. See
“Tire pressure information” in the “Display
screen, heater, air conditioner and audio
systems” section.For additional information, see “Low tire pressure
warning light” in the “Instruments and controls”
section, “Tire Pressure Monitoring System
(TPMS)” in the “In case of emergency” section.
WARNING
cIf the low tire pressure warning light
illuminates while driving, avoid sudden
steering maneuvers or abrupt braking,
reduce vehicle speed, pull off the road
to a safe location and stop the vehicle
as soon as possible. Serious vehicle
damage could occur and may lead to an
accident and could result in serious
personal injury. Check the tire pressure
for all four tires. Adjust the tire pressure
to the recommended COLD tire pres-
sure shown on the Tire and Loading
Information label to turn the low tire
pressure warning light OFF. If you have
a flat tire, replace it with a spare tire as
soon as possible. (See “Flat tire” in the
“In case of emergency” section for
changing a flat tire.)cWhen a spare tire is mounted or a wheel
is replaced, tire pressure will not be
indicated, the TPMS will not function
and the low tire pressure warning light
will flash for approximately 1 minute.
The light will remain on after 1 minute.
Contact your NISSAN dealer as soon as
possible for tire replacement and/or
system resetting.
cReplacing tires with those not originally
specified by NISSAN could affect the
proper operation of the TPMS.
cDo not inject any tire liquid or aerosol
tire sealant into the tires, as this may
cause a malfunction of the tire pressure
sensors.
CAUTION
Do not place metalized film or any metal
parts (antenna, etc.) on the windows. This
may cause poor reception of the signals
from the tire pressure sensors, and the
TPMS will not function properly.
Some devices and transmitters may temporarily
interfere with the operation of the TPMS and
cause the low tire pressure warning light to illu-
minate.
5-4Starting and driving
ZREVIEW COPYÐ2007 Xterra(xtr)
Owners ManualÐUSA_English(nna)
02/27/07Ðdebbie
X
Page 172 of 304
AUTOMATIC TRANSMISSION
WARNING
cDo not depress the accelerator pedal
while shifting from P (Park) or N (Neu-
tral) to R (Reverse) , D (Drive) , 3, 2 or 1.
Always depress the brake pedal until
shifting is completed. Failure to do so
could cause you to lose control and
have an accident.
cCold engine idle speed is high, so use
caution when shifting into a forward or
reverse gear before the engine has
warmed up.
cNever shift to P (Park) or R (Reverse)
while the vehicle is moving. This could
cause an accident.
CAUTION
cWhen stopping the vehicle on an uphill
grade, do not hold the vehicle by de-
pressing the accelerator pedal. The foot
brake should be used for this purpose.
cDo not downshift abruptly on slippery
roads. This may cause a loss of control.
The automatic transmission in your vehicle is
electronically controlled to produce maximum
power and smooth operation.The recommended operating procedures for this
transmission are shown on the following pages.
Follow these procedures for maximum vehicle
performance and driving enjoyment.
Starting the vehicle
1. After starting the engine, fully depress the
foot brake pedal before moving the shift
selector lever out of the P (Park) position.
2. Keep the foot brake pedal depressed and
move the shift selector lever into a driving
gear.
3. Release the foot brake, then gradually start
the vehicle in motion.
The automatic transmission is designed so
the foot brake pedal MUST be depressed
before shifting from P (Park) to any drive
position while the ignition switch is in the
ON position.
The shift selector lever cannot be moved
out of P (Park) and into any of the other
gear positions if the ignition key is turned
to the LOCK, OFF or ACC position or if the
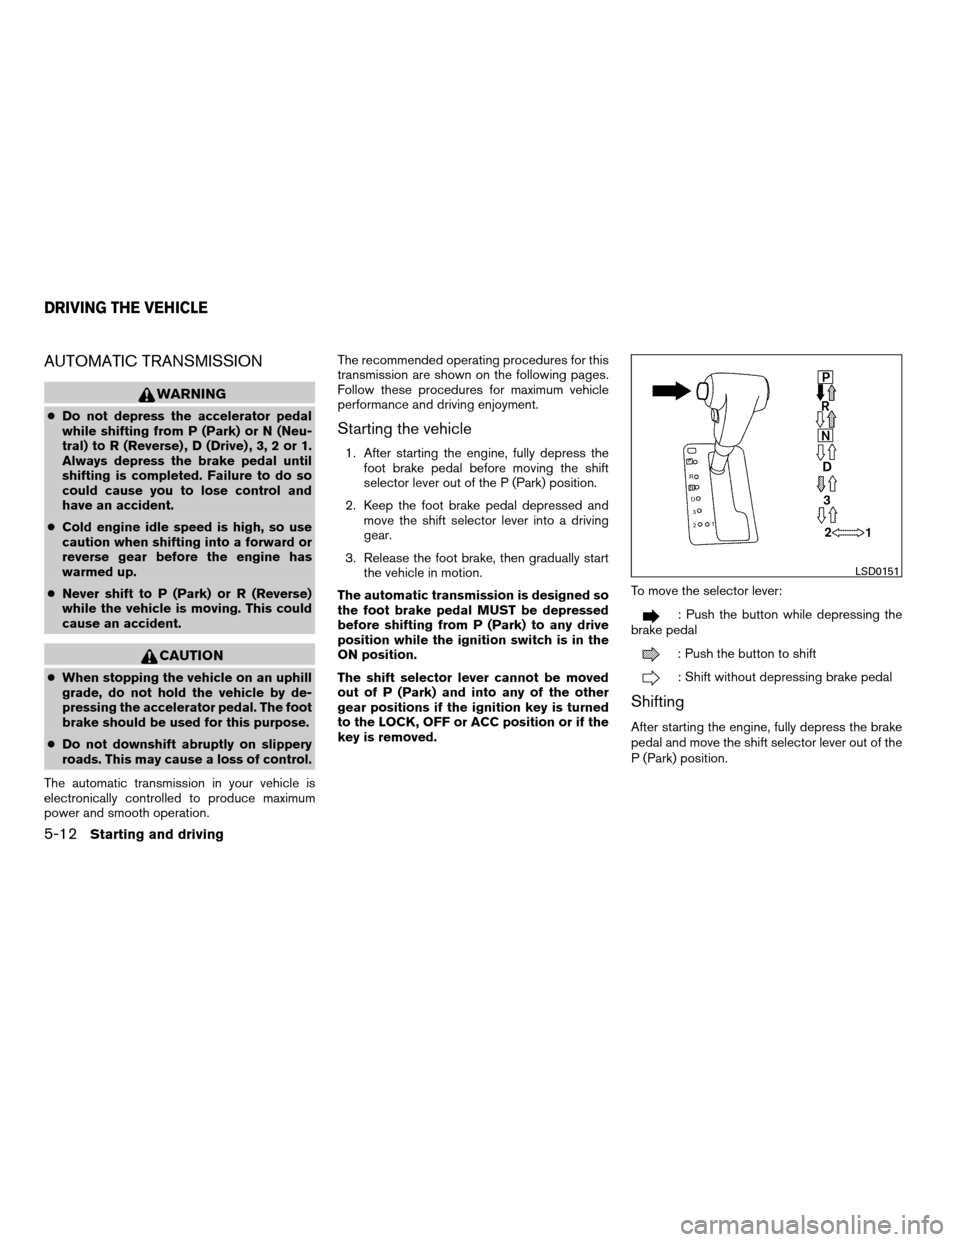
key is removed.To move the selector lever:
: Push the button while depressing the
brake pedal
: Push the button to shift
: Shift without depressing brake pedal
Shifting
After starting the engine, fully depress the brake
pedal and move the shift selector lever out of the
P (Park) position.
LSD0151
DRIVING THE VEHICLE
5-12Starting and driving
ZREVIEW COPYÐ2007 Xterra(xtr)
Owners ManualÐUSA_English(nna)
02/27/07Ðdebbie
X
Page 173 of 304
WARNING
Apply the parking brake if the selector
lever is in any position while the engine is
not running. Failure to do so could cause
the vehicle to move unexpectedly or roll
away and result in serious personal injury
or property damage.
If the key is turned to the OFF or ACC position for
any reason while the vehicle is in N (Neutral) , or
any D (Drive) position, the key cannot be turned
to the LOCK position and be removed from the
ignition switch. Move the selector lever to the P
(Park) position, then the key can be turned to
LOCK.
P (Park):
Use this selector position when the vehicle is
parked or when starting the engine. Make sure
the vehicle is completely stopped.The brake
pedal should be depressed to move the
selector lever from N (Neutral) or any drive
position to P (Park) .Apply the parking brake.
When parking on a hill, apply the parking brake
first, then shift the selector lever into the P (Park)
position.R (Reverse):CAUTION
Use this position only when the vehicle is
completely stopped.
Use this position to back up. Make sure the
vehicle is completely stopped before selecting
the R (Reverse) position.The brake pedal
must be depressed to move the selector
lever from P (Park) , N (Neutral) or any drive
position to R (Reverse) .
N (Neutral):
Neither forward nor reverse gear is engaged. The
engine can be started in this position. You may
shift to N (Neutral) and restart a stalled engine
while the vehicle is moving.
D (Drive):
Use this position for all normal forward driving.
3 (Third gear):
Use this position for driving up and down long
slopes where engine braking would be advanta-
geous.
Do not downshift into the 3 position at speeds
over the following and do not exceed the follow-
ing speeds in the 3 position.2WD:
62 MPH (100 km/h)
4H:
62 MPH (100 km/h)
4LO:
31 MPH (50 km/h)
2 (Second gear):
Use this position for hill climbing or engine brak-
ing on downhill grades.
Do not downshift into the 2 position at speeds
over the following and do not exceed the follow-
ing speeds in the 2 position.
2WD:
71 MPH (115 km/h)
4H:
62 MPH (100 km/h)
4LO:
31 MPH (50 km/h)
1 (Low gear):
Use this position when climbing steep hills slowly
or slow driving through deep snow, sand or mud,
or for maximum engine braking on steep downhill
grades.
Starting and driving5-13
ZREVIEW COPYÐ2007 Xterra(xtr)
Owners ManualÐUSA_English(nna)
02/27/07Ðdebbie
X