2007 NISSAN XTERRA tow
[x] Cancel search: towPage 9 of 304
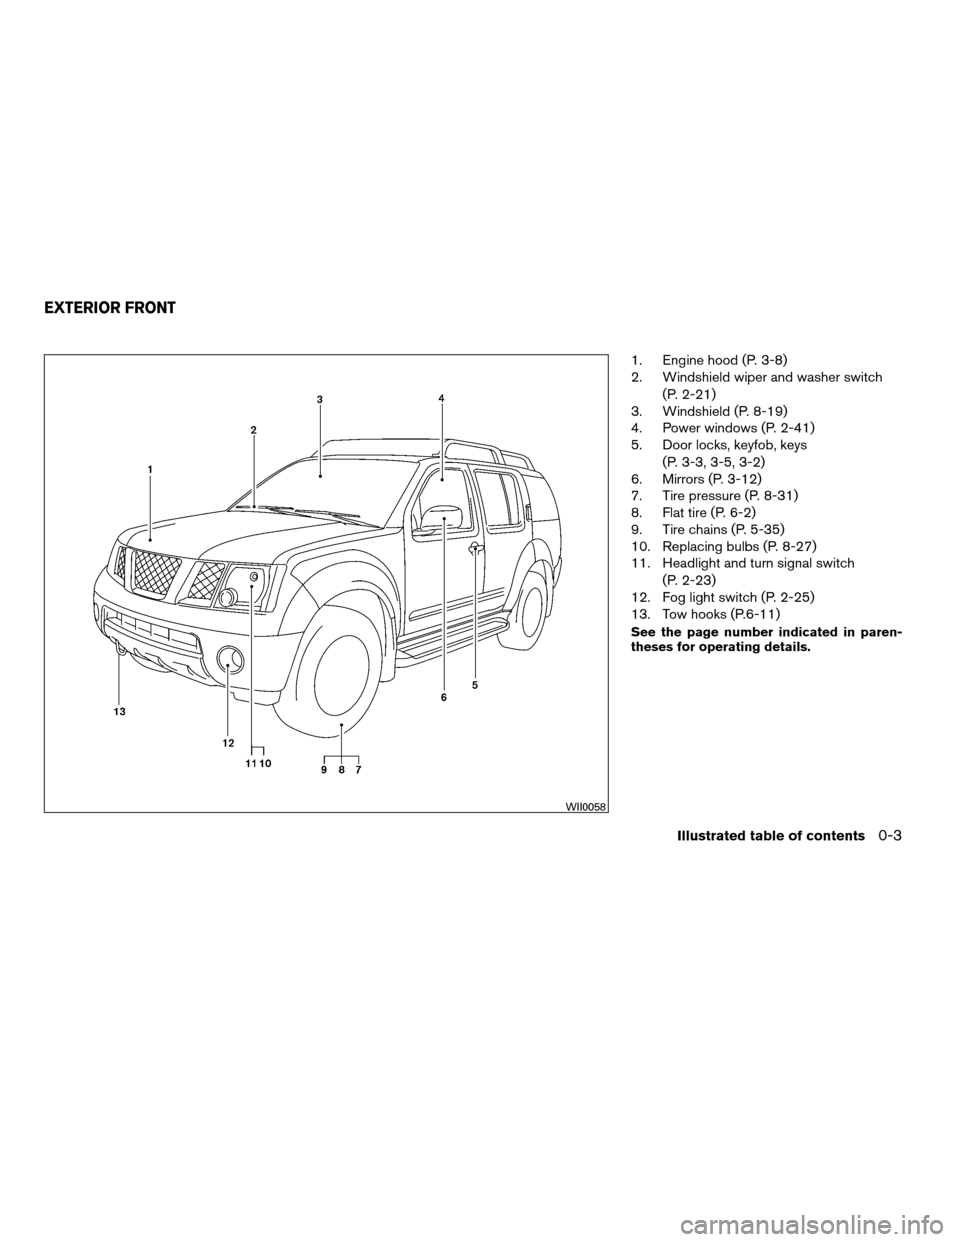
1. Engine hood (P. 3-8)
2. Windshield wiper and washer switch
(P. 2-21)
3. Windshield (P. 8-19)
4. Power windows (P. 2-41)
5. Door locks, keyfob, keys
(P. 3-3, 3-5, 3-2)
6. Mirrors (P. 3-12)
7. Tire pressure (P. 8-31)
8. Flat tire (P. 6-2)
9. Tire chains (P. 5-35)
10. Replacing bulbs (P. 8-27)
11. Headlight and turn signal switch
(P. 2-23)
12. Fog light switch (P. 2-25)
13. Tow hooks (P.6-11)
See the page number indicated in paren-
theses for operating details.
WII0058
EXTERIOR FRONT
Illustrated table of contents0-3
ZREVIEW COPYÐ2007 Xterra(xtr)
Owners ManualÐUSA_English(nna)
02/27/07Ðdebbie
X
Page 23 of 304
WARNING
cIf you fold the front passenger’s seat-
back flat forward to carry longer ob-
jects, be sure this cargo is properly se-
cured and not near an air bag. In a
crash, an inflating air bag might force
that object toward a person. This could
cause severe injury or even death. Se-
cure objects away from the area in
which an air bag would inflate. See
“Precautions on supplemental restraint
system” later in this section.
cNever allow anyone to ride in the cargo
area or on the front passenger’s seat
when it is in the fold-down position. Use
of these areas by passengers could re-
sult in serious injury in an accident or
sudden stop.
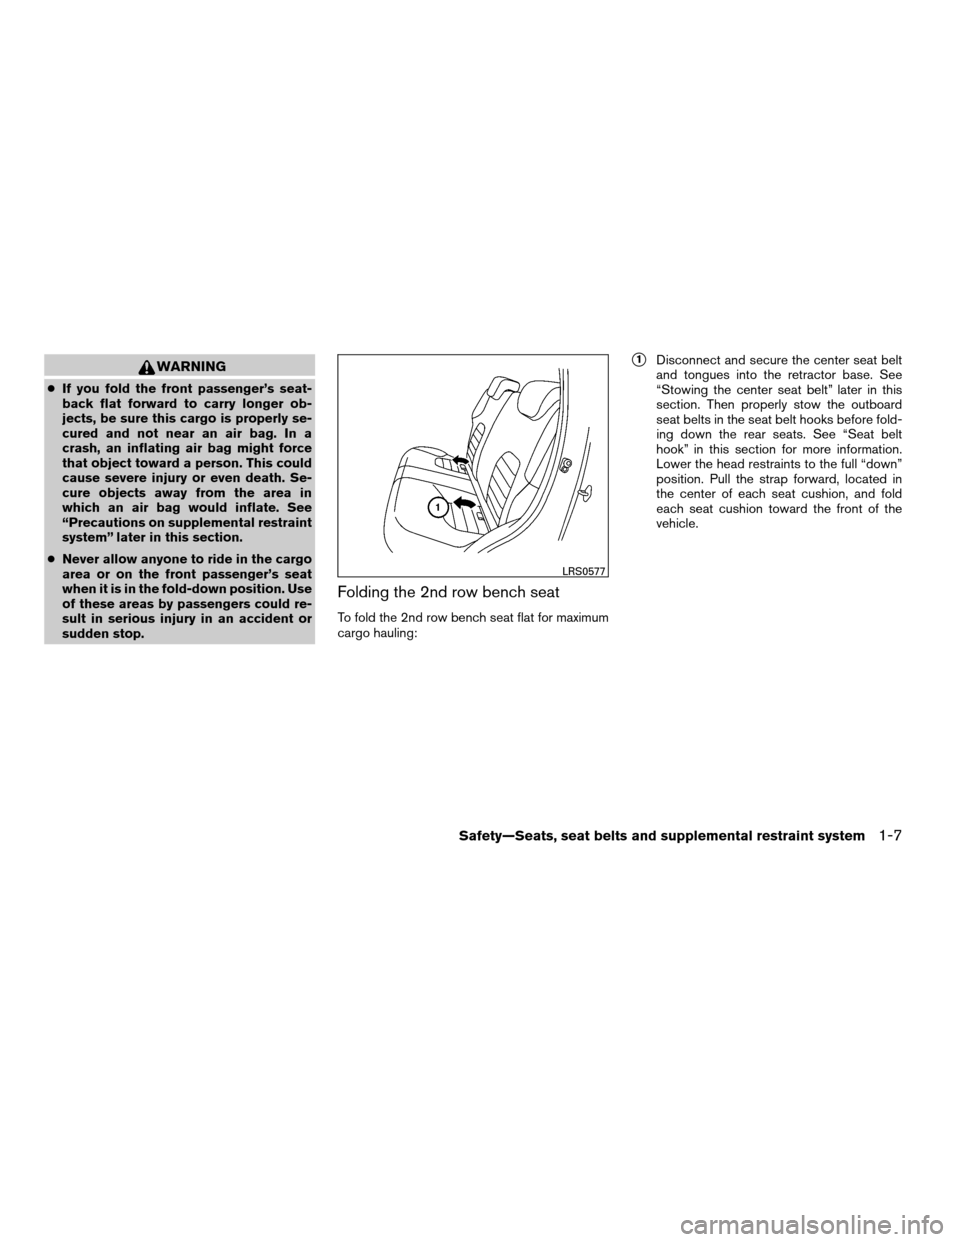
Folding the 2nd row bench seat
To fold the 2nd row bench seat flat for maximum
cargo hauling:
s1Disconnect and secure the center seat belt
and tongues into the retractor base. See
“Stowing the center seat belt” later in this
section. Then properly stow the outboard
seat belts in the seat belt hooks before fold-
ing down the rear seats. See “Seat belt
hook” in this section for more information.
Lower the head restraints to the full “down”
position. Pull the strap forward, located in
the center of each seat cushion, and fold
each seat cushion toward the front of the
vehicle.
LRS0577
Safety—Seats, seat belts and supplemental restraint system1-7
ZREVIEW COPYÐ2007 Xterra(xtr)
Owners ManualÐUSA_English(nna)
02/27/07Ðdebbie
X
Page 25 of 304
Removing the 2nd row bench seat
cushions
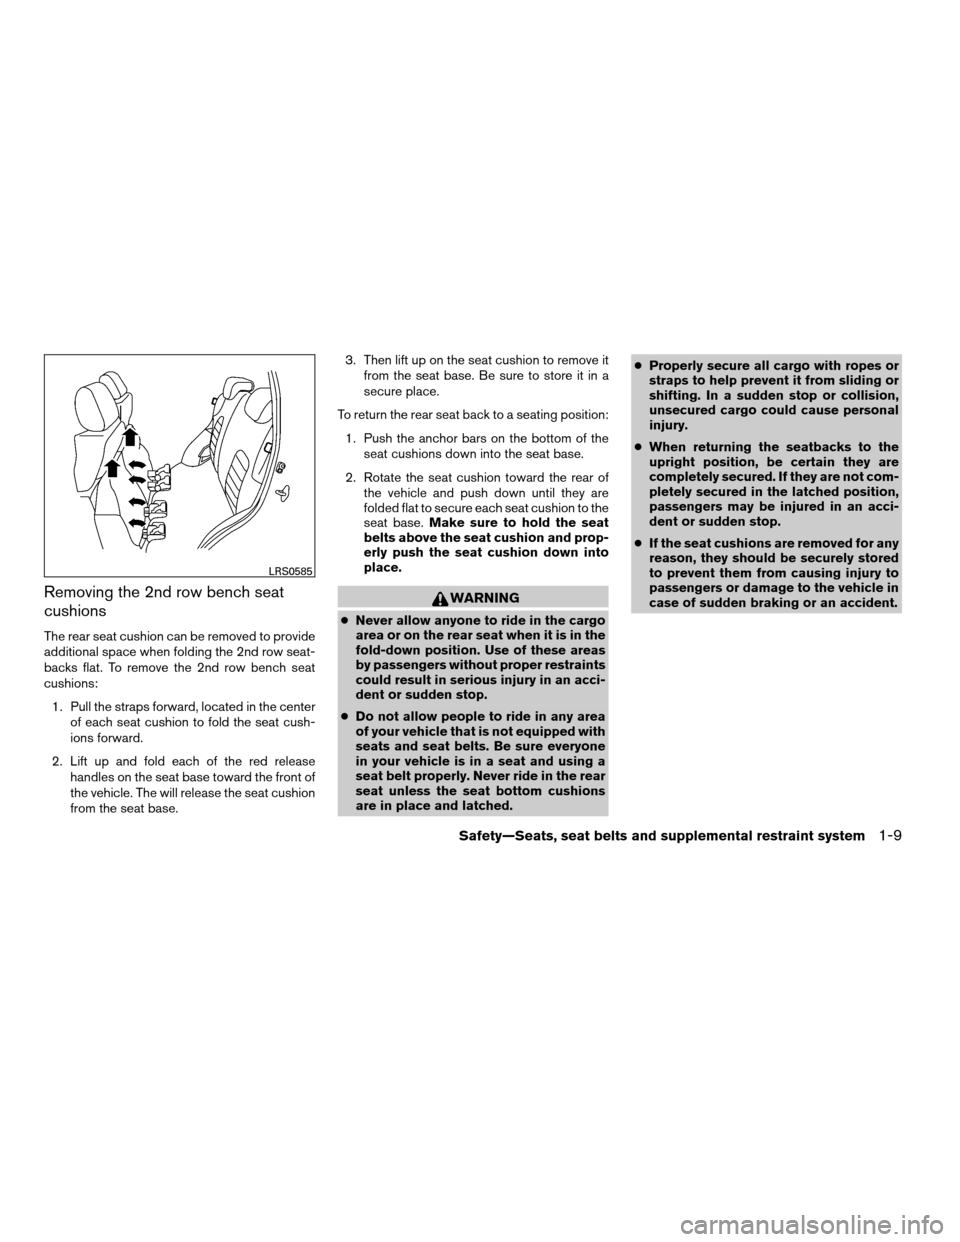
The rear seat cushion can be removed to provide
additional space when folding the 2nd row seat-
backs flat. To remove the 2nd row bench seat
cushions:
1. Pull the straps forward, located in the center
of each seat cushion to fold the seat cush-
ions forward.
2. Lift up and fold each of the red release
handles on the seat base toward the front of
the vehicle. The will release the seat cushion
from the seat base.3. Then lift up on the seat cushion to remove it
from the seat base. Be sure to store it in a
secure place.
To return the rear seat back to a seating position:
1. Push the anchor bars on the bottom of the
seat cushions down into the seat base.
2. Rotate the seat cushion toward the rear of
the vehicle and push down until they are
folded flat to secure each seat cushion to the
seat base.Make sure to hold the seat
belts above the seat cushion and prop-
erly push the seat cushion down into
place.
WARNING
cNever allow anyone to ride in the cargo
area or on the rear seat when it is in the
fold-down position. Use of these areas
by passengers without proper restraints
could result in serious injury in an acci-
dent or sudden stop.
cDo not allow people to ride in any area
of your vehicle that is not equipped with
seats and seat belts. Be sure everyone
in your vehicle is in a seat and using a
seat belt properly. Never ride in the rear
seat unless the seat bottom cushions
are in place and latched.cProperly secure all cargo with ropes or
straps to help prevent it from sliding or
shifting. In a sudden stop or collision,
unsecured cargo could cause personal
injury.
cWhen returning the seatbacks to the
upright position, be certain they are
completely secured. If they are not com-
pletely secured in the latched position,
passengers may be injured in an acci-
dent or sudden stop.
cIf the seat cushions are removed for any
reason, they should be securely stored
to prevent them from causing injury to
passengers or damage to the vehicle in
case of sudden braking or an accident.
LRS0585
Safety—Seats, seat belts and supplemental restraint system1-9
ZREVIEW COPYÐ2007 Xterra(xtr)
Owners ManualÐUSA_English(nna)
02/27/07Ðdebbie
X
Page 31 of 304
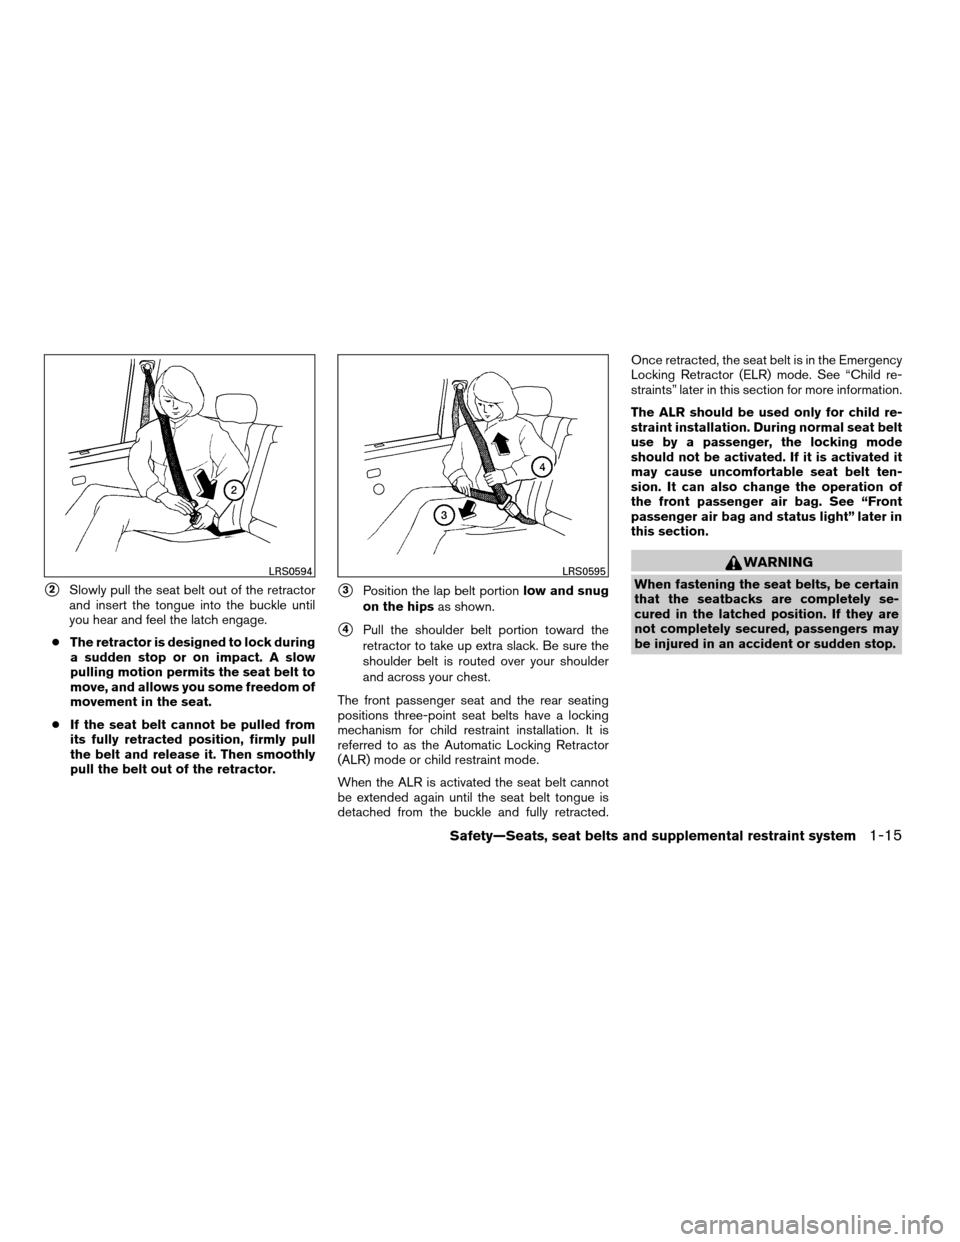
s2Slowly pull the seat belt out of the retractor
and insert the tongue into the buckle until
you hear and feel the latch engage.
cThe retractor is designed to lock during
a sudden stop or on impact. A slow
pulling motion permits the seat belt to
move, and allows you some freedom of
movement in the seat.
cIf the seat belt cannot be pulled from
its fully retracted position, firmly pull
the belt and release it. Then smoothly
pull the belt out of the retractor.s3Position the lap belt portionlow and snug
on the hipsas shown.
s4Pull the shoulder belt portion toward the
retractor to take up extra slack. Be sure the
shoulder belt is routed over your shoulder
and across your chest.
The front passenger seat and the rear seating
positions three-point seat belts have a locking
mechanism for child restraint installation. It is
referred to as the Automatic Locking Retractor
(ALR) mode or child restraint mode.
When the ALR is activated the seat belt cannot
be extended again until the seat belt tongue is
detached from the buckle and fully retracted.Once retracted, the seat belt is in the Emergency
Locking Retractor (ELR) mode. See “Child re-
straints” later in this section for more information.
The ALR should be used only for child re-
straint installation. During normal seat belt
use by a passenger, the locking mode
should not be activated. If it is activated it
may cause uncomfortable seat belt ten-
sion. It can also change the operation of
the front passenger air bag. See “Front
passenger air bag and status light” later in
this section.
WARNING
When fastening the seat belts, be certain
that the seatbacks are completely se-
cured in the latched position. If they are
not completely secured, passengers may
be injured in an accident or sudden stop.LRS0594LRS0595
Safety—Seats, seat belts and supplemental restraint system1-15
ZREVIEW COPYÐ2007 Xterra(xtr)
Owners ManualÐUSA_English(nna)
02/27/07Ðdebbie
X
Page 33 of 304
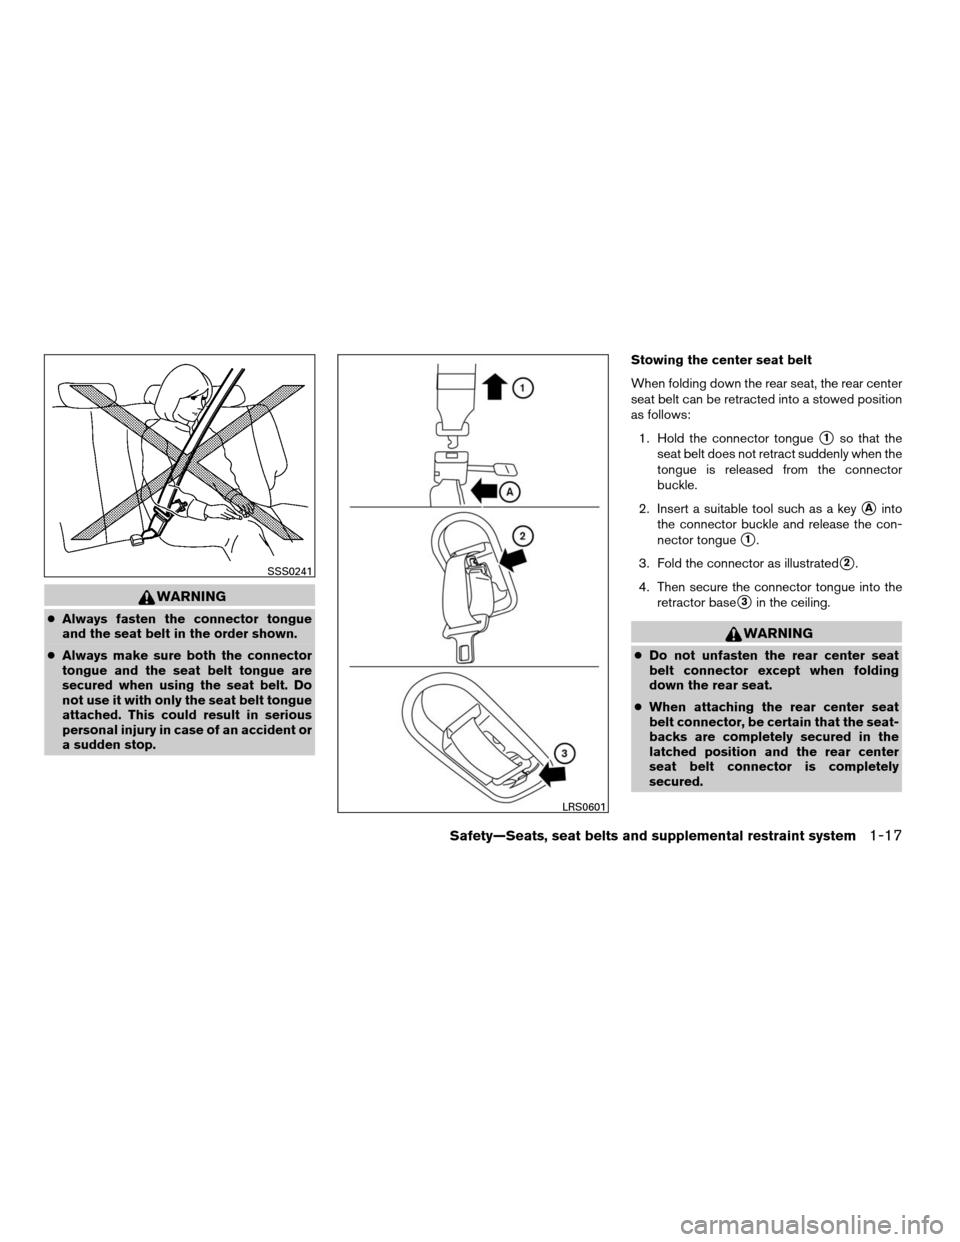
WARNING
cAlways fasten the connector tongue
and the seat belt in the order shown.
cAlways make sure both the connector
tongue and the seat belt tongue are
secured when using the seat belt. Do
not use it with only the seat belt tongue
attached. This could result in serious
personal injury in case of an accident or
a sudden stop.Stowing the center seat belt
When folding down the rear seat, the rear center
seat belt can be retracted into a stowed position
as follows:
1. Hold the connector tongue
s1so that the
seat belt does not retract suddenly when the
tongue is released from the connector
buckle.
2. Insert a suitable tool such as a key
sAinto
the connector buckle and release the con-
nector tongue
s1.
3. Fold the connector as illustrated
s2.
4. Then secure the connector tongue into the
retractor base
s3in the ceiling.
WARNING
cDo not unfasten the rear center seat
belt connector except when folding
down the rear seat.
cWhen attaching the rear center seat
belt connector, be certain that the seat-
backs are completely secured in the
latched position and the rear center
seat belt connector is completely
secured.
SSS0241
LRS0601
Safety—Seats, seat belts and supplemental restraint system1-17
ZREVIEW COPYÐ2007 Xterra(xtr)
Owners ManualÐUSA_English(nna)
02/27/07Ðdebbie
X
Page 35 of 304
cWhen attaching the rear center seat
belt connector, be certain that the seat-
backs are completely secured in the
latched position and the rear center
seat belt connector is completely
secured.
cIf the rear center seat belt connector
and the seatbacks are not secured in
the correct position, serious personal
injury may result in an accident or sud-
den stop.
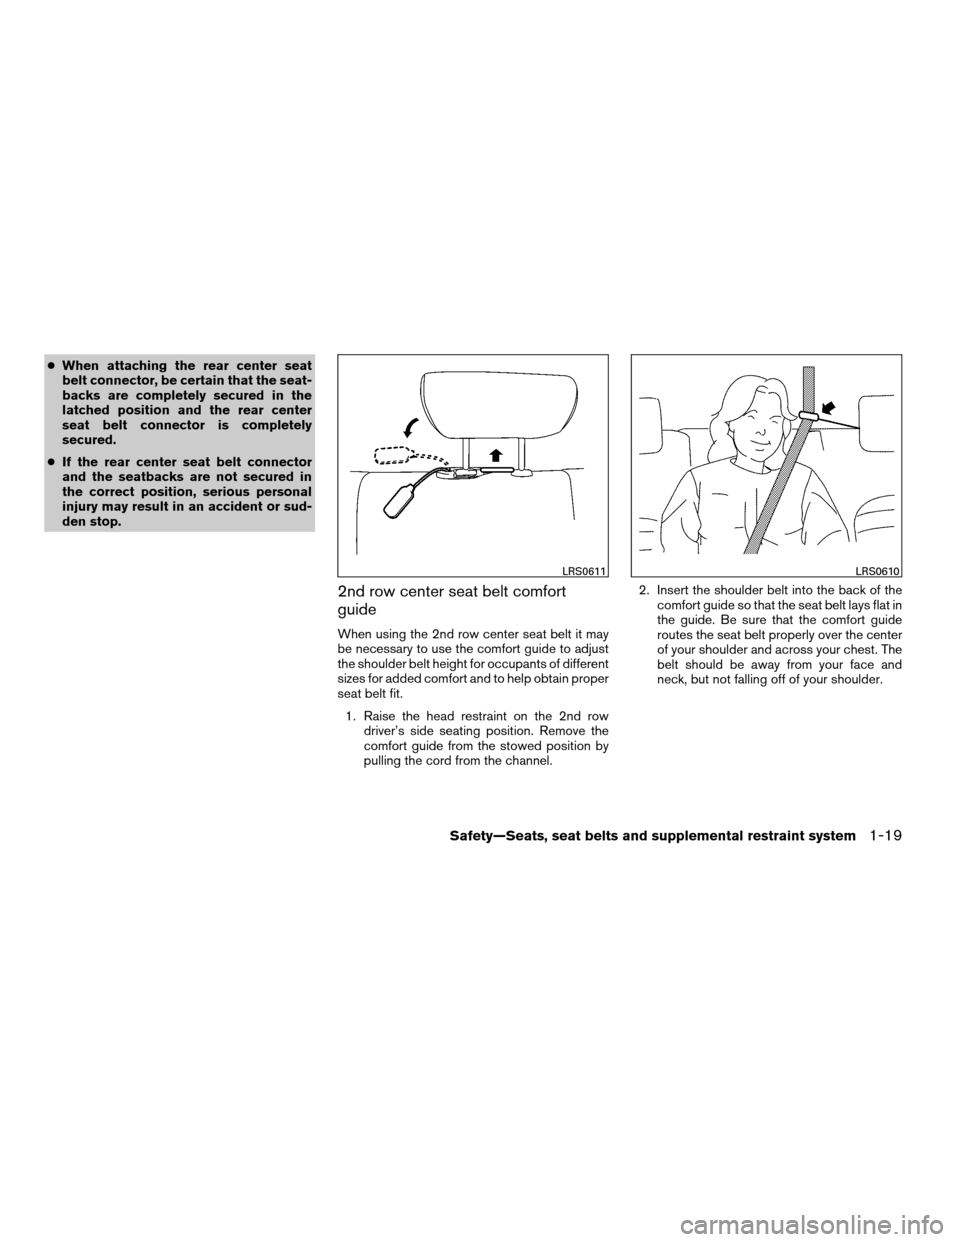
2nd row center seat belt comfort
guide
When using the 2nd row center seat belt it may
be necessary to use the comfort guide to adjust
the shoulder belt height for occupants of different
sizes for added comfort and to help obtain proper
seat belt fit.
1. Raise the head restraint on the 2nd row
driver’s side seating position. Remove the
comfort guide from the stowed position by
pulling the cord from the channel.2. Insert the shoulder belt into the back of the
comfort guide so that the seat belt lays flat in
the guide. Be sure that the comfort guide
routes the seat belt properly over the center
of your shoulder and across your chest. The
belt should be away from your face and
neck, but not falling off of your shoulder.
LRS0611LRS0610
Safety—Seats, seat belts and supplemental restraint system1-19
ZREVIEW COPYÐ2007 Xterra(xtr)
Owners ManualÐUSA_English(nna)
02/27/07Ðdebbie
X
Page 36 of 304
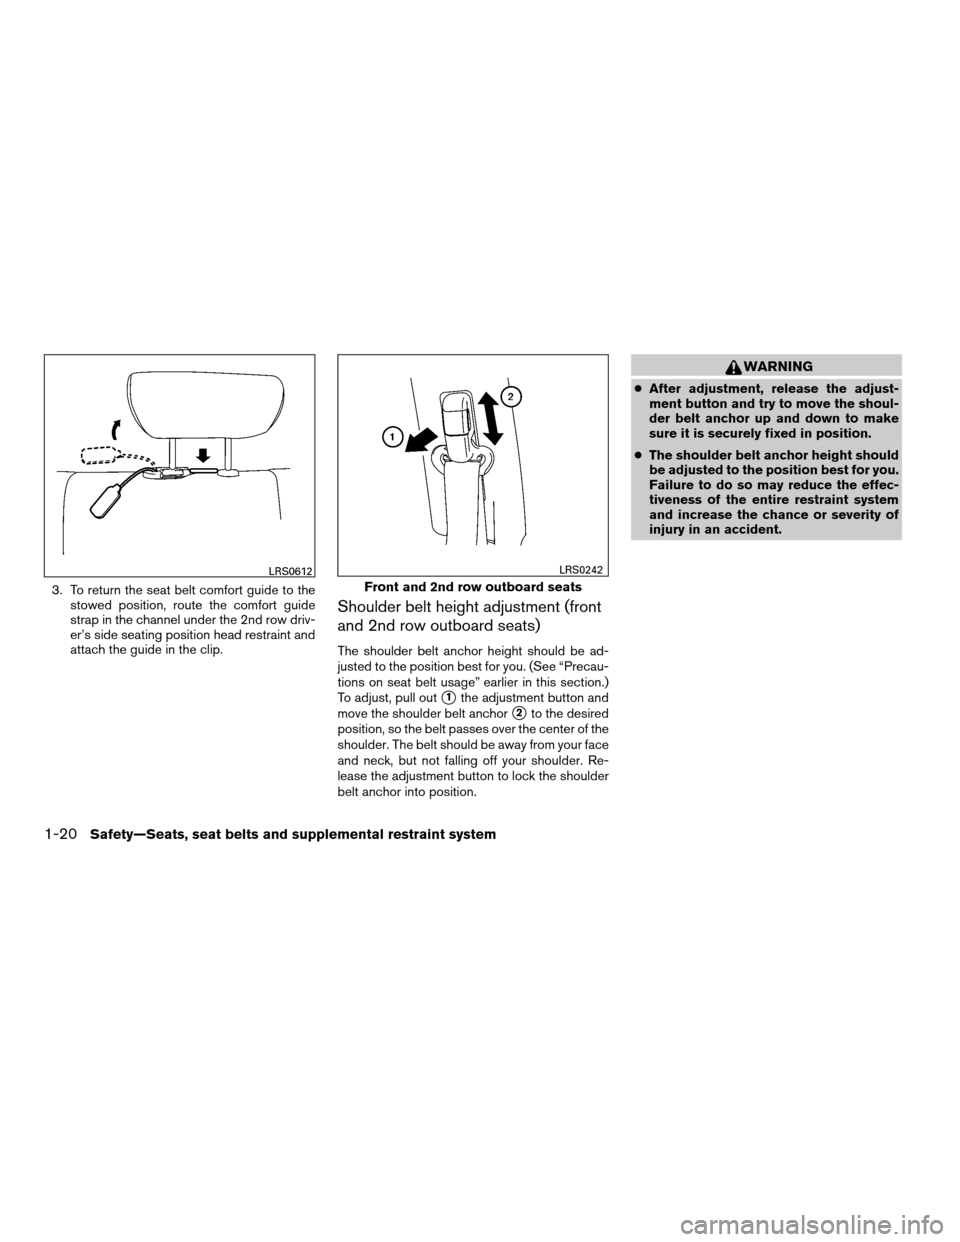
3. To return the seat belt comfort guide to the
stowed position, route the comfort guide
strap in the channel under the 2nd row driv-
er’s side seating position head restraint and
attach the guide in the clip.
Shoulder belt height adjustment (front
and 2nd row outboard seats)
The shoulder belt anchor height should be ad-
justed to the position best for you. (See “Precau-
tions on seat belt usage” earlier in this section.)
To adjust, pull out
s1the adjustment button and
move the shoulder belt anchor
s2to the desired
position, so the belt passes over the center of the
shoulder. The belt should be away from your face
and neck, but not falling off your shoulder. Re-
lease the adjustment button to lock the shoulder
belt anchor into position.
WARNING
cAfter adjustment, release the adjust-
ment button and try to move the shoul-
der belt anchor up and down to make
sure it is securely fixed in position.
cThe shoulder belt anchor height should
be adjusted to the position best for you.
Failure to do so may reduce the effec-
tiveness of the entire restraint system
and increase the chance or severity of
injury in an accident.
LRS0612
Front and 2nd row outboard seats
LRS0242
1-20Safety—Seats, seat belts and supplemental restraint system
ZREVIEW COPYÐ2007 Xterra(xtr)
Owners ManualÐUSA_English(nna)
02/27/07Ðdebbie
X
Page 53 of 304
cDo not use towels, books, pillows or
other items in place of a booster seat.
Items such as these may move during
normal driving or a collision and result
in serious injury or death. Booster seats
are designed to be used with a
lap/shoulder belt. Booster seats are de-
signed to properly route the lap and
shoulder portions of the seat belt over
the strongest portions of a child’s body
to provide the maximum protection dur-
ing a collision.
cFollow all of the booster seat manufac-
turer’s instructions for installation and
use. When purchasing a booster seat,
be sure to select one which will fit your
child and vehicle. It may not be possible
to properly install some types of
booster seats in your vehicle.
cIf the booster seat and seat belt is not
used properly, the risk of a child being
injured in a collision or a sudden stop
greatly increases.
cAdjustable seatbacks should be posi-
tioned to fit the booster seat, but as
upright as possible.cAfter placing the child in the booster
seat and fastening the seat belt, make
sure the shoulder portion of the belt is
away from the child’s face and neck and
the lap portion of the belt does not
cross the abdomen.
cDo not put the shoulder belt behind the
child or under the child’s arm. If you
must install a booster seat in the front
seat, see “Booster seat installation”
later in this section.
cWhen your booster seat is not in use,
keep it secured with a seat belt to pre-
vent it from being thrown around in
case of a sudden stop or accident.
CAUTION
Remember that a booster seat left in a
closed vehicle can become very hot.
Check the seating surface and buckles
before placing your child in the booster
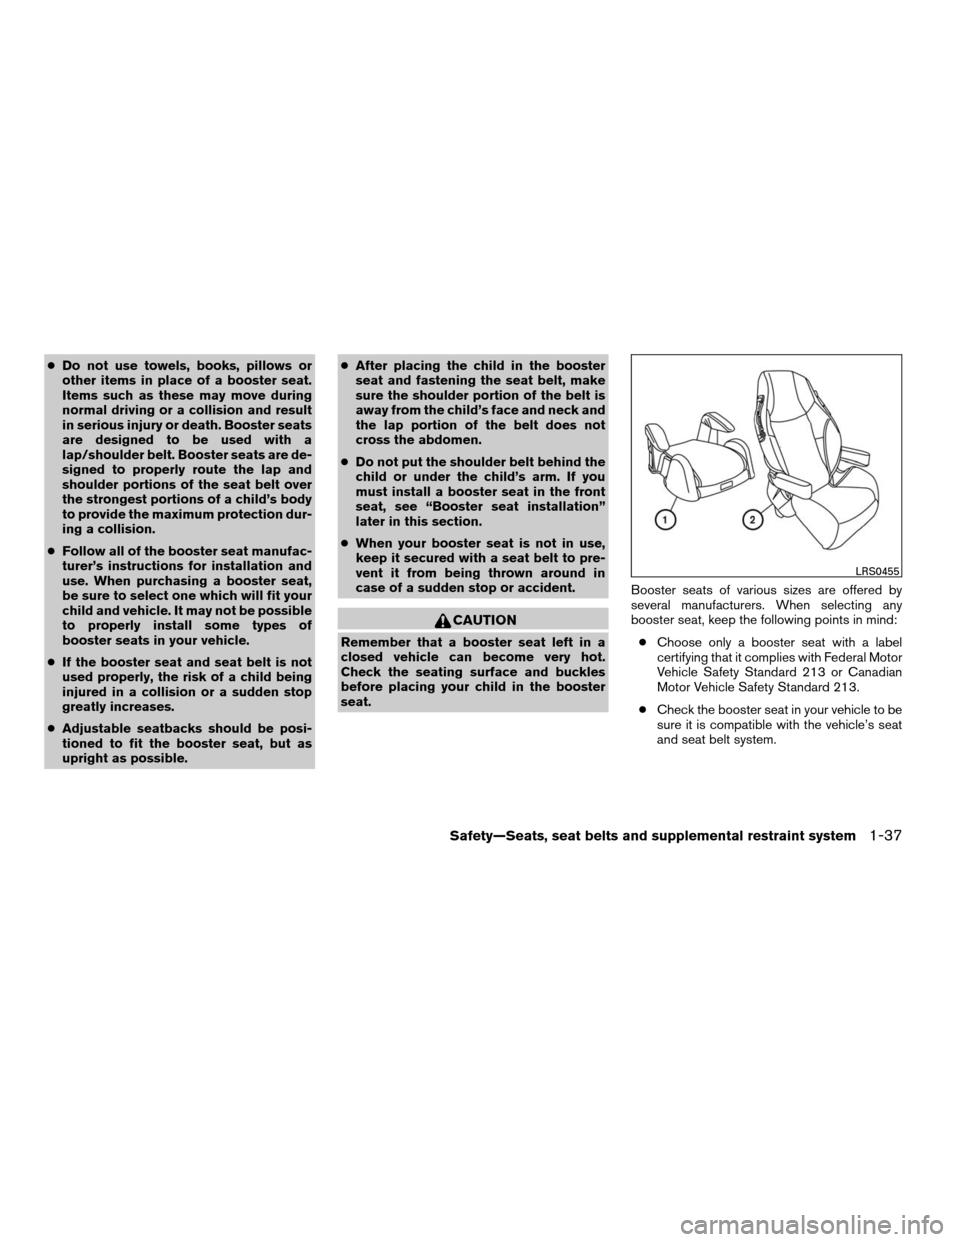
seat.Booster seats of various sizes are offered by
several manufacturers. When selecting any
booster seat, keep the following points in mind:
cChoose only a booster seat with a label
certifying that it complies with Federal Motor
Vehicle Safety Standard 213 or Canadian
Motor Vehicle Safety Standard 213.
cCheck the booster seat in your vehicle to be
sure it is compatible with the vehicle’s seat
and seat belt system.
LRS0455
Safety—Seats, seat belts and supplemental restraint system1-37
ZREVIEW COPYÐ2007 Xterra(xtr)
Owners ManualÐUSA_English(nna)
02/27/07Ðdebbie
X