2007 NISSAN TITAN glove box
[x] Cancel search: glove boxPage 11 of 368

1. DVD entertainment system
(if so equipped) (P. 4-47)
2. Sunroof (if so equipped) (P. 2-47)
3. Map lights (if so equipped) (P. 2-50)
4. Sun visors (P. 3-13)
5. HomeLinkT(if so equipped) (P. 2-51)
6. Glove box (P. 2-38)
7. Cup holders (P. 2-40)
8. Front seats (P. 1-2)
9. Folding rear bench seat (P. 1-10)
See the page number indicated in paren-
theses for operating details.
LII0029
PASSENGER COMPARTMENT
Illustrated table of contents0-5
ZREVIEW COPYÐ2007 Titan(tzw)
Owners ManualÐUSA_English(nna)
07/09/06Ðtbrooks
X
Page 12 of 368

1. Ventilators (P. 4-14)
2. Instrument brightness control (P. 2-28)
3. Headlight/fog light (if so equipped)/turn
signal switch (P. 2-25)
4. Steering wheel switch for audio control
(if so equipped) (P. 4-45)
5. Driver supplemental air bag/horn
(P. 1-45, P. 2-30)
6. Meters, gauges and warning/indicator
lights (P. 2-4, 2-12)
7. Cruise control main/set switches
(P. 5-18)
8. Windshield wiper/washer switch
(P. 2-23)
9. Ignition switch (P. 5-8)
10. Navigation system* (if so equipped)
(P. 4-2)
11. Navigation system* controls (if so
equipped) (P. 4-2)
12. Audio system controls (P. 4-24)
13. Front passenger supplemental air bag
(P. 1-45)
14. Glove box (P. 2-38)
15. Climate controls (P. 4-14)
16. Aux jack (if so equipped) (P. 4-44)
17. Heated seat switch (if so equipped)
(P. 2-30)
WIC0852
INSTRUMENT PANEL
0-6Illustrated table of contents
ZREVIEW COPYÐ2007 Titan(tzw)
Owners ManualÐUSA_English(nna)
07/09/06Ðtbrooks
X
Page 70 of 368

The driver supplemental front air bag is located in
the center of the steering wheel. The passenger
supplemental front air bag is mounted in the
dashboard above the glove box. The supplemen-
tal front air bags are designed to inflate in higher
severity frontal collisions, although they may in-
flate if the forces in another type of collision are
similar to those of a higher severity frontal impact.
They may not inflate in certain frontal collisions.
Vehicle damage (or lack of it) is not always an
indication of proper supplemental front air bag
system operation.
The NISSAN advanced air bag system has dual
stage inflators. It also monitors information from
the crash zone sensor, the diagnosis sensor unit,
seat belt buckle sensors, occupant classification
sensor (pressure sensor) and right front passen-
ger seat belt tension sensor. Inflator operation is
based on the severity of a collision and seat belt
usage for the driver. For the right front passenger,
it additionally monitors the weight of an occupant
or object on the seat and seat belt tension. Based
on information from the sensors, only one front air
bag may inflate in a crash, depending on the
crash severity and whether the front occupants
are belted or unbelted. Additionally, the right front
passenger air bag may be automatically turned
OFF under some conditions, depending on the
weight detected on the passenger seat and how
the seat belt is used. If the front passenger air bagis OFF, the passenger air bag status light will be
illuminated (if the seat is unoccupied, the light will
not be illuminated, but the air bag will be off) . See
“Front passenger air bag and status light” later in
this section for further details. One front air bag
inflating does not indicate improper performance
of the system.
If you have any questions about your air bag
system, please contact NISSAN or your NISSAN
dealer. If you are considering modification of your
vehicle due to a disability, you may also contact
NISSAN. Contact information is contained in the
beginning of this Owner’s Manual.
When a supplemental front air bag inflates, a
fairly loud noise may be heard, followed by the
release of smoke. This smoke is not harmful and
does not indicate a fire. Care should be taken to
not inhale it, as it may cause irritation and chok-
ing. Those with a history of a breathing condition
should get fresh air promptly.
Supplemental front air bags, along with the use of
seat belts, help to cushion the impact force on
the face and chest of the driver and right front
passenger. They can help save lives and reduce
serious injuries. However, an inflating front air
bag may cause facial abrasions or other injuries.
Front air bags do not provide restraint to the
lower body.Even with NISSAN advanced air bags, seat belts
should be correctly worn and the driver and pas-
senger seated upright as far as practical away
from the steering wheel or instrument panel. The
supplemental front air bags inflate quickly in order
to help protect the front occupants. Because of
this, the force of the front air bag inflating can
increase the risk of injury if the occupant is too
close to, or is against, the front air bag module
during inflation.
The front air bags deflate quickly after a collision.
The supplemental front air bags operate
only when the ignition switch is in the ON
or START position.
After turning the ignition key to the ON
position, the supplemental air bag warning
light illuminates. The supplemental air bag
warning light will turn off after about 7
seconds if the system is operational.
1-54Safety—Seats, seat belts and supplemental restraint system
ZREVIEW COPYÐ2007 Titan(tzw)
Owners ManualÐUSA_English(nna)
07/09/06Ðtbrooks
X
Page 81 of 368

Console box (if so equipped)...................2-36
Center armrest storage (if so equipped)..........2-37
Glove box....................................2-38
Sunglasses holder (if so equipped)..............2-38
Map pockets..................................2-39
Seatback pocket (if so equipped)...............2-39
Overhead console (if so equipped)..............2-39
Cup holders..................................2-40
Grocery hooks (if so equipped).................2-43
Lockable bedside storage compartment
(if so equipped)...............................2-43
Windows........................................2-44
Power windows (if so equipped)................2-44
Manual windows..............................2-46
Rear sliding window (if so equipped)............2-46
Rear power window switch (if so equipped)......2-47Sunroof (if so equipped)...........................2-47
Automatic sunroof.............................2-47
Interior light......................................2-49
Console light (if so equipped)...................2-50
Personal lights (if so equipped)....................2-50
Map lights (if so equipped)........................2-50
HomeLinkTuniversal transceiver (if so equipped).....2-51
Programming HomeLinkT.......................2-51
Programming HomeLinkTfor Canadian
customers....................................2-53
Operating the HomeLinkTuniversal
transceiver....................................2-53
Programming trouble-diagnosis.................2-54
Clearing the programmed information............2-54
Reprogramming a single HomeLinkTbutton......2-54
If your vehicle is stolen.........................2-54
ZREVIEW COPYÐ2007 Titan(tzw)
Owners ManualÐUSA_English(nna)
07/09/06Ðtbrooks
X
Page 82 of 368

1. Ventilators (P. 4-14)
2. Instrument brightness control (P. 2-28)
3. Headlight/fog light (if so equipped)/turn
signal switch (P. 2-25)
4. Steering wheel switch for audio control
(if so equipped) (P. 4-45)
5. Driver supplemental air bag/horn
(P. 1-45, P. 2-30)
6. Meters, gauges and warning/indicator
lights (P. 2-4, 2-12)
7. Cruise control main/set switches
(P. 5-18)
8. Windshield wiper/washer switch
(P. 2-23)
9. Ignition switch (P. 5-8)
10. Navigation system* (if so equipped)
(P. 4-2)
11. Navigation system* controls
(if so equipped) (P. 4-2)
12. Audio system controls (P. 4-24)
13. Front passenger supplemental air bag
(P. 1-45)
14. Glove box (P. 2-38)
15. Climate controls (P. 4-14)
16. Aux jack (if so equipped) (P. 4-44)
17. Heated seat switch (if so equipped)
(P. 2-30)
WIC0852
INSTRUMENT PANEL
2-2Instruments and controls
ZREVIEW COPYÐ2007 Titan(tzw)
Owners ManualÐUSA_English(nna)
07/09/06Ðtbrooks
X
Page 118 of 368

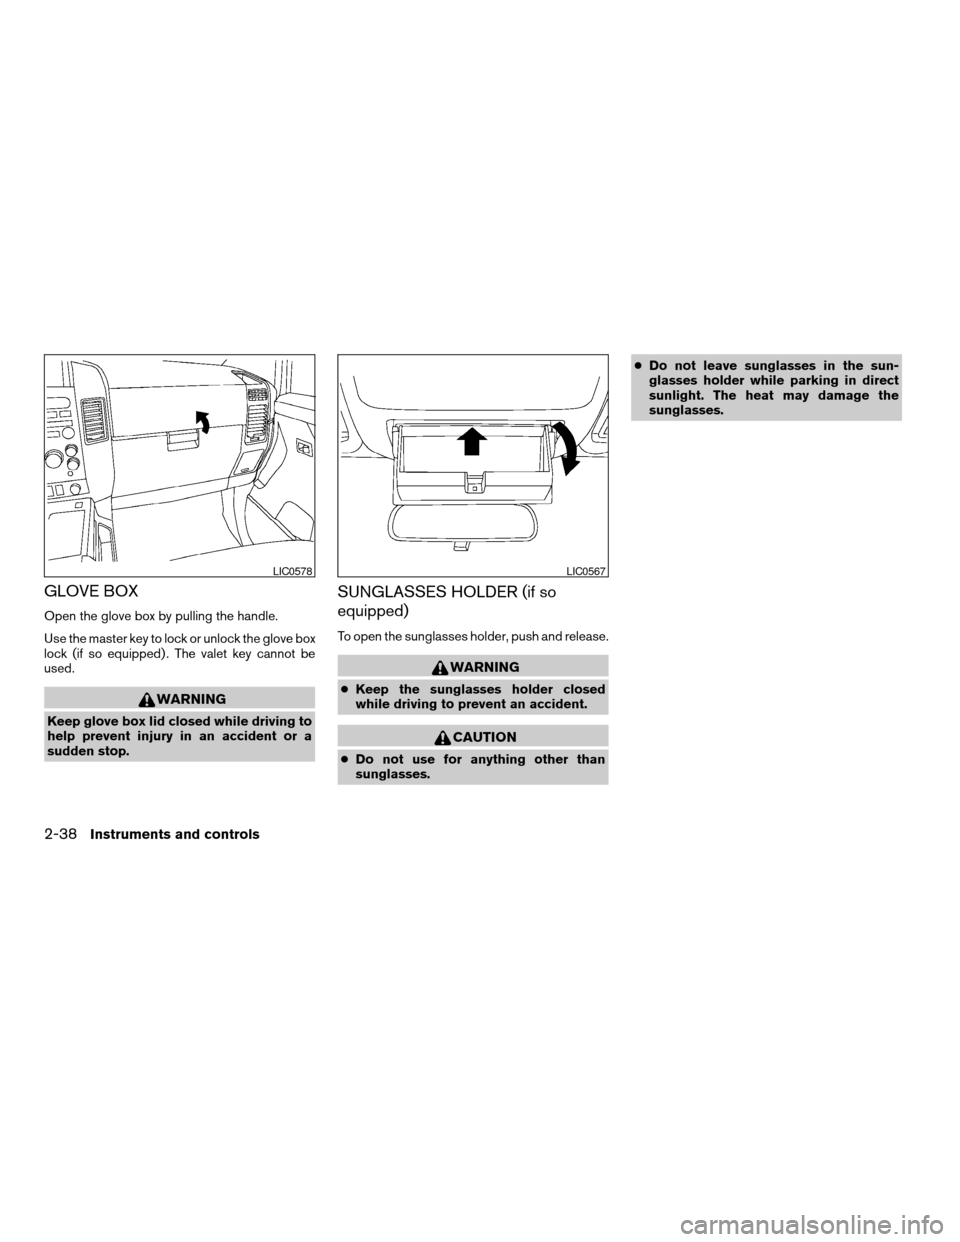
GLOVE BOX
Open the glove box by pulling the handle.
Use the master key to lock or unlock the glove box
lock (if so equipped) . The valet key cannot be
used.
WARNING
Keep glove box lid closed while driving to
help prevent injury in an accident or a
sudden stop.
SUNGLASSES HOLDER (if so
equipped)
To open the sunglasses holder, push and release.
WARNING
cKeep the sunglasses holder closed
while driving to prevent an accident.
CAUTION
cDo not use for anything other than
sunglasses.cDo not leave sunglasses in the sun-
glasses holder while parking in direct
sunlight. The heat may damage the
sunglasses.
LIC0578LIC0567
2-38Instruments and controls
ZREVIEW COPYÐ2007 Titan(tzw)
Owners ManualÐUSA_English(nna)
07/09/06Ðtbrooks
X
Page 136 of 368

1. Two master keys (black) with transpon-
der chip (if so equipped) and chrome
NISSAN brand symbol on one side
2. Valet key (black) with transponder chip
(if so equipped)
3. Key number plate
4. Transponder chip (if so equipped)
A key number plate is supplied with your keys.
Record the key number and keep it in a safe place
(such as your wallet) , not in the vehicle. If you lose
your keys, see a NISSAN dealer for duplicates by
using the key number. NISSAN does not record
key numbers so it is very important to keep track
of your key number plate.A key number is only necessary when you have
lost all keys and do not have one to duplicate
from. If you still have a key, your NISSAN dealer
can duplicate it.
NISSAN VEHICLE IMMOBILIZER
SYSTEM KEYS (if so equipped)
You can only drive your vehicle using the master
or valet keys which are registered to the NISSAN
Vehicle Immobilizer System components in your
vehicle. These keys have a transponder chip in
the key head.
The master key can be used for all the locks.
The valet key cannot be used for the console box
lock, the beside storage compartment lock, or the
glove box lock (if so equipped) .
To protect belongings when you leave a key with
someone, give them the valet key only.
Never leave these keys in the vehicle.
Additional or replacement keys:
If you still have a key, the key number is not
necessary when you need extra NISSAN Vehicle
Immobilizer System keys. Your dealer can dupli-
cate your existing key. As many as five NISSAN
Vehicle Immobilizer System keys can be used
with one vehicle. You should bring all NISSAN
Vehicle Immobilizer System keys that you have toyour NISSAN dealer for registration. This is be-
cause the registration process will erase the
memory of all key codes previously registered
into the NISSAN Vehicle Immobilizer System.
After the registration process, these components
will only recognize keys coded into the NISSAN
Vehicle Immobilizer System during registration.
Any key that is not given to your dealer at the time
of registration will no longer be able to start your
vehicle.
Do not allow the immobilizer system key, which
contains an electrical transponder, to come into
contact with salt water. This could affect system
function.
WPD0128
KEYS
3-2Pre-driving checks and adjustments
ZREVIEW COPYÐ2007 Titan(tzw)
Owners ManualÐUSA_English(nna)
07/09/06Ðtbrooks
X
Page 289 of 368

The air cleaner filter should not be cleaned and
reused. Replace it according to the maintenance
log shown in the “NISSAN Service and Mainte-
nance Guide.” When replacing the filter, wipe the
inside of the air cleaner filter housing and the
cover with a damp cloth.
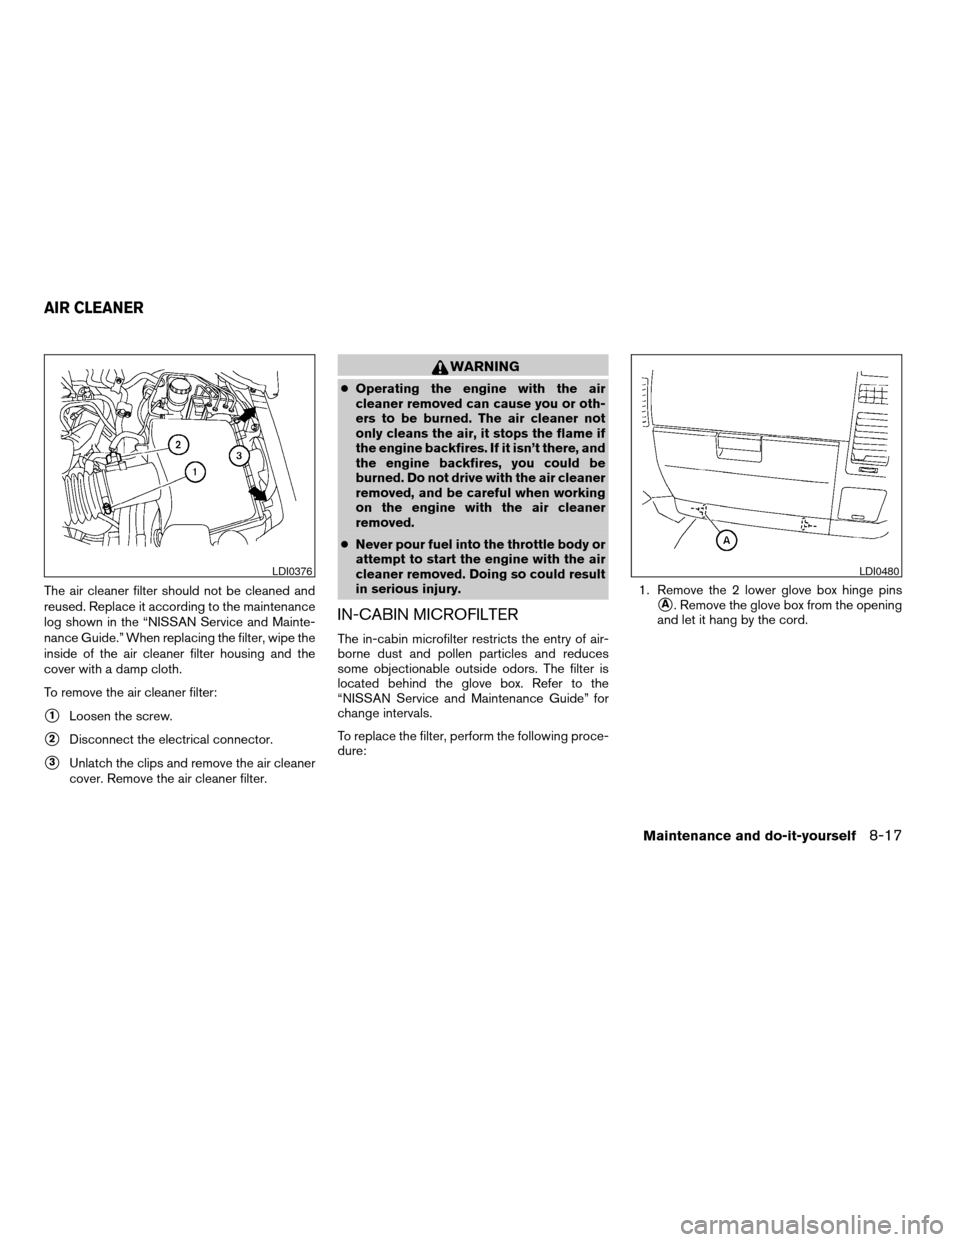
To remove the air cleaner filter:
s1Loosen the screw.
s2Disconnect the electrical connector.
s3Unlatch the clips and remove the air cleaner
cover. Remove the air cleaner filter.
WARNING
cOperating the engine with the air
cleaner removed can cause you or oth-
ers to be burned. The air cleaner not
only cleans the air, it stops the flame if
the engine backfires. If it isn’t there, and
the engine backfires, you could be
burned. Do not drive with the air cleaner
removed, and be careful when working
on the engine with the air cleaner
removed.
cNever pour fuel into the throttle body or
attempt to start the engine with the air
cleaner removed. Doing so could result
in serious injury.
IN-CABIN MICROFILTER
The in-cabin microfilter restricts the entry of air-
borne dust and pollen particles and reduces
some objectionable outside odors. The filter is
located behind the glove box. Refer to the
“NISSAN Service and Maintenance Guide” for
change intervals.
To replace the filter, perform the following proce-
dure:1. Remove the 2 lower glove box hinge pins
sA. Remove the glove box from the opening
and let it hang by the cord.
LDI0376LDI0480
AIR CLEANER
Maintenance and do-it-yourself8-17
ZREVIEW COPYÐ2007 Titan(tzw)
Owners ManualÐUSA_English(nna)
07/09/06Ðtbrooks
X