2007 NISSAN QUEST warning
[x] Cancel search: warningPage 46 of 384
TOP TETHER STRAP CHILD
RESTRAINT
If the manufacturer of your child restraint requires
the use of a top tether strap, it must be secured to
the anchor point.
WARNING
Child restraint anchor points are designed
to withstand only those loads imposed by
correctly fitted child restraints. Under no
circumstances are they to be used for
adult seat belts or harnesses.
Top Tether Anchor Point Locations
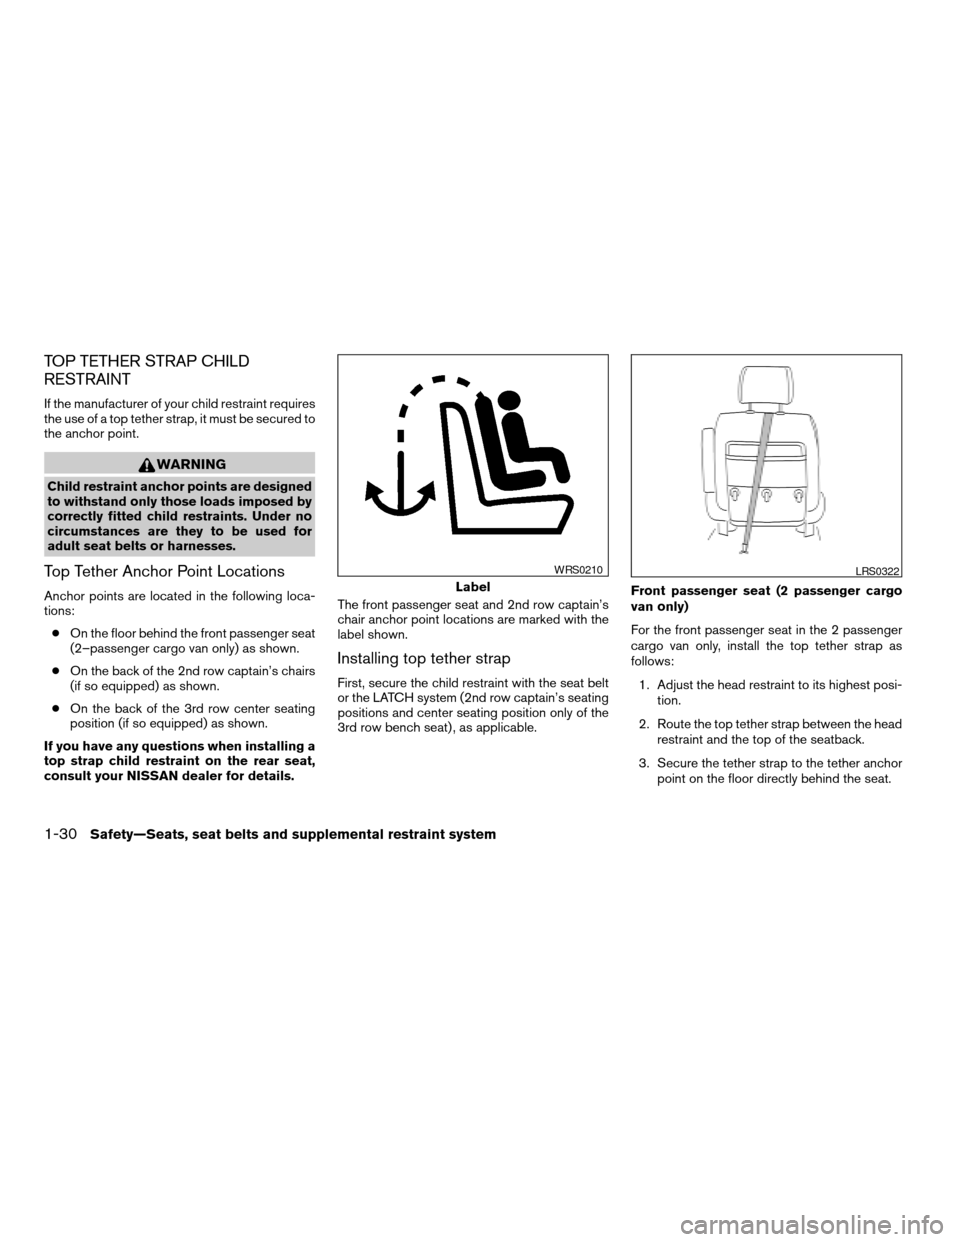
Anchor points are located in the following loca-
tions:
cOn the floor behind the front passenger seat
(2–passenger cargo van only) as shown.
cOn the back of the 2nd row captain’s chairs
(if so equipped) as shown.
cOn the back of the 3rd row center seating
position (if so equipped) as shown.
If you have any questions when installing a
top strap child restraint on the rear seat,
consult your NISSAN dealer for details.The front passenger seat and 2nd row captain’s
chair anchor point locations are marked with the
label shown.
Installing top tether strap
First, secure the child restraint with the seat belt
or the LATCH system (2nd row captain’s seating
positions and center seating position only of the
3rd row bench seat) , as applicable.Front passenger seat (2 passenger cargo
van only)
For the front passenger seat in the 2 passenger
cargo van only, install the top tether strap as
follows:
1. Adjust the head restraint to its highest posi-
tion.
2. Route the top tether strap between the head
restraint and the top of the seatback.
3. Secure the tether strap to the tether anchor
point on the floor directly behind the seat.
Label
WRS0210LRS0322
1-30Safety—Seats, seat belts and supplemental restraint system
ZREVIEW COPYÐ2007 Quest(van)
Owners ManualÐUSA_English(nna)
02/27/06Ðdebbie
X
Page 48 of 384
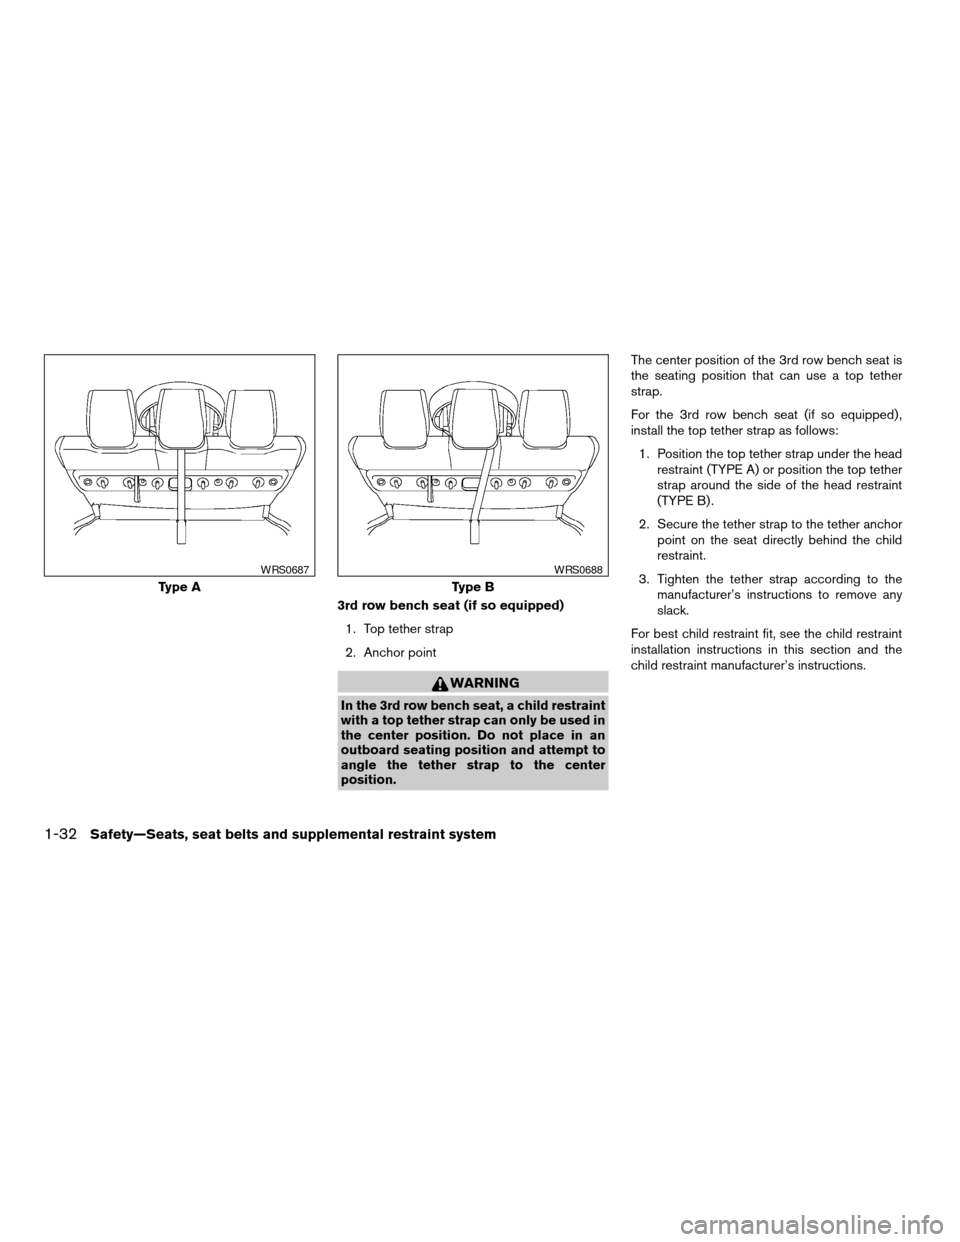
3rd row bench seat (if so equipped)
1. Top tether strap
2. Anchor point
WARNING
In the 3rd row bench seat, a child restraint
with a top tether strap can only be used in
the center position. Do not place in an
outboard seating position and attempt to
angle the tether strap to the center
position.The center position of the 3rd row bench seat is
the seating position that can use a top tether
strap.
For the 3rd row bench seat (if so equipped) ,
install the top tether strap as follows:
1. Position the top tether strap under the head
restraint (TYPE A) or position the top tether
strap around the side of the head restraint
(TYPE B) .
2. Secure the tether strap to the tether anchor
point on the seat directly behind the child
restraint.
3. Tighten the tether strap according to the
manufacturer’s instructions to remove any
slack.
For best child restraint fit, see the child restraint
installation instructions in this section and the
child restraint manufacturer’s instructions.
Type A
WRS0687
Type B
WRS0688
1-32Safety—Seats, seat belts and supplemental restraint system
ZREVIEW COPYÐ2007 Quest(van)
Owners ManualÐUSA_English(nna)
02/27/06Ðdebbie
X
Page 49 of 384
CHILD RESTRAINT INSTALLATION
USING LATCH-2ND ROW
CAPTAIN’S CHAIRS (if so equipped)
WARNING
cAttach LATCH system compatible child
restraints only at the locations shown.
For the LATCH lower anchor locations
see “LATCH (Latch Anchors and Tethers
for CHildren) system”. If a child restraint
is not secured properly, your child could
be seriously injured or killed in an
accident.
cThe LATCH system anchors are de-
signed to withstand only those loads
imposed by correctly fitted child re-
straints. Under no circumstance are
they to be used for adult seat belts or
harnesses.
cInspect the lower anchors by inserting
your fingers into the lower anchor area
and feeling to make sure there are no
obstructions over the LATCH system an-
chors, such as seat belt webbing or seat
cushion material. The child restraint will
not be secured properly if the LATCH
system anchors are obstructed.
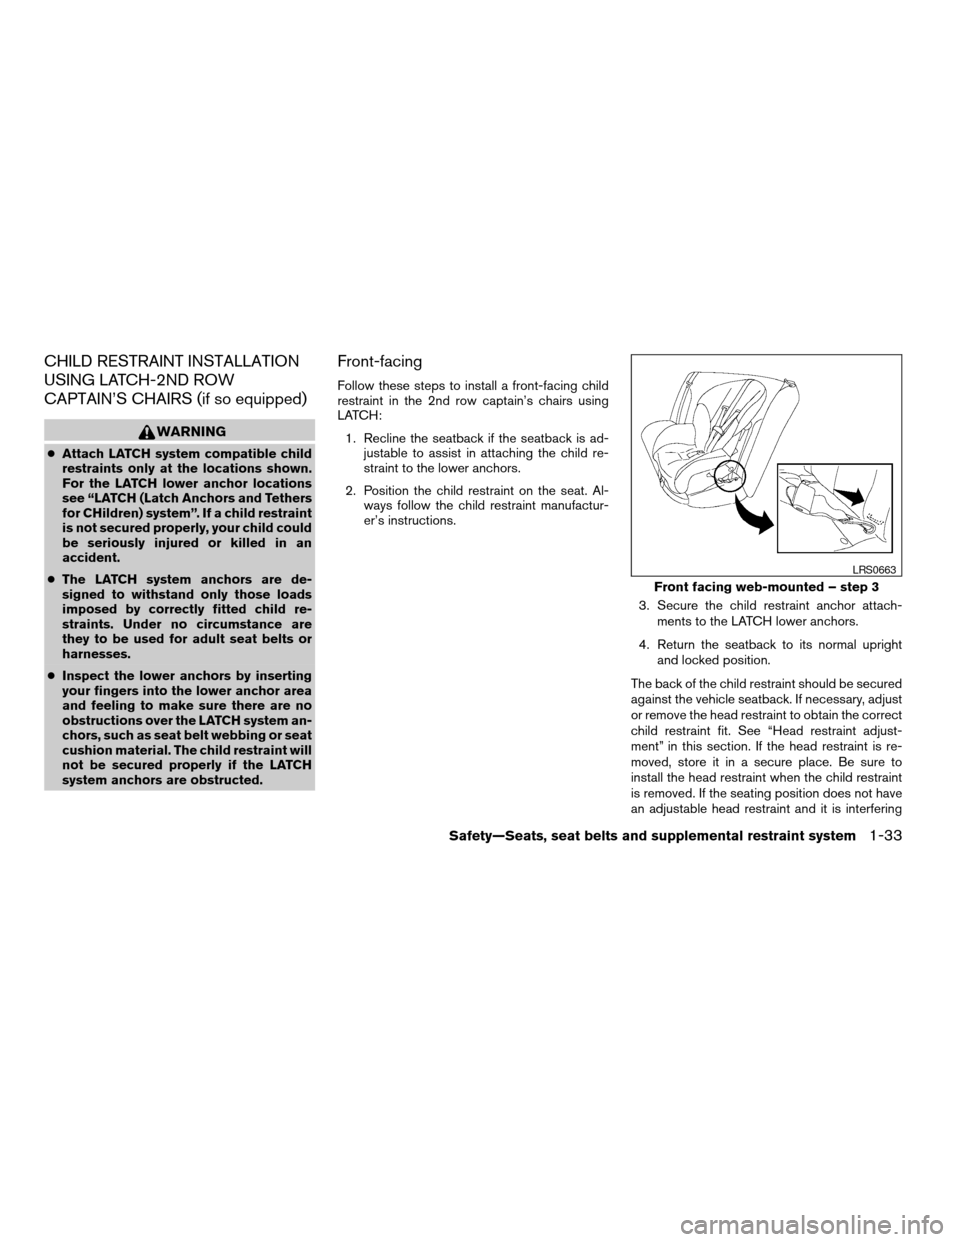
Front-facing
Follow these steps to install a front-facing child
restraint in the 2nd row captain’s chairs using
LATCH:
1. Recline the seatback if the seatback is ad-
justable to assist in attaching the child re-
straint to the lower anchors.
2. Position the child restraint on the seat. Al-
ways follow the child restraint manufactur-
er’s instructions.
3. Secure the child restraint anchor attach-
ments to the LATCH lower anchors.
4. Return the seatback to its normal upright
and locked position.
The back of the child restraint should be secured
against the vehicle seatback. If necessary, adjust
or remove the head restraint to obtain the correct
child restraint fit. See “Head restraint adjust-
ment” in this section. If the head restraint is re-
moved, store it in a secure place. Be sure to
install the head restraint when the child restraint
is removed. If the seating position does not have
an adjustable head restraint and it is interfering
Front facing web-mounted – step 3
LRS0663
Safety—Seats, seat belts and supplemental restraint system1-33
ZREVIEW COPYÐ2007 Quest(van)
Owners ManualÐUSA_English(nna)
02/27/06Ðdebbie
X
Page 53 of 384
CHILD RESTRAINT INSTALLATION
USING LATCH-3RD ROW BENCH
SEAT (if so equipped)
WARNING
cAttach LATCH system compatible child
restraints only at the locations shown.
For the LATCH lower anchor locations
see “LATCH (Latch Anchors and Tethers
for CHildren) system”. If a child restraint
is not secured properly, your child could
be seriously injured or killed in an
accident.
cThe LATCH system anchors are de-
signed to withstand only those loads
imposed by correctly fitted child re-
straints. Under no circumstance are
they to be used for adult seat belts or
harnesses.
cInspect the lower anchors by inserting
your fingers into the lower anchor area
and feeling to make sure there are no
obstructions over the LATCH system an-
chors, such as seat belt webbing or seat
cushion material. The child restraint will
not be secured properly if the LATCH
system anchors are obstructed.
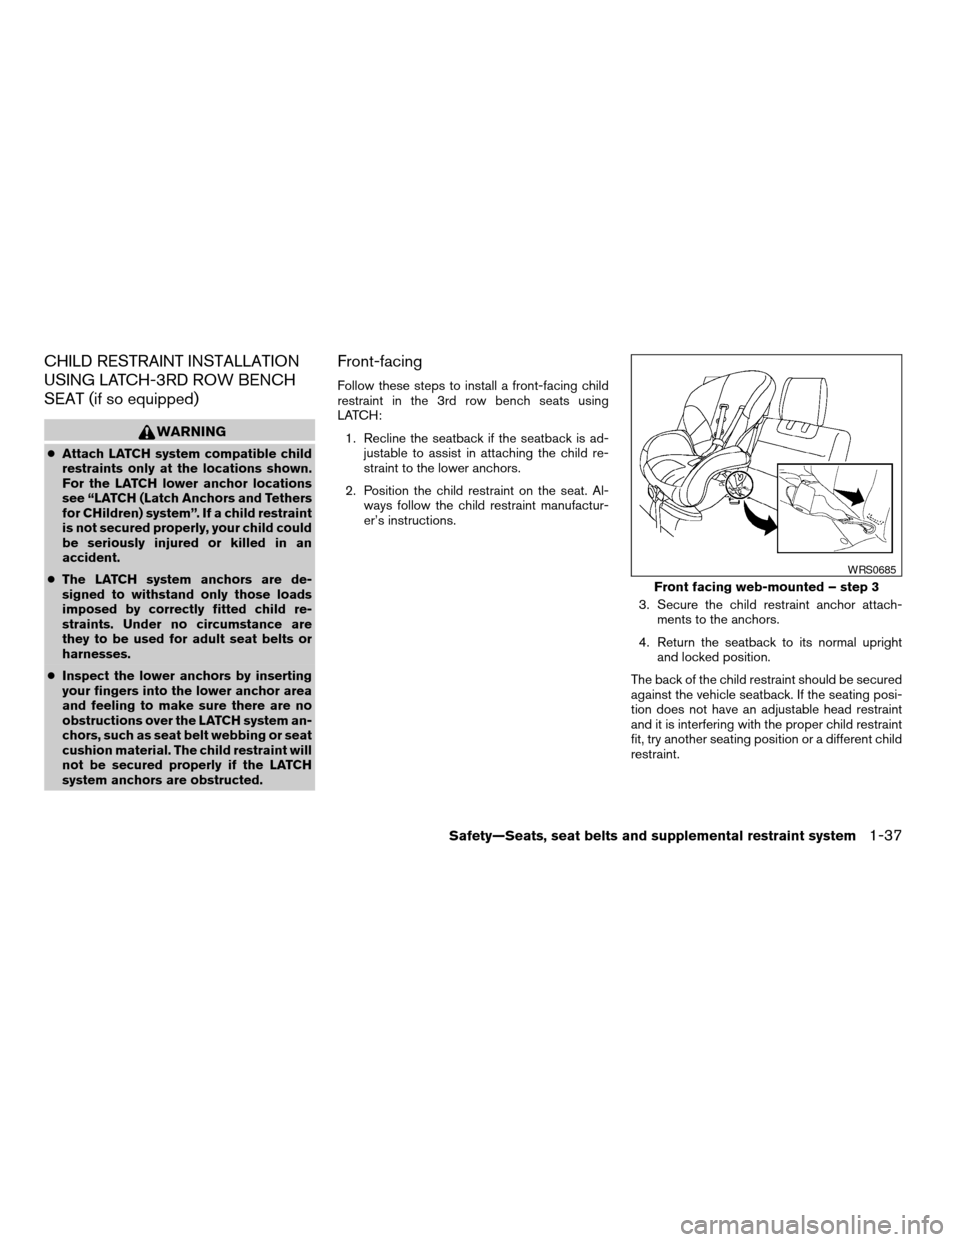
Front-facing
Follow these steps to install a front-facing child
restraint in the 3rd row bench seats using
LATCH:
1. Recline the seatback if the seatback is ad-
justable to assist in attaching the child re-
straint to the lower anchors.
2. Position the child restraint on the seat. Al-
ways follow the child restraint manufactur-
er’s instructions.
3. Secure the child restraint anchor attach-
ments to the anchors.
4. Return the seatback to its normal upright
and locked position.
The back of the child restraint should be secured
against the vehicle seatback. If the seating posi-
tion does not have an adjustable head restraint
and it is interfering with the proper child restraint
fit, try another seating position or a different child
restraint.
Front facing web-mounted – step 3
WRS0685
Safety—Seats, seat belts and supplemental restraint system1-37
ZREVIEW COPYÐ2007 Quest(van)
Owners ManualÐUSA_English(nna)
02/27/06Ðdebbie
X
Page 56 of 384
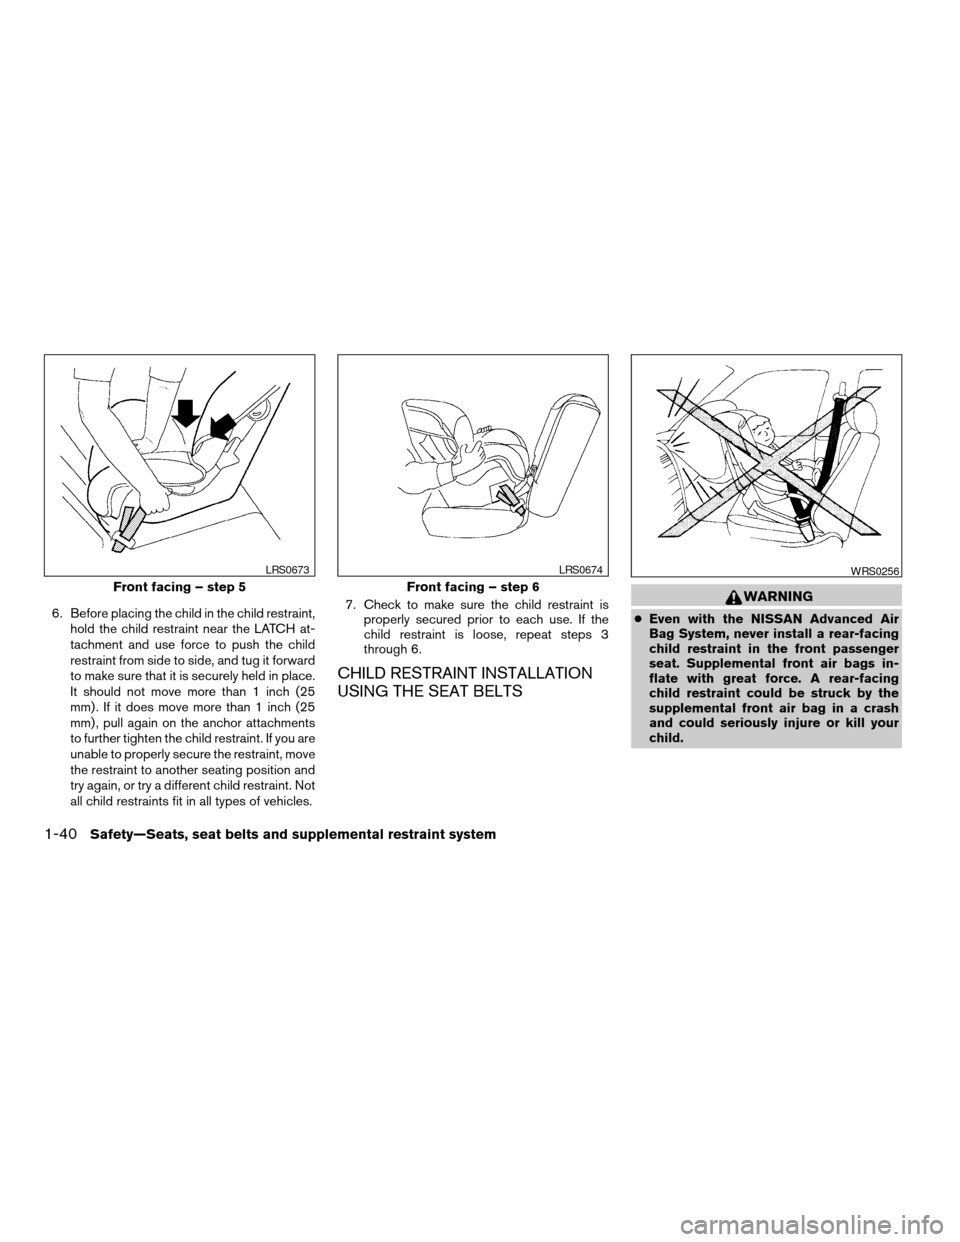
6. Before placing the child in the child restraint,
hold the child restraint near the LATCH at-
tachment and use force to push the child
restraint from side to side, and tug it forward
to make sure that it is securely held in place.
It should not move more than 1 inch (25
mm) . If it does move more than 1 inch (25
mm) , pull again on the anchor attachments
to further tighten the child restraint. If you are
unable to properly secure the restraint, move
the restraint to another seating position and
try again, or try a different child restraint. Not
all child restraints fit in all types of vehicles.7. Check to make sure the child restraint is
properly secured prior to each use. If the
child restraint is loose, repeat steps 3
through 6.
CHILD RESTRAINT INSTALLATION
USING THE SEAT BELTS
WARNING
cEven with the NISSAN Advanced Air
Bag System, never install a rear-facing
child restraint in the front passenger
seat. Supplemental front air bags in-
flate with great force. A rear-facing
child restraint could be struck by the
supplemental front air bag in a crash
and could seriously injure or kill your
child.
Front facing – step 5
LRS0673
Front facing – step 6
LRS0674WRS0256
1-40Safety—Seats, seat belts and supplemental restraint system
ZREVIEW COPYÐ2007 Quest(van)
Owners ManualÐUSA_English(nna)
02/27/06Ðdebbie
X
Page 63 of 384
PRECAUTIONS ON BOOSTER
SEATS
WARNING
cInfants and small children should al-
ways be placed in an appropriate child
restraint while riding in the vehicle.
Failure to use a child restraint or
booster seat can result in serious injury
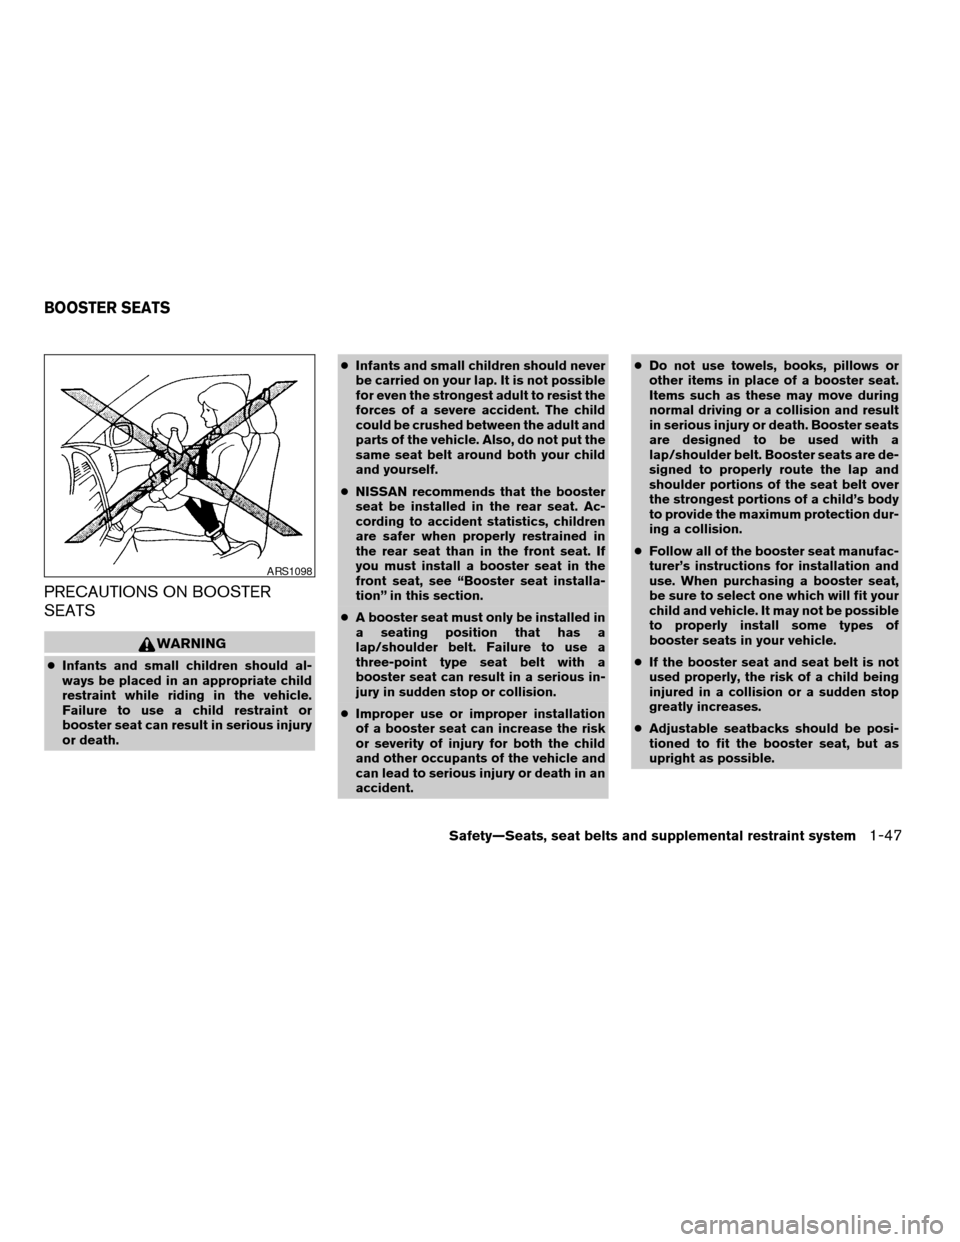
or death.cInfants and small children should never
be carried on your lap. It is not possible
for even the strongest adult to resist the
forces of a severe accident. The child
could be crushed between the adult and
parts of the vehicle. Also, do not put the
same seat belt around both your child
and yourself.
cNISSAN recommends that the booster
seat be installed in the rear seat. Ac-
cording to accident statistics, children
are safer when properly restrained in
the rear seat than in the front seat. If
you must install a booster seat in the
front seat, see “Booster seat installa-
tion” in this section.
cA booster seat must only be installed in
a seating position that has a
lap/shoulder belt. Failure to use a
three-point type seat belt with a
booster seat can result in a serious in-
jury in sudden stop or collision.
cImproper use or improper installation
of a booster seat can increase the risk
or severity of injury for both the child
and other occupants of the vehicle and
can lead to serious injury or death in an
accident.cDo not use towels, books, pillows or
other items in place of a booster seat.
Items such as these may move during
normal driving or a collision and result
in serious injury or death. Booster seats
are designed to be used with a
lap/shoulder belt. Booster seats are de-
signed to properly route the lap and
shoulder portions of the seat belt over
the strongest portions of a child’s body
to provide the maximum protection dur-
ing a collision.
cFollow all of the booster seat manufac-
turer’s instructions for installation and
use. When purchasing a booster seat,
be sure to select one which will fit your
child and vehicle. It may not be possible
to properly install some types of
booster seats in your vehicle.
cIf the booster seat and seat belt is not
used properly, the risk of a child being
injured in a collision or a sudden stop
greatly increases.
cAdjustable seatbacks should be posi-
tioned to fit the booster seat, but as
upright as possible.
ARS1098
BOOSTER SEATS
Safety—Seats, seat belts and supplemental restraint system1-47
ZREVIEW COPYÐ2007 Quest(van)
Owners ManualÐUSA_English(nna)
02/27/06Ðdebbie
X
Page 65 of 384
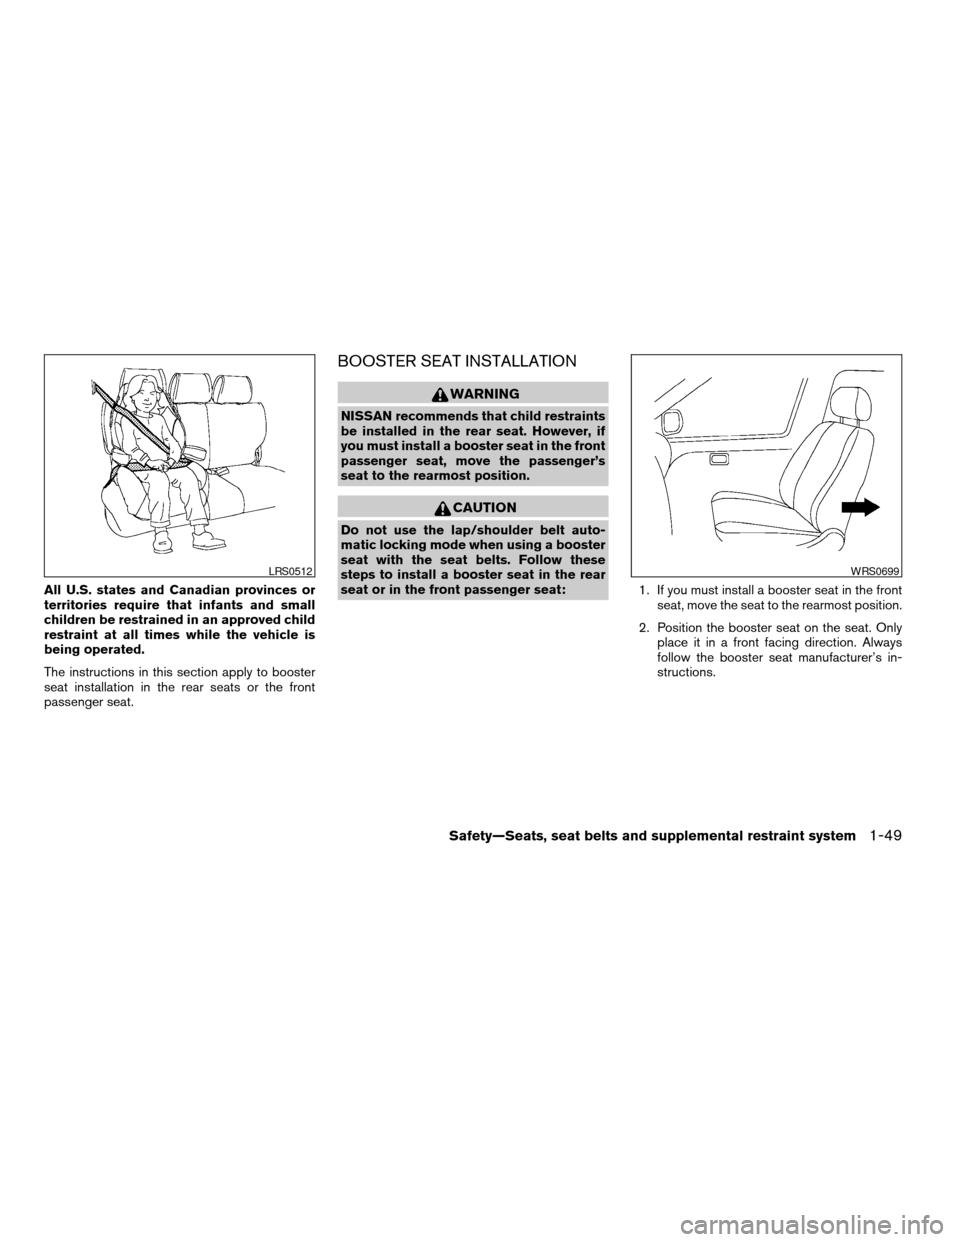
All U.S. states and Canadian provinces or
territories require that infants and small
children be restrained in an approved child
restraint at all times while the vehicle is
being operated.
The instructions in this section apply to booster
seat installation in the rear seats or the front
passenger seat.
BOOSTER SEAT INSTALLATION
WARNING
NISSAN recommends that child restraints
be installed in the rear seat. However, if
you must install a booster seat in the front
passenger seat, move the passenger’s
seat to the rearmost position.
CAUTION
Do not use the lap/shoulder belt auto-
matic locking mode when using a booster
seat with the seat belts. Follow these
steps to install a booster seat in the rear
seat or in the front passenger seat:
1. If you must install a booster seat in the front
seat, move the seat to the rearmost position.
2. Position the booster seat on the seat. Only
place it in a front facing direction. Always
follow the booster seat manufacturer’s in-
structions.
LRS0512WRS0699
Safety—Seats, seat belts and supplemental restraint system1-49
ZREVIEW COPYÐ2007 Quest(van)
Owners ManualÐUSA_English(nna)
02/27/06Ðdebbie
X
Page 66 of 384
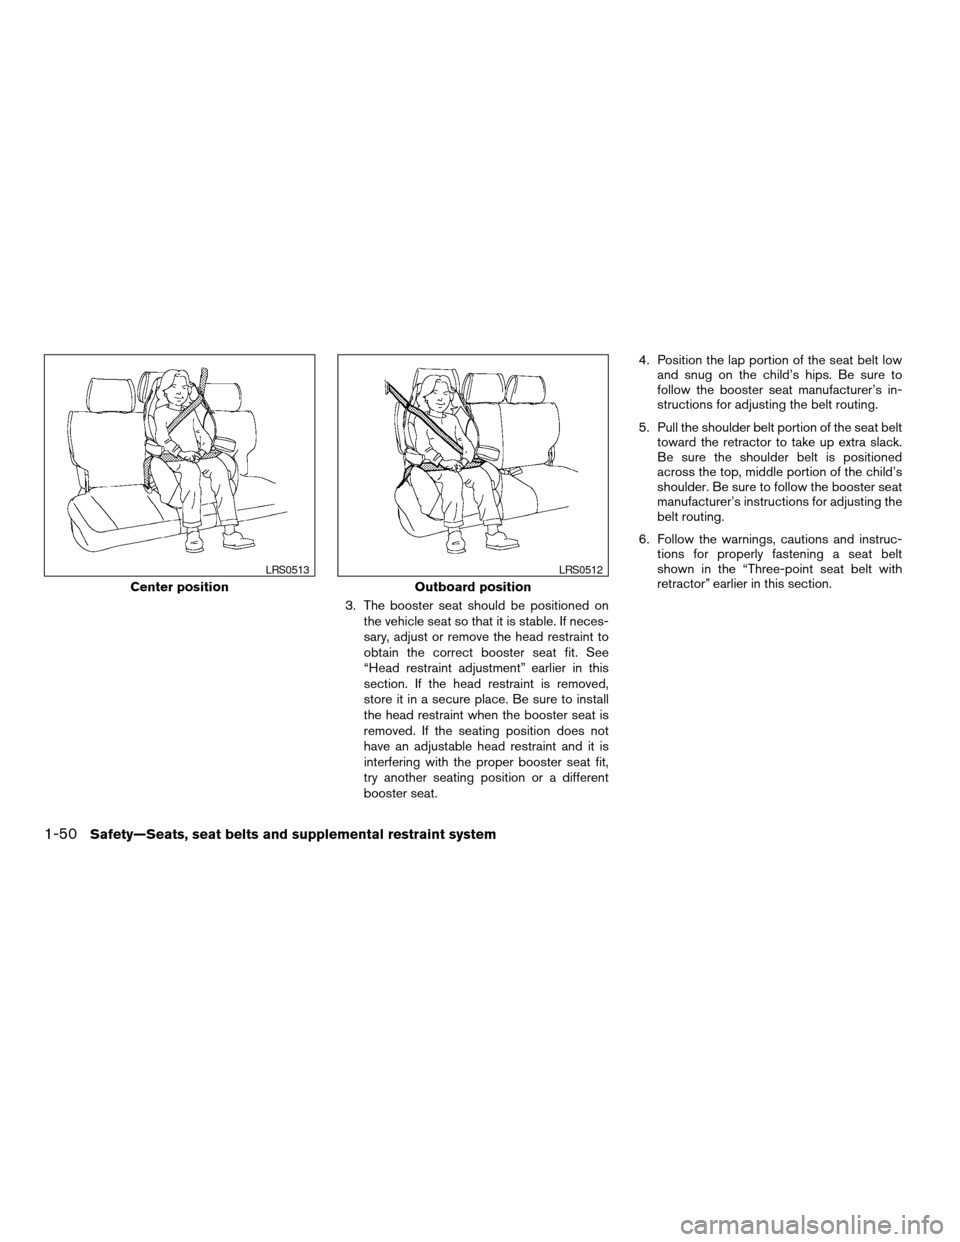
3. The booster seat should be positioned on
the vehicle seat so that it is stable. If neces-
sary, adjust or remove the head restraint to
obtain the correct booster seat fit. See
“Head restraint adjustment” earlier in this
section. If the head restraint is removed,
store it in a secure place. Be sure to install
the head restraint when the booster seat is
removed. If the seating position does not
have an adjustable head restraint and it is
interfering with the proper booster seat fit,
try another seating position or a different
booster seat.4. Position the lap portion of the seat belt low
and snug on the child’s hips. Be sure to
follow the booster seat manufacturer’s in-
structions for adjusting the belt routing.
5. Pull the shoulder belt portion of the seat belt
toward the retractor to take up extra slack.
Be sure the shoulder belt is positioned
across the top, middle portion of the child’s
shoulder. Be sure to follow the booster seat
manufacturer’s instructions for adjusting the
belt routing.
6. Follow the warnings, cautions and instruc-
tions for properly fastening a seat belt
shown in the “Three-point seat belt with
retractor” earlier in this section.
Center position
LRS0513
Outboard position
LRS0512
1-50Safety—Seats, seat belts and supplemental restraint system
ZREVIEW COPYÐ2007 Quest(van)
Owners ManualÐUSA_English(nna)
02/27/06Ðdebbie
X