2007 NISSAN QUEST parking brake
[x] Cancel search: parking brakePage 305 of 384

CAUTION
Oil level should be checked regularly. Op-
erating the engine with an insufficient
amount of oil can damage the engine, and
such damage is not covered by warranty.
CHANGING ENGINE OIL
1. Park the vehicle on a level surface and apply
the parking brake.
2. Start the engine and let it idle until it reaches
operating temperature, then turn it off.
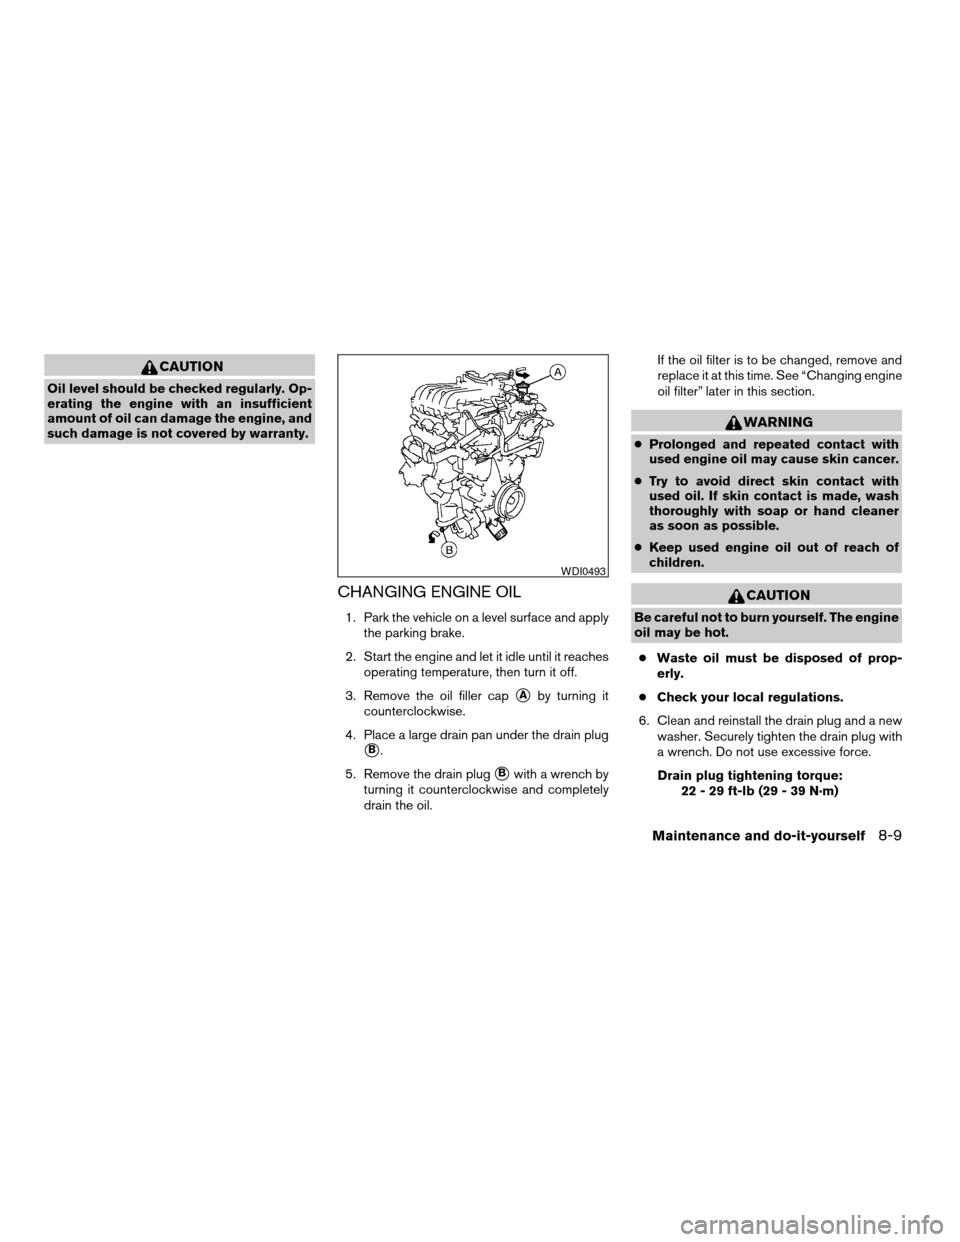
3. Remove the oil filler cap
sAby turning it
counterclockwise.
4. Place a large drain pan under the drain plug
sB.
5. Remove the drain plug
sBwith a wrench by
turning it counterclockwise and completely
drain the oil.If the oil filter is to be changed, remove and
replace it at this time. See “Changing engine
oil filter” later in this section.
WARNING
cProlonged and repeated contact with
used engine oil may cause skin cancer.
cTry to avoid direct skin contact with
used oil. If skin contact is made, wash
thoroughly with soap or hand cleaner
as soon as possible.
cKeep used engine oil out of reach of
children.
CAUTION
Be careful not to burn yourself. The engine
oil may be hot.
cWaste oil must be disposed of prop-
erly.
cCheck your local regulations.
6. Clean and reinstall the drain plug and a new
washer. Securely tighten the drain plug with
a wrench. Do not use excessive force.
Drain plug tightening torque:
22 - 29 ft-lb (29 - 39 N·m)
WDI0493
Maintenance and do-it-yourself8-9
ZREVIEW COPYÐ2007 Quest(van)
Owners ManualÐUSA_English(nna)
02/27/06Ðdebbie
X
Page 306 of 384

7. Refill engine with recommended oil through
the oil filler opening, then install the oil filler
cap securely.
See “Capacities and recommended
fuel/lubricants” in the “Technical and con-
sumer information” section of this manual for
drain and refill capacity.
The drain and refill capacity depends on the
oil temperature and drain time. Use these
specifications for reference only. Always use
the dipstick to determine when the proper
amount of oil is in the engine.
8. Start the engine. Check for leakage around
the drain plug and oil filter. Correct as re-
quired.
9. Turn the engine off and wait more than 10
minutes. Check the oil level with the dipstick.
Add engine oil if necessary.
CHANGING ENGINE OIL FILTER
1. Park the vehicle on a level surface and apply
the parking brake.
2. Turn the engine off.
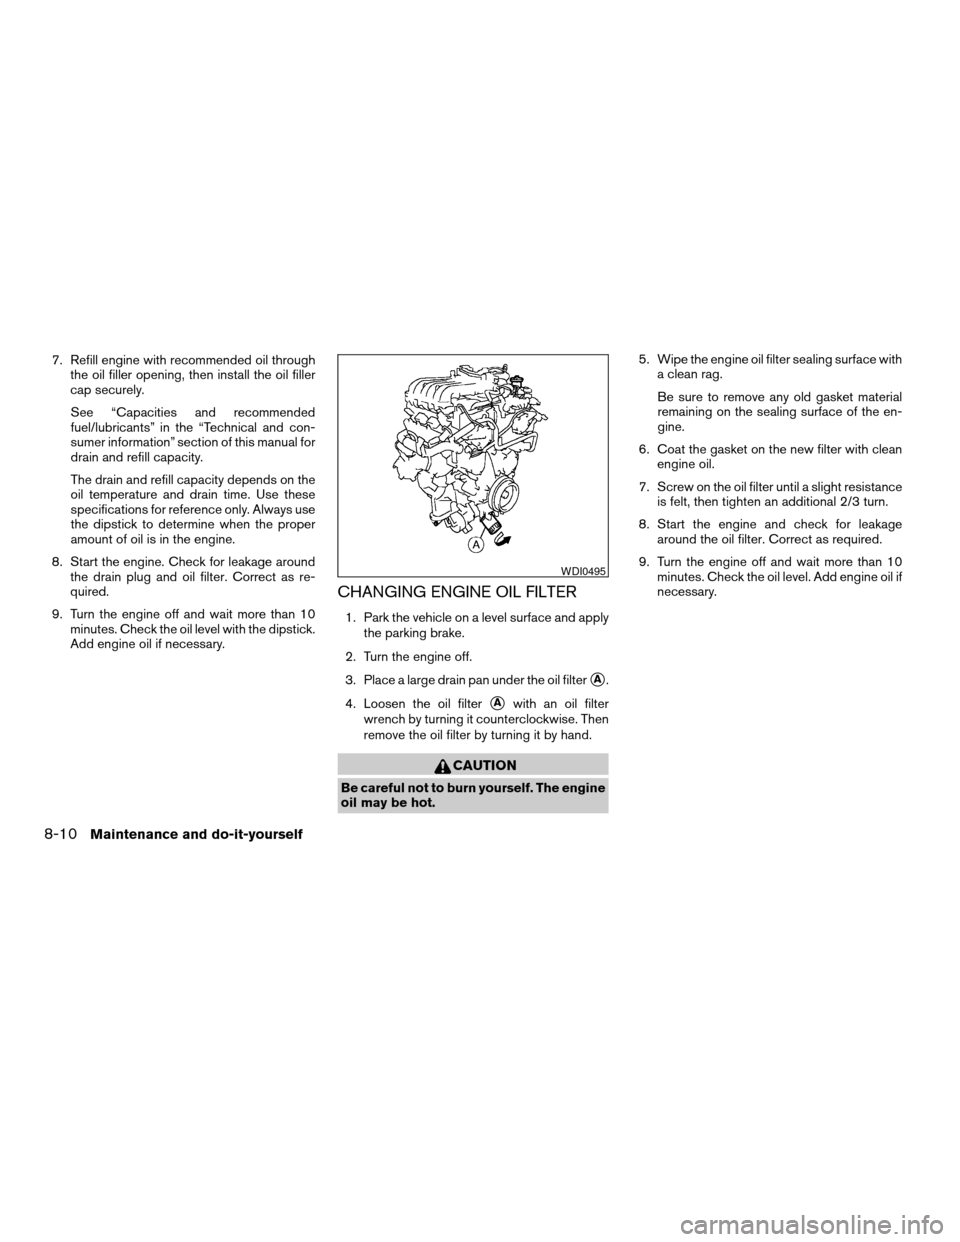
3. Place a large drain pan under the oil filter
sA.
4. Loosen the oil filter
sAwith an oil filter
wrench by turning it counterclockwise. Then
remove the oil filter by turning it by hand.
CAUTION
Be careful not to burn yourself. The engine
oil may be hot.5. Wipe the engine oil filter sealing surface with
a clean rag.
Be sure to remove any old gasket material
remaining on the sealing surface of the en-
gine.
6. Coat the gasket on the new filter with clean
engine oil.
7. Screw on the oil filter until a slight resistance
is felt, then tighten an additional 2/3 turn.
8. Start the engine and check for leakage
around the oil filter. Correct as required.
9. Turn the engine off and wait more than 10
minutes. Check the oil level. Add engine oil if
necessary.
WDI0495
8-10Maintenance and do-it-yourself
ZREVIEW COPYÐ2007 Quest(van)
Owners ManualÐUSA_English(nna)
02/27/06Ðdebbie
X
Page 312 of 384

WARNING
Be sure the engine and ignition switch are
off and that the parking brake is engaged
securely.
CAUTION
Be sure to use the correct socket to re-
move the spark plugs. An incorrect socket
can damage the spark plugs.
If replacement is required, see your NISSAN
dealer for assistance.
The air cleaner filter should not be cleaned and
reused. Replace it according to the maintenance
log shown in the “NISSAN Service and Mainte-
nance Guide.” When replacing the filter, wipe the
inside of the air cleaner filter housing and the
cover with a damp cloth.
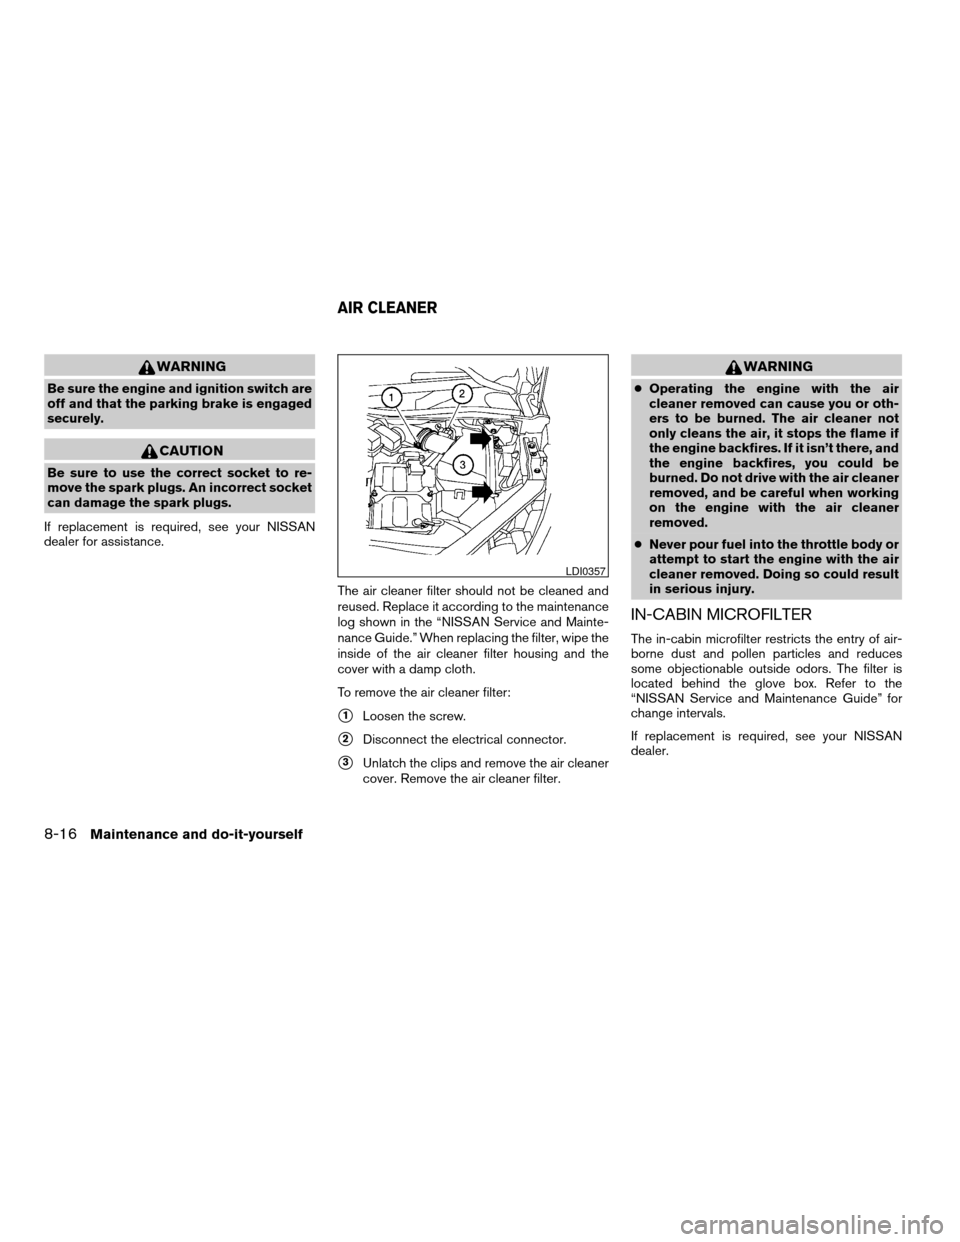
To remove the air cleaner filter:
s1Loosen the screw.
s2Disconnect the electrical connector.
s3Unlatch the clips and remove the air cleaner
cover. Remove the air cleaner filter.
WARNING
cOperating the engine with the air
cleaner removed can cause you or oth-
ers to be burned. The air cleaner not
only cleans the air, it stops the flame if
the engine backfires. If it isn’t there, and
the engine backfires, you could be
burned. Do not drive with the air cleaner
removed, and be careful when working
on the engine with the air cleaner
removed.
cNever pour fuel into the throttle body or
attempt to start the engine with the air
cleaner removed. Doing so could result
in serious injury.
IN-CABIN MICROFILTER
The in-cabin microfilter restricts the entry of air-
borne dust and pollen particles and reduces
some objectionable outside odors. The filter is
located behind the glove box. Refer to the
“NISSAN Service and Maintenance Guide” for
change intervals.
If replacement is required, see your NISSAN
dealer.
LDI0357
AIR CLEANER
8-16Maintenance and do-it-yourself
ZREVIEW COPYÐ2007 Quest(van)
Owners ManualÐUSA_English(nna)
02/27/06Ðdebbie
X
Page 361 of 384

cBe certain your rearview mirrors conform to
all federal, state or local regulations. If not,
install any mirrors required for towing before
driving the vehicle.
cDetermine the overall height of the vehicle
and trailer so the required clearance is
known.
Trailer towing tips
In order to gain skill and an understanding of the
vehicle’s behavior, you should practice turning,
stopping and backing up in an area which is free
from traffic. Steering stability and braking perfor-
mance will be somewhat different than under
normal driving conditions.
cAlways secure items in the trailer to prevent
load shift while driving.
cLock the trailer hitch coupler with a pin or
lock to prevent the coupler from inadvert-
ently becoming unlatched.
cAvoid abrupt starts, acceleration or stops.
cAvoid sharp turns or lane changes.
cAlways drive your vehicle at a moderate
speed.
cWhen backing up, hold the bottom of the
steering wheel with one hand. Move your
hand in the direction in which you want thetrailer to go. Make small corrections and
back up slowly. If possible, have someone
guide you when you are backing up.
Always block the wheels on both vehicle and
trailer when parking. Parking on a slope is not
recommended; however, if you must do so:
CAUTION
If you move the shift selector lever to the P
(Park) position before blocking the
wheels and applying the parking brake,
transmission damage could occur.
1. Apply and hold the brake pedal.
2. Have someone place blocks on the down hill
side of the vehicle and trailer wheels.
3. After the wheel blocks are in place, slowly
release the brake pedal until the blocks ab-
sorb the vehicle load.
4. Apply the parking brake.
5. Shift the transmission into P (Park) .
6. Turn off the engine.
To drive away:
1. Start the vehicle.
2. Apply and hold the brake pedal.
3. Shift the transmission into gear.4. Release the parking brake.
5. Drive slowly until the vehicle and trailer are
clear from the blocks.
6. Apply and hold the brake pedal.
7. Have someone retrieve and store the blocks.
cWhen going down a hill, shift into a lower
gear and use the engine braking effect.
When going up a long grade, downshift the
transmission to a lower gear and reduce
speed to reduce chances of engine over-
loading and/or overheating. However, for
long steep grades, do not stay in 1st gear
when driving above 35 MPH (56 km/h) or
2nd gear when driving above 58 MPH (93
km/h) .
cIf the engine coolant rises to an extremely
high temperature when the air conditioner
system is on, turn off the air conditioner.
Coolant heat can be additionally vented by
opening the windows, switching the fan
control to high and setting the temperature
control to the HOT position.
cTrailer towing requires more fuel than normal
circumstances.
cAvoid towing a trailer for your vehicle’s first
500 miles (805 km) .
Technical and consumer information9-21
ZREVIEW COPYÐ2007 Quest(van)
Owners ManualÐUSA_English(nna)
02/27/06Ðdebbie
X
Page 369 of 384

10 Index
A
Active head restraint...............1-7
Adjusting pedal position............3-21
Air bag (See supplemental restraint
system).....................1-51
Air bag system
Front (See supplemental front impact
air bag system)...............1-58
Side and curtain (See supplemental side
air bag and curtain side-impact air bag
system)...................1-62
Air bag warning labels.............1-65
Air bag warning light...........1-65, 2-11
Air cleaner housing filter............8-16
Air conditioner
Air conditioner operation..........4-34
Air conditioner service...........4-43
Air conditioner specification label.....9-11
Air conditioner system refrigerant and
oil recommendations.............9-6
Heater and air conditioner
controls................4-31, 4-40
Rear seat air conditioner..........4-42
Servicing air conditioner..........4-43
Air flow charts..................4-35
Alarm system
(See vehicle security system).........2-14
Anchor point locations.............1-30
Antenna.....................4-61
Anti-lock brake warning light..........2-8Anti-lock braking system (ABS)........5-20
Audible reminders................2-14
Audio system..................4-43
AM-FM-SAT radio with compact disc
(CD) changer................4-51
AM-FM-SAT radio with compact disc
(CD) player.................4-51
Compact Disc (CD) changer.......4-56
Compact disc (CD) player.........4-55
MP3 display..................4-6
Radio....................4-43
Rear audio controls.............4-60
Steering wheel audio control switch. . . .4-59
Autolight switch.................2-20
Automatic
Automatic drive positioner.........3-25
Automatic power window switch.....2-40
Automatic transmission position indicator
light.....................2-11
Driving with automatic transmission. . . .5-10
Transmission selector lever lock
release....................5-12
Automatic anti-glare inside mirror.......3-23
Average speed..................4-4
B
Back button................4-7, 4-18
Battery......................8-13
Charge warning light.............2-8
Before starting the engine............5-9Belts (See drive belts).............8-15
Bench seat adjustment (3rd row). . . .1-7, 1-12
BluetoothThands-free phone system.....4-72
Booster seats..................1-47
Brake
Anti-lock braking system (ABS)......5-20
Brake fluid..................8-12
Brake light (See stop light).........8-25
Brake system................5-19
Brake warning light..............2-8
Brake wear indicators........2-14, 8-20
Parking brake check............8-20
Parking brake operation..........5-14
Self-adjusting brakes............8-20
Brake pedal...................8-20
Break-in schedule................5-16
Brightness control
Instrument panel..............2-22
Brightness/contrast button. . . .4-6, 4-16, 4-28
Bulb check/instrument panel..........2-7
Bulb replacement................8-25
C
Capacities and recommended
fuel/lubricants...................9-2
Captain’s chair adjustment (2nd row)......1-6
Car phone or CB radio.............4-72
Cargo (See vehicle loading information) . . .9-12
CD care and cleaning.............4-58
CD changer (See audio system)........4-56
ZREVIEW COPYÐ2007 Quest(van)
Owners ManualÐUSA_English(nna)
02/27/06Ðdebbie
X
Page 373 of 384

Overheat
If your vehicle overheats..........6-10
Owner’s manual order form..........9-25
Owner’s manual/service manual order
information....................9-25
P
Parking
Parking brake check............8-20
Parking brake operation..........5-14
Parking/parking on hills...........5-18
Pedal position adjustment...........3-21
Personal lights.................2-44
Power
Front seat adjustment............1-4
Power door locks...............3-5
Power outlet.................2-27
Power steering fluid.............8-11
Power steering system...........5-19
Power vent windows............2-40
Power windows...............2-38
Precautions
Maintenance precautions..........8-5
Precautions on child restraints . . .1-25, 1-40,
1-47
Precautions on seat belt usage......1-15
Precautions on supplemental restraint
system....................1-51
Precautions when starting and driving . . .5-2
Pre-tensioner seat belt system.........1-64
Programmable features......4-5, 4-11, 4-22
Push starting..................6-10R
Radio
Car phone or CB radio...........4-72
Compact Disc (CD) changer.......4-56
Rear audio controls.............4-60
Steering wheel audio control switch. . . .4-59
Readiness for inspection maintenance (I/M)
test........................9-24
Rear audio controls...............4-60
Rear center seat belt..............1-21
Rear seat air conditioner............4-42
Rear sonar system off switch.........2-27
Rear view monitor................4-29
Rear window and outside mirror defroster
switch......................2-18
Rear window wiper and washer switches . . .2-18
Recorders
Event data..................9-25
Refrigerant recommendation..........9-6
Registering your vehicle in another country. . .9-9
Remote controller (See DVD entertainment
system).....................4-64
Remote keyless entry system..........3-9
Reporting safety defects (US only)......9-24
Resetting average speed............4-4
Resetting the fuel economy.....4-4, 4-9, 4-19
Resetting trip 1 and trip 2.........4-8, 4-18
S
Safety
Child safety sliding door lock........3-9
Child seat belts........1-25, 1-40, 1-47Reporting safety defects (US only). . . .9-24
Screen (See DVD entertainment system) . . .4-64
Seat adjustment
Front manual seat adjustment........1-2
Front power seat adjustment........1-4
Second row captain’s chair.........1-6
Third row bench seat.........1-7, 1-12
Seat belt
Child safety.................1-17
Infants and small children.........1-18
Injured Person................1-19
Larger children...............1-18
Precautions on seat belt usage......1-15
Pregnant women..............1-19
Pre-tensioner seat belt system.......1-64
Rear center seat belt............1-21
Seat belt extenders.............1-25
Seat belt maintenance...........1-25
Seat belts..................1-15
Shoulder belt height adjustment......1-24
Three-point type with retractor.......1-19
Seat belt warning light.............2-11
Seatback pockets................2-32
Seats
Adjustment..................1-2
Automatic drive positioner.........3-25
Front seats..................1-2
Heated seats................2-25
Manual front seat adjustment........1-2
Second row captain’s chair adjustment.....1-6
Security indicator light.............2-13
Security system (NISSAN vehicle immobilizer
system) , engine start.........2-16, 3-2, 5-9
Self-adjusting brakes..............8-20
Service manual order form...........9-25
Servicing air conditioner............4-43
10-5
ZREVIEW COPYÐ2007 Quest(van)
Owners ManualÐUSA_English(nna)
02/27/06Ðdebbie
X