2007 NISSAN QUEST display
[x] Cancel search: displayPage 5 of 384

Table of
ContentsIllustrated table of contents
Safety—Seats, seat belts and supplemental restraint system
Instruments and controls
Pre-driving checks and adjustments
Display screen, heater, air conditioner, audio and phone systems
Starting and driving
In case of emergency
Appearance and care
Maintenance and do-it-yourself
Technical and consumer information
Index
0
1
2
3
4
5
6
7
8
9
10
Page 12 of 384

1. Ventilators (P. 4-31)
2. Headlight/fog light (if so equipped)/turn
signal switch (P. 2-19)
3. Steering wheel switch for audio
control/BluetoothThands-free phone
system (if so equipped) (P. 4-59)
4. Driver supplemental air bag/horn
(P. 1-51, P. 2-25)
5. Meters and gauges (P. 2-3)
6. Cruise control main/set switches
(P. 5-15)
7. Windshield wiper/washer switch and
rear window wiper/washer switch
(P. 2-17, 2-18)
8. Display screen/Navigation system*
(P. 4-2, P. 4-7, P. 4-17)
9. Front passenger supplemental air bag
(P. 1-51)
10. Glove box (P. 2-31)
11. Front passenger air bag status light
(P. 1-59)
12. Hazard warning flasher switch (P. 2-24)
13. Climate controls (P. 4-31, 4-40)
14. Audio system controls (P. 4-43)
15. Display screen/Navigation system*
controls (P. 4-2, P. 4-7, P. 4-17)
16. Power outlets (P. 2-27)
LIC0928
INSTRUMENT PANEL
0-6Illustrated table of contents
ZREVIEW COPYÐ2007 Quest(van)
Owners ManualÐUSA_English(nna)
02/24/06Ðdebbie
X
Page 81 of 384

1. SRS Front Air Bag Warning Labels
2. SRS Side Air Bag Warning Label (if so
equipped)
SUPPLEMENTAL AIR BAG
WARNING LABELS
Warning labels about the supplemental front air
bag and supplemental side air bag systems (if so
equipped) are placed in the vehicle as shown in
the illustration.
SUPPLEMENTAL AIR BAG
WARNING LIGHT
The supplemental air bag warning light,
displayingin the instrument panel, moni-
tors the circuits of the supplemental front air bag,
supplemental side air bag and curtain side-
impact air bag and pre-tensioner seat belt sys-
tems. The circuits monitored by the supplemental
air bag warning light are the diagnosis sensor
unit, crash zone sensor, satellite sensors, front air
bag modules, side air bag modules, curtain side-
impact air bag modules, pre-tensioner seat belts
and all related wiring.When the ignition key is in the ON or START
position, the supplemental air bag warning light
illuminates for about 7 seconds and then turns
off. This means the system is operational.
If any of the following conditions occur, the
supplemental front air bag, supplemental side air
bag and curtain side-impact air bag and pre-
tensioner seat belt systems need servicing:
cThe supplemental air bag warning light re-
mains on after approximately 7 seconds.
cThe supplemental air bag warning light
flashes intermittently.
cThe supplemental air bag warning light does
not come on at all.
Under these conditions, the supplemental front
air bag, supplemental side air bags and curtain
side-impact air bag or pre-tensioner seat belt
systems may not operate properly. It must be
checked and repaired. Take your vehicle to the
nearest NISSAN dealer.
LRS0318LRS0100
Safety—Seats, seat belts and supplemental restraint system1-65
ZREVIEW COPYÐ2007 Quest(van)
Owners ManualÐUSA_English(nna)
02/27/06Ðdebbie
X
Page 86 of 384

1. Ventilators (P. 4-31)
2. Headlight/fog light (if so equipped)/turn
signal switch (P. 2-19)
3. Steering wheel switch for audio
control/BluetoothThands-free phone
system (if so equipped) (P. 4-59)
4. Driver supplemental air bag/horn
(P. 1-51, P. 2-25)
5. Meters and gauges (P. 2-3)
6. Cruise control main/set switches
(P. 5-15)
7. Windshield wiper/washer switch and
rear window wiper/washer switch
(P. 2-17, 2-18)
8. Display screen/Navigation system*
(P. 4-2, P. 4-7, P. 4-17)
9. Front passenger supplemental air bag
(P. 1-51)
10. Glove box (P. 2-31)
11. Front passenger air bag status light
(P. 1-59)
12. Hazard warning flasher switch (P. 2-24)
13. Climate controls (P. 4-31, 4-40)
14. Audio system controls (P. 4-43)
15. Display screen/Navigation system*
controls (P. 4-2, P. 4-7, P. 4-17)
16. Power outlets (P. 2-27)
LIC0928
INSTRUMENT PANEL
2-2Instruments and controls
ZREVIEW COPYÐ2007 Quest(van)
Owners ManualÐUSA_English(nna)
02/27/06Ðdebbie
X
Page 87 of 384

17. Shift selector lever (P. 5-10)
18. Ignition switch (P. 5-8)
19. Tilt steering wheel control (P. 3-21)
20. Rear sonar system off switch
(if so equipped) (P. 2-26)
21. Vehicle dynamic control (VDC) off
switch (if so equipped) or Traction con-
trol system (TCS) off switch
(if so equipped) (P. 2-26, P. 2-26)
22. Lights on demand switch (P. 2-43)
*: Refer to the separate Navigation System Own-
er’s Manual (if so equipped) .
See the page number indicated in paren-
theses for operating details.
1. Tachometer
2. Warning/indicator lights
3. Speedometer
4. Engine coolant temperature gauge
5. Fuel gauge
6. Odometer/Twin trip odometer1. Speedometer
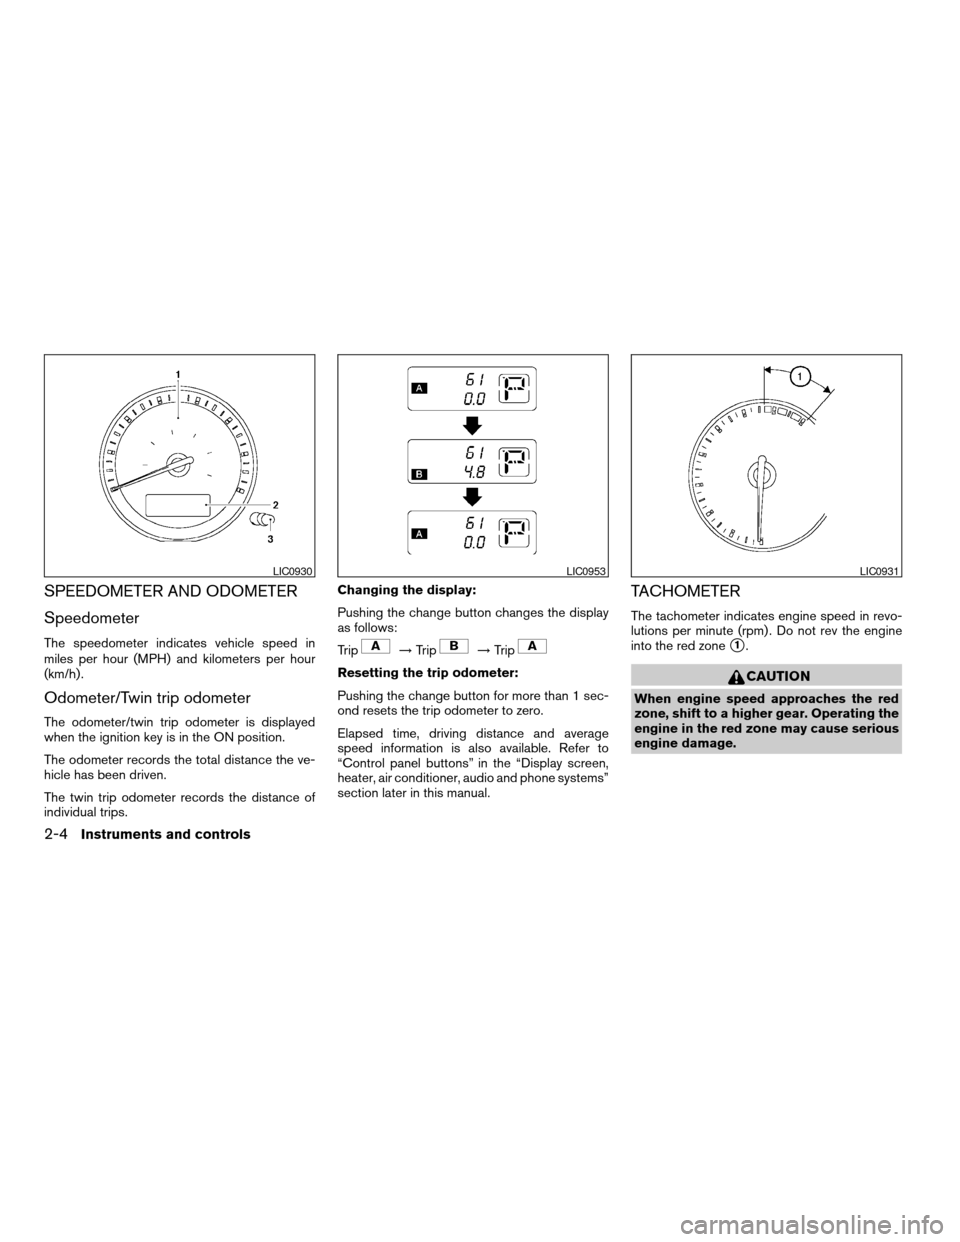
2. Odometer/twin trip display
3. Change button
LIC0929
METERS AND GAUGES
Instruments and controls2-3
ZREVIEW COPYÐ2007 Quest(van)
Owners ManualÐUSA_English(nna)
02/27/06Ðdebbie
X
Page 88 of 384

SPEEDOMETER AND ODOMETER
Speedometer
The speedometer indicates vehicle speed in
miles per hour (MPH) and kilometers per hour
(km/h) .
Odometer/Twin trip odometer
The odometer/twin trip odometer is displayed
when the ignition key is in the ON position.
The odometer records the total distance the ve-
hicle has been driven.
The twin trip odometer records the distance of
individual trips.Changing the display:
Pushing the change button changes the display
as follows:
Trip
!Trip!Trip
Resetting the trip odometer:
Pushing the change button for more than 1 sec-
ond resets the trip odometer to zero.
Elapsed time, driving distance and average
speed information is also available. Refer to
“Control panel buttons” in the “Display screen,
heater, air conditioner, audio and phone systems”
section later in this manual.
TACHOMETER
The tachometer indicates engine speed in revo-
lutions per minute (rpm) . Do not rev the engine
into the red zone
s1.
CAUTION
When engine speed approaches the red
zone, shift to a higher gear. Operating the
engine in the red zone may cause serious
engine damage.
LIC0930LIC0953LIC0931
2-4Instruments and controls
ZREVIEW COPYÐ2007 Quest(van)
Owners ManualÐUSA_English(nna)
02/27/06Ðdebbie
X
Page 93 of 384

The engine oil pressure warning light is not
designed to indicate a low oil level.Use the
dipstick to check the oil level. See “Engine oil” in
the “Maintenance and do-it-yourself” section of
this manual.
CAUTION
Running the engine with the engine oil
pressure warning light on could cause se-
rious damage to the engine almost imme-
diately. Such damage is not covered by
warranty. Turn off the engine as soon as it
is safe to do so.
Low fuel warning light
This light comes on when the fuel level in the fuel
tank is getting low. The low fuel warning chime
will also sound under certain conditions. See
“Low fuel warning chime” later in this section.
Refuel as soon as it is convenient, preferably
before the fuel gauge reaches E (Empty) .There
will be a small reserve of fuel in the tank
when the fuel gauge needle reaches E
(Empty) .
Low tire pressure warning
light
Your vehicle is equipped with a Tire Pressure
Monitoring System (TPMS) that monitors the tire
pressure of all tires except the spare.
The low tire pressure warning light warns of low
tire pressure or indicates that the TPMS is not
functioning properly.
After the ignition switch is turned ON, this light
illuminates for about 1 second and turns off.
Low tire pressure warning (for models with-
out MichelinTPAXTtires only):
If the vehicle is being driven with low tire pres-
sure, the warning light will illuminate. If you select
the tire pressure information in the display, the
LOW PRESSURE warning message will be dis-
played. The tire pressure for each tire will also be
displayed.
When the low tire pressure warning light illumi-
nates, you should stop and adjust the tire pres-
sure to the recommended COLD tire pressure
shown on the Tire and Loading Information label
to turn the light OFF.
For additional information, see “Tire pressure
monitoring system (TPMS)” in the “Starting and
driving” section and in the “In case of emergency”
section.Low tire pressure warning (for models with
MichelinTPAXTtires only):
If the vehicle is being driven with low tire pressure
the warning light will illuminate. If you select the
tire pressure information in the display, the LOW
PRESSURE warning message will be displayed.
The tire pressure for each tire will also be dis-
played.
When the low tire pressure warning light illumi-
nates, you should stop and adjust the tire pres-
sure to the recommended COLD tire pressure
shown on the Tire and Loading Information label
to turn the light OFF.
Flat tire warning (for models with Mich-
elinTPAXTtires only):
If the vehicle is being driven with one or more flat
tires, the warning light will flash continuously and
a chime will sound for 10 seconds.
The chime will only sound at the first indication of
a flat tire and the warning light will flash continu-
ously. When the flat tire warning is activated,
have the system reset and the tire checked and
replaced if necessary by a NISSAN dealer or
authorized Michelin PAX system dealer. Even if
the tire is inflated to the specified COLD tire
pressure, the warning light will continue to flash
until the system is reset by a NISSAN dealer.
Instruments and controls2-9
ZREVIEW COPYÐ2007 Quest(van)
Owners ManualÐUSA_English(nna)
02/27/06Ðdebbie
X
Page 94 of 384

If you select the tire pressure information in the
display, the LOW PRESSURE warning message
will be displayed. The tire pressure for each tire
will also be displayed.
Your vehicle can be driven for a limited time on a
flat tire. See “Michelin PAX Tires” in the “Mainte-
nance and do-it-yourself” section.
For additional information, see “Tire pressure
monitoring system (TPMS)” in the “Starting and
driving” section and in the “In case of emergency”
section.
TPMS malfunction (all models):
If the TPMS is not functioning properly, the low
tire pressure warning light will flash for approxi-
mately 1 minute when the ignition switch is
turned ON. The light will remain on after the 1
minute. Have the system checked by a NISSAN
dealer.
For additional information, see “Tire pressure
monitoring system (TPMS)” in the “Starting and
driving” section and in the “In case of emergency”
section.WARNING
cIf the light does not illuminate with the
ignition switch turned ON, have the ve-
hicle checked by a NISSAN dealer as
soon as possible.
cIf the light illuminates while driving,
avoid sudden steering maneuvers or
abrupt braking, reduce vehicle speed,
pull off the road to a safe location and
stop the vehicle as soon as possible.
Serious vehicle damage could occur
and may lead to an accident and could
result in serious personal injury. Check
the tire pressure for all four tires. Adjust
the tire pressure to the recommended
COLD tire pressure shown on the Tire
and Loading Information label to turn
the low tire pressure warning light OFF.
If the light still illuminates while driving
after adjusting the tire pressure, a tire
may be flat. If you have a flat tire, re-
place it with a spare tire as soon as
possible.cAlthough you can continue driving with
a punctured MichelinTPAXTtire (if so
equipped) , remember that vehicle han-
dling stability is reduced, which could
lead to an accident and personal injury.
Also, driving a long distance at high
speeds may damage the tires.
cDo not drive at speeds above 50 MPH
(80 km/h) and do not drive more than
125 miles (200 km) with a punctured
MichelinTPAXTtire (if so equipped) .
The actual distance the vehicle can be
driven on a flat tire depends on outside
temperature, vehicle load, road condi-
tions and other factors.
cDo not tow a trailer when a MichelinT
PAXTtire (if so equipped) is flat.
cWhen a spare tire is mounted or a wheel
is replaced, tire pressure will not be
indicated, the TPMS will not function
and the low tire pressure warning light
will flash. Contact your NISSAN dealer
as soon as possible for tire replacement
and/or system resetting.
cReplacing tires with those not originally
specified by NISSAN could affect the
proper operation of the TPMS.
2-10Instruments and controls
ZREVIEW COPYÐ2007 Quest(van)
Owners ManualÐUSA_English(nna)
02/27/06Ðdebbie
X