2007 NISSAN PATHFINDER check engine
[x] Cancel search: check enginePage 283 of 352
If you add electrical accessories to your vehicle
ground it to the body ground
sAlocated near the
battery along the negative battery cable.
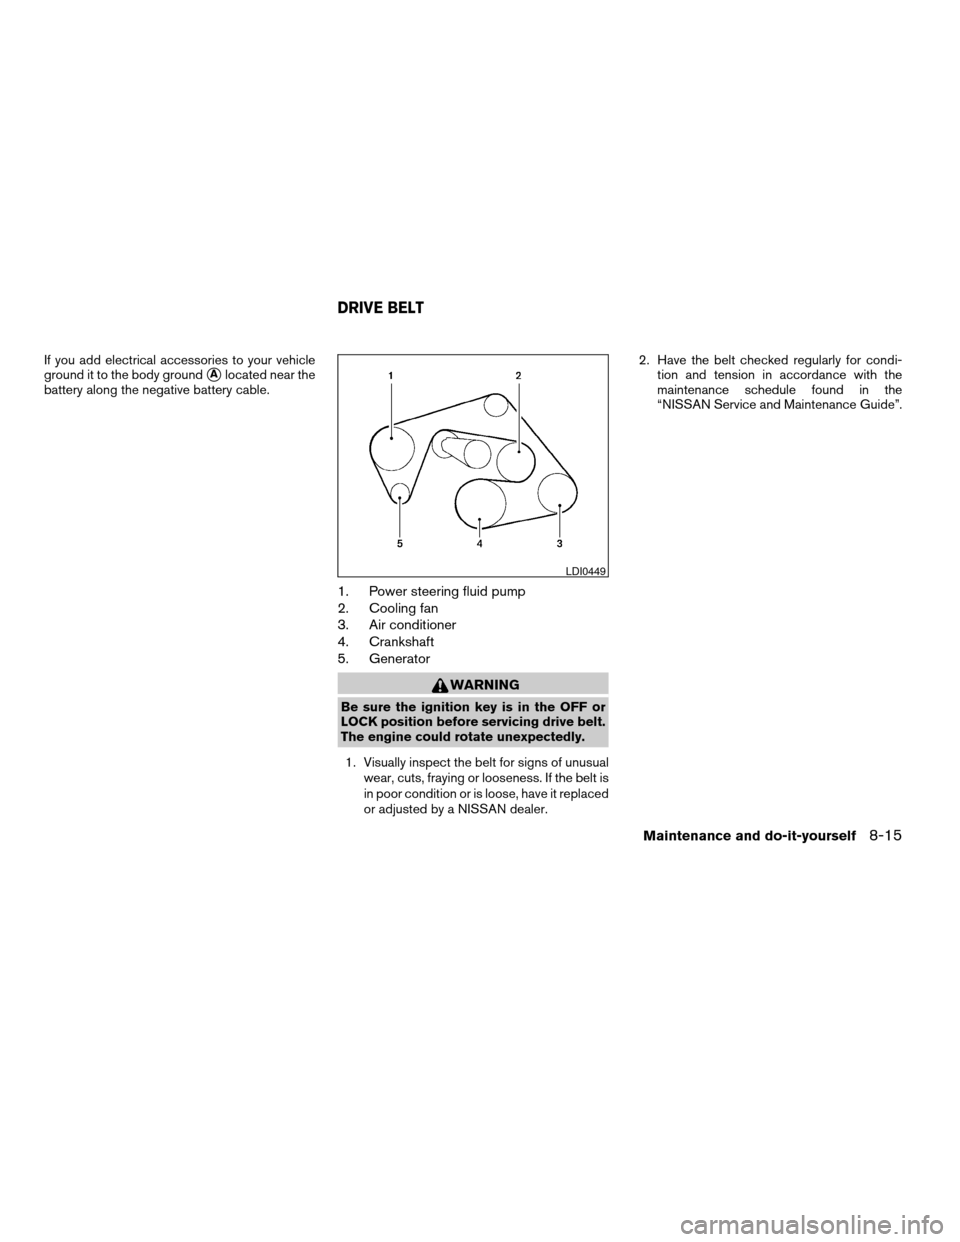
1. Power steering fluid pump
2. Cooling fan
3. Air conditioner
4. Crankshaft
5. Generator
WARNING
Be sure the ignition key is in the OFF or
LOCK position before servicing drive belt.
The engine could rotate unexpectedly.
1. Visually inspect the belt for signs of unusual
wear, cuts, fraying or looseness. If the belt is
in poor condition or is loose, have it replaced
or adjusted by a NISSAN dealer.2. Have the belt checked regularly for condi-
tion and tension in accordance with the
maintenance schedule found in the
“NISSAN Service and Maintenance Guide”.
LDI0449
DRIVE BELT
Maintenance and do-it-yourself8-15
ZREVIEW COPYÐ2007 Pathfinder(pat)
Owners ManualÐUSA_English(nna)
10/26/06Ðcathy
X
Page 289 of 352
If the brakes do not operate properly, have the
brakes checked by a NISSAN dealer.
Self-adjusting brakes
Your vehicle is equipped with self-adjusting
brakes.
The front and rear disc-type brakes self-adjust
every time the brake pedal is applied.
WARNING
See a NISSAN dealer for a brake system
check if the brake pedal height does not
return to normal.
Brake pad wear indicators
The disc brake pads on your vehicle have audible
wear indicators. When a brake pad requires re-
placement, a high pitched scraping or screech-
ing sound will be heard when the vehicle is in
motion. The noise will be heard whether or not the
brake pedal is depressed. Have the brakes
checked as soon as possible if the wear indicator
sound is heard.
Under some driving or climate conditions, occa-
sional brake squeak, squeal or other noise may
be heard. Occasional brake noise during light to
moderate stops is normal and does not affect the
function or performance of the brake system.Proper brake inspection intervals should
be followed.For more information regarding
brake inspections, see the appropriate mainte-
nance schedule information in the “NISSAN Ser-
vice and Maintenance Guide”.
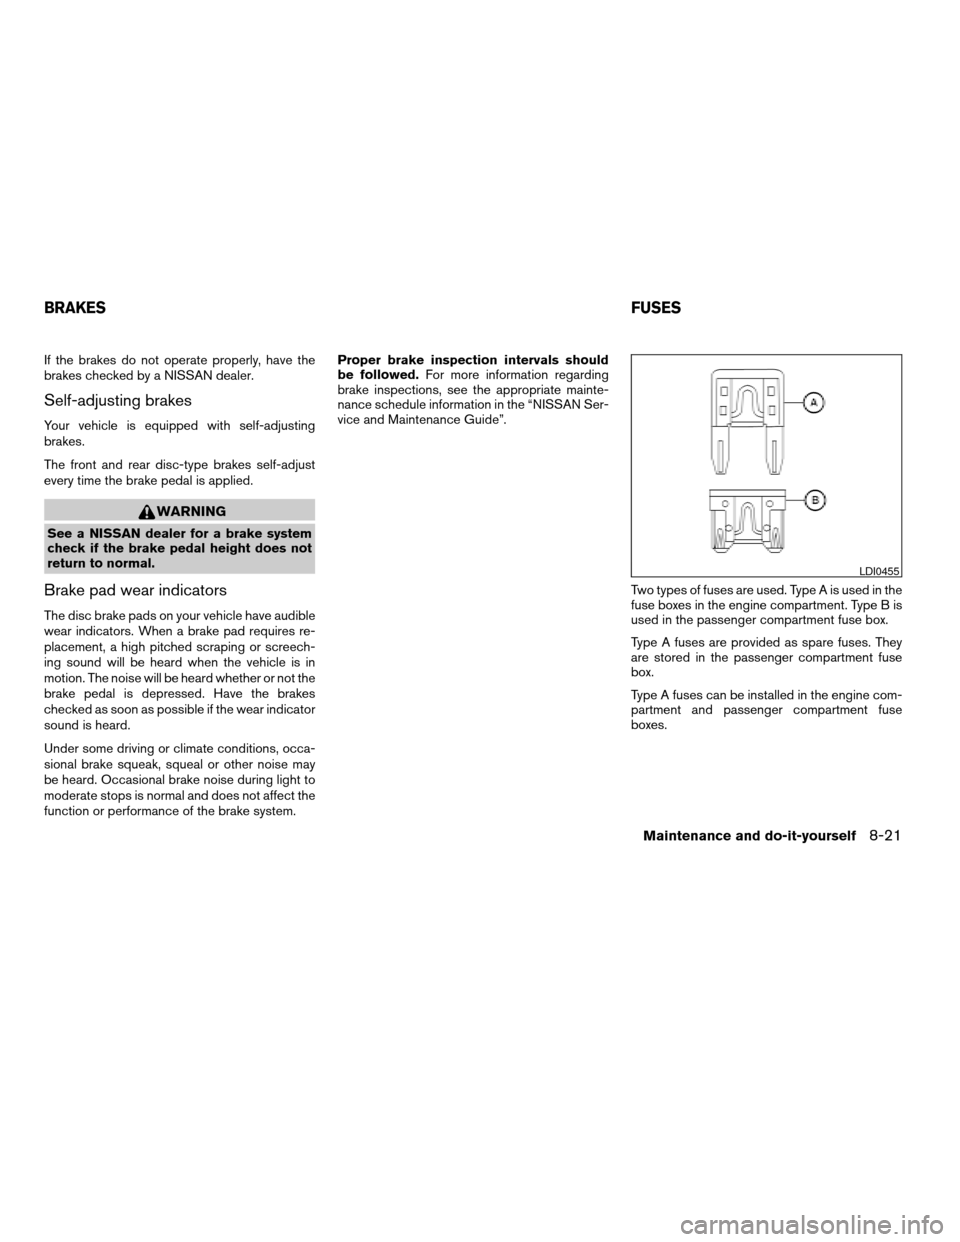
Two types of fuses are used. Type A is used in the
fuse boxes in the engine compartment. Type B is
used in the passenger compartment fuse box.
Type A fuses are provided as spare fuses. They
are stored in the passenger compartment fuse
box.
Type A fuses can be installed in the engine com-
partment and passenger compartment fuse
boxes.
LDI0455
BRAKESFUSES
Maintenance and do-it-yourself8-21
ZREVIEW COPYÐ2007 Pathfinder(pat)
Owners ManualÐUSA_English(nna)
10/16/06Ðdebbie
X
Page 290 of 352
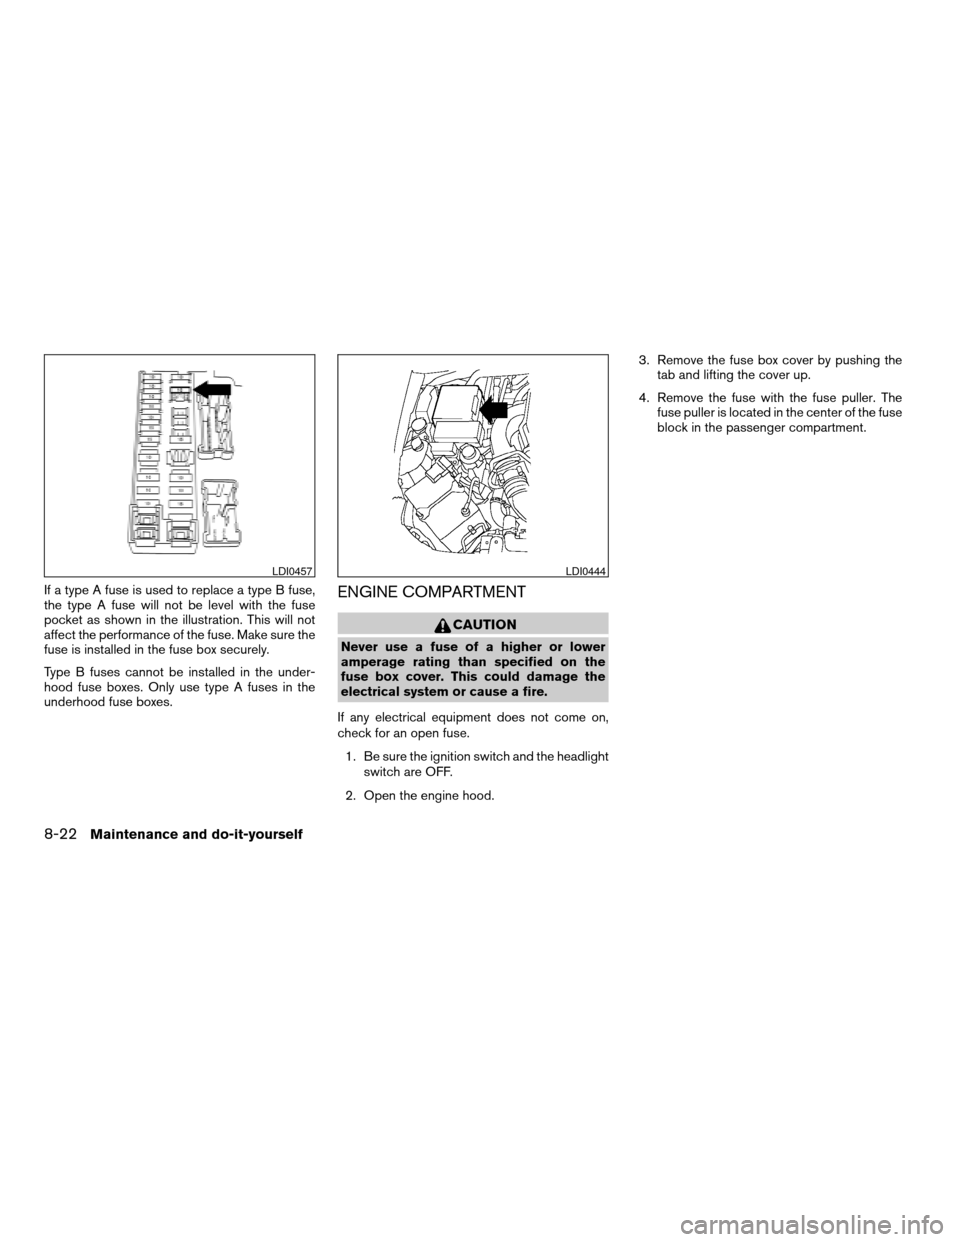
If a type A fuse is used to replace a type B fuse,
the type A fuse will not be level with the fuse
pocket as shown in the illustration. This will not
affect the performance of the fuse. Make sure the
fuse is installed in the fuse box securely.
Type B fuses cannot be installed in the under-
hood fuse boxes. Only use type A fuses in the
underhood fuse boxes.ENGINE COMPARTMENT
CAUTION
Never use a fuse of a higher or lower
amperage rating than specified on the
fuse box cover. This could damage the
electrical system or cause a fire.
If any electrical equipment does not come on,
check for an open fuse.
1. Be sure the ignition switch and the headlight
switch are OFF.
2. Open the engine hood.3. Remove the fuse box cover by pushing the
tab and lifting the cover up.
4. Remove the fuse with the fuse puller. The
fuse puller is located in the center of the fuse
block in the passenger compartment.
LDI0457LDI0444
8-22Maintenance and do-it-yourself
ZREVIEW COPYÐ2007 Pathfinder(pat)
Owners ManualÐUSA_English(nna)
10/16/06Ðdebbie
X
Page 293 of 352
If the battery is removed for any reason
other than replacement, perform step 5.
cAn improperly disposed battery can
hurt the environment. Always confirm
local regulations for battery disposal.
cThe keyfob is water-resistant; how-
ever, if it does get wet, immediately
wipe completely dry.
cThe operational range of the keyfob
extends to approximately 33 ft (10 m)
from the vehicle. This range may vary
with conditions.
FCC Notice:
Changes or modifications not expressly ap-
proved by the party responsible for compli-
ance could void the user’s authority to op-
erate the equipment.
This device complies with Part 15 of the
FCC Rules and RSS-210 of Industry
Canada.
Operation is subject to the following two
conditions: (1) This device may not cause
harmful interference, and (2) this device
must accept any interference received, in-
cluding interference that may cause undes-
ired operation of the device.HEADLIGHTS
The headlight is a semi-sealed beam type which
uses a replaceable headlight (halogen) bulb. A
bulb can be replaced from inside the engine
compartment without removing the headlight as-
sembly.
CAUTION
cHigh pressure halogen gas is sealed
inside the halogen bulb. The bulb may
break if the glass envelope is scratched
or the bulb is dropped.
cWhen handling the bulb, do not touch
the glass envelope.
cDO NOT TOUCH THE BULB
cUse the same number and wattage as
originally installed:
Wattage 65/55Bulb No. HB5/9007*
*: Always check with the Parts Depart-
ment at a NISSAN dealer for the latest
parts information.
cDo not leave the bulb out of the head-
light reflector for a long period of time
as dust, moisture and smoke may enter
the headlight body and affect the per-
formance of the headlight.cAiming is not necessary after replacing
the bulb. When aiming adjustment is
necessary, contact a NISSAN dealer.
LIGHTS
Maintenance and do-it-yourself8-25
ZREVIEW COPYÐ2007 Pathfinder(pat)
Owners ManualÐUSA_English(nna)
10/16/06Ðdebbie
X
Page 312 of 352
E–85 fuel
E-85 fuel is a mixture of approximately 85% fuel
ethanol and 15% unleaded gasoline. E-85 can
only be used in a Flexible Fuel Vehicle (FFV) . Do
not use E-85 in your vehicle. U.S. government
regulations require fuel ethanol dispensing
pumps to be identified by a small, square, orange
and black label with the common abbreviation or
the appropriate percentage for that region.
Aftermarket fuel additives
NISSAN does not recommend the use of any
aftermarket fuel additives (for example, fuel injec-
tor cleaner, octane booster, intake valve deposit
removers, etc.) which are sold commercially.
Many of these additives intended for gum, varnish
or deposit removal may contain active solvents or
similar ingredients that can be harmful to the fuel
system and engine.
Octane rating tips
Using unleaded gasoline with an octane
rating lower than recommended can cause
persistent, heavy “spark knock.” (“Spark
knock” is a metallic rapping noise.) If se-
vere, this can lead to engine damage. If you
detect a persistent heavy spark knock even
when using gasoline of the stated octane
rating, or if you hear steady spark knock
while holding a steady speed on levelroads, have a NISSAN dealer correct the
condition. Failure to correct the condition
is misuse of the vehicle, for which NISSAN
is not responsible.
Incorrect ignition timing may result in spark
knock, after-run and/or overheating, which may
cause excessive fuel consumption or engine
damage. If any of the above symptoms are en-
countered, have your vehicle checked at a
NISSAN dealer.
However, now and then you may notice
light spark knock for a short time while
accelerating or driving up hills. This is not a
cause for concern, because you get the
greatest fuel benefit when there is light
spark knock for a short time under heavy
engine load.
CAUTION
cYour vehicle is not designed to run on
E-85 fuel. Using E-85 fuel in a vehicle
not specifically designed for E-85 fuel
can damage fuel system components
and is not covered by the NISSAN new
vehicle limited warranty.
cE-85 is a mixture of approximately 85%
fuel ethanol and 15% unleaded
gasoline.cU.S. government regulations require
ethanol dispensing pumps to be identi-
fied by a small, square, orange and
black label with the common abbrevia-
tion or the appropriate percentage for
that region.
9-4Technical and consumer information
ZREVIEW COPYÐ2007 Pathfinder(pat)
Owners ManualÐUSA_English(nna)
10/16/06Ðdebbie
X
Page 333 of 352
cCrosswinds and rough roads will adversely
affect vehicle/trailer handling, possibly caus-
ing vehicle sway. When being passed by
larger vehicles, be prepared for possible
changes in crosswinds that could affect ve-
hicle handling.
Do the following if the trailer begins to sway:
1.
Take your foot off the accelerator pedal to allow
the vehicle to coast and steer as straight ahead
as the road conditions allow. This combination
will help stabilize the vehicle
- Do not correct trailer sway by steering or
applying the brakes.
2. When the trailer sway stops, gently apply the
brakes and pull to the side of the road in a
safe area.
3. Try to rearrange the trailer load so it is bal-
anced as described earlier in this section.
cBe careful when passing other vehicles.
Passing while towing a trailer requires con-
siderably more distance than normal pass-
ing. Remember, the length of the trailer must
also pass the other vehicle before you can
safely change lanes.
cDown shift the transmission to a lower gear
for engine braking when driving down steep
or long hills. This will help slow the vehicle
without applying the brakes.cTo maintain engine braking efficiency and
electrical charging performance, do not use
overdrive.
cAvoid holding the brake pedal down too long
or too frequently. This could cause the
brakes to overheat, resulting in reduced
braking efficiency.
cIncrease your following distance to allow for
greater stopping distances while towing a
trailer. Anticipate stops and brake gradually
cDo not use cruise control while towing a
trailer.
cSome states or provinces have specific regula-
tions and speed limits for vehicles that are
towing trailers. Obey the local speed limits.
cCheck your hitch, trailer wiring harness con-
nections, and trailer wheel lug nuts after 50
miles (80 km) of travel and at every break.
cWhen stopped in traffic for long periods of
time in hot weather, put the vehicle in the P
(Park) position.
cWhen launching a boat, don’t allow the wa-
ter level to go over the exhaust tail pipe or
rear bumper.
cMake sure you disconnect the trailer lights
before backing the trailer into the water or
the trailer lights may burn out.When towing a trailer, final drive gear oil
should be replaced and transmission
oil/fluid should be changed more fre-
quently. For additional information, see the
“Maintenance and do-it-yourself” section
earlier in this manual.
FLAT TOWING
Towing your vehicle with all four wheels on the
ground is sometimes called flat towing. This
method is sometimes used when towing a vehicle
behind a recreational vehicle, such as a motor
home.
CAUTION
cFailure to follow these guidelines can
result in severe transmission damage.
cWhenever flat towing your vehicle, al-
ways tow forward, never backward.
cDO NOT tow any automatic transmis-
sion vehicle with all four wheels on the
ground (flat towing) . Doing so WILL
DAMAGE internal transmission parts
due to lack of transmission lubrication.
cFor emergency towing procedures refer
to “Towing recommended by NISSAN”
in the “In case of emergency” section of
this manual.
Technical and consumer information9-25
ZREVIEW COPYÐ2007 Pathfinder(pat)
Owners ManualÐUSA_English(nna)
10/26/06Ðcathy
X
Page 336 of 352
Due to legal requirements in some states and
Canadian Provinces, your vehicle may be re-
quired to be in what is called the “ready condi-
tion” for an Inspection/Maintenance (I/M) test of
the emission control system.
The vehicle is set to the “ready condition” when it
is driven through certain driving patterns. Usually,
the ready condition can be obtained by ordinary
usage of the vehicle.
If a powertrain system component is repaired or
the battery is disconnected, the vehicle may be
reset to a “not ready” condition. Before taking the
I/M test, check the vehicle’s
inspection/maintenance test readiness condi-
tion. Turn the ignition switch ON without starting
the engine. If the Malfunction Indicator Light
(MIL) comes on steady for 20 seconds and then
blinks for 10 seconds , the I/M test condition is
9not ready9. If the MIL does not blink after 20
seconds, the I/M test condition is9ready.9If the
MIL indicates the vehicle is in a9not ready9con-
dition, drive the vehicle through the following
pattern to set the vehicle to the ready condition. If
you cannot or do not want to perform the driving
pattern, a NISSAN dealer can conduct it for you.WARNING
Always drive the vehicle in a safe and
prudent manner according to traffic con-
ditions and obey all traffic laws.
1. Start the engine when the engine coolant
temperature gauge needle points to C. Al-
low the engine to idle until the gauge needle
points between the C and H (normal oper-
ating temperature) .
2. Accelerate the vehicle to 55 MPH (88
km/h) , then quickly release the accelerator
pedal completely and keep it released for at
least 10 seconds.
3. Quickly depress the accelerator pedal for a
moment, then drive the vehicle at a speed of
53 - 60 MPH (86 - 96 km/h) for at least 9
minutes.
4. Stop the vehicle.
5. Accelerate the vehicle to 35 MPH (55 km/h)
and maintain the speed for 20 seconds.
6. Repeat steps 4 through 5 at least 10 times.
7. Accelerate the vehicle to 55 MPH (88 km/h)
and maintain the speed for at least 3 min-
utes.8. Stop the vehicle. Place the transmission se-
lector lever in the P (Park) or N (Neutral)
position.
9. Turn the engine off.
10. Repeat steps1-8atleast one more time.
If steps 1 through 7 are interrupted, repeat the
preceding step. Any safe driving mode is accept-
able between steps. Do not stop the engine until
step 7 is completed.
READINESS FOR INSPECTION/
MAINTENANCE (I/M) TEST
9-28Technical and consumer information
ZREVIEW COPYÐ2007 Pathfinder(pat)
Owners ManualÐUSA_English(nna)
10/26/06Ðcathy
X
Page 339 of 352

10 Index
4WD warning light...............2-16
A
Active head restraint...............1-7
Adjusting pedal position............3-12
Air bag (See supplemental restraint
system).....................1-39
Air bag system
Front (See supplemental front impact
air bag system)...............1-47
Air bag warning labels.............1-55
Air bag warning light...........1-55, 2-18
Air cleaner housing filter............8-16
Air conditioner
Air conditioner operation..........4-17
Air conditioner service...........4-25
Air conditioner specification label.....9-11
Air conditioner system refrigerant and
oil recommendations.............9-6
Heater and air conditioner
controls................4-15, 4-22
Rear seat air conditioner..........4-25
Servicing air conditioner..........4-25
Air flow charts..................4-19
Alarm system
(See vehicle security system).........2-22
Anchor point locations.............1-24
Antenna.....................4-48
Anti-lock brake warning light..........2-14
Anti-lock braking system (ABS)........5-29Audible reminders................2-22
Audio system..................4-26
Compact Disc (CD) changer. . . .4-39, 4-45
Compact disc (CD) player.........4-34
FM/AM radio with compact disc (CD)
player....................4-32
FM-AM radio with compact disc (CD)
player....................4-36
FM/AM/SAT radio with compact disc (CD)
changer...................4-42
Radio....................4-26
Steering wheel audio control switch. . . .4-48
Autolight switch.................2-28
Automatic
Automatic drive positioner.........3-17
Automatic power window switch.....2-48
Automatic transmission position
indicator light................2-18
Driving with automatic transmission. . . .5-11
Transmission selector lever lock release .5-13
Automatic anti-glare inside mirror.......3-14
AUX jack.................4-41, 4-47
B
Back button....................4-3
Battery......................8-13
Charge warning light............2-15
Before starting the engine...........5-10
Belt (See drive belt)..............8-15
Booster seats..................1-35Brake
Anti-lock braking system (ABS)......5-29
Brake fluid..................8-11
Brake light (See stop light).........8-27
Brake system................5-28
Brake warning light.............2-15
Brake wear indicators........2-22, 8-21
Parking brake operation..........5-15
Self-adjusting brakes............8-21
Brakes......................8-21
Break-in schedule................5-17
Brightness control
Instrument panel..............2-30
Brightness/contrast button...........4-13
Bulb check/instrument panel..........2-14
Bulb replacement................8-27
C
Capacities and recommended fuel/
lubricants.....................9-2
Car phone or CB radio.............4-58
Cargo light...................2-52
Cargo net....................2-44
Cargo (See vehicle loading information) . . .9-12
CD care and cleaning.............4-47
CD changer (See audio system). . . .4-39, 4-45
CD player (See audio system).........4-34
Child restraint with top tether strap......1-24
Child restraints.......1-14, 1-15, 1-20, 1-22
ZREVIEW COPYÐ2007 Pathfinder(pat)
Owners ManualÐUSA_English(nna)
10/27/06Ðbetty
X