2007 NISSAN PATHFINDER Neutral
[x] Cancel search: NeutralPage 232 of 352

2WD or 4WD shift procedure:
4WD Shift
Switch PositionWheels
DrivenIndicator Light
Use Conditions 4WD Shift Procedure
4WD shift Transfer 4LO position
2WDRear
wheels
For driving on dry, paved roads (Economy
drive) or state dynamometer I/M testingMove the 4WD switch.
2WD <—> 4H
4WD shift indicator light will indicate transfer shift position engaged.
IT IS NOT NECESSARY TO SHIFT THE TRANSMISSION SELEC-
TOR LEVER TO THE N POSITION IN THIS OPERATION. PERFORM
THIS OPERATION WHEN DRIVING STRAIGHT.
4H4 wheels
For driving on rocky, sandy or snow-
covered roads
Neutral
*1
May blinkNeutral disengages the automatic trans-
mission mechanical parking lock, which
will allow the vehicle to roll. Do not leave
the transfer shift position in Neutral.*21. Stop the vehicle.
2. Shift the transmission selector to the (N) position with the brake
pedal depressed.
3. Depress and turn the 4WD shift switch to 4LO or 4H with the
brake pedal depressed.
THE TRANSFER CASE DOES NOT ENGAGE BETWEEN 4H AND
4LO (OR 4LO TO 4H) UNLESS YOU HAVE FIRST STOPPED THE
VEHICLE, DEPRESSED THE BRAKE PEDAL AND MOVED THE
TRANSMISSION SELECTOR TO NEUTRAL. *3
4LO
4 wheels
IlluminatedFor use when maximum power and trac-
tion is required (for example: on steep
grades or rocky, sandy, muddy roads)
*1: Before moving the transmission selector shift lever from neutral, wait until the 4LO indicator light stays on steady. This indicates that the 4WD shift procedure is completed and the transfer gear is
correctly set in the 4LO position. If the vehicle is shifted into gear before the indicator is on steady, the transfer gear may grind, not engage correctly or stay in the neutral position.
- If the 4WD warning light illuminates, perform the following procedure to return the transfer case to correct operating condition.
1. Turn off the engine by turning the ignition switch9OFF9.
2. Start the engine.
- Check that the 4WD warning light turns off. If the 4WD light illuminates, have the system checked by a NISSAN dealer.
3. Apply the parking brake, depress the brake pedal and move the transmission selector lever to Neutral position.
4. With the brake pedal depressed, move the 4WD shift switch to desired mode.
- Be sure to wait until the transfer gear change completes before shifting the transmission selector lever from Neutral position.
*2: While changing in and out of 4LO, the ignition key must be ON and the vehicle’s engine must be running for a shift to take place and for the indicator lights (4WD shift and 4LO position indicator) to
be operable. Otherwise, the shift will not take place and no indicator lights will be on or flashing.
*3: Make sure the transfer 4LO position indicator light turns on when you shift the 4WD shift switch to 4LO. The
indicator light (if so equipped) will also turn on when 4LO is selected. See “Vehicle
dynamic control system” later in this section.
5-22Starting and driving
ZREVIEW COPYÐ2007 Pathfinder(pat)
Owners ManualÐUSA_English(nna)
10/16/06Ðdebbie
X
Page 233 of 352

The transfer case 4WD shift switch is used to
select either 2WD or 4WD depending on the
driving conditions. There are three types of drive
modes available, 2WD, 4H and 4LO.
The 4WD shift switch electronically controls the
transfer case operation. Rotate the switch to
move between each mode, 2WD, 4H and 4LO.
To change into or out of 4LO, the vehicle
MUST be stationary, shift the transmission
selector to Neutral (N) , and depress the
brake pedal. The switch must be depressed
and turned when changing into or out of
4LO.
WARNING
cWhen parking, apply the parking brake
before stopping the engine and make
sure that the 4WD shift indicator light is
on and the ATP warning light goes off.
Otherwise, the vehicle could unexpect-
edly move even if the automatic trans-
mission is in the P position.cThe 4LO indicator light must stop blink-
ing and remain illuminated or turn off
before shifting the transmission into
gear. If the transmission selector is
shifted from the (N) position to any
other gear when the 4LO indicator light
is blinking, the vehicle may move
unexpectedly.
CAUTION
cNever shift the 4WD shift switch be-
tween 4LO and 4H while driving.
cThe 4H position provides greater trac-
tion. Avoid excessive speed, as it will
cause increased fuel consumption and
higher oil temperatures, and could
damage drivetrain components.
Speeds over 62.5 MPH (100 km/h) in 4H
is not recommended.
cThe 4LO position provides maximum
traction. Avoid raising vehicle speed ex-
cessively, as the maximum speed is ap-
proximately 31 MPH (50 km/h) .
cWhen driving straight, shift the 4WD
shift switch to the 2WD or 4H position.
Do not move the 4WD shift switch when
making a turn or reversing.cDo not shift the 4WD shift switch (be-
tween 2WD and 4H) while driving on
steep downhill grades. Use the engine
brake and low automatic transmission
gears (D1 or D2) for engine braking.
cDo not operate the 4WD shift switch
(between 2WD and 4H) with the rear
wheels spinning.
cDo not drive on dry hard surface roads
in the 4H or 4LO position. Driving on dry
hard surfaces in 4H or 4LO may cause
unnecessary noise and tire wear.
NISSAN recommends driving in the
2WD position under these conditions.
cThe 4WD transfer case may not be
shifted between 4H and 4LO at low am-
bient temperatures and the transfer
4LO position indicator light may blink
even when the 4WD shift switch is
shifted. After driving for a while you can
change the 4WD transfer case between
4H and 4LO.
When driving on rough roads,
cSet the 4WD shift switch to 4H or 4LO.
cDrive carefully according to the road surface
conditions.
When the vehicle is stuck,
Starting and driving5-23
ZREVIEW COPYÐ2007 Pathfinder(pat)
Owners ManualÐUSA_English(nna)
10/16/06Ðdebbie
X
Page 255 of 352

cWhenever working on or near a battery,
always wear suitable eye protectors (for
example, goggles or industrial safety
spectacles) and remove rings, metal
bands, or any other jewelry. Do not lean
over the battery when jump starting.
cDo not attempt to jump start a frozen
battery. It could explode and cause se-
rious injury.
cYour vehicle has an automatic engine
cooling fan. It could come on at any
time. Keep hands and other objects
away from it.
WARNING
Always follow the instructions below.
Failure to do so could result in damage to
the charging system and cause personal
injury.
1. If the booster battery is in another vehicle,
position the two vehicles to bring their bat-
teries near each other.
Do not allow the two vehicles to touch.2. Apply the parking brake. Move the shift lever
to N (Neutral) (manual transmission) or to P
(Park) (automatic transmission) . Switch off
all unnecessary electrical systems (lights,
heater, air conditioner, etc.) .
3. Remove vent caps on the battery (if so
equipped) . Cover the battery with an old
cloth to reduce explosion hazard.
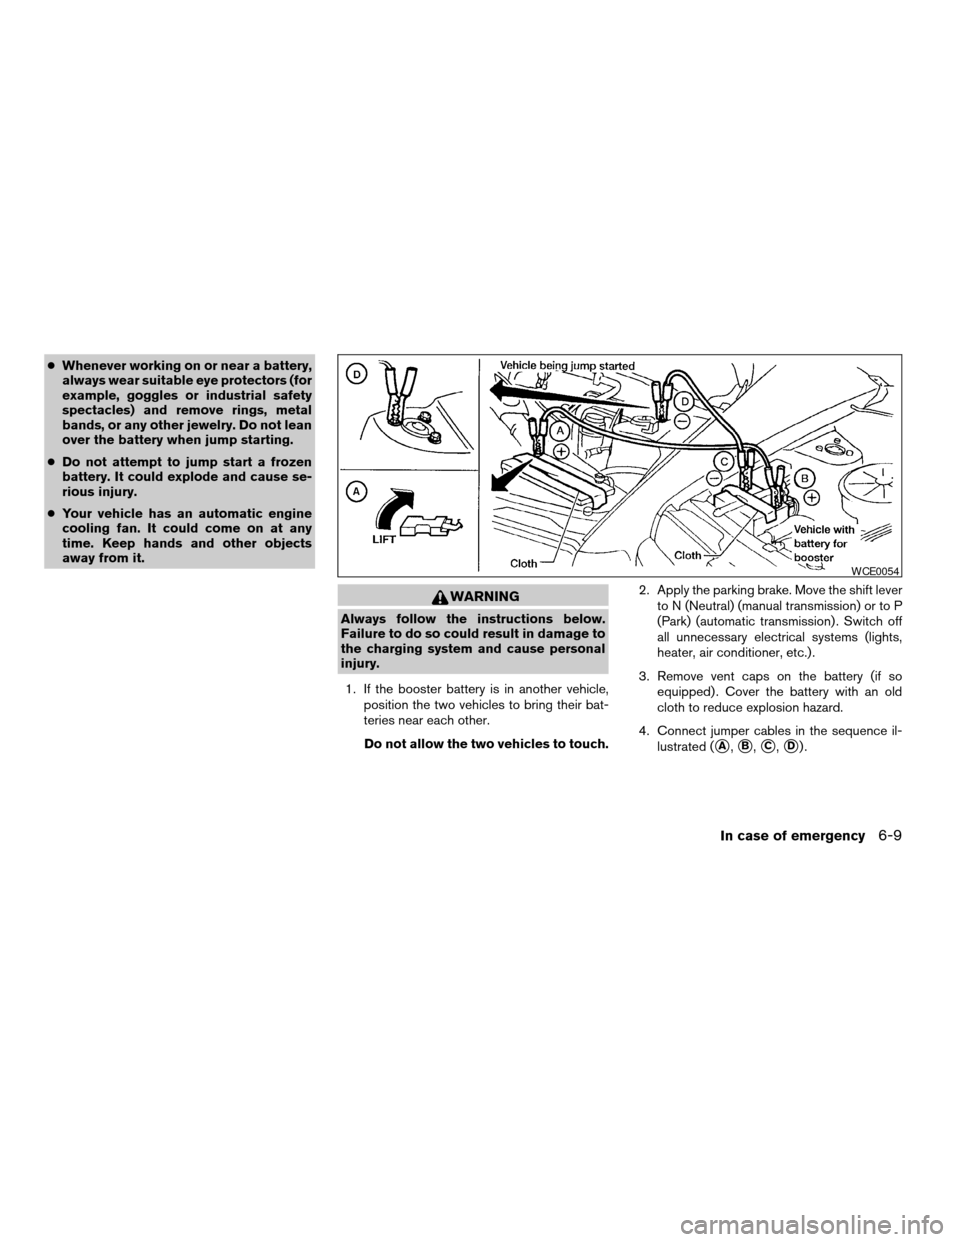
4. Connect jumper cables in the sequence il-
lustrated (
sA,sB,sC,sD).
WCE0054
In case of emergency6-9
ZREVIEW COPYÐ2007 Pathfinder(pat)
Owners ManualÐUSA_English(nna)
10/16/06Ðdebbie
X
Page 336 of 352

Due to legal requirements in some states and
Canadian Provinces, your vehicle may be re-
quired to be in what is called the “ready condi-
tion” for an Inspection/Maintenance (I/M) test of
the emission control system.
The vehicle is set to the “ready condition” when it
is driven through certain driving patterns. Usually,
the ready condition can be obtained by ordinary
usage of the vehicle.
If a powertrain system component is repaired or
the battery is disconnected, the vehicle may be
reset to a “not ready” condition. Before taking the
I/M test, check the vehicle’s
inspection/maintenance test readiness condi-
tion. Turn the ignition switch ON without starting
the engine. If the Malfunction Indicator Light
(MIL) comes on steady for 20 seconds and then
blinks for 10 seconds , the I/M test condition is
9not ready9. If the MIL does not blink after 20
seconds, the I/M test condition is9ready.9If the
MIL indicates the vehicle is in a9not ready9con-
dition, drive the vehicle through the following
pattern to set the vehicle to the ready condition. If
you cannot or do not want to perform the driving
pattern, a NISSAN dealer can conduct it for you.WARNING
Always drive the vehicle in a safe and
prudent manner according to traffic con-
ditions and obey all traffic laws.
1. Start the engine when the engine coolant
temperature gauge needle points to C. Al-
low the engine to idle until the gauge needle
points between the C and H (normal oper-
ating temperature) .
2. Accelerate the vehicle to 55 MPH (88
km/h) , then quickly release the accelerator
pedal completely and keep it released for at
least 10 seconds.
3. Quickly depress the accelerator pedal for a
moment, then drive the vehicle at a speed of
53 - 60 MPH (86 - 96 km/h) for at least 9
minutes.
4. Stop the vehicle.
5. Accelerate the vehicle to 35 MPH (55 km/h)
and maintain the speed for 20 seconds.
6. Repeat steps 4 through 5 at least 10 times.
7. Accelerate the vehicle to 55 MPH (88 km/h)
and maintain the speed for at least 3 min-
utes.8. Stop the vehicle. Place the transmission se-
lector lever in the P (Park) or N (Neutral)
position.
9. Turn the engine off.
10. Repeat steps1-8atleast one more time.
If steps 1 through 7 are interrupted, repeat the
preceding step. Any safe driving mode is accept-
able between steps. Do not stop the engine until
step 7 is completed.
READINESS FOR INSPECTION/
MAINTENANCE (I/M) TEST
9-28Technical and consumer information
ZREVIEW COPYÐ2007 Pathfinder(pat)
Owners ManualÐUSA_English(nna)
10/26/06Ðcathy
X