2007 NISSAN PATHFINDER remove seats
[x] Cancel search: remove seatsPage 23 of 352
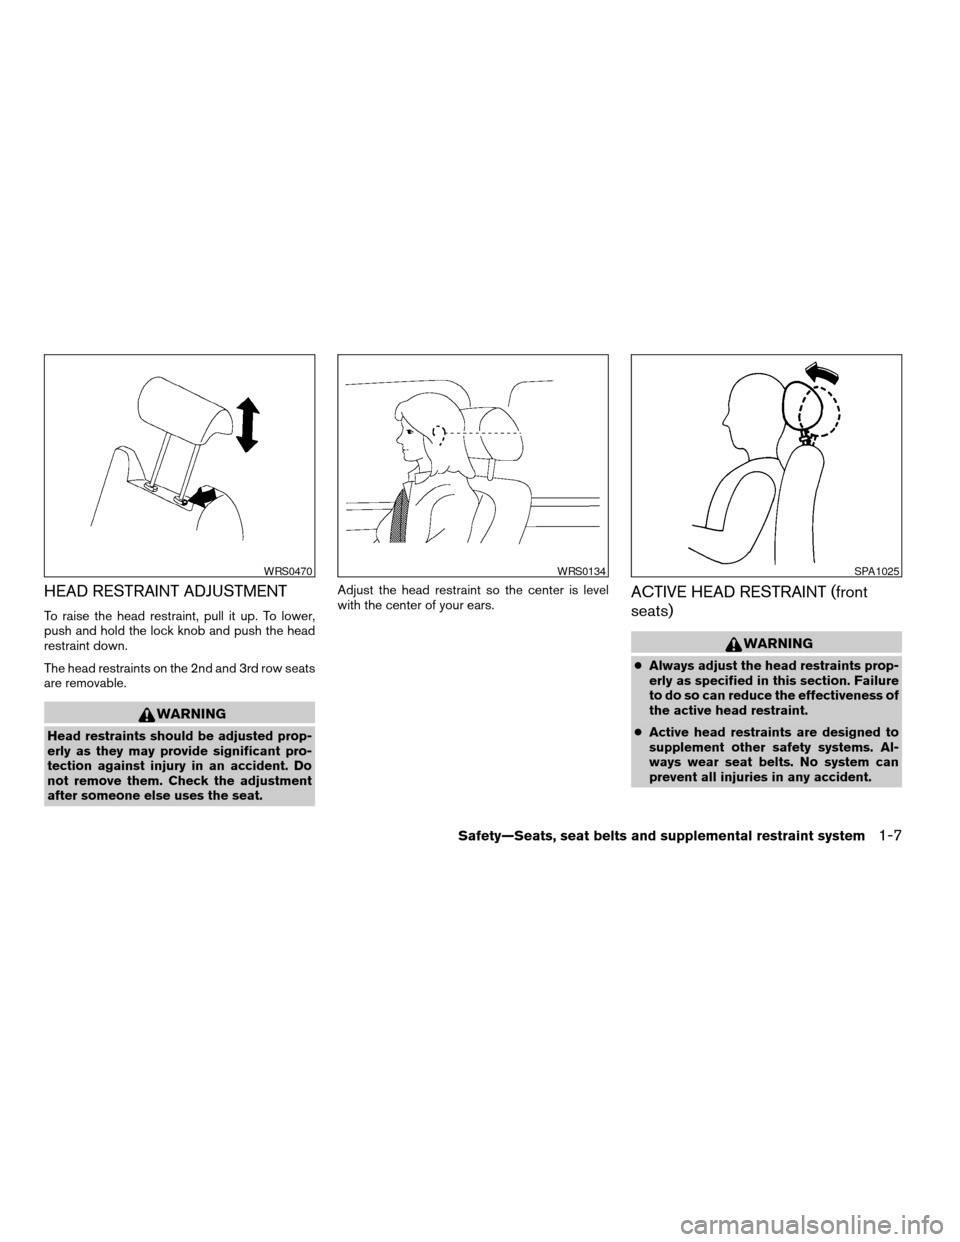
HEAD RESTRAINT ADJUSTMENT
To raise the head restraint, pull it up. To lower,
push and hold the lock knob and push the head
restraint down.
The head restraints on the 2nd and 3rd row seats
are removable.
WARNING
Head restraints should be adjusted prop-
erly as they may provide significant pro-
tection against injury in an accident. Do
not remove them. Check the adjustment
after someone else uses the seat.Adjust the head restraint so the center is level
with the center of your ears.
ACTIVE HEAD RESTRAINT (front
seats)
WARNING
cAlways adjust the head restraints prop-
erly as specified in this section. Failure
to do so can reduce the effectiveness of
the active head restraint.
cActive head restraints are designed to
supplement other safety systems. Al-
ways wear seat belts. No system can
prevent all injuries in any accident.
WRS0470WRS0134SPA1025
Safety—Seats, seat belts and supplemental restraint system1-7
ZREVIEW COPYÐ2007 Pathfinder(pat)
Owners ManualÐUSA_English(nna)
10/13/06Ðarosenma
X
Page 24 of 352
cDo not attach anything to the head re-
straint stalks. Doing so could impair
active head restraint function.
The head restraint moves forward utilizing the
force that the seatback receives from the occu-
pant in a rear-end collision. The movement of the
head restraint helps support the occupant’s head
by reducing its backward movement and helping
absorb some of the forces that may lead to whip-
lash type injuries.
Active head restraints are effective for collisions
at low to medium speeds in which it is said that
whiplash injury occurs most.
Active head restraints operate only in certain
rear-end collisions. After the collision, the head
restraints return to their original positions.
Properly adjust the active head restraints as de-
scribed earlier in this section.
ARMREST
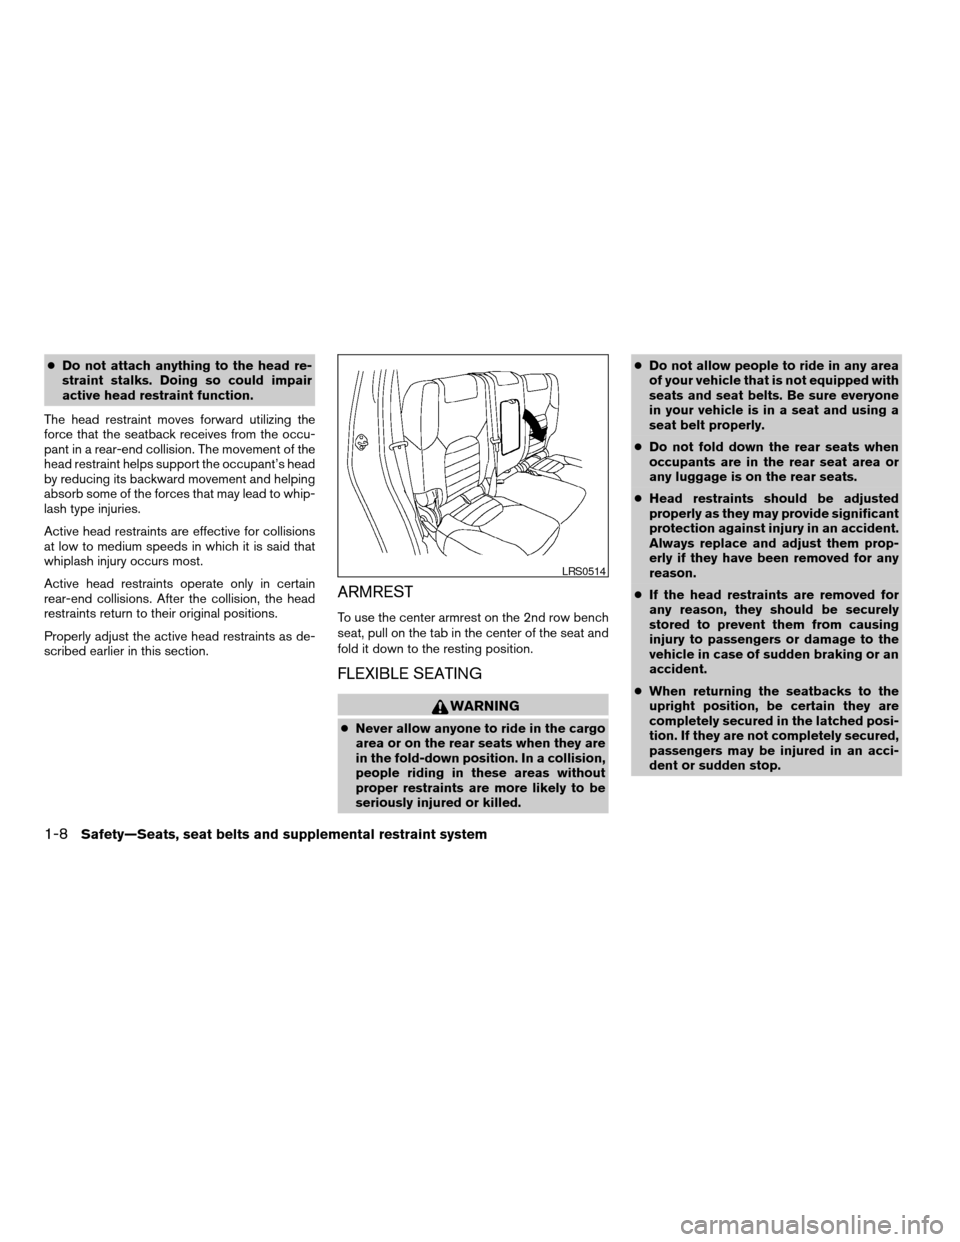
To use the center armrest on the 2nd row bench
seat, pull on the tab in the center of the seat and
fold it down to the resting position.
FLEXIBLE SEATING
WARNING
cNever allow anyone to ride in the cargo
area or on the rear seats when they are
in the fold-down position. In a collision,
people riding in these areas without
proper restraints are more likely to be
seriously injured or killed.cDo not allow people to ride in any area
of your vehicle that is not equipped with
seats and seat belts. Be sure everyone
in your vehicle is in a seat and using a
seat belt properly.
cDo not fold down the rear seats when
occupants are in the rear seat area or
any luggage is on the rear seats.
cHead restraints should be adjusted
properly as they may provide significant
protection against injury in an accident.
Always replace and adjust them prop-
erly if they have been removed for any
reason.
cIf the head restraints are removed for
any reason, they should be securely
stored to prevent them from causing
injury to passengers or damage to the
vehicle in case of sudden braking or an
accident.
cWhen returning the seatbacks to the
upright position, be certain they are
completely secured in the latched posi-
tion. If they are not completely secured,
passengers may be injured in an acci-
dent or sudden stop.
LRS0514
1-8Safety—Seats, seat belts and supplemental restraint system
ZREVIEW COPYÐ2007 Pathfinder(pat)
Owners ManualÐUSA_English(nna)
10/13/06Ðarosenma
X
Page 40 of 352
TOP TETHER STRAP CHILD
RESTRAINT
If the manufacturer of your child restraint requires
the use of a top tether strap, it must be secured to
the anchor point.
WARNING
cChild restraint anchor points are de-
signed to withstand only those loads
imposed by correctly fitted child re-
straints. Under no circumstances are
they to be used for adult seat belts or
harnesses.
cThe child restraint top tether strap may
be damaged by contact with items in
the cargo area. Secure any items in the
cargo area. Your child could be seri-
ously injured or killed in a collision if
the top tether strap is damaged.
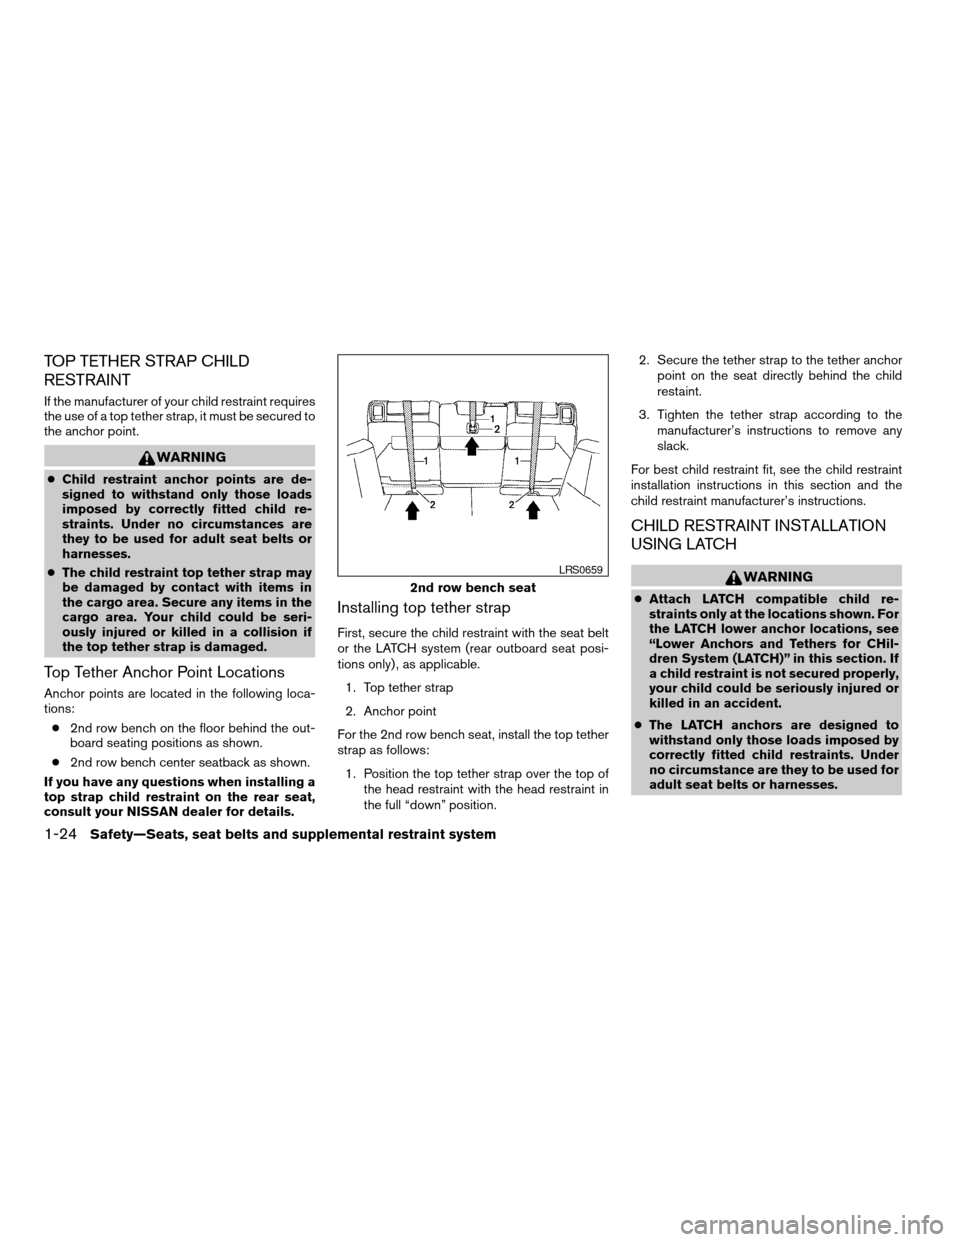
Top Tether Anchor Point Locations
Anchor points are located in the following loca-
tions:
c2nd row bench on the floor behind the out-
board seating positions as shown.
c2nd row bench center seatback as shown.
If you have any questions when installing a
top strap child restraint on the rear seat,
consult your NISSAN dealer for details.
Installing top tether strap
First, secure the child restraint with the seat belt
or the LATCH system (rear outboard seat posi-
tions only) , as applicable.
1. Top tether strap
2. Anchor point
For the 2nd row bench seat, install the top tether
strap as follows:
1. Position the top tether strap over the top of
the head restraint with the head restraint in
the full “down” position.2. Secure the tether strap to the tether anchor
point on the seat directly behind the child
restaint.
3. Tighten the tether strap according to the
manufacturer’s instructions to remove any
slack.
For best child restraint fit, see the child restraint
installation instructions in this section and the
child restraint manufacturer’s instructions.
CHILD RESTRAINT INSTALLATION
USING LATCH
WARNING
cAttach LATCH compatible child re-
straints only at the locations shown. For
the LATCH lower anchor locations, see
“Lower Anchors and Tethers for CHil-
dren System (LATCH)” in this section. If
a child restraint is not secured properly,
your child could be seriously injured or
killed in an accident.
cThe LATCH anchors are designed to
withstand only those loads imposed by
correctly fitted child restraints. Under
no circumstance are they to be used for
adult seat belts or harnesses.2nd row bench seat
LRS0659
1-24Safety—Seats, seat belts and supplemental restraint system
ZREVIEW COPYÐ2007 Pathfinder(pat)
Owners ManualÐUSA_English(nna)
10/13/06Ðarosenma
X
Page 41 of 352
cInspect the lower anchors by inserting
your fingers into the lower anchor area
and feeling to make sure there are no
obstructions over the LATCH anchors,
such as seat belt webbing or seat cush-
ion material. The child restraint will not
be secured properly if the LATCH an-
chors are obstructed.
Front-facing
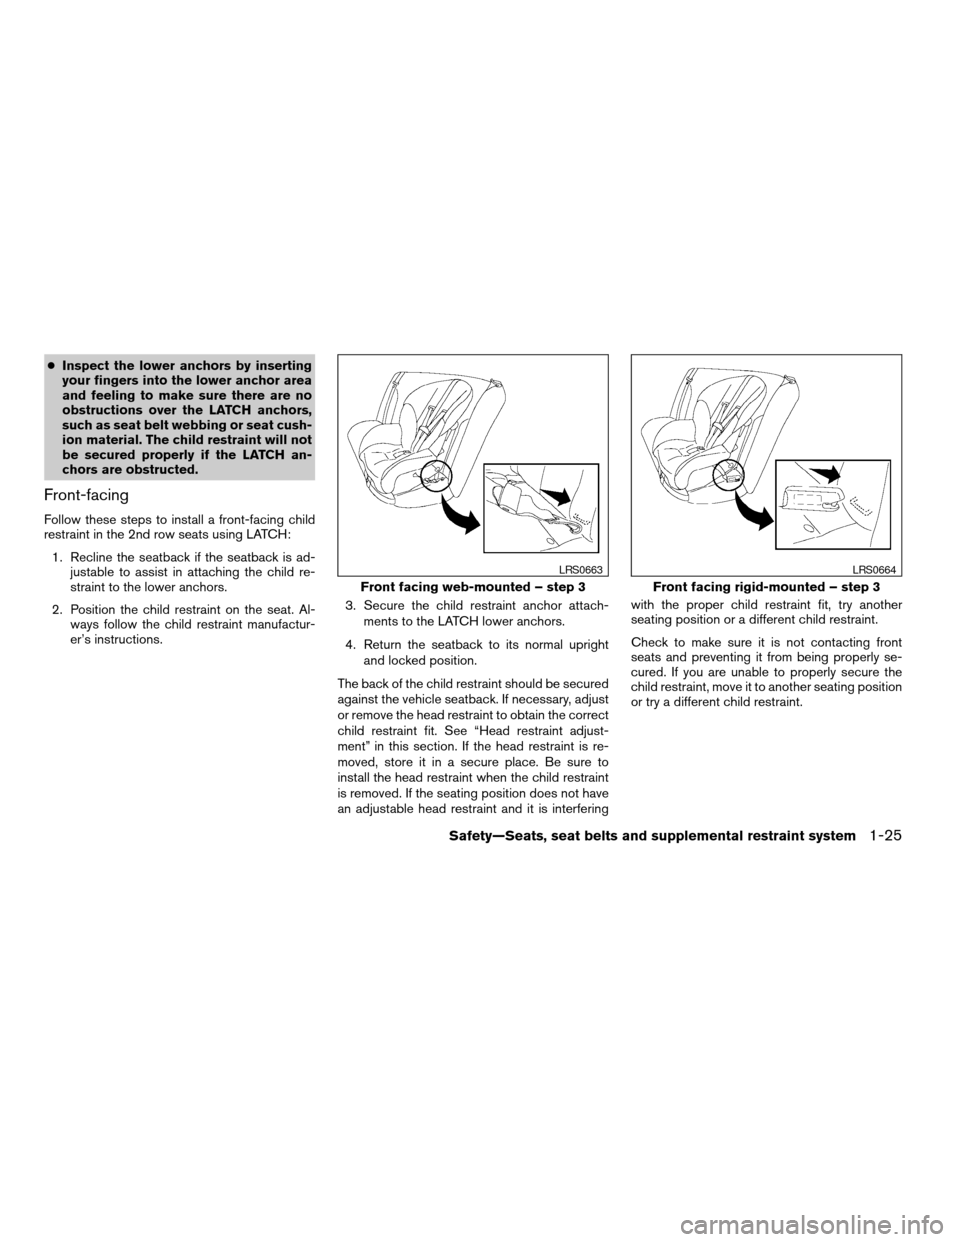
Follow these steps to install a front-facing child
restraint in the 2nd row seats using LATCH:
1. Recline the seatback if the seatback is ad-
justable to assist in attaching the child re-
straint to the lower anchors.
2. Position the child restraint on the seat. Al-
ways follow the child restraint manufactur-
er’s instructions.3. Secure the child restraint anchor attach-
ments to the LATCH lower anchors.
4. Return the seatback to its normal upright
and locked position.
The back of the child restraint should be secured
against the vehicle seatback. If necessary, adjust
or remove the head restraint to obtain the correct
child restraint fit. See “Head restraint adjust-
ment” in this section. If the head restraint is re-
moved, store it in a secure place. Be sure to
install the head restraint when the child restraint
is removed. If the seating position does not have
an adjustable head restraint and it is interferingwith the proper child restraint fit, try another
seating position or a different child restraint.
Check to make sure it is not contacting front
seats and preventing it from being properly se-
cured. If you are unable to properly secure the
child restraint, move it to another seating position
or try a different child restraint.
Front facing web-mounted – step 3
LRS0663
Front facing rigid-mounted – step 3
LRS0664
Safety—Seats, seat belts and supplemental restraint system1-25
ZREVIEW COPYÐ2007 Pathfinder(pat)
Owners ManualÐUSA_English(nna)
10/13/06Ðarosenma
X
Page 42 of 352
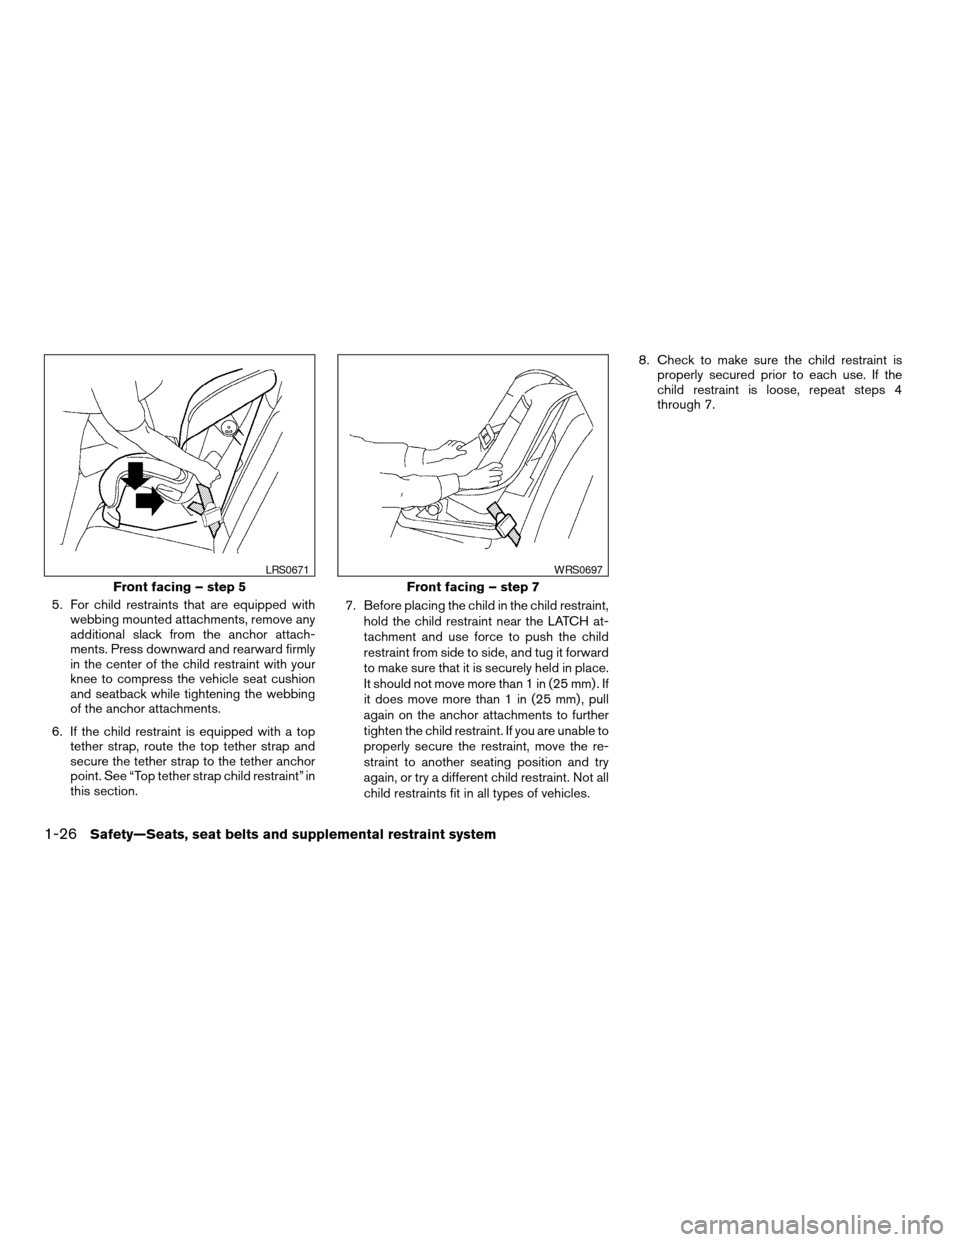
5. For child restraints that are equipped with
webbing mounted attachments, remove any
additional slack from the anchor attach-
ments. Press downward and rearward firmly
in the center of the child restraint with your
knee to compress the vehicle seat cushion
and seatback while tightening the webbing
of the anchor attachments.
6. If the child restraint is equipped with a top
tether strap, route the top tether strap and
secure the tether strap to the tether anchor
point. See “Top tether strap child restraint” in
this section.7. Before placing the child in the child restraint,
hold the child restraint near the LATCH at-
tachment and use force to push the child
restraint from side to side, and tug it forward
to make sure that it is securely held in place.
It should not move more than 1 in (25 mm) . If
it does move more than 1 in (25 mm) , pull
again on the anchor attachments to further
tighten the child restraint. If you are unable to
properly secure the restraint, move the re-
straint to another seating position and try
again, or try a different child restraint. Not all
child restraints fit in all types of vehicles.8. Check to make sure the child restraint is
properly secured prior to each use. If the
child restraint is loose, repeat steps 4
through 7.
Front facing – step 5
LRS0671
Front facing – step 7
WRS0697
1-26Safety—Seats, seat belts and supplemental restraint system
ZREVIEW COPYÐ2007 Pathfinder(pat)
Owners ManualÐUSA_English(nna)
10/13/06Ðarosenma
X
Page 43 of 352
Rear-facing
Follow these steps to install a rear-facing child
restraint in the 2nd row seats using LATCH Sys-
tem:
1. Recline the seatback if the seatback is ad-
justable to assist in attaching the child re-
straint to the lower anchors.
2. Position the child restraint on the seat. Al-
ways follow the child restraint manufactur-
er’s instructions.
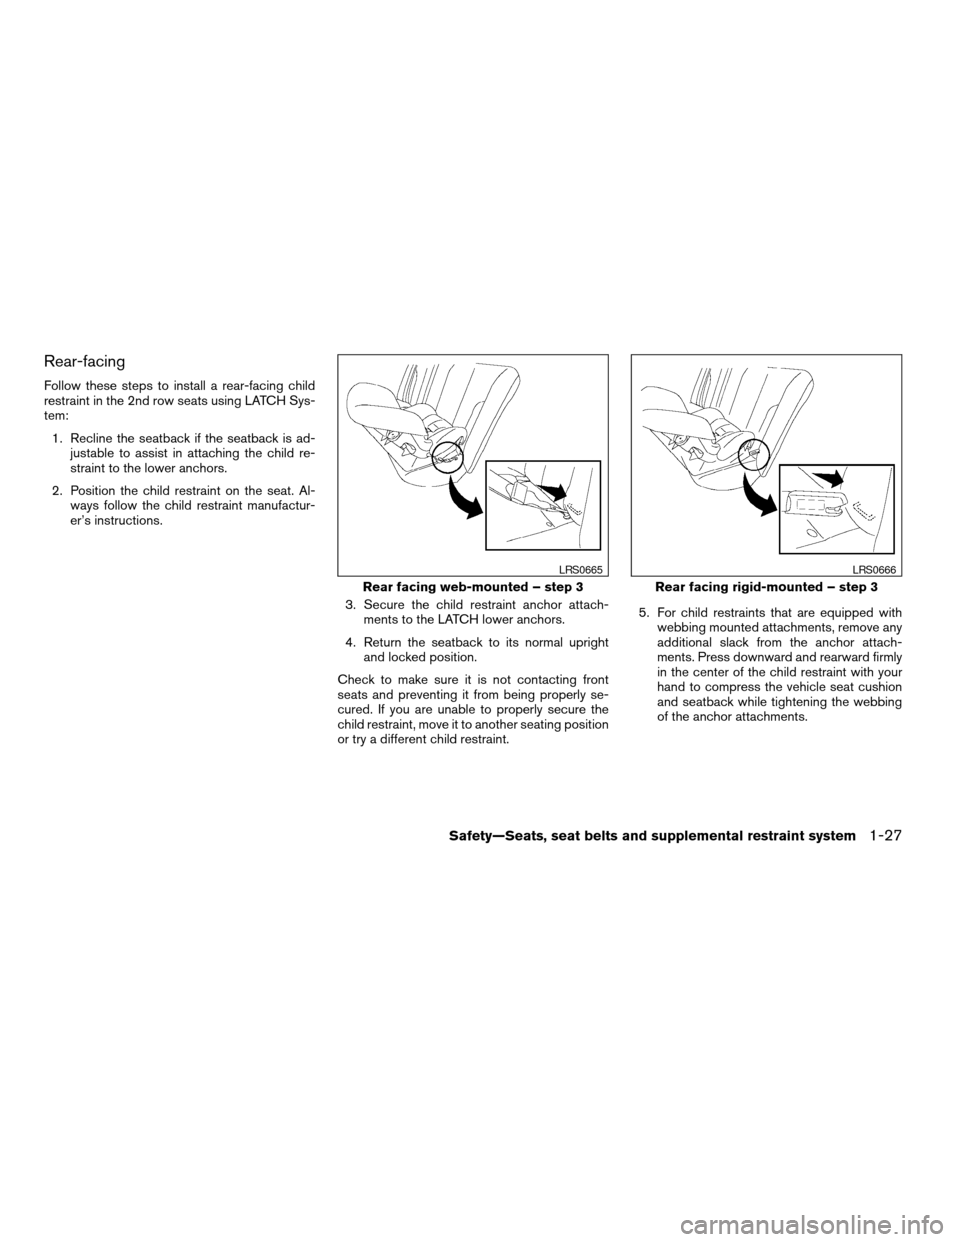
3. Secure the child restraint anchor attach-
ments to the LATCH lower anchors.
4. Return the seatback to its normal upright
and locked position.
Check to make sure it is not contacting front
seats and preventing it from being properly se-
cured. If you are unable to properly secure the
child restraint, move it to another seating position
or try a different child restraint.5. For child restraints that are equipped with
webbing mounted attachments, remove any
additional slack from the anchor attach-
ments. Press downward and rearward firmly
in the center of the child restraint with your
hand to compress the vehicle seat cushion
and seatback while tightening the webbing
of the anchor attachments.
Rear facing web-mounted – step 3
LRS0665
Rear facing rigid-mounted – step 3
LRS0666
Safety—Seats, seat belts and supplemental restraint system1-27
ZREVIEW COPYÐ2007 Pathfinder(pat)
Owners ManualÐUSA_English(nna)
10/13/06Ðarosenma
X
Page 46 of 352
2. Position the child restraint on the seat. Al-
ways follow the child restraint manufactur-
er’s instructions
The back of the child restraint should be secured
against the vehicle seat back. If necessary, adjust
or remove the head restraint to obtain the correct
child restraint fit. See “Head restraint adjust-
ment” in this section.
If the head restraint is removed, store it in a
secure place. Be sure to install the head restraint
when the child restraint is removed. If the seating
position does not have an adjustable head re-
straint and it is interfering with the proper child
restraint fit, try another seating position or a dif-
ferent child restraint.
When installing a child restraint in the 2nd or 3rd
row, check to make sure that it is not contacting
the seat directly in front of it. If you are unable to
properly secure the child restraint, move it to
another seating position or try a different child
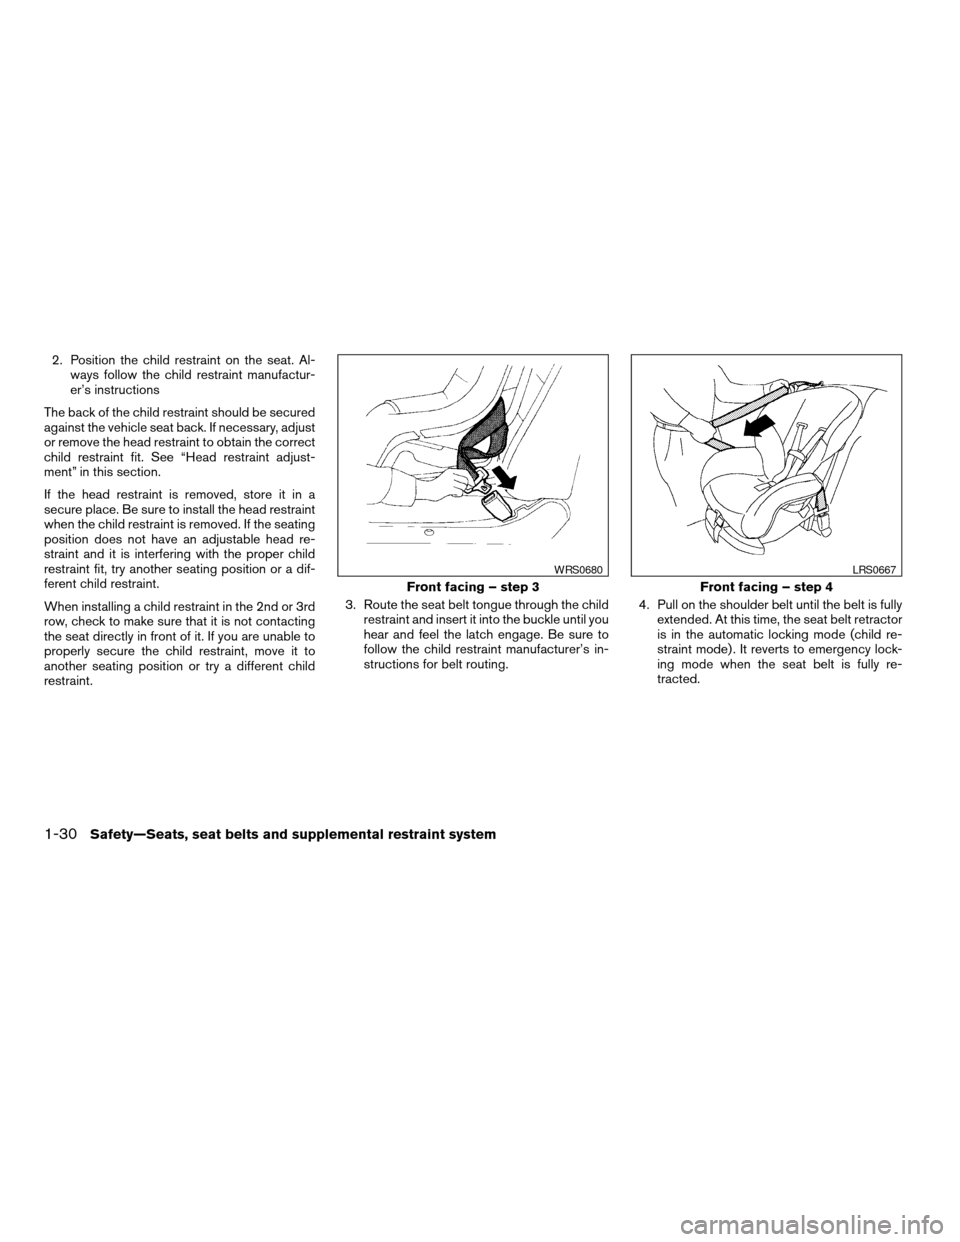
restraint.3. Route the seat belt tongue through the child
restraint and insert it into the buckle until you
hear and feel the latch engage. Be sure to
follow the child restraint manufacturer’s in-
structions for belt routing.4. Pull on the shoulder belt until the belt is fully
extended. At this time, the seat belt retractor
is in the automatic locking mode (child re-
straint mode) . It reverts to emergency lock-
ing mode when the seat belt is fully re-
tracted.
Front facing – step 3
WRS0680
Front facing – step 4
LRS0667
1-30Safety—Seats, seat belts and supplemental restraint system
ZREVIEW COPYÐ2007 Pathfinder(pat)
Owners ManualÐUSA_English(nna)
10/13/06Ðarosenma
X
Page 47 of 352

5. Allow the seat belt to retract. Pull up on the
shoulder belt to remove any slack in the belt.6. Remove any additional slack from the seat
belt; press downward and rearward firmly in
the center of the child restraint with your
knee to compress the vehicle seat cushion
and seatback while pulling up on the seat
belt.7. If the child restraint is equipped with a top
tether strap, route the top tether strap and
secure the tether strap to the tether anchor
point. See “Top tether strap child restraint” in
this section. Do not install child restraints
that require the use of a top tether strap to
seating positions that do not have a top
tether anchor.
Front facing – step 5
LRS0668
Front facing – step 6
WRS0681
Front facing – step 7
WRS0698
Safety—Seats, seat belts and supplemental restraint system1-31
ZREVIEW COPYÐ2007 Pathfinder(pat)
Owners ManualÐUSA_English(nna)
10/13/06Ðarosenma
X